Welcome to the ClientTracker Online Manual
- Expand the Directory at left by clicking on a Chapter. Then click a section to get started.
- Use the Search field at the top to quickly find a subject.
Online Manual Changes
Your ClientTracker online manual is an evolving resource, and is added to constantly. Throughout this manual, changes in different versions are identified as follows:
Basic program functions and features up through version 4 in 2013 form the basis of the manual.
Changes and new features for the version 5 series up through 2014 are noted with [5.0] and/or a graphic. Some new features replace old ones, others are additive. See <<940>> for more info.
Changes and new features for version 6 series are noted with [6.0] in the title of the section. See <<940>> for more info.
Cloud-only features are in the ClientTracker Cloud chapter, including things that work differently in the cloud. See <<849>> for more info.
There are previous versions for which parts of this Online Manual may still be accurate; however, it is our policy that all customers are best served by being in the current version, so the latest features are the focus of this manual.
Same ClientTracker - Two Different Modes of Access
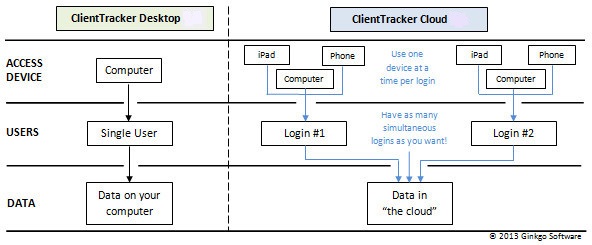
The same ClientTracker software program is available as a desktop version or a cloud version. In this manual they are sometimes referred to as "ClientTracker 6" and "ClientTracker Cloud 6.0". Both versions have 98% of the same features.
ClientTracker Desktop ? This is installed on your computer. The data resides on your computer?s hard drive. It can be used by one user at a time. There are no cloud back ups available for the desktop.
ClientTracker Cloud ? Access your ClientTracker with almost any computer or device. Your data resides on a HIPAA secure server ?in the cloud.? You use free remote connection software to connect to it. Multiple people can use ClientTracker simultaneously, each with their own login. A login can be made from a variety of devices, as illustrated below.
Tip: If you are uncertain which version you have, check on the top menu, under Help --> About ClientTracker
ClientTracker Cloud works well with
- Windows 8, 8.1 and 10
- Mac OS 10.9 and higher
- A computer less than 3 years old is strongly recommended
- The faster your internet connection the better. The minimum specifications:
- Download 7.5mbs
- Upload 1.5mbs
- Ping 20 or less
Devices and OS that are known to be a challenge include Google Chromebooks.
For technical assistance, contact Ginkgo Software support at info@ginkgosoftware.com, or call 877-727-6174 to make an appointment. Our standard support hours are Mon-Fri, 9am-7pm EST.Details in this section include:
- <<857>>
- <<858>>
- <<862>>
- <<864>>
- <<869>>
- <<989>>
Windows 8, and above access to your ClientTracker Cloud.Contact Ginkgo Software to be assigned a user name and password. When one is assigned, you will be emailed the Remote Application, shortcut for your desktop.
Please contact Ginkgo Support for more info.
Macs 10.9 and above & iPad Contact Ginkgo Software to be assigned a user name and password. When one is assigned, you will be emailed the Remote Application, shortcut for your desktop.
Go to the App Store.and download Microsoft RDP. It is free and is a red, circle, icon
Please contact Ginkgo Support for more info.
For iPhones, iPads, Tablets and Android Phones.
Open a web browser
Go to your assigned web page either,
Please contact Ginkgo Support for more info.
Listed devices are supported unless otherwise noted. These do not have a full OS capable of performing all the functions in ClientTracker, e.g. printing. The interface is limited by the device's OS, and may change over time, and is not the responsibility of Ginkgo Software or ClientTracker.
Supported Tablets - MOST TABLETS DO NOT PRINT**
iPad - IOS 8 or higher
Android
Kindle Fire
**NOTES ON TABLETS
- You can't print from most tablets, so it's not a device to use for running an entire medical office by itself.
- The iPad works great for SOAP Notes, and if it has "Siri" you can even dictate text.
- ClientTracker functions involving printing, import, export, attaching files or photos, and e-billing do not work from a tablet or iPad.
- You can use more than one device with ClientTracker Cloud, sharing the same login sequentially or having multiple, simultaneous logins.
- A strong Internet connection is required.
Supported Smart Phones
iPhone
Android
Blackberry
Devices specifically NOT SUPPORTED
Google Chromebook-- Will work with web access only.
Windows 8 "RT" (one of the first versions - all subsequent versions of Windows 8 work well)
Early "Surface" Tablets (check with Ginkgo Support)
On of the best features of ClientTracker cloud, is the ability to access ClientTracker from any location that has access to the internet. All you need, is to set up your device with access to our server. Once that it is place, see directions for your device above, you will be able to access from just about anywhere, again, as long as there is dependable internet.
Please contact Ginkgo Support for more info.
DOCUMENTATION IN PROGRESS
Please contact Ginkgo Support for more info.
Details in this section include:
- <<845>>
- <<846>>
- <<848>>
- <<870>>
- <<866>>
- <<863>>
- <<867>>
- <<868>>
- <<962>>
The same ClientTracker program is available in two ways: a single-user desktop version, and a single or multiple-user cloud version.
ClientTracker Desktop ? This single-user software program is installed on your computer. The data resides on your computer?s hard drive. It can be used by one user at a time.
ClientTracker Cloud ? Multiple users access ClientTracker from almost any computer or device. Your data resides on a HIPAA secure server ?in the cloud,? and you use free remote connection software to connect to it. Multiple logins can be made simultaneously with their own login. Each login can be made from a variety of devices, as illustrated below.
Tip: If you are uncertain which version you have, check on the top menu, under Help --> About ClientTracker
Every ClientTracker Cloud account has at least one login. This could be any person who logs on using your assigned login. You can have as many simultaneous logins as you like.
- Single-User = An account with only one login
- Multi-User = An account with 2 or more logins
A Multi-User account can have as many devices as you want accessing your ClientTracker Cloud simultaneously, each using a different login. Each login can be used by only one device at a time. If a second person signs-in with the same login, the first person using the login will be disconnected.
In order to save changes to your data properly, no two users can access the exact same record at a time. ClientTracker Cloud is a database composed of records ? for example, one client is a record, one invoice is a record, one appointment is a record, etc.
Tip: Use Ctrl+S to "save" a record when you're done with it, which will make it available to others.
When two users try to access the same record at the same time, ClientTracker displays a warning message, "Guest user is modifying the record, you cannot edit the record until they are done. Please, wait until they exit the record". The second user has to wait until the first user is out of the record before she can make changes to that record. When your cursor is in a field, or you have clicked to make a choice, you are ?in? the record. To get out of the record and save what you entered, click anywhere outside a field in a blank spot that has no action, aka ?negative space.?
Conflicting simultaneous actions that may trigger a warning include:
- Using a QuickFinder in the footer of the same List screen
- Using a pop-up QuickFinder for the same thing
- Entering preferences in the Settings area
- Selecting a new line item on an invoice (even if different invoices)
- Creating a report
- Using a Find button in the same area
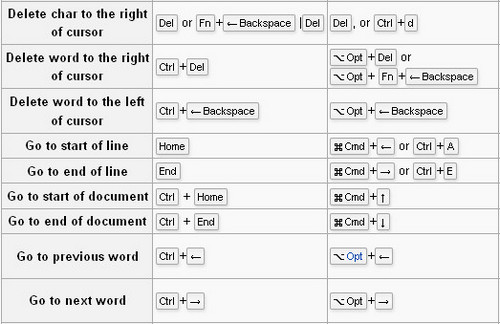
If you use keyboard shortcuts on your Mac, using the Command key won't work in ClientTracker Cloud because it's a Windows server. For most equivalent keyboard shortcuts, simply use the Ctrl key instead of Command.
- If you use the numeric keypad, hit NumLock on Windows or Clear (on a Mac keyboard) to activate the number pad every time you log in.
Many font symbols can be entered via keyboard shortcuts. For example, if your keyboard has a number pad, the temperature symbol (i.e. ?F) can be typed with Alt + 248. Other symbols can be found with a simple Google search, e.g. "How do I type ____ with a windows keyboard shortcut?"
- To see an online PDF table of many shortcuts, copy and paste this URL into your browser:
http://usefulshortcuts.com/downloads/ALT-Codes.pdf - Be sure to press "Num Lock" so your number pad is active.
- ClientTracker simply receives text that you type - you will be able to enter data more efficiently when you take the time to find and learn the method for typing what you want with your keyboard.
Keyboard shortcuts for text editing


External Keyboard
To facilitate ease of use on your iPad, we strongly recommend using an external key board with your iPad.
When you are in "keyboard mode" you can input the data using your external keyboard.
Connection Tips
1.
The error message "FileMaker has stopped working" happens at the time
ClientTracker is logging on and looking for an Internet connection. Just login again.
2. If you only have one login and get The error message ?___[guest] is using this record...? indicates you were still logged in and the cursor was in a field locking the record from your previous session. This also points to a poor Internet connection, and can affect printing. If you have multiple logins and get that message, it is more likely that two of you are trying to access the same record at the same time.
3. Temporary Connection Issues Can Result From
An "Internet storm" of high traffic in your area
Intermittent and temporary disconnections from the Internet
Wireless interference from other wireless devices
ISP or router malfunction
Computers going to sleep - make sure all devices are set not to sleep, which disconnects
4. Don?t Let Your Computer Sleep On the Job!
Set your computer to NOT go to sleep - this is a power-saving feature on your computer that will disconnect your Internet and can cause delays when you want to use ClientTracker Cloud.
In Windows, this is found in the Control Panel, under Display
In Mac, look in System Preferences - Energy Saver
5. Insure your computer's operating system updates are up-to-date. Strangely, this can make a difference. After your computer does updates, remember to check to make sure that the update did not revert your sleep settings to go to sleep. This happens on both Mac and Windows
Know Your Internet Connection
It's
a good idea on your end (even if it was not the problem), to learn more
about all things related to your own Internet connection at your
office, so you can troubleshoot it, which we can't do from here. Some
of these things of course may not be available if your Internet truly
goes down, but they are usually available with intermittent disruptions
in service.
Bookmark/write down your ISP provider's Help pages, phone numbers, and how to check for service issues
Bookmark your cable modem and router's troubleshooting pages (manufacturer's web sites)
Know how to reboot these devices, if needed
Some have software you can open and monitor their performance on your screen
Become a knowledgeable ISP customer and bug them often if you're not happy with your service! Check www.netindex.com to see what you should be getting in your area.
Run another speed test from time to time to monitor your local performance at www.speedtest.net (they also have many resources on improving your speed and performance)
Train anyone who is using your Internet bandwidth to shut down speed-hogging programs, videos, open browser tabs, etc. when they're not using them.
Does anyone else control or affect your Internet connection? Landlord? Office partners?
In a real Internet outage, you can access your ClientTracker (and Internet) using a 4G or similar network for short periods of time (this can be expensive)
ClientTracker Cloud is designed to "know" your local default printer and work seamlessly with it. The way it knows this is by reading your local computer's printer settings in the operating system. If your settings are off, this may confuse how ClientTracker Cloud connects to it.
Things to Check
- Can you print from other programs? Is the printer plugged in, and does it have plenty of paper, ink, or toner?
- Do you have the most current printer driver installed on your computer? Check the manufacturer's web site periodically.
- Is the target printer set as the default printer for your system? ClientTracker Cloud looks for the default printer. If you move your computer to a new location, set that printer as the default in your operating system.
- Does the printer have a backlog of print jobs in its queue? Open the printer interface and check, and remove any old print jobs.
- Do you still have old, unused printer drivers installed? This may confuse the cloud connection. Uninstall any printer drivers you are no longer using
- Mac users, turn off advanced printing. You can do this by choosing to print something, click Click Print then Print again in the print preview palette. Then click Properties and Properties again then choose Advanced printing. Once you click that, you will see a list of options, towards the bottom of the list is Advanced Printing Options, it may say "Enabled" if it does, click it and change it to Disabled
If you check the above, and are still unable to print, please contact Ginkgo Software Support.
Your Internet Up/Down speeds (as shown on our IT Survey) represent the speeds that are available to you with a full connection. Obtaining a full connection depends on many factors, including your computer, router, modem, and other hardware. Other factors that may reduce the quality of your connection include competition (others using the same connection), interference, and local Internet outages or service interruptions.
Speed Matters!
What you see in your browser in terms of speed is different than how the quality of your Internet connection can affect ClientTracker Cloud. The cloud server is checked several times a day, and is kept running in tip-top shape. That?s only part of the picture! More important by far is your own Internet connection, which is out of our sphere of influence and support.
It All Starts with Your Computer
To
maximize the benefit state-of-the-art technology like ClientTracker
Cloud, it is wise to have the latest equipment. A computer that is more
than 2 years old is a liability in technological terms, as newer models
are equipped with faster processors, more memory, and - most importantly
- the advanced technology required for working with the Internet.
Browsing and using Facebook demand very little of your computer's
speed. Exchanging information with the Cloud for your business requires
the best machine you can afford... and it's tax deductible!
If You Experience Slow Performance
First, check your own Internet connection.
Ensure you're getting a clean connection. Stop any ongoing downloads, and shut down any programs that may be using your connection, such as peer-to-peer software.
Reboot your modem and router. It's the stock advice, but it solves an astonishing number of problems. Turn them both off and wait 30 seconds, then turn just the modem back on. Wait 15 seconds, and turn on the router. Wait another minute or so, then reboot your computer.
Simplify the picture. If you're using Wi-Fi to connect, try using a wired Ethernet connection to eliminate the possibility of wireless interference.
- Contact your ISP. Maybe they are working on your service, or would be able to reset your modem remotely from their service center. ISPs usually provide the cheapest mass-produced modems possible. If slowness persists, often having the ISP replace a faulty modem can help tremendously.
- For more Internet connection tips, see <<863>> above.
Extreme
slowness is very unusual, and should be addressed as soon as possible.
Our cloud server is very consistent, so usually the only variable is
your Internet... the "up" speed is affecting what you type (from your
keyboard to the file in the cloud), and the "down" speed affects the
process of moving from one screen to the other. This is a different
sort of connection than a web site in your browser.
IMPORTANT: Your connection hardware - or how you physically connect to the Internet - is your responsibility. Ginkgo Software does not provide support for your hardware systems. This information is provided as a guide only.
How to Reboot Your Modem & Router
This simple procedure solves an astonishing number of problems. Turn them both off and wait 30 seconds, then turn just the modem back on. Wait 15 seconds, and turn on the router. Wait another minute or so, then reboot your computer.
Modem
There is often a "reset" procedure or button on a modem. When performance is poor, the modem may need to be reset. Consult the manufacturer's user guide, or other information provided by your ISP. If the modem is provided by your ISP, often they can reset or "reboot" it from their service center. In some cases, the ISP may physically replace a faulty modem.
Router
The router is literally a "bottleneck" in your wireless network. If there is too much traffic, it may drop "packets" of information in an effort to serve all the demands on the system. It is wise to have the best router you can afford to ease this bottleneck. We recommend an N router. Do not buy anything that is under $100. SonicPoint, Lynksis and Netgear have quality N routers. Check the online reviews for routers, and look for one that can handle more than your traffic needs.
Computer
Windows - Check Your Ethernet or Network Interface Card (NIC)
The
Internet often seems like ?magic? when you can walk around your home or
office with a laptop and connect to the entire world! The place where
your computer connects wirelessly is called the Network Interface Card
(NIC) in Windows. This device may be built in to your computer or an
external plugin, and it can get run down, outdated, or crossed up. With
average computer skills, you can check this critical device
performance.
Apple Has Built-In Wi-Fi Diagnostic Tools
The
easiest place to check your Mac?s wireless performance is in
Applications/Utilities/Network Utility. If your Mac is older and
doesn?t have this, chances are it?s outdated anyway. Wireless
technology changes rapidly! Make sure you have the most up-to-date
drivers and information from Apple.
Tip: Hold down the Option key and hold down the mouse button over the Wifi strength meter in the Menu Bar. This tells you channel, signal strength, address of base station, speed, and a few other tech tidbits.
Wireless is becoming the norm in many small and medium sized offices and it is an effective means of data transmission. For most purposes wireless communications are good enough but in the case of remote access software or database software it can run into some problems.
The reason comes down to packets.
When packets are sent across the internet the receiving machine knows how many to expect prior to putting them back together. This is needed to ensure it waits until all pieces are gathered and requests the host machine to re-send them until all are received.
A wired connection allows for a constant stream of communication and unless some type of interference exists on the connecting lines the amount of packet loss should be negligible.
A wireless connection sends the packets out over radio waves that do run into interference. This results in wireless data transmission being on average a bit slower than wired. Exceptions exist and are beginning to grow as wireless technology improves but generally speaking a wired connection will always be fast because less chance exists for packet loss. How wireless is beginning to bend the curve is by broadcasting more faster rather than resolving the packet loss issue at its root, meaning finding a way to ensure the packets sent are received.
What does packet loss look like?
When your screen is beginning to load and it hangs or has to reload many times prior to showing the entire page, that is an effect of packet loss. Pieces of data are missing and therefore the screen takes longer to load.
What does low download speed look like?
With a low download speed your page loads, whether in remote software or internet browsers would slowly draw the screen line by line, if you remember the effect of dial up this is what it looks like and would look like.
What does low upload speed look like?
Low upload speed can be a bit trickier to see since some of the effect can be low download or packet loss but a low upload means the information you are sending to the internet will be moving more slowly. In a remote software you would notice delay or a lag in what was being done versus what you are seeing. In a webpage you may notice a delay in how it responds when typing, a delay in searching or a delay in the time it takes to put in the letter you just typed shows an upload speed issue most likely...unless it is packet loss, of course.
Details in this section include:
- <<850>>
- <<854>>
- <<873>>
- <<877>>
If you have more than one login for your ClientTracker Cloud, you can have more than one person using the program simultaneously. One of the areas in the program where multiple users are likely to "bump into each other" is the Calendar.
Tip: Use Ctrl+S to "save" a record when you're done with it, which will make it available to others.
The Calendar has a Graphical column display where appointments appear as if they are in an appointment book. This display needs to be refreshed regularly. The List Views do not need to be refreshed.
When you make or edit an appointment in ClientTracker, it saves the appointment so the user who made it can see it immediately. Other users will see a bright yellow message at the top of the screen: "Click to Refresh Calendar." This has been provided so you can refresh the Calendar when you need to, and not have an automatic refresh disrupt what you may be doing. The refresh action usually takes only 2-5 seconds.
When you click the message, "Click to Refresh Calendar," the message will disappear and any new appointments will appear on your screen.
Tip: It's wise to refresh whenever you are looking to make a new appointment, so you can see what slots are available.
There are several places in ClientTracker where you can upload a file, graphic, or image to be linked to your ClientTracker records in the cloud.
- When you do this, the original file stays in your local computer system wherever you found it
- Only a copy is uploaded to the Cloud, where it will behave the same
- If you unlink or "delete" a file in the Cloud, it does not affect the original file that stays on your local computer system
- If you have upgraded from a desktop version of ClientTracker, and had linked files in your Files-Photos folder, contact Ginkgo Support to have them moved into your Cloud file.
- The first time you locate a file for any feature will establish where ClientTracker looks first in the future. For best performance, establish one source folder on your computer to store files to be copied and used in the Cloud.
How to Find and Link a File from the Cloud
Tip: You can see the files displayed in various ways. Click the View As icon near the upper left of the Browser to select a view.
Tip: Use the Back button on the upper left corner of the Browser to go back to where you were before. If the Back button doesn't appear, use the "navigator" drop-down arrows in the top "address" area, as shown below.
ClientTracker Features That Use Linked Files
Email an Invoice - See <<865>> for more info.
Graphic Header for Letters & Forms
- Settings / Program / Files tab - Upload a graphic to appear on printed headers of Letters & Forms. See <<289>> for more info.
- Photo tab - Link a portrait photo of the Client. See <<29>>
- Files tab - Link any file to a Client's record. Click to open PDF, image, and text files. For best performance, use PDF, Word, or text format for documents. See <<480>>
- Settings / Practice tab - Upload a scan of a practitioner's signature, and use it on SOAP Notes and/or invoices. See <<1052>>
- Files - Link any file or image file to a SOAP Note. Click to open and view the file. For best performance, use PDF, Word, or text format for documents. See <<101>>
- Photos -Link any graphic image or photo to a SOAP Note. Click to open and view the image. See <<103>>
Compile and manage a list of files stored "in the Cloud" that can be used as attachments for emails sent from within ClientTracker.
- Email - Attach any file to be sent with an email. See <<859>>
- Email Templates - Attach any file to a Template, and it will be attached to any email created from that Template. See <<860>>
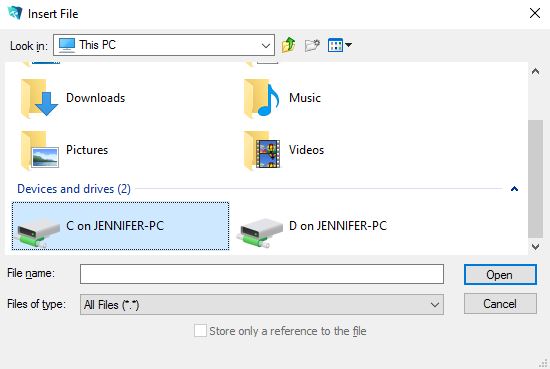
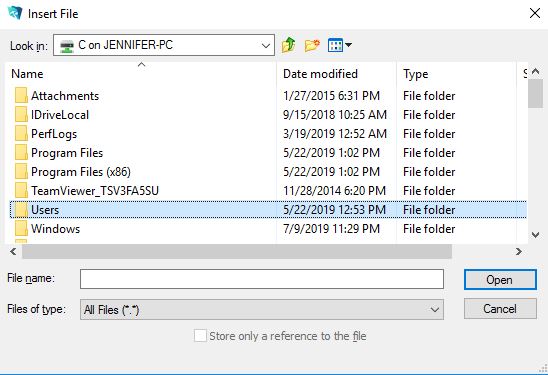
In the Cloud, you are working with ClientTracker on a "remote desktop." To save an e-billing file on your local computer, we have prepared a "bridge" in the File Directory.
1. Click the Create Batch File button and name your file as usual
2. When you click OK, you will see a directory that looks something like this. (You can drag the lower right corner to make it bigger if you like):
4. Select the folder and click OK.
Your batch file will be saved in that folder, and next time you do this ClientTracker will "remember" the location of your folder so you just do step 5.
*Tip - In Windows, the file folder path to get to your desktop is usually something like this:
- This PC
- C Drive
- Users
- (Your Computer User Name)
- Desktop or documents, usually
In the Cloud, you are working with ClientTracker on a "remote desktop." To save an export file on your local computer, we have prepared a "bridge" in the File Directory.
Export Functions from the Cloud:
- Export Bulk Email Addresses - see <<220>>
- Export Client Information - See <<749>>
- Export Inventory List - See <<766>>
1. Click the button or select export from the menu and name your file as usual
2. When you click OK, you will see a directory that looks something like this. (You can drag the lower right corner to make it bigger if you like):


4. Select the folder and click OK.
Your batch file will be saved in that folder, and next time you do this ClientTracker will "remember" the location of your folder so you just do step 5.
*Tip - In Windows, the file folder path to get to your desktop is usually something like this:
- This PC
- C Drive
- Users
- (Your Computer User Name)
- Desktop or documents, usually
Details in this section include:
- <<510>>
- <<634>>
This QuickStart Guide will help you quickly install, configure and become familiar with the basic functions of ClientTracker software. ClientTracker is published and copyrighted by Ginkgo Software, at www.ginkgosoftware.com
- The full online ClientTracker user's manual begins with <<223>>.
ClientTracker is a practice management software solution designed for health providers in a small office or a larger clinic. It enables you to manage the following types of information:
? Clients, Families
? Appointments
? SOAP Notes
? Invoices, payments and insurance claims
? Payments on account
? Practitioners
? Inventory of retail supplies and vendors
? Insurance companies and payments
? Clearing Houses for e-billing
? Communications
? Register for a bank account
If you have any questions about using ClientTracker or this online documentation, contact user support at support@ginkgosoftware.com.
The "Demo," or Demonstration Mode, lets you try the features of ClientTracker before you buy.
The installer runs like any program. A ClientTracker shortcut or alias will be placed on your computer's desktop. Click this to open the Demo.
When the program opens, click the button to try out ClientTracker. Other choices are:
- Click if you have a new Registration Code, after having used Demo Mode before.
- Naturally, we hope all who try out ClientTracker in Demo Mode will purchase the full version of the program! If you have any questions about purchasing ClientTracker, visit our web site at www.ginkgosoftware.com, or contact us at info@ginkgosoftware.com.
Note: While in Demo mode, you can test almost all features. You are limited to entering 10 new clients, 30 new appointments, and 10 new invoices. Printing is disabled, but the Floating Preview Palette shows how a printout would look.
HURRAY! All data you enter can be saved when you register. It is your choice if you want to keep it or not. All the Demo data will be deleted when you register.Demo Mode contains enough sample data to show how your practice can use ClientTracker's features. You can add or edit data (within the restrictions noted above).
Note: Some Demo data is set up differently than it will appear after you register. See <<634>> below for more info.
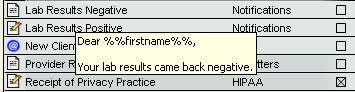
New Clients and Communications Templates
Communications Templates can be set to "auto-create" when a new client is created. This can be useful, for example, to generate forms or other communication that your practice would like to make sure new clients read or sign. These Communication templates are set to auto-create in Demo Mode:
- Receipt of Privacy Practice
- Consent to Treatment
- Welcome
Photos and Files
Files can be linked to ClientTracker, including digital photo files. These can be linked to the Client record, or SOAP Note. To demonstrate this process, the main ClientTracker folder installed on your computer has a sub-folder called ClientTracker Files-Photos. This is a built-in place to put all the files linked to ClientTracker. You can move this folder elsewhere or you can choose your own folder location as well.
For more info on linking files and photos, see:
- <<480>>
- <<101>>
- <<103>>
- <<455>>
Details in this section include:
- <<4>>
- <<5>>
- <<6>>
- <<7>>
Use the following information to download and install ClientTracker. If you have any trouble, contact us at support@ginkgosoftware.com.
Windows 8, 8.1 or 10 is required.
Having enough computer power to run a mission-critical program like ClientTracker is essential. These are minimum requirements... more power is always helpful to run your business efficiently. If ClientTracker is running slowly for you, see <<761>> for more info. Specifications:
- CPU 1 GHZ or faster
- RAM 1 GB, 2+ GB recommended
- 1GB available disk space
- 64-bit architecture highly recommended for faster speeds
- to Backup your ClientTracker data, an external drive (flash or hard) and/or a cloud service
Touch screen: Most ClientTracker functions work well with a touch screen.
Full operating system required. Windows 8 "RT" is a partial operating system available on some computers (e.g. "Surface"); this OS will not run ClientTracker.
Windows XP, Vista and Windows 7 systems will not work with ClientTracker 6.
Note: An Uninterrupted Power Supply (aka UPS) is strongly recommended for your computer. This is not a function of the software, but is an important hardware and data retention safeguard.
- Download the ClientTracker demo version for Windows, click here
- Double-click on the file you downloaded to start the installer. We recommend installing it to the default location. When the installer has completed, double-click on the ClientTracker icon on your desktop.
- This is the full version of ClientTracker. It has almost all the functions. When you purchase, you will receive a registration code and have the option of keeping all the data you entered while trying out the software.
Max OS 10.12 or higher is required.
Having enough computer power to run a mission-critical program like ClientTracker is essential. These are minimum requirements... more power is always helpful to run your business efficiently. If ClientTracker is running slowly for you, see <<761>> for more info. Specifications:
-
RAM 2 GB, 4 GB is recommended
- to Backup your ClientTracker data, an external drive (flash or hard) and/or a cloud service
- At least 500 Megabytes available disk space
To install:
- Download the ClientTracker demo for Mac from our website here.
- Follow the instructions to update your System Preferences before downloading the installer.
- The installer window may open on its own after the download is complete. If so, skip to step 4.
- Go to the folder on your computer where you first downloaded the package. Find a file called ClientTracker.dmg.
- You will see a window containing a folder called ClientTracker. Drag the ClientTracker folder to your Applications folder. To make the icon appear in your dock, open the ClientTracker folder and locate the 'ClientTracker' file with the round green icon. Drag this to your dock.
Note: If you are moving ClientTracker to another computer, you do not need to register the new copy. See more info at <<668>>.
Once you have purchased ClientTracker and received your registration code, go to the Settings area at the bottom of the Program screen, and click the Register ClientTracker link.
This takes you to a screen where you enter your practice name and registration code. These must be entered exactly as they appear in the email you received after purchasing ClientTracker. We recommend that you copy and paste these items from the email to the boxes on the Registration screen for accuracy. Be sure there are no extra spaces or other characters or it will not work.
STEP 1 - Enter your Practice Name and Registration Code exactly as you received it in your registration email.
Note: Be careful of the differences between the letter "O" and zero, and the letter "I" and number 1.
STEP 2 - Set the starting number of your invoices (this can only be done once).
STEP 3 - Enter the name of one practitioner and one room to start.
That's it! You can now begin using ClientTracker as a registered user. Next, you will see the QuickStart Tips screen. To learn more about this and get off to a smooth start, see <<566>>.
IMPORTANT: Your license allows you to install ClientTracker only on up to 2 computers. Multi-user access (i.e. sharing data between multiple computers) is not supported in the desktop version. If you install on 2 computers they will have separate sets of data. Installation on a network or server is not supported.
After successful registration, you have the opportunity to enter optional passwords to protect your data to prevent unauthorized access to your data.
- Set an Administrator password to limit access to ClientTracker.
- Set the Staff password to allow others to access ClientTracker with limited privileges.
If you choose to enter passwords at this time, more info can be found at <<539>>.
To enter Required Information and start using ClientTracker, click the button.
Note: If you have trouble registering, or need a new Registration Code for any reason, see <<703>>.Let Us Help You
As part of your initial ClientTracker set up, you should make sure that your email program's spam filters are set to send direct to their inbox any email from ClientTracker support:
- info@ginkgosoftware.com
This is so you can easily receive our emails with specific support issues or upgrade info, and also our newsletter.
Follow the below for the safety of your business-critical data:
- Close ClientTracker every night and restart it in the morning. This is the best practice for a number of reasons involving security and data integrity.
- Close ClientTracker before shutting down your computer. Never shut down your computer when ClientTracker is open, as this can cause file corruption.
- Password protection is recommended. See <<232>> for more info. Be sure to keep your passwords written down in a safe place.
- Local Backup - Every time you close ClientTracker, a local copy of your ClientTracker file is automatically created. See <<293>> for detailed information on Local Backup.
- Additional Backup - ClientTracker has a feature to make an additional backup to any location or folder that can be accessed by your computer; including online folders you may have created with other software. This can be a life saver! See <<746>> for detailed information on Additional Backup.
- External Backup - For the safety of your business-critical data, it is imperative that you create a verified external backup regularly to safeguard against fire, theft or or damage to you computer. The Additional Backup above can serve this imperative; however, many people also like having a physical backup on a flash drive or external drive. See <<693>> for more info about how to do this.
- UPS Power outages can shut down your computer while ClientTracker is on and cause corruption. To protect against this and the time it takes to repair or restore your data, get an Uninterrupted Power Supply. See <<670>> for information.
Some features in ClientTracker are dependent on your own computer environment:
- A working Internet connection must be enabled to
- send email using ClientTracker, you must have a working email program or service provider
- view the web site of a Clearing House
- Auto-notification of ClientTracker news
- See this ClientTracker Manual
Details in this section include:
- <<560>>
- <<562>>
- <<563>>
- <<635>>
Note: The deletion of Demo data when you register does not change any of the Program Settings or Practice Information you may have already entered in the Settings area. If you have valid data there, you can use it going forward or change it as you see fit.
Tip: To access Start-up Tips anytime, go to any Settings screen and click the button at the bottom of the screen. The Start-up Tips screen has an additional link where you can Take a Tour of ClientTracker, and see the main areas and features.
- Address - Enter your practice address and other info. For this to show on print headers, go to Programs/Print and click the button.
- Practitioners - After registration, you should already have one practitioner. You can have as many as you want, but must have one active at all times. For more info see <<1048>>.
- Rooms - The same rules are true for rooms. The practitioners and rooms you designate as active will show up on the Calendar schedules. For more info see <<252>>.
- Sales Tax Options - The default settings are for no sales taxes. If needed, set the sales taxes that will be applied to products and/or procedures at your practice. For more info see <<246>>.
- SOAP Templates - If you want to use ClientTracker's SOAP Notes, they will all be created automatically from the built-in System Default SOAP Template when you first start using ClientTracker. You can edit this Default template, or create additional SOAP Templates for various types of client visits, and designate any of them for use to create SOAP Notes for different types of visits and practitioners. For more info see <<494>>.
Note: SOAP Templates can be set up in advance with diagnoses, procedures, and products that will show up on the invoice generated for a client visit. By doing this, even if you don't use ClientTracker's SOAP Notes, you can create templates for invoices.
- Referring Providers - As you get clients referred to your practice from other providers, you can create a list of them and generate thank you letters. For more info see <<447>>.
From the QuickStart Tips layout, click to view and edit the Settings/Program area. From most other screens in ClientTracker, click the icon at the far right of the Functions Bar; then click the Programs tab. from there, select a subtab to view specific settings.
Defaults Subtab
- Clients' Default Information - Address and Area Code, your name and type for client ID, and controls for Automatic Appointment Confirmation Email. For more info see <<225>>.
- Email Sending Method - If you will be sending email from ClientTracker, set up how your existing email client or program will process it. For more info see <<227>>.
- Calendar Defaults - Designate Appointment Duration, Calendar View, and your Time Zone, and choose which screen to show when ClientTracker is opened. For more info see <<226>>.
- Other defaults are available on this screen as well.
- Password Setup - If you haven't already, now would be an excellent time to consider password protection for your practice and client data. For more info see <<539>>.
- Payments on Invoices - Set the default payment source & method, and optional data entry reminders.
- Also on this tab, optionally "archive" old invoices (i.e. display only those after a certain date), show the client's account balance on their screens, use the Register, or add notes and/or terms to printed invoices. For more info see <<291>>.
- Set up how printed headers and footers appear for Reports and printed communication. For more info see <<288>>.
- Enable and manage backup of your data using the Local Backup utility.
- Set the default file path for Files & Photos linked to ClientTracker records.
- Set up and manage lists of values that are meaningful to your practice. These "Value Lists" are used throughout ClientTracker as drop-down lists and pop-up menus, from which you can quickly select a value to speed up data entry. For more info see <<260>>.
Other Areas Where You Might Want Starting Information
- Diagnosis Codes and Procedure Codes - ClientTracker is shipped with standard diagnosis (ICD-10) codes and procedure (CPT) codes used for billing. To customize these lists, click the respective tabs in the Settings area, and see <<254>> for more info.
- Calendar - Check to make sure your active practitioners and rooms show up on the Calendar, get familiar with the different views and ways of finding a date, and practice making a few appointments. See <<483>> for more info.
- Clearing Houses - If you use electronic billing, set up the Clearing
Houses that you will use and their billing info. See <<464>> for more info.
- Insurance - Enter the companies you know are being used by your clients, and assign Clearing Houses as needed. As you create client records, you will look up Insurance Companies to create polices for clients. See <<471>> for more info.
- Vendors - Enter the companies that are selling products to you. You may also want to set up office charges - using "vendors" as categories - or edit the ones already provided by ClientTracker. See <<458>> for more info.
- Inventory - Create a list of any products sold by your practice so they will be available to put on invoices. Assign Vendors, set up beginning and reorder levels, and designate sales tax. See <<457>> for more info.
- Register - If you choose to use the Register, you may want to enter a beginning balance as the first entry. See <<123>> for more info.
Optional Automatic Functions
- Email Appointment Confirmation - If you want an email to be sent to the client when an appointment is made, go to Settings/Program/Defaults. See <<83>> for more info.
- Communication Templates - If you want any communication to
auto-create for new clients, go to Reports/Templates
& Marketing and check the "Auto" box in the template row. See <<144>> for more info.
- SOAP
Templates - If you want to use SOAP Templates as an option when
filling out a SOAP Note, set these up by clicking the SOAP Templates
button on Reports/Templates & Marketing. See <<494>> for more info.
- Practitioner Designated SOAP Templates - If you would like to
designate SOAP Templates for use by certain
practitioners, go to each practitioner's Detail screen (from the Settings/Practice tab) and assign the template
for Initial and/or Subsequent visits. See <<503>> for more info.
- <<782>>
- <<783>>
- <<784>>
- <<785>>
Details in this section include:
- <<558>>
Take a Tour of ClientTracker
On the Start-Up Tips screen is a link, Take a Tour of ClientTracker, which opens a pop-up window with Back and Next buttons that show you a few highlights of the program.
Most ClientTracker screens have a set of navigation tools called "The Functions Bar."
Functions Bar

Control Panel Navigation Panel
Navigation Panel - Click an icon to go to a main area of ClientTracker. All but Calendar and Settings will show all the records in that area.
- = All clients, their insurance, history, appointments, and invoices
- = The main calendar, or appointment schedule
- = All invoices (and the Register, if you choose to use it)
- = Reports, templates, and marketing tools
- = All insurance companies and clearing houses
- = All products and vendors who sell them to you
- = Practice information, program settings, diagnosis and procedure codes
Control Panel - These icons perform different functions, depending on which area you're in. In the example above, there are functions for , , , , and .

Back & Forward Buttons - If you get lost, or want to return somewhere where you just were, use the and buttons, which function just like a web browser.
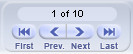 Record Navigator - This shows how many records you are looking at in a set, called the "Found Set" in this manual. Clicking the , , , or buttons in a List screen moves you up or down the list. In a Detail screen, you see the different records like turning the page of a book.
For more info about the key concept of a Found Set of records, see <<552>>.
Main Menu
ClientTracker's Main Menu runs across the very top of the window, and has 6 choices:
File | Edit | View | Records | Insert | Help
Each Main menu choice opens a drop-down menu of additional choices. Some menu choices offer keyboard shortcuts, e.g.
Copy (Ctrl + C). Notable choices include:
- File = Print Setup, Exit Program (Ctrl + Q)
- Edit = Standard data entry shortcuts, including Undo (Ctrl +Z), Copy (Ctrl + C), and Paste (Ctrl + V). Also a spell checking utility.
- View = Zoom In (F3) or Zoom Out (Shift + F3)to control how large your screen appears.
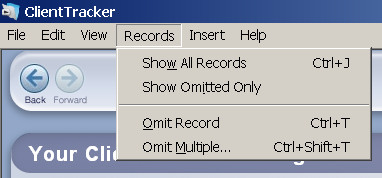
- Records = Show All Records (Ctrl + J), Omit Record (Ctrl + T), Omit Multiple (Ctrl + Shift + T), and Show Omitted Only
- Insert = Current Date (Ctrl + -)
- Help = Open this ClientTracker Online Manual, or view the Startup Tips, Registration Info, or About ClientTracker pop-up.
For detailed information about using the Main Menu when
working with ClientTracker, see <<535>>.
Details in this section include:
- <<11>>
- <<14>>
- <<502>>
Current Record Highlight

On a List view, the currently selected record is highlighted by a lighter background around the row.
Portal List
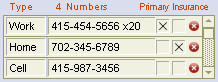
A smaller list of records is called a "portal" because it is looking at records related to a single, main record being viewed - for example, the portal of Phone Numbers for each client. These usually have small scroll handles on the right for viewing all of the portal list.
Sort Records
The records of many portals and List screens can be sorted by the contents of the columns. Click the column to toggle the sort by ascending or descending, depending on whether the data is text, a date, or a number. To undo all sorts, hold down the Shift key and click the column.
 Tip: A sortable column is noted by a small 3-bar graphic to the left of the column header. Many List screens are sorted automatically by name.
Found Set
In any List screen, the current set of records is known as a "Found Set." This can be modified by performing a Find, using the QuickFinder (if available), or omitting a record temporarily from the visible list. (See below.)
For more info about the key concept of a Found Set of records, see <<552>>.
Finding information in ClientTracker is discussed in more detail in another section, <<552>>.
QuickFinder - for finding one matching record

A small version of the QuickFinder appears as an orange-bordered field with a magnifying glass next to it (see above). It appears on full screens and pop-up windows.
Type any information into the field, or pick a category from the drop-down list, and the portal of available choices will adjust to show records matching what you entered. This method is used to select one record; for example, finding one client or adding a procedure or product to an invoice.
See <<554>> for more info.
QuickFinder - for finding one or more matching records on a list screen

A bigger QuickFinder is in the footer of most List screens where a large
number of different records are expected, for example, the Diagnosis
Code screen. This creates an instant "Found Set" of records in
response to information entered into its fields - including powerful
"Search Operators." The resulting set can be worked with in many ways.
See <<553>> for more info.
Find Screens
![]()
Click the icon in the Control Panel of an area to access a more detailed method of finding a group of records, or even just one.
In a Find screen, you enter one search criterion, or a combination of criteria, and click . The results of the search are displayed on another screen, usually a List. This method is also used to generate reports, and can be used with "Search Operators."
See <<552>> for more info.
A "tooltip" is a brief message that pops up when your mouse hovers over some fields or objects in ClientTracker. A tooltip lasts for about 5 seconds, and informs about a choice, or displays more information about the field.
The contents of tooltips cannot be copied, pasted, or held open for longer than the 5 seconds. To see it again, move your mouse away and back again.
Definitions
Value List - A list of values, such as words or phrases, that can be inserted into a field.
- Some are defined by the program, and cannot be changed
- Some show a list of everything that has been entered in a field
- Some of these can be added to by typing an "Other" value (see below)
- Some of these can be added to by typing an "Other" value (see below)
- Some can be edited on Settings/Program/Value Lists
- Some of these have system values added to your custom list
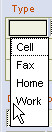
Drop-down List - A function that opens a Value List when a field is clicked. (If the list is long there is a scrollbar.)
- Typing a letter "zooms" you to that part of the list
- Click a value to insert it into the field
- Allows "ad hoc" entry of a typed value, which will not be added to the list
- To type an ad hoc value, click the field again after the list is opened
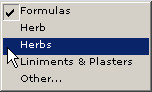
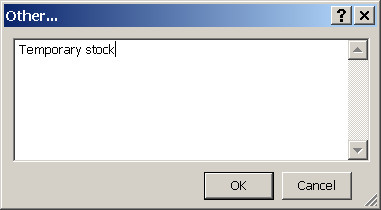
Pop-up Menu - A function that opens a Value List like a menu when a field is clicked.
- Identifiable by shadowed borders around the field
- Click a value to insert it into the field
- If there is a value already in the field, it is noted by a check mark
- Use the black handles at the top and bottom of the menu to scroll if the list is long
- Select "Other" (if available) to type a value not on the list, which will be entered in the field and also added to the list
Note: This list is provided as a guide only. Insurance billing requirements may differ in your area. If you follow all these steps, you will be ready to bill insurance companies for services provided to patients, which are called "clients" in ClientTracker.
You may also want to review our 6-part video series, "ClientTracker and Insurance," which is available via the Video Library page on our web site. These are more detailed than what you see here; however, you may also find the links below to be useful additions to the videos.
STEPS TO SET UP INSURANCE BILLING
Before you start seeing patients...
1. Register ClientTracker using the Practice Name that is the "Service Facility" (i.e. the place where the patient received services) See <<245>>
- This info will go into Box 32
2. Enter practitioners and their insurance address, NPI, Social Security or EIN number, license number, and other 1500 info. See <<1051>>
- This will be for Box 24j, 31, and 33 of the 1500 (as needed)
3. Create a clearing house account (outside of ClientTracker) and set up the company information. A few popular clearing house records are already entered in ClientTracker. See <<471>>
- This info is used for e-billing a batch of 1500 claims. For more info about e-billing setup, see <<378>>
- This is often done when a new insurance client presents
- Assign your chosen Clearing House to each insurance company
- Insurer info will go into Box 1 and the address window area of the 1500
- Sometimes a company has preferences that affect Box 4, 7, 24f, 24g, 26 and other parts of the 1500. Check with each company for their billing requirements as needed.
5. Create or import Procedure and Diagnosis Codes see
- These are needed for billing on the 1500
- Procedure Codes go into Box 24a through 24f and contain your prices
- Diagnosis Codes are used in Box 21
As you begin seeing patients...
6. Set up each Client's record and their Client Insurance Policy by selecting the Insurer and filling out the info needed for the 1500. See <<32>>
- This is often done the first time you see a new insurance patient
- This info will go into many areas of the 1500
- If the Policyholder is different than the client, additional "Insured" information may need to be entered. See <<41>>
7. Enter referring providers and their NPI, license number. As needed... See <<447>>
- This is often done when a new insurance client is referred
- This info will go into Box 17, 17a, and 17b of the 1500
8. Create 1500 claim forms as invoices for client visits, and all the above information will automatically transfer to the proper boxes. See <<119>>
- Once a clearing house is set up and assigned to insurance companies, and some 1500 invoices (i.e. claim forms) have been created for clients having a policy with these companies, then you are ready to create and send an E-Billing batch file. Some practices do this weekly, some even more frequently. The process involves two steps:
- Create an E-Billing batch in ClientTracker and save it as a file to your computer. This alone does not send the batch file! See <<601>>
- Go to your user account on the clearing house website and upload the above file to send it for processing.
Formerly known as the HCFA 1500, or CMS-1500, this is the main claim form used in ClientTracker for billing insurance.
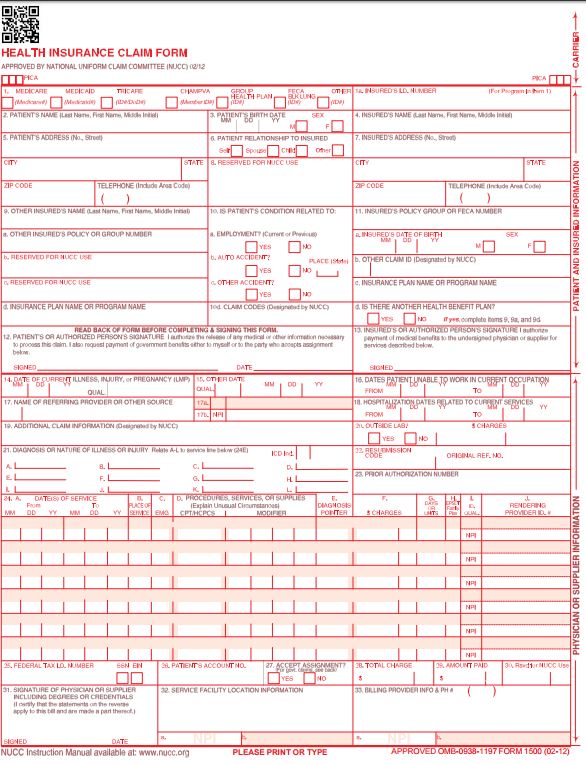
For details about the 1500 Claim form and where the ClientTracker "source info" can be found for each Box in the form, see the following sections of this Manual:
- <<121>> (Box 1 through 13)
- <<577>> (Box 14 through 23)
- <<645>> (Box 24a through 24j)
- <<578>> (Box 25 through 33b)
Welcome to ClientTracker!
This online documentation is intended to help you become familiar with the basic functions of ClientTracker software. ClientTracker is published and copyrighted by Ginkgo Software, at www.ginkgosoftware.com.
- For more info about the new features in ClientTracker, see <<508>>.
- The full online ClientTracker user's manual begins with <<223>>.
- For offline access, see <<771>> below.
ClientTracker Online Documentation
The Table of Contents (TOC) runs along the left side of the web page. Click on a chapter to expand it and show sections within that chapter. You can open more than one chapter in the TOC by clicking the small plus [+] symbol next to each chapter. Click a section to display its details on the reading panel (right side) of the screen.
Throughout the online documentation or "User's Manual," you will see many links to see more information about a certain topic, like those shown above. Click a link to quickly go to that part of the manual. In some cases, you will have a link to return, but you may find it easier to return to where you were by using the TOC or clicking the button on your browser.
- After using a link, clicking the button on your browser returns you to the last section viewed.
- When using the TOC to navigate, clicking the button on your browser also returns you to the last section viewed.
At the end of each detail, or topic, in a section, there is a Back to Top link that will scroll the reading panel of the web page back to the top, or beginning of that section.
You can always use the and buttons on your browser to see other pages in your current session.
Find Information
There is an index of topics available in <<565>>. A glossary of terms used in the manual can be found at <<531>>.
To find information by keywords, type one or more words into the search field and click the button. A summary of details matching the search will be displayed, with a link to each detail just above. Your options are:
- Click a link to go to a detail displaying a match
- Click < < Manual at the top left to return to the manual and abort the search
- If no match was found, click try again to go back and try a new search, or use the button on your browser
Tips, Notes, and Warnings
Throughout the online documentation, you will see special information in colored boxes. A "Tip" is a suggestion about making ClientTracker easier to use, for example:
Tip: For faster results, consult the online documentation first before contacting Ginkgo Software support.
A "Note" is an advisory or alert about information important to a function, for example:
Note: After clicking a link, using the Back button on your browser will return you to the last section viewed.
A "Warning" is critical information that could significantly alter how the program works, for example:
Warning: Do not eat while using ClientTracker, because you might spill food on your keyboard and temporarily disable your computer.
If you have any questions about using ClientTracker or this online documentation, contact info@ginkgosoftware.com.
The Online Manual is available free to anyone without a support plan. This includes the right to make an offline copy, PDF, or printouts of the Manual as needed, using your own software tools. We do not provide a PDF or other file copy as a standard, because the manual is changing and improving all the time. The online method of providing documentation has become the industry standard for software.
Note: To make an offline copy, you will need Internet access to the Online Manual, even if only temporarily. Without a Support Plan, Ginkgo Software does not provide any files, shortcuts, or assistance for making an offline copy, other than the information below.
Tip: Having a Support Plan is a useful way to optimize your ClientTracker experience. We will be happy to provide a copy of the manual that can be viewed in your browser, IF you have a valid Support Plan.
Save As an Offline Copy (easiest)
Using your Browser software (usually under "File" at the upper left), you can save save the Online Manual as a "Complete Web Page" in most browsers, so you can open it and read it offline. Check your browser's Help pages.
Tip: Save it from the title page: http://www.ginkgosoftware.com/documentation/
Warning: Links embedded in the manual will not work offline. Use the Directory on the left to read the entire manual in offline mode.
Printing the Manual
As the ClientTracker Manual is online, you can print any section by using the Print button on your browser. This will print everything you see in the one section.Making a PDF
If you have the software to print as a PDF, you can try this when printing. Or, with more sophisticated PDF software, you can save an entire web site as a PDF.
Note: The above options are explained in your own software's Help pages, and are not part of ClientTracker or our support.
Warning: Links embedded in the manual will not work in a PDF. You will need to scroll through the pages or make your own bookmarks to read the entire manual in offline mode.
The ClientTracker software and manual use terms that may already be familiar to practice management software users. To assist in understanding important concepts, we offer a limited glossary below. Words in blue are defined in this glossary.
Ad Hoc - A manual data entry that bypasses a Drop-down List, and does not become part of the Value List for that Field.
Area - A group of several screens about the same type of Record, e.g. the "Clients Area."
Button - A clickable object that looks like a button, which executes an action. The names of Buttons are in this manual.
Chart Note - See SOAP Note
Comm Panel - A group of four or five Buttons that will access the Communications Module.
Control Panel - The left side of the Functions Bar in a specific area.
Detail Screen - A screen with the most information about a Record.
Dialog or Message Box - A pop-up gray box that requires a response from you.
Drop-down List - A Value List that opens when a field is clicked; from which to select an entry. You can also enter an ad hoc value by clicking the field a second time.
Field - A place to type or enter data in ClientTracker.
Find - The process of searching for Records by specified criteria.
Found Set - A set of Records resulting from a Find.
Functions Bar - The main horizontal panel of Icons located at the top of most screens.
Icon - A large Button with a graphic, which performs an action or navigates to another Area.
Insured - The policyholder of an insurance policy (may be someone other than the client).
Line Item - An item that appears in a Portal on an invoice as a diagnosis, procedure, product, or payment.
Link - In ClientTracker, this is appears as an underlined blue link that acts like a Button, and usually performs an action. In this Manual a ClientTracker link is represented in bold blue so as not to be confused with links to other parts of the Manual.
List Screen - A screen showing a Found Set, or list of records arranged in rows.
Main Menu - The gray, horizontal menu of ClientTracker functions, e.g. "Edit" or "Help." Clicking a menu item opens a submenu of choices.
Navigation Panel - The right side of the Functions Bar, composed of seven navigation Icons that, when clicked, will take you to another Area of ClientTracker.
Payment On Account - A pre-payment, or payment made by a client or insurer to be applied to existing charges or retained as a credit.
Payment Palette - A group of Fields and Tabs for use in entering a payment
Pop-up Menu - A Value List that pops up when a field is clicked, and offers a menu of choices including "Other..." as a way to enter a value that becomes part of the list.
Pop-up Window - A small ClientTracker window that opens on top of the screen you were on. It may be moved, but requires and action from you to close it.
Portal - A small list of records and information related to the current record, which often have actions associated with them.
Posting - An action that transfer "funds" from a Payment On Account to pay an invoice or an adjustment to an invoice.
Print Palette - A small Pop-up Window that opens each time something is printed, with a set of Buttons and controls to preview, print, or cancel the print job.
QuickFinder - A type-ahead method of finding one or more matching records in a Portal or list of records. Available as a Pop-up Window to select a single record, or at the bottom of List screens that have a lot of records.
Radio Buttons - A set of clickable small circles that will select only one from a choice of values
Record - A single unit in ClientTracker, such as a client, company, or communication.
Record Navigator - A small panel of buttons to move to the first, previous, next, or last record in a Found Set.
Scroll Bar - A small handle that slides in a vertical bar on the right edge of a Portal or the main window of ClientTracker to show additional items.
Search Operators - Symbols that can be combined with text, dates, or numbers to express dynamic search criteria in an Advanced Find; e.g. ">100" or "John *smith."
SOAP Note - An acronym for Subjective, Objective, Assessment, and Plan, which are the main tabs of the SOAP Note; used in ClientTracker to record clinical info from a client's visit.
Sort - A temporary rearrangement of the order of records in a Found Set, e.g. alphabetical order of clients.
Tab and Subtab - A set of layered panels with clickable tabs that display the contents of the panel. A subtab is a set of tabs within a tab.
Tabbing - The act of moving from Field to Field on a screen by using the "Tab" key on your keyboard.
Third Party Payer - A company or other person who makes a payment on a client's charges.
Value List - A list of values that can be entered in a field by means of a Drop-down List or Pop-up Menu.
What's the fastest way to find something in ClientTracker?
For the latest updates, see <<940>>
- This tells you where to find it in ClientTracker
- Click a blue or purple link to see more info in this manual
1500 - (see Insurance Claim Form)
Appointments - Create an appointment for a client, or view appointments
- Go to the area, or a client's Personal screen
- <<65>>
- Main choices are in the area, Program/Defaults tab
- Also on each individual client's Personal screen
- <<83>>
- Main choices and controls are in the area, Program/Utilities tab
- <<293>>
- Go to the area
- <<483>>
- Go to the area, and click the Clearing Houses tab
- <<471>>
- Go to the area, and click a client name or to get started
- <<22>>
- From any client's Personal screen, click the History tab
- <<42>>
- Click a button on the Comm Panel located in the lower left of most screens
- <<153>>
- Go to the area, and click the Templates & Marketing tab
- <<144>>
- Go to the area and click the Diagnosis Codes tab
- <<254>>
- Go to the area, and click the Program/Defaults tabs
- <<426>>
- Go to the area, and click the Templates & Marketing tab (clients only)
- Or go to an individual client. provider, insurance company, or vendor record
- <<664>>
- Go to the area, and click the icon in the Control Panel
- <<481>>
- Go to a client's Personal screen, Files tab
- <<480>>
- On any SOAP Note, click the Photos/Files tab (on the right edge)
- <<101>>
- Go to the area and click the row of a company or click to begin
- <<464>>
- Go to the area and create a , and select 1500 as the type
- From a client's Personal screen, click at the bottom
- Click in a pop-up Appointment window from the area
- <<119>>
- Go to the area, select a client, and click the Insurance tab
- <<34>>
- Go to the area, select a client, and click the Insurance tab
- Click Complete List in Box 4 of the Policy 1500 Info panel
- <<41>>
- Go to the area
- <<457>>
- Go to the area, select a client, and click the New Invoice no SOAP button
- OR - Go to the area, create or access an Appointment, and click the Invoice button
- OR - Go to the area and click the New Invoice icon in the Control panel
- OR - From any SOAP, click the button
- For all the above, see <<107>> for more info
- Go to the area, and click the Program/Financial tabs
- <<450>>
- Go to the area, and click the Invoices tab
- <<48>>
- OR - To pay a single invoice, go to the Invoice and use the Payment Palette
- <<116>>
- Go to the area, and click the Personal/Photos tabs
- <<29>>
- OR - On a SOAP Note, click the Photos/Files tab (vertical tab on right edge)
- <<103>>
- Go to the area, and see the Practice tab
- <<245>>
- Go to the area, and click the Practice/Practitioners tabs
- <<240>>
- Go to the area, and click the Program/Print tabs
- <<288>>
- Go to the area, and click the Procedure Codes tab
- <<254>>
- Go to the area
- <<457>>
- Go to the area, and on the Practice tab, click the button
- <<447>>
- Go to the Client's Invoices tab, select the payment, and click the blue Ref. link
- <<571>>
- See also <<126>> for important info
- Go to the area, and on the Program/Financial tab, check the box to Use the Register
- One enabled, go to the area and click the Register tab
- <<123>>
- See <<703>> in this manual
Reminders - Create or edit a reminder to show on the schedule
- Go to the area and click the icon
- <<85>>
- Go to the area and choose a report
- <<183>>
- Go to the area, Practice tab, and click the Rooms subtab
- <<252>>
- Go to the area, Practice tab, and set the Sales Tax at lower left
- <<246>>
- Generate a SOAP from the area, in any Appointment pop-up window
- Or go to the area and generate a SOAP from an invoice that is not linked to one yet
- <<493>>
- Go to the area, Templates & Marketing tab, and click the button near the top
- Or click the button from any SOAP Note's Templates tab
- <<494>>
- Go to the Client's Invoices tab and click the Statement button on the Invoices & Statements subtab
- <<46>>
Thank You Letters or Email - Create and send thank-you communication to those who refer clients to you
- Go to the area, Templates & Marketing tab, and run a report in the Thank You Letters section
- Or
click a link or button from the referred client's Referrals tab, or the referring provider's list or detail screens
- See <<436>> or <<437>>
- See <<617>> in this manual
- Go to the area, and click the Program/Value Lists tab
- <<260>>
- Go to the area, and click the Vendors tab
- <<458>>
NOTE: Also look in other areas of the Online Manual (e.g. SOAP Notes) for new features & changes in each area.
Tip: Use the Search field at the upper right of this site to find specific topics, e.g. Client Instructions, Waiting List, Formula Templates, etc.
New Features in 5.0 for BOTH Desktop and Cloud VersionsQuick Clips
- <<819>>
- <<839>>
- <<834>>
- <<814>>
- <<872>>
- <<811>>
- <<806>>
- <<812>>
- <<815>>
- <<817>>
- <<852>>
- <<823>>
- <<824>>
- <<825>>
- <<818>>
- <<821>>
- <<832>>
- <<841>>
- <<809>>
- <<840>>
- <<805>>
- <<837>>
- <<810>>
- <<835>>
- <<836>>
Details in this section include:
- <<761>>
- <<535>>
- <<537>>
- <<539>>
- <<667>>
- <<738>>
- <<819>>
- <<842>>
If you have repeated "slow" experiences with ClientTracker, this may be due to the overall speed of your computer... even if other programs seem to be working properly. The Minimum System Requirements are at least 2.0 GHz processor speed and 1 GB RAM. This is average speed for a computer nowadays... a faster processor and more RAM are always helpful. We strongly recommend at least a 2.66 GHz processor, because this has more to do with overall program speed than the RAM, although 3-4 GB of RAM is recommended if you typically run ClientTracker while other programs are open on your computer.
Minimum System Requirements
- <<4>>
- <<5>>
Things That Slow Down ClientTracker
Running a system backup - these should be scheduled for times when ClientTracker is not running. We strongly recommend shutting down ClientTracker every night so it can be backed up.
File Transfers - If you are uploading or downloading a file, this takes a lot of memory and will slow down overall performance.
Graphics and other programs - If you have fancy, graphics-heavy customizations for your desktop or OS, this can take a lot of memory to maintain. Basic desktop settings are recommended. Closing other non-essential programs is also recommended while ClientTracker is running.
Online connections - Some online functions can use a lot of memory. Just displaying graphic-heavy web pages, or having many tabs open in your browser can slow down overall performance.
Experiment with a Faster Computer
Here is an experiment to try: If you copy your the entire ClientTracker 4.0 folder (or download the Demo) to a flash drive or other portable USB drive, you could try this eye-opening experiment:
1. Take the USB drive with ClientTracker on it to a computer store (or a friend's new computer) and say you want to "test drive" on a new computer a program that is critical to you.
2. Plug in the USB drive and find the ClientTracker 4.0 folder in the new computer's directory.
3. Inside the Program folder, double-click the ClientTracker.exe program, and you will be able to run ClientTracker on the new computer and try a few things... like (state reported problem)
You may see how much faster the experience is on other computers!
Note: With some computers, running ClientTracker from an external drive (as in the experiment above) can slow down the program. If this happens, try installing the free Demo on a 2nd computer and compare the speed of the Demo vs. the speed on your other computer.
ClientTracker's Main Menu runs across the very top of the window, and has 6 choices:
File | Edit | View | Records | Insert | Help
Each Main menu choice opens a drop-down menu of additional choices; explained below. Some menu choices offer keyboard shortcuts, e.g. Ctrl + C for Copy (for Macintosh, use the Ctrl or Command key). For more information about keyboard and mouse shortcuts when working with ClientTracker, see <<537>>.
File
- Print Setup - This will let you
set program-wide print options, including choice of printer, etc.
Often, these settings would be overidden by ClientTracker print
settings for a particular printout. You also will see a Print Options
dialog when you print.
- Quit (Ctrl + Q) - Saves data entered and closes ClientTracker.
Edit (menu choices change as you work with data in fields)
- Undo (Ctrl + Z) - Undo last action (not always available)
- Cut (Ctrl + X) - Cut selection
- Copy (Ctrl + C) - Copy selection
- Paste (Ctrl + V) - Paste selection at cursor point
- Clear - Clear entire current field
- Select All (Ctrl + A) - Select all text in the current field
- Spelling...
- Check Selection
- Check Record
- Check All (Ctrl + Shift + Y)
- Correct Word
View
- Zoom In (F3) - Increases the screen display in the same sized window
- Zoom Out (Shift + F3) - Decreases the screen display in the same sized window

Tip: You can also Zoom In and Zoom Out by clicking the scale buttons in the lower left corner of the main ClientTracker window.
Format
- Shows on selected screens only - see <<738>> below.
Records
- Show All Records (Ctrl + J) - Displays all the records in an area; wherever you are. For example, on a client's Personal screen, all clients in ClientTracker would be added to the Found Set.
Tip: The total number of records in the current Found Set can be seen in the Record Navigator, located in the top Functions Bar on most layouts. Click the buttons to move forward and backward through the records.
- Omit Record (Ctrl + T) - Omits the current record temporarily from the Found Set.
- Omit Multiple... (Ctrl + Shift + T) - Opens a small dialog, in which you enter the number of records to omit from the current found set; counting from the current record. This is useful for omitting a large block of records from a sorted list.
- Show Omitted Only - When you have a Found Set, it naturally omits records not in the current set. Choose this option to see all the omitted records, and choose it again to go back.
Note: Menu choices for Records apply to the main record being viewed; not records in a portal. We do not recommend using Record choices when a pop-up window is open.
Insert
- Current Date (Ctrl + -) - Inserts the current date wherever the cursor is.
Help
- ClientTracker Online Manual - This brings you to the online User's Manual, which you are reading right now.
- Startup Tips - Takes you to the ClientTracker QuickStart Tips screen.
- View Registration Info - Allows you to quickly view the status of your ClientTracker registration. (If passwords are enabled, only those with Admin privileges can view the registration info.)
- About ClientTracker... - Displays the current version and other info, including a link to our Support web page.
Keyboard & Mouse Navigation Shortcuts (Windows)
Note: Macintosh users most of
the time substitute COMMAND (cloverleaf or Apple logo key) for "Ctrl"
for Windows. Some Mac keyboards also have a separate CTRL key that may
sometimes be used. Consult your keyboard or system documentation for
help.
Keyboard Shortcuts
Many keyboard shortcuts are available for Main Menu functions. See <<535>> for more info.
Windows:
- Tab - Moves from field to field, from L to R, from up to down
- Shift + Tab - Moves R to L (previous field)
- Insert, Home, Delete, and End keys - function only when your cursor is in a text field
On long Detail screens (like the invoices), use these keys when your cursor is not in a field:
- Page Up & Page Down - Scrolls up and down equivalent to the height of the window.
- Shift + Page Up or Page Down - Scrolls L or R
- Home - Scroll all the way up & all way to left
- End - Scroll all the way down & all way to left
On List screens, some keys behave differently:
- Home - moves to first record in the set
- End - moves to last record in the set
Data Entry
Dates - Enter in M/D/YY format. If the date is in the current year, the year will enter automatically; e.g. 6/11 becomes 6-11-10.
- ClientTracker formats dates as 6-11-10, but the system often shows the date as 06/11/2010 when your cursor is in the field. This is normal, and you can type dates with either slashes (6/11/10) or dashes (6-11-10) as is your custom.
Dollar Amounts - No need to enter a dollar sign, or a decimal if a whole number. For example, entering "100" will display as $100.00 when you exit the field
- ClientTracker formats dollar amounts as $100.00, but the system often shows the amount as a whole number (e.g. 100) when your cursor is in the field.
Mouse Shortcuts
Note: One click is usually all
that is needed to select an item from a portal or QuickFinder. When
the cursor is in a data entry field, the double- and triple-clicks will
select text as usual.
Right-Click - Displays a small menu of options when the cursor is in a field: Suggested Spellings, Cut, Copy, Paste Unformatted Text, Insert (current date), and Export Field Contents.
Mouse Wheel - Scrolls through records in List screens or
portals. In List screens, the mouse wheel moves through the list of
records (i.e. scrolls the main window), without changing the active
record. In large text fields (e.g. communications), the mouse wheel
will scroll the text up or down.
After successfully registering, you next have the option of setting your passwords. If you don't want to set your password(s) now, you can do it later. You can always change your passwords at any time.
Initial Setup of Passwords

To activate password protection: Go to the Settings/Program/Defaults tab. Click the button, which is at the bottom next to your registration info.
- Enter
an Admin password twice to confirm, and click . After the initial setting of the password(s), you will be logged in
as Admin.
- Enter a Staff, Practitioner or Receptionist password by first entering the Admin password; then enter the Staff, Practitioner or Receptionist password twice to confirm. After setting the additional password, you would need to quit ClientTracker and have the Staff person login with the new password for the restrictions to take effect.
You can change a password at any time with Admin access, by clicking the button on the Settings/Program/Defaults tab. On the Admin Setup screen, click either button to change a password. You will be asked to enter the current Admin password, and the new password (twice to confirm).
To set ClientTracker not to use any passwords, leave the new password fields completely blank, and click .
Note: If you remove the Admin password, the additional passwords will also be cleared automatically.
Opening ClientTracker with Password Protection
If you have set any passwords, a Login dialog box will prompt you to enter a password. ClientTracker will know what level of access you login with. Other Login options are:
- You can click, and ClientTracker will close without any access.
- You can click and view information about how to contact Ginkgo Software for password recovery.
Recovering a Lost Password
If a you forget your password, click the button on the initial Login dialog box. These instructions on how to request a temporary password will show:
- Reset, Help or Cancel
- Call 877-727-6174
- Click Reset to enter the Password Reset Code provided by Ginkgo Support
The ClientTracker program has one main window open at a time. Additional, smaller windows may open as pop-ups.
Closing a window: During use of most programs, clicking on the red X (Windows) or dot (Mac) usually closes a window. ClientTracker has this function disabled. The only way to close a window is to finish the process if it is a small pop-up window. To exit the main ClientTracker window, completely Quit or Exit the program from the Main Menu.
Macintosh Computers Only
The Macintosh feature Expose allows you to change windows. You can use F10 to change window back to the main window (from the small pop-up). However, while you can change to the main window, as soon as you click anywhere on this new window, you will be brought back to the small pop-up to finish your task.
Tip: If your ClientTracker program window winds up off screen, one thing you can always do is go to System Preferences -> Displays -> Gather Windows, which should bring every open window back onto the screen.
Windows Computers Only
If your ClientTracker window winds up off screen:
First make sure you?ve alt-tabbed to the window, or clicked on it once to bring it into focus. Then right-click on the taskbar and choose Move.
At this point, you should notice that your cursor changes to the ?Move? cursor, but you still can?t move anything.
Just hit any one of the arrow keys (Left, Right, Down, Up), move your mouse, and the window should return onto the screen.
Tip: For keyboard savvy people, you can just alt-tab to the window, use Alt+Space, then M, then Arrow key, and then move your mouse.1. The SOAP Note detailWhen you are on one of these screens, an additional menu choice appears in the top, or Main Menu, called "Format."
2. The SOAP Template detail
3. The Communications Compose screen (when writing a letter or form)
4. The Communications Template detail, or Compose screen
5. The Program/Print tab. for the header used for reports and invoices (in the Settings area)
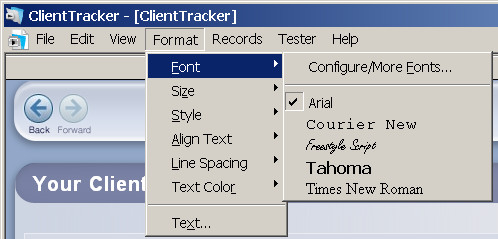
To format text, highlight what you want to format and expand the menu for additional choices.
Tip: Click the Text... choice at the bottom of the menu to open the Text Format for selected text dialog, where more choices are available.

Note: The choices are standard for text formatting. The best way to learn what options are available is to make a Communications Template or SOAP Template and try the different formatting options before using them.
Formatting a Paragraph
Click the Paragraph... button on the Text Format for selected text dialog to open the Paragraph dialog, where you can apply alignment, indents, or line spacing to the currently selected paragraph of text.

Tip: You can also use the Text Ruler to format indents and see where tabs are set in the current field. You must be clicked in the field to see the Text Ruler.

Formatting Tabs
Click the Tabs... button on the Paragraph dialog to set tabs for the currently selected paragraph.
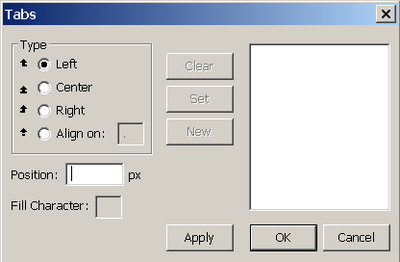
"QuickClips" is a pop-up feature that you can access anywhere within ClientTracker to insert text in a field. The clip is copied to your computer's clipboard, after which you can paste it anywhere you enter text by using Ctrl + V on your keyboard (Command + V for a Mac).
To access the QuickClips pop-up window:
-- From the top menu, select QuickClips --> Open QuickClips
-- FASTER: Press Ctrl + 1 (Command + 1 on a Mac)
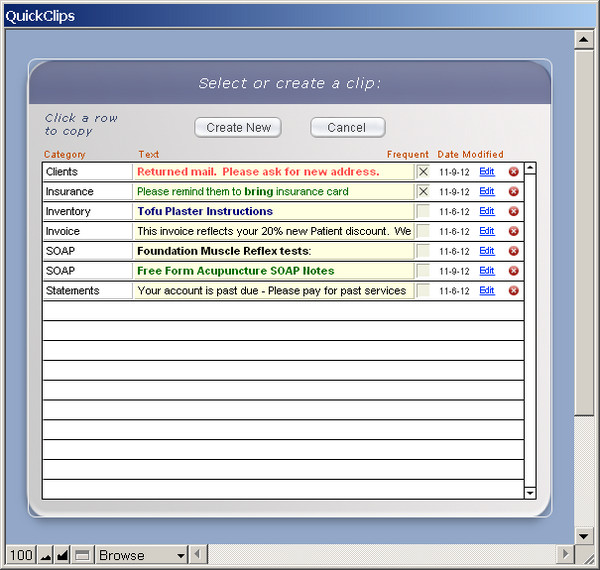
Create your own list of clips of any length -- short or elaborate, and organize them by Category or check the Frequent box to make them appear at the top of the list. The list sorts to put those marked Frequent first, then it sorts by by Category, and then by the first letter or number of the text.
Tip: Your clips can be text formatted using the Format options in the top menu, and the formatting will be retained during copy and paste.
To create a new clip, open the QuickClips pop-up and click the button. Enter the text and assign a Category if you like. The drop-down Category list builds itself from values you have entered for any clip. What you enter is saved automatically by ClientTracker.
Click << Return to list to go back to the Clipboard list.
Tip: To copy and use the new clip immediately, click Copy this clip and close pop-up
To edit any clip, click the small Edit link at the right of its row. Click the red button to Delete.
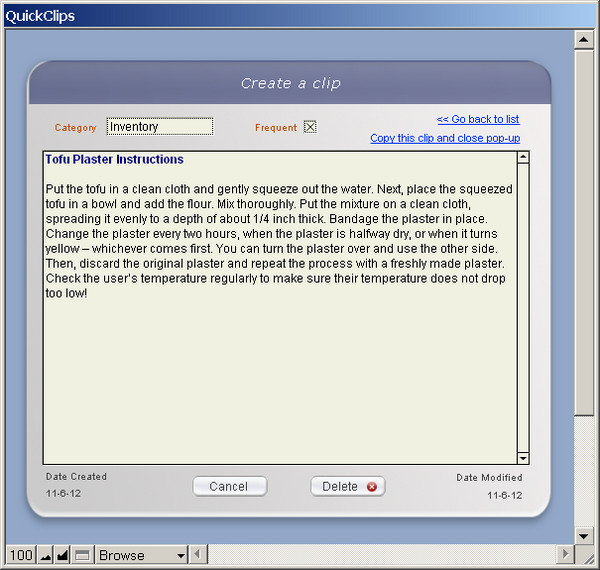

If you use keyboard shortcuts on your Mac, they won't work in ClientTracker Cloud because it's a Windows server. For most equivalent keyboard shortcuts, simply use the Ctrl key instead of Command.
The following chart is copied from Wikipedia for your convenience. The original can be viewed by visiting the Wikipedia website.
Many font symbols can be entered via keyboard shortcuts. For example, if your keyboard has a number pad, the temperature symbol (i.e. ?F) can be typed with Alt + 248. Other symbols can be found with a simple Google search, e.g. "How do I type ____ with a windows keyboard shortcut?"
- To see an online PDF table of many shortcuts, copy and paste this URL into your browser:
http://usefulshortcuts.com/downloads/ALT-Codes.pdf - Be sure to press "Num Lock" so your number pad is active.
- ClientTracker simply receives text that you type - you will be able to enter data more efficiently when you take the time to find and learn the method for typing what you want with your keyboard.
Keyboard shortcuts for text editing


The Main Areas of ClientTracker are represented by buttons on the Navigation Panel of the Functions Bar and are explained in more detail below.

Clients - See <<541>>.
Calendar - See <<542>>.
Financial - See <<543>>.
Reports - See <<544>>.
Insurance - See <<545>>.
Inventory - See <<546>>.
Settings - See <<547>>.
Each area contains multiple screens, tabs, and controls to display information as efficiently and clearly as possible.
Take a Tour of ClientTracker
On the Start-Up Tips screen is a link, Take a Tour of ClientTracker, which opens a pop-up window with Back and Next buttons that show you a few highlights of the program.
Clients - This area is for finding clients, and adding or editing their information. When you click this icon, a QuickFinder list of clients is displayed, including basic information such as age, category, next & last appointments, and phone. The clients area is discussed in its own chapter, <<22>>.
The Client Control Panel
![]()
You can also access the Client QuickFinder from all screens in the client area by clicking the icon in the Control Panel.
- To find a client, enter text in the Name field, or select a
Category from the pop-up menu. The list will change to show records
matching whatever is entered. See <<23>> for more info.
- To see the client's record, click on the client's name.
- You may also click the Advanced Find button for more options. To learn more, see <<23>>.
New Client![]()
To add a new client, click the
icon on the Control Panel. This pops-up a small window for you to
enter the client's name which checks to see if this person may already
be in ClientTracker.
After entering the name, click
to insert this name into a blank client record where you can add all
the client's information, including contact information, referrals and
linked files, and even an optional photo of the client.
Creating
a client record is necessary in order to schedule appointments for a
client -- this can also be done from the Calendar. See <<69>>.
Clients List![]()
Clicking the icon displays a list of all active clients in ClientTracker, initially sorted in alphabetical order. You can change the sort order by clicking on any of the column headers. Three other List views are available. For more info, see <<522>>.
When on the clients List screen, the icon is used to display all clients in ClientTracker (including inactive). This will replace the current found set.
Tip: To retain a found set of records, use the Back and Forward buttons to navigate.
Print![]()
The icon opens a pop-up Print Menu of choices - depending on where you are - for printing client records in list form, their personal records, reports, or just a set of labels & envelopes. For details, see <<521>>.
![]()
The icon allows you to group clients into families for shared billing. See <<481>> for more info.
Client Area Tabs
There are five main screens in the Clients area, represented by five navigation tabs:
- Personal - most of the information about a client is entered and stored here. Clicking a row in the Client QuickFinder or Clients List takes you here.
- Insurance -enter information about any insurance policies used by a client
- History - for recording the client's medical history, allergies, etc.
- Appointments & SOAPs - a view-only, sortable list of all client visits
- An appointment is a future visit and contains the key specifics: date, time, practitioner and room. It forms the basis for a SOAP Note
- A SOAP Note is a past visit, contain all the details about the visit, and are often referred to as "SOAPs"
- Invoices - information about client invoices, statements, and payments is displayed. Payments on Account are entered here.
Note: The tab titles are gray if there is no information in them.
For more information about adding and editing clients, see <<22>>.
![]()
When you open ClientTracker, the Calendar can be the first screen you see, if you have selected that choice on the Settings/Program/Defaults tab (see <<224>>).
You can choose which screens to view the Calendar. Your favorite can be set on the Defaults tab above, and you can also use the View Selector to switch between views from any Calendar screen. Each view can be modified to show all appointments for that view, or just those for one practitioner (and some for rooms, as well).
View All Appointments...
- ...as a List (i.e. all appointments in ClientTracker)
- ...for One Day as a List*
- ...for One Day by Practitioner - Column View*
- ...for One Day by Room - Column View*
- ...for One Week by Practitioner - Column View
- ...for One Month by Practitioner - Calendar View
*Available as a Defaults view choice
The Calendar Control Panel
The Calendar shows all appointments, time and duration, as well as reminders. It first opens showing the current day's appointments and allows you to easily move to any day to check upcoming or past appointments.
Create Appointments![]()
To create appointments or recurring appointments from any Calendar view, just click the or
icon to open the a pop-up scheduling window. From there, enter the
client name, appointment date(s), time, and other optional info.
A pop-up window with vital information will open when any appointment is clicked on a Calendar view.
For more info, see <<65>> or <<78>>.![]()
Just like appointments, a reminder can be scheduled at any time by clicking the or
icon. Use this feature for any reason that is meaningful to your
practice. Reminders will show on all views and printed
schedules (except Month). Reminders can be made for one practitioner
or all practitioners.
For more info, see <<85>>.
Print![]()
A different schedule will print from each screen when the icon is clicked. The schedules may be sorted by day, practitioner, or room, depending on the current view.
For more info, see <<84>>.
See Today's Schedule

Click the button as a quick way to return to your chosen default view to display the current day's schedule.
Calendar Area Tabs

- Day - Goes to the last selected Day view; for the currently selected day.
- Week - Displays the week of the currently selected Day in Column View.
- Month - Displays the month of the currently selected Day in Calendar View.
Find a Date
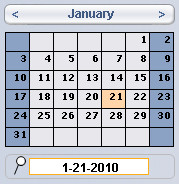
Use the small "date selector" calendar to quickly
locate and display any date in the past or future. Simply click on a
visible date, or use the navigation bar to select a different month.
To locate a date directly, enter it in the QuickFinder just underneath.
The Financial area shows a complete list of invoices for all clients. This is a good way to view billing summaries from all clients without having to look in each client's record, and is useful for spotting anomalies such as unpaid invoices. If you have checked the box to use the optional Register, on the Settings/Program/Financial tab, it is available via a main tab.
The Financial Control Panels
Control Panel for Invoices![]()
The
icon first asks you to select a client and invoice type. Then creates
an invoice that is NOT yet linked yet to a SOAP Note - although you can
quickly create one from the Invoice detail screen.
- For more info, see <<107>>.
Find an Invoice![]()
Click the
icon to enter detailed criteria to find one or more invoices and
display them on this List screen. You may also use the QuickFinder at the bottom of the screen for many searches (see below).
- For more info, see <<605>>.
List Options![]()
Available only on the List screen, the Show All Invoices icon will show all Invoices in
ClientTracker, with the highest invoice number first. This replaces
any found set of invoice records that was displayed and/or sorted.
![]()
On other screens, the icon is in this place shows as and which takes you to the List screen with your current found set.
![]()
Clicking the icon has different actions depending on the screen:
- From
the List screen - Opens the Invoice Print Menu pop-up window, where you
can choose to print a list of invoices, all invoices, statements,
envelopes, or labels for the invoices in the list.
- From Invoice detail screens - Prints the invoice shown.
- From
the Register - Offers a choice to print a list of payments and
deposits, or a report of income and expenses sorted by category.
- For more info, see <<106>>.
![]()
Available
only on Invoice detail screens, this create a new invoice with all the
same information as the current one (except date, invoice # and
payments).
For more info, see <<574>>.
Control Panel for Register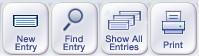
The Register Entry List has a set of icons in the Control Panel for register functions.
- - Creates a new, blank entry
- - Opens a Find screen to search for one or more entries
- - Shows all register entries in ClientTracker; in the order they were created
- - Prints a simple list, or a report sorted by Income and Expenses
- For more information on using the register, see <<123>>.
Financial Area Tabs

Note: The tabs will show only if the Register is set for use on the Settings/Program/Financial tab
- Invoices - Goes to the List screen and shows all invoices
- Register - Goes to the register Entry List and shows all entries
Invoice List Functions
- Click a row to go to the invoice Detail screen or the client icon [ ] to go to the client's Personal screen.
- QuickFinder - Use this to quickly narrow the list of displayed invoices by any of the column parameters. See <<553>> for more info.
- - Click this to show
totals at the bottom. If you have set passwords, this is available
only to the Admin user. Depending on the number of invoices in the
found set,this may take a few moments to display.
Filling Out an Invoice
 Select an invoice type (see below), and if the client has an active
insurance policy, it will be loaded for Superbill or 1500 types. If
the invoice is generated from a SOAP, the procedures and products (and
diagnoses if applicable) will be transferred automatically to the
invoice, after which the SOAP and invoice are "program_linked," and a change in
one would change the other as well.
Select an invoice type (see below), and if the client has an active
insurance policy, it will be loaded for Superbill or 1500 types. If
the invoice is generated from a SOAP, the procedures and products (and
diagnoses if applicable) will be transferred automatically to the
invoice, after which the SOAP and invoice are "program_linked," and a change in
one would change the other as well.
On the invoice detail screens, you can click to enter a line item for diagnoses, procedures, and products sections. Discounts can be entered for line items or for all the procedures, or all the products. Payments are entered in the "Payment Palette."
Invoice Types
Simple - This invoice type is intended for simple transactions not involving insurance.
Superbill - This may be used for insurance or client billing, and has the diagnosis codes.
1500 - This claim form is used for billing insurance companies on paper or electronically.
For more info, see <<105>>.
This area enables you to generate a variety of reports from your data. There are two main tabs in the Reports area: Reports and Templates & Marketing, which can be accessed via the tabs on the upper right side of the screen.
Note: Reports are naturally more useful when you have plenty of data in your ClientTracker software. For this reason, the QuickStart only gives a description of what each reports are available. For more information about running reports, see <<183>>.
Reports Tab
This area is divided into sections for Invoices, Inventory, Appointments & Visits, and financial reports.
- Invoices - Find unpaid invoices, unfiled claims, incomplete & blank invoices, visits with no invoice, or create an e-billing batch.
- Inventory
- View profit & cost of goods sold during any time period, check
inventory value, or print out an inventory list or list of merchandise
to be reordered from suppliers.
- Deposits - Print a deposit slip and enter items in the Register (if this is being used).
- Appointments & Visits
- Find and print multiple SOAP Notes, upcoming appointments, or visits
- during any time period you choose. Print a list of diagnoses given,
or procedures performed.
- Financial - Print a report of
all financial transactions during a period of time and/or per client,
as well as payment & posting logs, credits & payments on
account balance, accounts receivable, and sales taxes collected on
procedures and/or inventory items.
- Reconcile - This helps you to reconcile bank statements and credit cards on the register (if in use) with your checking account balance.
Templates & Marketing Tab
This area allows you to manage Communications Templates, access SOAP Templates, and perform marketing-related tasks.
- Communication Template Manager
- Create, edit, or use Communication Templates to send or produce a
letter, email, or form for one or more client or provider recipients.
See <<147>> for more info.
- SOAP Templates - Click this button to access the SOAP Templates area. See <<494>> for more info.
- Thank You Letters (or email) - for providers or clients who have referred clients to your practice.
- Providers: see <<436>> for more info
- Clients: see <<437>> for more info
- Information - Show information about the sources of clients, or a visit & invoice summary for selected clients. See <<219>> for more info.
- Bulk Email
- Export selected email addresses in an Excel file format, for use in
external bulk mailing applications. See <<220>> for more info.
- Envelopes and Labels - Print envelopes and address labels for clients. You can choose a specific client, or certain clients based on any criteria you wish, such as all clients with a birthday in January, or all clients with outstanding invoices.
![]()
This is where Insurance Companies and Clearing Houses are added, and electronic billing, or "E-Billing" is performed.
Insurance Area Tabs
- Insurance Companies - Displays a list of all insurance companies entered in ClientTracker (including inactive).
- On Detail screens, there are two subtabs available to show Company and Payments info
- Clearing Houses - Displays a list of all clearing houses entered in ClientTracker (including inactive).
- On Detail screens, there are two subtabs available to show Company and E-Billing info
Insurance Companies Tab
Control Panel
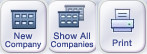
- - Create a blank record for a new insurance company
- - Revert to the full list of all companies; in alphabetical order
- (from List screen) Print a list of all the companies in the current found set
- (from Detail screen) Open a Print Menu, from which you can print company details, an envelope, or a label.
Actions Available Insurance Company List Screen
- Click any row to see the Detail screen for a company

Click the Payments button to view the Payments screen for a company
- Click a blue link to view the clearing house assigned to a company
- Check or uncheck the Active box (only active companies will show on drop-down selection lists)

Click to Omit a company temporarily from the list; e.g. before printing
- Use the QuickFinder utility at the bottom of the screen to narrow the list of companies by their names
Insurance Company Detail Screen (Company Subtab)
- Enter
information about the insurance company, including multiple sets of
Address, Phones, and Email for contacts, web site, payment type, and
clearing house used (if any).
- Set up information to automatically fill 1500 claim forms with the company's preferences on the 1500 tab. See <<600>> for more info.
- View a list of clients who have policies with a company, or go to that policy, on the Client Policies tab.
Insurance Company Payments Screen (Payments Subtab)
- Enter a New Payment, and distribute it to invoices for the company, or access the invoices from a portal list.
Clearing Houses Tab
Control Panel
- - Create a blank record for a new clearing house
- - Revert to the full list of all clearing houses; in alphabetical order
- Click any row to see the Detail screen for a clearing house
- Check or uncheck the Active box (only active clearing houses will show on drop-down selection lists)
- Check to designate one clearing house as Primary (this will be the primary clearing house for e-billing functions
Click the E-Billing button to view the E-Billing screen for a clearing house
Click to Omit a clearing house temporarily from the listFor more info, see <<471>>.
Clearing House Detail Screen (Company Subtab)
- Enter information about the clearing house, including multiple sets
of Address, Phones, and Email for contacts, web site, and login ID
- Once a correct URL is entered, the web site of the clearing house will display in a small browser window on the screen
Clearing House E-Billing Screen (E-Billing Subtab)
- Process an e-billing batch by selecting invoices to send, or view claims sent.
![]()
This is where you enter products that you sell as Inventory, and the Vendors that sell them to you.
Inventory Area Tabs
- Inventory- Go to the Inventory List screen, and show all products (including inactive); in alphabetical order
- Vendors- Go to the Vendors List screen, and show all vendors in alphabetical order
Inventory Tab
The Inventory Control Panel
- - Creates a blank record on the Detail screen, to enter information about a new product
- - Goes to the Find Inventory screen, where you can search for one or more products by multiple criteria
- - Displays all products in ClientTracker on the List screen (including inactive); in alphabetical order
- - offers a choice to print just a list of the products in the current found set, or to group them by vendor.
Actions Available on the Inventory List Screen

Click the Go button to view the Detail screen for any product
- Most of the information displayed on the Inventory List screen can be edited in the rows, or by accessing the Detail screen
- Check or uncheck the Active box (only active products will show in drop-down selection lists)
- Use the QuickFinder utility at the bottom of the screen to narrow the list of products by selected criteria
The Inventory Detail Screen
- Enter
details about a product, including description, instructions for use,
and vendor info. Track the status and inventory levels, and create
Inventory Transactions to adjust levels as needed.
- Run a report for any date range; by clicking the button.
Vendors Tab
The Vendors Control Panel
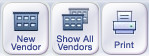
- - Create a blank record for a new vendor
- - Revert to the full list of all vendors; in alphabetical order
- - Print a list of all the vendors in the current found set
Click the Go button to view the Detail screen for any vendor
Click to Omit a vendor temporarily from the list; e.g. before printing
- For more info, see <<458>>.
The Vendor Detail Screen
- Enter
information about the vendor, including multiple sets of
Address, Phones, and Email for contacts, web site, and what they supply.
- View a list of products supplied by the vendor, and update info (or view the product's Detail screen) as needed.
This is the area where you can customize ClientTracker to suit your practice. Program defaults can be set here, as well as backup settings and other details. By clicking on the various tabs in this section you can also configure data related to your Practice, as well as Diagnosis Codes and Procedure Codes.
Before getting started with most ClientTracker activity, we recommend that you fill out information about your practice, practitioners, and rooms in the Program and Practice tabs.
Practice Settings Available
- Practice Information - used throughout ClientTracker
- Sales Tax settings & rates - used on invoices
- Practitioners in your practice who see clients
- Rooms used in your practice to see clients
Defaults tab
- Clients' Default Information (auto-enter shortcuts)
- Automatic Appointment Confirmation Email
- Email Sending Method
- Password Setup
- Calendar Defaults and Choices
- Startup Screen
- SOAP Note info
- Bank Account & Business License
- Default Payment type for Invoices
- Choices for Printing Invoices
- Display Client Balances
- Use Optional Checkbook Register
- Default general notes and terms for invoices.
- Customize Headers (for letters, forms, SOAP Notes, and invoices)
- Your Practice Return Address
- Display "printed on" date & time in footers
- Default Path for Files & Photos (Desktop only)
- Local Backup (Desktop only)
- your Additional Location (Desktop only)
- Set the Zoom Level for how big you want to view ClientTracker
- Customize the choices in selected drop-down menus for faster data entry
For a more detailed description of Settings, see <<223>>.
Note: As soon as you have mission-critical data stored on your computer, you should begin a regular backup schedule~not just with ClientTracker's built-in backup system, but also to an external drive. Don't wait until you've lost hours (or more) of of work entering data before you start safeguarding it.
Details in this section include:
- <<549>>
- <<550>>
- <<991>>
- <<992>>
- Communication (letters & forms)
- Reports (most often run from the Reports area)
- Lists of records (e.g. a list of clients)
- Clinical information (SOAP Notes or client history)
- Appointment schedules
- Invoices, including the HCFA 1500 claim form
Tip: If you have Adobe or comparable software, you may be able to print nearly all ClientTracker output in PDF or other electronic formats. This depends on the software installed on your computer and is not a part of ClientTracker.
ClientTracker should automatically use the printer you have set as the default for your computer. If it doesn't, you can choose a printer (or other output) and set the paper size and source for the program; use the Main Menu (at the top of the window). Go to File --> Print Setup and try different options until you are satisfied with the output.
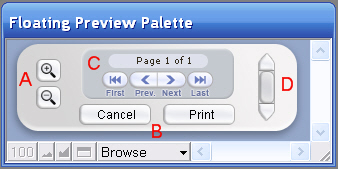
When printing with ClientTracker's buttons, you will see a "Floating Preview Palette" that controls how you preview the document, which is seen in a preview mode just underneath.
The Floating Preview Palette can be moved (just like any pop-up window) so you can see what's underneath.
Available options are:
- A. Zoom In, Zoom Out - Small magnifying glass buttons will scale the underlying preview
- B. - Closes the preview windows and return to where you started (do not print)
- B. - Opens the Print dialog for your computer (see below)
- C. First, Prev, Next, Last - If your printout is more than 1 page, use these to move between pages
- D. Scroll Bar - If the printout is deeper than the window (i.e. 8.5 x 11 paper), use this to scroll the underlying preview up or down
Note: All ClientTracker printouts are formatted for 8 1/2" by 11" paper, with at least a 5/8" margin for all sides. For printouts with headers, the first page header area is about 2" high. The second sheet is about 1" high.
Your Computer's Print Dialog
When you click Print on the Floating Preview Palette, you will see a new Print window, called a "dialog" because it can accept instructions from you about which printer to use, how many copies, etc. In Windows, the Print dialog looks like this:
IMPORTANT: Make sure the top choice Print: is always "Records Being Browsed."
Other Choices:
Printer Name - Select from a menu of your computer's available print options. The example above shows "Adobe PDF" because Adobe Acrobat is installed on the computer. Your system default printer should show automatically.
Print Range - Should always be set to "All" unless you want just selected pages of a report, for example.
For more info about your computer's Print dialog, consult your computer's Help resources. Ginkgo Software does not provide support for using the Print dialog, except as noted above.
Print Setup
For most Windows computers, you can preset the print choices that will appear in your Print dialog. Whether a ClientTracker printout prints in portrait or landscape is governed by the Preview Palette described above. However, if you have multiple printers, you can select which one will show in your Print dialog. To do this, go to Print / Print Setup in the top Main Menu of ClientTracker.
Note: In Macintosh computers, selecting a printer in either the Print Setup or Page Setup dialogs may not change what will be shown as the default printer in the Print dialog.
You can customize the default print headers for all printouts,
including communication, reports, and SOAP Notes. When you print a
letter or form, you can also choose to use your pre-printed stationery
or plain paper, and the printout will reformat accordingly. All other
printouts are intended for plain paper and will print the default
header.
On Settings/Program/Print there are two subtabs, each representing a choice of how you want your default print header to look throughout ClientTracker for Invoices & Reports, or Letters & Forms. Formatting a header for one of these selects the header used on the first page of all print layouts. By choosing different options, you can format how your practice information and logo are displayed.
For more info, see <<289>>.
- Practice Name - The default practice name is part of your ClientTracker registration and can only be changed by obtaining a new registration code.
- Address Info - The default text is the data you enter in Settings/Practice.
- Pre-printed stationery - Load your own pre-printed letterhead or forms in the printer before printing.
- Invoices & Reports header - Use the Text header described above.
- Graphic - Link and use an existing graphic file.
For more info, see <<289>>.
Introduction
PDF stands for "portable document format." It is a type of file with the extension .pdf at the end. It's like an electronic copy of a printed document (even multiple pages), with no paper! Adobe is the software company that originally invented PDF; now there are several ways to save a document in .pdf format.
Requirements
Your computer must have software installed that creates a PDF. ClientTracker Desktop does not come with this software. ClientTracker Cloud does.
- Most Mac computers have this automatically - see below
- There are several free options available for Windows - see below
Tip: With v6.0 or higher, ClientTracker Cloud can name and save a .pdf file to a designated location automatically (for selected print jobs). With ClientTracker Desktop, you need to save the file manually. See <<992>> below for more info.
To manage the documents of your practice using PDF format, you have 2 inherent responsibilities.Responsibility #1 - Know the PDF Options On Your Computer
Mac
By default, Mac computers already have a way to convert doc to pdf. You can easily perform the conversion without installing any software. How the PDF program on your Mac computer works is your responsibility, and is not covered by Ginkgo Software support.
Step 1 - Click Print on the Floating Preview Palette in ClientTracker. This calls the Print window for your type of computer (which is not part of ClientTracker).
Step 2 - Look for the PDF button on the lower left, and click it.
Step 3 - Choose "Save as PDF" from the list of options
Step 4 - Give the file a meaningful name, navigate to the location on your computer where you want to save it, and click Save.
Windows
Finding and installing a PDF program on your Windows computer is your responsibility, and is not covered by Ginkgo Software support. Our advice here is intended as a service only, and the options may change over time. Your computer may already have PDF-making software installed. The way to tell is that a PDF option usually appears in your list of available printers, as if it was an actual printer.
The list of available printers looks like this (your computer's actual options are probably different):
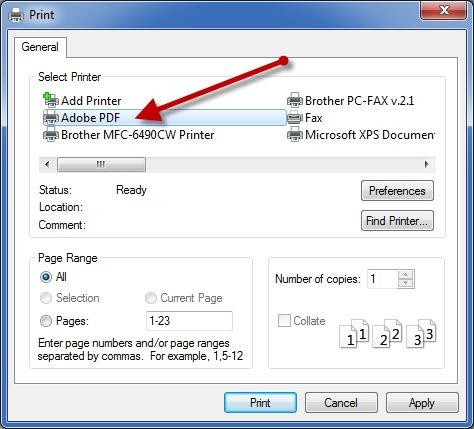
Tip: Adobe Reader is the standard free program, and is available on www.adobe.com. We don't "recommend" any software, but we do advise you to BEWARE! Many downloads of free software are bundled with other programs that get downloaded at the same time. You would do well to carefully READ EACH step of the download process, and UNCHECK any options you don't want to download!
- If you are a ClientTracker Cloud customer, the PDF-making software is installed already, and appears in the system Print window's list of available printers as "Adobe (redirect 9)," or some other option including the phrase "Adobe PDF"
- If you have ClientTracker Desktop, you need to install, learn, and manage your own PDF-making software, just like any other program on your computer.
Responsibility #2 - Manage Your PDF Files
After you have saved a document as PDF you can do several handy things with it.
- Open the file and view it, or print to paper if needed (find the file and click on it)
- Attach it to an email (your own email program, or in ClientTracker).
- ClientTracker Cloud: see <<854>> for more info
- ClientTracker Desktop: see <<480>> for more info
- Attach it to a Client's record or SOAP Note.
- ClientTracker Cloud: see <<859>> for more info
- ClientTracker Desktop: see <<750>> for more info
Tip: A PDF made from a ClientTracker printout is usually protected health information, and must be treated the same as other private health records. It is your responsibility to know your customers' preferences in this regard, as well as State and Federal laws.
ClientTracker Cloud and ClientTracker Desktop both offer the ability to "print" certain documents as a PDF and send it to a Client (or other recipient) as an email attachment. This function is done from the Floating Preview Palette, using a new button that appears in version 6.0 or higher. The button only appears for certain print options that are commonly sent to an individual Client. If you do not see the button, the option is not available.
Print Jobs that can be handled by this new feature include:
- Individual invoices - from the invoice detail or the Client's Invoices screen
- Multiple invoices cannot be emailed automatically as PDF - consider sending a Statement or Transactions Report instead
- Statements - from the Client/Invoices tab
- Year End Transactions Report - from the Client/Invoices tab
- One SOAP Note - from the SOAP Detail
- Multiple SOAP Notes (for the same client) - from the Appointments & SOAPs list
- Insurance Verification - from the Client's Insurance screen
The Send as Email button on the Floating Preview Palette looks like this:
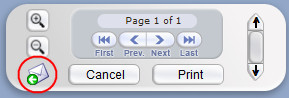
"Send As Email" Tasks
ClientTracker performs the following tasks when this function is performed properly:
- Saves the file as a PDF to your designated Default File Path; inside a new folder called "Attachments"
- Creates a Files record for the PDF file, so it shows in the Files list on the Client's Personal screen
- Creates an email Communications record with generic text, and the PDF file linked as an Attachment
Tip: The process is slightly different from the Cloud or Desktop, with the Cloud enabling a more convenient user experience.
ClientTracker Cloud
Click the Send as Email button, and the above tasks are completed automatically. You wind up on the Communications Compose screen, with the PDF ready to send as an attachment.
ClientTracker Desktop
This can be very fast and convenient when you get the hang of it, but you must follow these instructions exactly, and have the following requirements in place:
INSTRUCTIONS
- Set and confirm your Default File Path (see <<455>>)
- Install and know how to use PDF-making software (on Mac this is built in; on Win many free programs are available). See <<991>> for more details on how PDF software works. Installation and management of PDF-making software is your responsibility, and is not covered by Ginkgo Software support.
- The Client must have a valid email address marked "Use" (or use the override to send to someone else - see <<993>> for more info)
- Your email sending method must be set up and tested (see <<426>>)
(Instructions and graphic are for Windows, but Mac is very similar)
- Click the Send as Email button, and your system Print dialog will appear, where you have a choice of which printer to use. Select your PDF option, and click Print.
- A new window opens, asking you where you want to save the PDF (see graphic below)
- Navigate to your Default File Path location and select the folder (we recommend using the ClientTracker Files-Photos folder located inside your ClientTracker folder)
- Confirm your Default File Path (in Settings/Program/Utilities) before you do this the first time, and navigate to that location. You must save the PDF in your Default File Path location for this feature to work properly.
- The first time you do this, ClientTracker will create a new folder called "Attachments" inside the folder you select. From then on, you should always select the Attachments folder.
- If you always do this the same way, your PDF-making software will probably remember this location, and you won't have to navigate to it the next time.
- The file name is created automatically, and must be pasted (Ctrl+V) in the proper place. Do not change this after it is pasted. Do not type any other file name or the Files and Communications records will not link to it.
- Click Open or Save, and the PDF file will be created, and the rest of the above tasks are completed automatically, so that you wind up on the Communications Compose screen.
- Compose your email, or apply a Communications Template you created for that type of email.
- Click Send, and your email will be sent with the PDF file as an attachment.
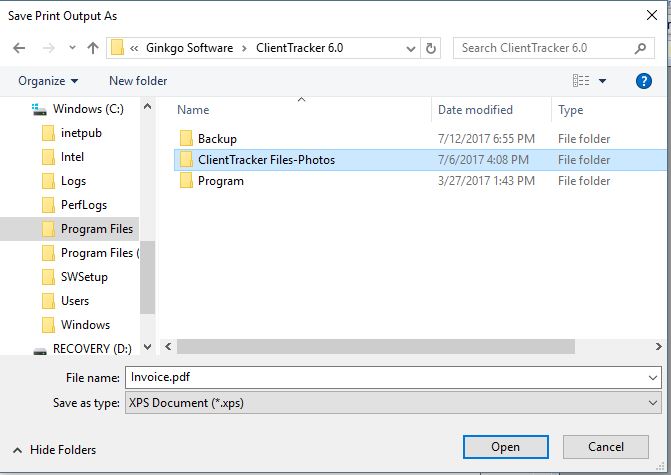
Tip: You can open the file and view it like any PDF, by clicking on it in the Attachments tab of the Compose screen (before or after you send the email), or in the Client's Files list.
Details in this section include:
- <<553>>
- <<554>>
- <<556>>
- <<557>>
The QuickFinder - The small QuickFinder appears with selected portals in a pop-up window; used throughout ClientTracker to select a single record. For example, the pop-up QuickFinder is used to choose a product for an invoice, or a client to make an appointment. See <<554>>.
A larger QuickFinder is available on most List screens, and is a fast way to find one or more matching records based on criteria entered about the information displayed in the list. In this type of QuickFinder, special search operators can be used to enhance your search. See <<553>>.
Tip: For all QuickFinders, the match results in the portal or list will change with each keystroke, so often you only need to type a few characters to get what you want.
Find Icon - Some areas have a Control Panel button, or icon, to search for records in that area by multiple criteria. Each of these are specific to the area, and are discussed in the corresponding section of the manual.
Find Clients - The icon available on Client Area screens will offer a more detailed set of options for combining search criteria to locate one or more clients. See <<24>>.
- This method is also available when finding a client to use as a recipient for communication.
About The "Found Set"
When one of the methods for finding information returns more than one matching record, you have a "Found Set" of records. This is a very powerful tool for running reports, customizing printed lists, comparing like (or unalike) records, or crunching numbers.
The contents of a Found Set are usually displayed on a List screen. The Record Navigator (shown here) will indicate how many records are in the Found Set, and which record is active in the sequence.
For example, you could find a set of Invoices with a similar status, and then view any Invoice's Detail screen. From there, use the Record Navigator's or buttons to go through the records in the Found Set like pages of a book.
Most List screens have an button with which to temporarily remove a single record from the Found Set. A record omitted from a Found Set is not deleted from ClientTracker. To see all records not included in the Found Set, select Records --> Show Omitted Only from the Main Menu at the top of the ClientTracker window.Note: A Found Set is retained if you use the Back and Forward buttons in the Functions Bar to navigate. If you select an icon for a Main Area from the Navigation Panel (right side) of the Function bar, or click a "Show All" icon, the Found Set will be replaced by all the records in that area.
A large QuickFinder is in the footer of most List screens. It is comprised of two oval entry fields, a help button, and a text display showing the current Found Set. The smaller oval on the left defaults to "All," meaning all the records are showing. Click in this field to see a drop-down list of the searchable columns. Choose "All" to search in all the fields listed.
First choose a column on the left, then enter one or more characters in the right oval field to display records that match the search text for the selected column. Choosing "All" columns will display search results that match any of the columns in the drop-down list.
As you type your criteria, the records in the list above are immediately changed and the find results are displayed below the oval fields, telling you how many records are found and the total number of records in ClientTracker. For example it might say, "308 records found, in a total of 954." Each time you type a new character, the find results are updated.
Find results are known as a "Found Set" (see above for more info).
The Found Set resulting from the use of a QuickFinder can be sorted, printed, or used for other output. When you type any new character or select a different column, ClientTracker sees this as a new find request, and any existing sort order is cleared.
To clear the QuickFinder fields and show all records, click the white X that appears on the right when any search text is entered. Otherwise, the find text and results will be retained in the List screen until you clear them.
Tips for Finding Information with a QuickFinderText - Any text you type will display results with each keystroke.
"a" will return africa, animal, apartment, apple, and application
"ap" will return apartment, apple, and application
"app" will return apple and application
Advanced Search Options for a List Screen's QuickFinder
Dates - Date fields will start finding as soon as the first number is entered. For example "9" gives you all September dates; for all years in ClientTracker. Similarly, "9-15" would display 9-15-07, 9-15-08, 9-15-09, etc. The most reliable results are from using full dates, or in combination with Search Operators.
-
Use date format 9-15-09 or 9/15/09 or 9.15.09.
-
Year can be entered as 2 digits (09) or 4 digits (2009).
-
Use > or < to find before or after a date; e.g. >9-15-09.
-
Find a specific date range by separating date "from" and date "to" with 3 dots, e.g. 9-1-09...9-15.09
Use the wildcard operator * to find all dates in a month or year; e.g. 9-*-09.
-
Use > or < to find greater or less than a number
Find a numeric range by separating with 3 dots; e.g. 1...99
- Do not enter a $ for searching for dollar amounts
Phone Numbers - Only works if phone numbers are entered in the format: 702-345-7777 (i.e. no parentheses)
Starts by searching on 1st digit (Area Code, if that is entered - or prefix if not)
FOR ALL TYPES OF DATA
-
Find all blank values by entering =
-
Find all non-blank values by entering *
-
Find all duplicate values by entering !
Find a literal value by entering = in front; e.g. =John finds "John" but not "Johnson"
Whenever a new column heading is selected, the search criteria is cleared.
Existing sorts are reset when:
For more information, see <<556>> or <<557>> below.
A new column heading is selected
A new character is typed in the search criteria field
The reset (X) button is clicked
Shift+click on the column header
A smaller version of the QuickFinder works with small lists, or portals. It searches almost always on text, and does not use Search Operators. In other words, it works like a type-ahead list, where typing the first few letters of a name or word will show only matching records. Some QuickFinders allow you to search by a drop-down list of values, e.g. client Category.
The QuickFinder is used when selecting a single record for a specific purpose, i.e. to add a product to an invoice, or to make an appointment for a client. The QuickFinder is an orange-bordered field with a small magnifying glass, and is found in many places.
EXAMPLE: Using a QuickFinder is when selecting a client for an appointment. When you click the New Appointment icon in the Calendar area, a small pop-up window appears, with a portal of all active clients. Each time you type a letter in the QuickFinder above the portal, its contents change to show clients whose first, middle, or last name matches the typed letters. The best way to learn how the QuickFinder works is to try it!
-
In QuickFinders, whatever text you type will be evaluated from the beginning of any word in the column. For example, a "p" for Description will find "Psychological Trauma" and "Knee Pain"
Use common search operators such as those listed below.
> finds any alphanumeric value greater than that entered
< finds any alphanumeric value less than that entered
* acts as a "wild card" symbol:
"*p" finds any word with a p that does not begin with p
"p*" finds any word that ends in p
A space between the find text will find for both; for example, "p t" returns records with words beginning with both p and t
Finding numbers requires either a whole number or the use of search operators.
EXAMPLE: "1" will find the number 1; but not 10, 100, 111, etc.
Find Process (true for all Advanced Find layouts):
If only one item is found, you go to its detail screen.
If >1 found, go to List
If none found, error message & return to Find screen
Search operators (also referred to as "symbols" in ClientTracker) can be very useful when performing a search using the Advanced Find button.
Use a symbol before a value to define the search criteria:
= match whole word or match empty
- =Smith returns Smith, Smithey & Smithson
- = returns all records with no values
== match entire field
- ==Smith returns only Smith
! find duplicate values
- !Smith returns all records with Smith
> greater than value
>= greater or equal to value
< less than value
<= less than or equal to value
... range
- 20...30 for Age returns all ages 20 thru 30
- 5/1/10..5/31/10 returns all for May 2010
// today's date
"" literal search (enclose your criteria in quotes); very useful when searching by email address
The necessary files and folders for the proper function are contained inside the main ClientTracker 6.0 folder.
Location of the ClientTracker 6.0 folder
Unless you placed it somewhere else when you installed the program, this folder will be in:
- Macintosh: Your ClientTracker 6.0 folder is in your
Applications folder.
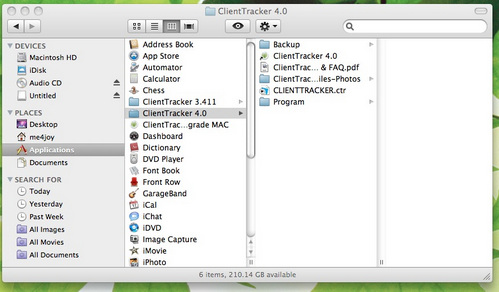
- Windows: Your ClientTracker 6.0 folder is at this location: C:\Program Files\ Ginkgo Software
Note: If your computer is a Vista 64 bit or Windows 7 64 bit, the folder where Ginkgo Software is installed is called C:\Program Files.
Contents of the ClientTracker 6.0 Folder - Both Windows and Macintosh
Your computer settings may or may not display any "extensions" on a file name, i.e. the .ctr .exe or .app that follows at the end of the file name.
- Backup folder - copies of your data files
- ClientTracker_1.ctr (up to _9) (see <<293>> for more info)
- Overwritten folder
- ClientTracker.ctr - file with all your data.
- ClientTracker Files-Photos folder - any files and photos you may have attached to records. (see <<456>> for more info on to how to move this elsewhere)
- Program folder - files and folders that run ClientTracker and should not be moved or altered.
- ClientTracker.exe (or just ClientTracker on a Mac) - the program's executable file or application. Your shortcut or alias points to this file to open ClientTracker.
- Miles.ctr-Enables use of ICD-10 codes and Code library
- Extensions folder - files and folders necessary for functioning of ClientTracker.
- Windows has additional files and folders necessary for functioning of ClientTracker. These 5 folders and 36 .dll files should also not be moved or altered.
ClientTracker does not have a way to export all the information that is part of an invoice. However, many people successfully use ClientTracker in conjunction with Quickbooks. Many people use the ClientTracker reports for all that tax reporting needs. It's up to you and your accountant for what is best for your practice.
ClientTracker keeps the details of clients/patients, their invoices and payments, and sales of herbs and supplements. Using ClientTracker to manage these details provides the additional benefit of having all the clients' electronic medical records, in one place: including financial data which is connected to all the scheduling, SOAP notes, insurance information, 1500 form, electronic billing, and marketing information.
ClientTracker has a very simple check register for one bank account to track checks and ATM charges from that one account. It will give a simple report by category of Income and Expenses. It doesn't have a payroll function or provide you with a balance sheet. ClientTracker does not claim to be a full accounting software. Depending on the practice, many small offices do find it sufficient to provide reports to their accountant for taxes purposes.
To use QuickBooks for your full accounting needs, we recommend keeping your invoices and their payments, and inventory in ClientTracker. Create a Customer in QuickBooks called "ClientTracker." Then run the ClientTracker report(s) you need for the time period: Transactions, Payments Log, Posting Log, Liabilities, Accounts Receivable, Sales Tax, and possibly the inventory reports. Take the total(s) and enter them manually into QuickBooks. Now you can run the balance sheet and profit and loss reports from QuickBooks.
This saves the hassle of double entry of all the detail, in both ClientTracker and QuickBooks.
![]()
Before you enter clients and appointments and use ClientTracker, you should go to the Settings area and set up basic information and options related to the program, and to your practice. You can also customize diagnosis and procedure codes, and customize the look and functions of your ClientTracker program.
Settings has the following areas; divided into main tabs and subtabs:
Practice Tab- See <<244>>
- Practice Settings
- Sales Tax
- Practitioners
- Rooms
Program Tab
- Defaults - See <<224>>
- Financial - See <<291>>
- Print - See <<288>>
- Utilities - See :<<623>>
- Value Lists - See :<<260>>
Diagnosis Codes Tab or Procedure Codes Tab - See <<254>>
The main Settings/Practice tab is where you enter contact information, sales tax options, and other information about your practice. Choices include:
- Practice Settings - <<245>>
- Entry and storage of main information about your practice which is used throughout ClientTracker
- How to use ClientTracker for multiple locations (with the same practice name) <<943>>
- Practitioners - See <<1047>> for info about managing Practitioners and their settings.
- Rooms - <<252>> and <<253>>
- A list of rooms used on the Calendar to schedule clients.
- Sales Tax - <<246>>
- <<689>>
- <<661>>
- <<768>>
- Other Information - <<241>>
- Access to other practice-related lists:
- SOAP Templates - <<494>>
- Referring Providers - <<447>>
- Non-Client Insured - <<41>>
- (Available in v5.2 or higher) My Resources <<983>>
Enter the contact information for your practice in this area, including practice name, address, phone and fax numbers, email address, and web site.
- The Practice Name is keyed to your registration, and cannot be changed except by getting a new registration code from Ginkgo Software.
- To get a new code, copy & paste this URL into your browser:
http://ginkgosoftware.com/registration/request_code.php
When you get your new Practice Name, go to the Program tab and: - Click View Registration Information
- Click the Edit Registration Info button
- Enter your new Practice Name and Registration Code
- Also enter an Activation Key if required
- Click Complete Registration to save
- Check the Print tab in Settings/Program to make sure your invoice header appears as you want it to. See <<289>> for more info.
- The practice address is used throughout ClientTracker on letterhead, invoices, reports and envelopes, and may be used to generate a Google Map of the practice location for automatic email confirmation. See <<428>> for more information.
Note: In order for the Practice Address to show on invoices, you must go to the Program/Print tab and click the Reset Address button. This should be done if you want to change the address, too. See <<289>> for more info.
Tip: You can click on the ZIP link, and a web site will open for looking up the ZIP+4 Code for your address. You can edit the URL of the web site in Settings area, on the Programs/Utilities tab.
- The email address is the default used as the "Reply To" address for email sent from ClientTracker, unless you change it in Settings>Program>Defaults. See <<426>> for more information.
ClientTracker is built to handle only one practice address in Settings, which is used throughout the program. Having a separate ClientTracker account for your 2nd location (with a different practice name and address in Settings) would require the purchase of another license (cloud or desktop). That is the ultimate option, if the following workarounds are not desirable.
How to Work with 2 Practice Locations
- Your "main location" would be in Settings/Practice
- To see schedules for both locations, you can make different Rooms or Practitioners (even to have two versions of a single practitioner)
- The info for each practitioner would show in Box 33 of the 1500 if you Toggle
- The
info from Settings/Practice will show in Box 32 (Facility Location) of
the 1500. You can type something in that box to override the default,
and that will copy forward to future 1500s for each individual client.
- Clients can be assigned to any practitioner. Some people with 2
locations use Category to note location. If patients might use either
location, choose the best one.
- The header info that shows on reports,
letters, and invoices can be customized, except for the Practice Name.
You could conceivably have both practice
addresses just below your name, and circle one when printing an invoice
for someone. Click here to see how to change this info.
- When you send an appt confirmation email (ACE), if it includes directions to your location you can add to the template to show directions for both. There is no way to have separate ACE templates for 2 locations.
New in 6.2.04, we have added the option to have multiple templates for each practitioner. There is One for the new client, one regular email reminder and one text reminder per practitioner. This is the perfect solution for multiple locations. If you have already created an additional practitioner for insurance billing, all you need to do is edit the new practitioner templates to reflect the different addresses!
In ClientTracker, you can create as many rooms you need to manage your practice, but there must always be at least one room. Rooms have no detail information, and are managed on a portal on the Settings/Practice/Rooms tab. If you want to make a new room, click the button. When you create a room, it is automatically designated as "Active" so it will show in drop-down lists and on the Column View of the Calendar (when View by Room is chosen).
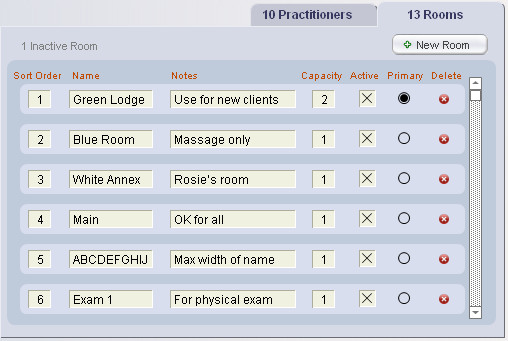
- The sort order of rooms can be set by entering numbers in the rows of the portal
- A primary room can be designated, and it will load as the default for appointments, except for those made from a specific Room column on the Calendar Column Views.
- The Name is what will show on appointments, the calendar, and on printouts. You can rename a room at any time in the list, and the changed name will apply to all appointments already made for that room; both past and future.
- Optional Notes are available only on the portal. these will not show anywhere else.
- You can deactivate a room, and it will remain on the master list, but will not show in drop-down lists or the Column View of the Calendar. (See below.)
- The Capacity of a room is used only if you check the "Use Room Capacity feature" box in the Settings area, on the Program/Defaults tab.
- The number indicates how many appointments can be scheduled for that room; for the same time slot (including overlapping times). The default is a capacity of 1, which means only one appointment can be scheduled. If a room is used for more than one client at a time (e.g. groups), set the capacity accordingly.
Similar to the rules for deleting and deactivating practitioners, there are rules that govern the management of rooms. You will not be able to delete or deactivate a room if any of the following are true:
- One or more future appointments are scheduled for that room
- Remedy: A list of any scheduled appointments for that room will be available for rescheduling.
- The room is the last one remaining on the list, or is the last one designated as "Active."
- Remedy: Create a new room first.
Warning: Deleting a room is permanent, and if you re-enter a room with the same name, it will NOT link up to any existing appointments in ClientTracker.
At the bottom of the Settings/Practice area, you can enter the following information:
- Bank Account Number - shows on a deposit slip generated from ClientTracker
- Facility NPI - is the default NPI on 1500 Insurance Claim Forms, Box 32a and 33a
- Business License Number - for your information only; doesn't show on any ClientTracker report
- Renewal Date - for your information only; doesn't show on any ClientTracker report
The button takes you to a sortable list of SOAP Templates used in ClientTracker, including the System Default plus any new SOAP Templates you create. For more info, see <<494>>.
The button takes you to a sortable list of providers that refer clients to your practice, and can be used on the 1500 form, Box 17. (See <<447>> below for more info.)
The button takes you to a sortable list of people who are not clients in ClientTracker, but are designated for use as "Insured" on client insurance policies. For more info, see <<41>>.
Referring Providers List
 To view a sortable list of providers that shows client referrals, click the button near the bottom of the Settings/Practice tab.
On the list, you can perform the following actions:
- Click the column headers with a sort symbol to toggle between ascending or descending sorts of the records shown. Shift+Click a column header to unsort.
- Click any row to view or manage details on a provider
- Click the icon in the Control Panel to add to the list
- View information about clients referred to your practice by that provider
- Click to generate a Thank You Letter or email for a provider
- Click the Active checkbox to show the provider on other lists in ClientTracker, or uncheck to inactivate.
- Click to a provider from the list temporarily, or click the icon in the Control Panel.
Referring Providers Detail Screen
On the left side of the screen, enter the provider name, address, phone numbers, email, and optional notes. On the right side is insurance information such as License Number, Federal Tax ID, and NPI.
On the far right is a Specialty field with a drop-down list.
- You can add to the list of values in Settings/Program/Value Lists, or
- You can enter an "Other" value that will not be part of the list, by selecting that option
Communications tab - Providers can also be recipients of communications. On this tab, you can view a portal of the communications sent to this provider or generate a new one with the Comm Panel just above it. You can also view a Complete List of these communications, in a larger, sortable list.
For more information on how communication works, see <<153>>.
Clients Referred tab - This tab shows a portal of all clients who have been referred to your practice by this provider. For each client, you can click the arrow button or row to view their Personal screen, view the date of their first appointment, or enter a date when a Thank You was sent to the provider for that client's referral. The number of invoices and Total for that client shows on the right.
- A client's row is highlighted as follows: no color if no Thank You letter has been created, orange if the Thank You letter is pending and "TY Letter Sent" date is blank, pale green if the TY letter is sent.
Just to the left of the tabs is a button, which will generate a Thank You letter or email to thank the provider for all the client referrals that do not yet have a TY Letter Sent date. You can also view a Detailed List of the referred clients.
1500 tab- ClientTracker automates many of the tasks of filling in a 1500 claim form. A referring provider can be chosen before an invoice is made (on the Clients/Personal screen), or at the time you fill out the 1500. To automatically fill info on the 1500 claim form, the following info needs to be entered for the referring provider:
- License Number Default - When you assign a provider as the referring provider for a client; or directly on a 1500 in Box 17, the following are filled in:
- Box 17 Provider Name
- Box 17a Qualifier and State License Number (or optional identifier, below)
- Box 17b NPI
Tip: If a provider doesn't have a License Number, then fill in the 1500 tab info on the provider's Detail screen; for example, if a different number needs to show in Box 17a (Qualifier + Identifier). For more information, see <<577>>.
ClientTracker's sales tax system is set up to accommodate the varied reporting requirements for the USA and in Canada. You can enter sales tax rate or rates you are required to charge on taxable products and/or procedures. You can also control how and for what items those rates are charged when they appear on an invoice.
Before You Begin
The first thing is to determine what are your sales tax requirements for your practice location. Most practices know this already, and will simply need to set up ClientTracker with the correct information.
ClientTracker allows the entry of single or multiple rates. One or two rates can be entered and assigned to different Inventory items (a.k.a. "Products" on an invoice) and Procedures, as required in your area. Each rate can be made of up to two compound parts that will show the total tax charged for each part on invoices and reports.
All rates and their parts can be given a name of your choice, to make selection and interpretation of reports easier.
Sales Tax Options - Available to select for Products and Procedures:
(none) - The default setting shipped for ClientTracker, and is always an available choice. No sales tax will be charged for any Product or Procedure. - One Rate - A single percentage rate will be available
- Two Rates - Two different percentage rates will be available
- Compound - Two different rates available in selection lists; however, on invoices and reports will show as compound parts (based on information you set up)
Check your state tax laws for the collection rules in your area, or check with your accountant. Usually, you are required to collect sales tax only for the rates that apply in your area, regardless of where the client lives. If you sell products by mail, you may not have to collect sales tax for out-of-state sales.
Tip: The ClientTracker program has built-in examples of how your Sales Tax choices will appear on a printed invoice. To see these, click the Set Rates button on Settings/Practice, and look at the Examples tab.
How to Set Up
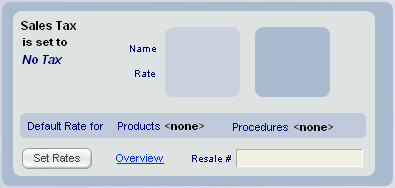
To Begin: Click the button to enter the Sales Tax Rate Setup screen.
Review: We recommend you explore the 2 tabs on the Sales Tax Rate Setup screens, to get familiar with the process:

- Overview - Basic information about how the ClientTracker Sales Tax system works. See <<689>> for more info.
- Set Rate - Contains controls and instructions to set your practice sales tax rate in 5 steps. The first thing you do will be to choose one of the Tax Rate setup options in Step 1. See <<661>> below for more info.
As an optional reference, enter your tax account number in the box marked "Resale #" at the bottom which shows on the Sales Tax report.
ClientTracker's sales tax system can accommodate many varied reporting requirements. Once you set up or change your rate(s) and assign a default to products and/or procedures, then this rate is used for all future invoices.
Look at the Example tab to see how the different Rates show on an invoice.
In the Sales Tax section of Settings/Practice, click the button and follow the 5 steps. Use these steps to set up your tax rate for the first time in ClientTracker or to change an existing rate.
Step 1 - Choose Your Tax Rate
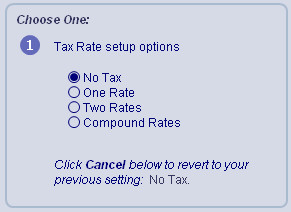
One Rate or Two Rates - Most locations will enter their rate on the One Rate or Two Rates tab because the invoice only needs to display the tax total. This works for those who have:
-- one tax rate for products and/or procedures
-- a different rate for products and procedures
--a second rate for some items
The Sales Tax report gives the total tax collected for each rate, and from that you can fill out your taxing agency?s reporting form. If your area has the total tax subdivided into percentage for State, County, etc, the form guides you in specifying those amounts.
Compound Rates - If your reporting agency requires an invoice to display the names and amounts of the tax parts, choose the Compound Rates to enter tax rates. Fill in the name for Rates 1 and 2, and set up the two parts for each, or at least two parts for Rate 1 and one part for Rate 2. The Sales Tax report provides each of the four parts.
Tip: Look at the Example tab to see how the different Rates show on an invoice.
Step 2 - Enter Your Tax Rate for Products and/or Procedures
The Tax Rates are referred to as Rate 1 and Rate 2. Each has a Rate Name, and a percentage Tax Rate, and using Compound Rates, the Part Name.
- Rate Name - The name used to choose the the rate assigned to Inventory items (Products) and Procedure Codes.
- Tax Rate - This tax rate will be charged for any Product or Procedure Code to which it is assigned.
- Part Name - For the Compound Rate only, this shows on an invoice and sales tax report.
Select a default rate for both Products and Procedures. If no tax is to be the default, choose (none). This will be assigned automatically as new Products and Procedures are created. If you are updating existing tax rates, it will also replace the former corresponding rate with the new one. For example, the new Rate 1 Rate Name + Tax Rate will replace any existing Rate 1 Rate Name + Tax Rate
- Optional: Check the "Change all that have the other Rate" box to apply this rate to existing Products and/or Procedures that have the other Rate.
- Optional: Check the second box to apply the Rate to existing Products and/or Procedures that are set to (none)
.
Step 5 - Set the Rate
When finished, click the
-- For any individual Product or Procedure, you can change the default tax rate on the master list for Products and Procedures.
-- The tax charged on all future invoices will be the new rate. Any invoices created in the past keep the old rate that was in effect at the time the invoice was created.
DETAIL 1 - One Rate - the most common option
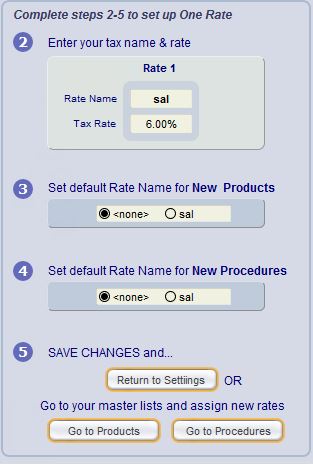
Step 1 - Select One Rate as the setup option on the left.
Step 2 - Enter the Rate Name & Tax Rate for Rate 1.
-- Enter a Tax Rate either with the whole number or with 2 decimal places. No need to enter the % sign.
Step 3 - Set the default Rate Name for new Products (either "none" or the one Rate Name you entered).
-- (Optional) Choose whether to apply this rate to Products that have another Rate Name.
-- (Optional) Choose whether to apply this rate to all Products currently set to "none"
-- (Optional) Choose whether to apply this rate to existing Procedures that have another Rate Name.
-- (Optional) Choose whether to apply this rate to all Procedures currently set to "none"
Step 5 - Click the button. Your changes will not be applied until you click this button.
---------------------------------------------------------------------------------------------------------------
DETAIL 2 - Two Rates - no compound "parts" needed
If
you have to collect two different Tax Rates, use the Two Rates option, for example, if you have one rate for Products, and another for Procedures.
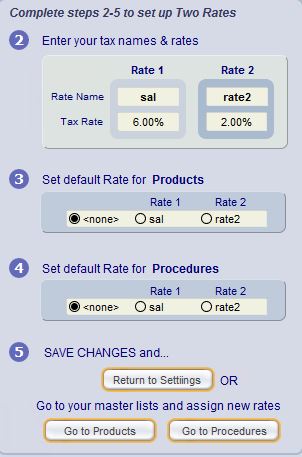
Step 1 - Select Two Rates as the setup option on the left.
Step 2 - Enter the Rate Name & Tax Rate for each Rate 1 and Rate 2.
-- Enter a tax rate either with the whole number or with 2 decimal places. No need to enter the % sign.
Step 3 - Set the default Rate Name for new Products (either "none" or one of the Rate Names you entered).
-- (Optional) Choose whether to apply this rate to existing Products that have the other Rate Name.
-- (Optional) Choose whether to apply this rate to all Products currently set to "none"
Step 4 - Set the default Rate Name for new Procedures (either "none" or one of the Rate Names you entered).-- (Optional) Choose whether to apply this rate to existing Procedures that have the other Rate Name.
-- (Optional) Choose whether to apply this rate to all Procedures currently set to "none"
Step 5 - Click the button. Your changes will not be applied until you click this button.
---------------------------------------------------------------------------------------------------------------
DETAIL 3 - Compound Rates - 1 or 2 rates with named parts
- ClientTracker will keep track of four totals: Part #1 and Part #2 for both Rate 1 and Rate 2.
- EXAMPLE: Some Canadian provinces require displaying on the invoice the separate Rates for GST and PST. By putting these types and rates into Rate 1 and Rate 2, your invoices will comply.
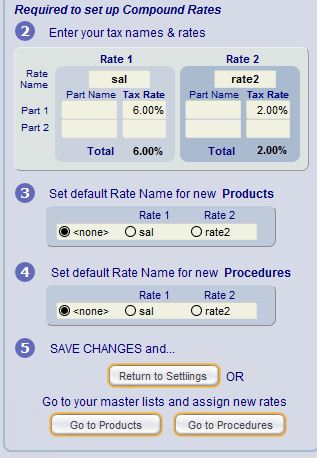
Step 1 - Select Compound Rates as the setup option on the left.
Step 2 - Enter the Rate Name for Rate 1, plus the Rate Name & Tax Rate for its Part 1 and Part 2. If needed, do the same for Rate 2.
-- Enter a tax rate either with the whole number or with 2 decimal places. No need to enter the % sign.
Step 3 - Set the default Rate Name for new Products (either "none" or one of the Rate Names you entered).
-- (Optional) Choose whether to apply this rate to existing Products that have the other Rate Name.
-- (Optional) Choose whether to apply this rate to all Products currently set to "none"
Step 4 - Set the default Rate Name for new Procedures (either "none" or one of the Rate Names you entered).
-- (Optional) Choose whether to apply this rate to existing Products that have the other Rate Name.
-- (Optional) Choose whether to apply this rate to all Products currently set to "none"
Step 5 - Click the button. Your changes will not be applied until you click this button.
Invoice - ClientTracker calculates the sales tax on each item individually. This is to accommodate the states which tax some products or procedures and not other products or procedures, or have different tax rates for the items.
Depending on your sales tax and the amount being taxed, the actual sales tax may result in 3 or more decimal places, which needs to be rounded up or down to be two places. The tax on an a ClientTracker invoice is the sum of the tax for these individual items.
If the sales tax calculation was postponed to be on the total of all taxable items, this tax might be a small amount more or less than the tax on calculated individual items. This is due to the rounding effect.
Sales Tax Report - This gives the totals of the taxable items and tax collected. From this you can fill out your taxing agency?s reporting form. If your area has the total tax subdivided into percentages for State, County, etc, the form guides you in specifying those amounts. The actual amount owed to the state or other entity is calculated from total Taxable Products and Taxable Procedures that you enter on the form.
The Collected Tax on the Sales Tax Report may be different from the sales tax calculated on the Total Taxable.
When you fill in the tax reporting form, you'll calculate the sales tax on the Taxable Products or Taxable Procedure listed on ClientTracker's Sales Tax Report. The result may be different from the tax you collected. This is due to the rounding mentioned above.
Your business is collecting Sales Tax. Your tax agency just wants to know the tax on total gross taxable sales for the time period, which can't be known at the time of each sale.
Beginning with version 5.2, ClientTracker has another way to store contact information.

Click the My Resources button at the bottom of the Practice screen to access your "My Resources" list of records. These are intended to be contact records of people or entities other than those handled in other parts of ClientTracker, such as clients, referral providers or vendors. This could be a terrific way to keep track of all the resources you use to support your practice - schools, coaches, favorite web sites, forums, landlord, local IT support, etc. Each listing allows up to 3 web URLs that can be opened with a click.
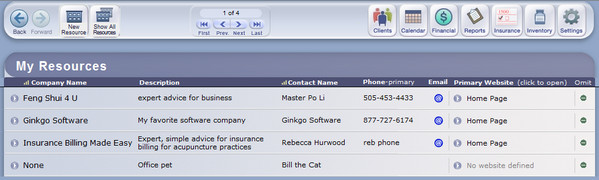
On the list screen, you can sort by Company or Contact Person, open the Primary URL in your browser (see below), or click a row to access the Detail screen. The Detail screen is divided into 2 parts. On the left are the contact elements, and on the right is a large Notes field for you to use. Aside from the obvious elements, here are some things you can do:
- Enter up to 3 URLs, and open them in your browser with a click of the Go button to the left
- Designate one of the URLs to be Primary, and it will also show on the List, where you can open it with a Go button without having to access the Detail screen
- Enter as many email addresses as needed, and click the blue @ button to the left to open a Send Mail window in your native email program. This email is not stored in ClientTracker.
- Turn into a Client - If your janitor (for example) becomes a client, use this to quickly create a Client listing from the details in your My Resources record.
- Delete a listing - The Delete button will permanently delete a record from ClientTracker.
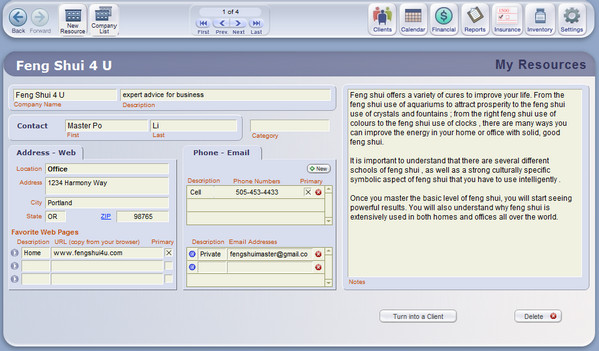
Here are some ideas for using "My Resources" (courtesy of Rebecca Hurwood, LAc, the author of "Insurance Billing Made Easy")
- Easy management of marketing contacts - Having networking
affiliates, providers you refer to, target market key players like
wellness fair coordinators, etc. - all in the same program as your patients
makes it easier to create referral lists and network.
- Easy management of service provider contacts
- Keeping track of outside or remote PR and marketing people, ghost
writers, laundry service, water service, utilities, etc. can be a
challenge. Having it all listed with your database keeps work and home
separate and coordinated.
- Networking Groups - Are you a member of a
networking or referral group like BNI or "I Take the Lead?" Keep track of
all your contacts and activity here and use the Notes field to refer and report on
activity.
- Affiliate Programs - Work with affiliate MLM companies? keep track of your contacts here!
Tip: What are your ideas for using "My Resources"? Let us know your needs, and we will have our Design Team consider them for possible future development. Our team adds new features from customer suggestions all the time!
The Practitioners list is managed in the Practice tab of Settings.
- This
is a flexible, sortable list of practitioners who work at your
practice. Click a row to enter and view expanded information about each
practitioner.
Details in this section include:
- <<1048>>
- <<1049>>
- <<1050>>
- <<1051>>
- <<1052>>
- <<1053>>
- <<1054>>
On the Settings/Practice/Practitioners tab, there is a portal where you can manage a list of practitioners that work in your practice. You can have as many practitioners as you want; however, there must always be at least one.
Note: ClientTracker uses the term "practitioner" for caregivers who work in your practice, and "provider" for outside caregivers who refer clients to your practice. For information about referral providers, see <<447>> below.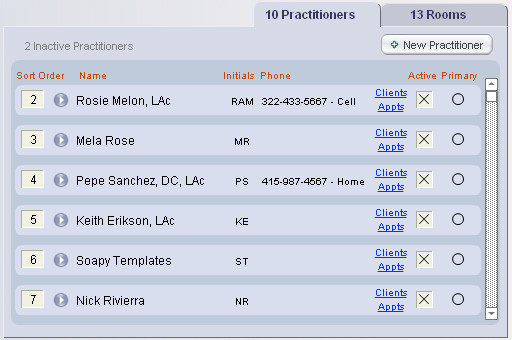
- Click a practitioner's name or button to access the
practitioner detail screen
- Change the sort order for this list, which changes the order of
columns on the Calendar Column View.
- Click a blue link to
see a List View of Clients or
appointments (Appts) for each
practitioner
- Check the Active box, or uncheck to deactivate a
practitioner (see below)
- One practitioner may be designated as Primary, and will be used for appointments in the absence of a specified practitioner.
- Delete practitioners (only those who have no clients, appointments, or invoices).
Create a New Practitioner
On Settings/Practice/Practitioners, click the button to begin. This takes you to the Practitioner detail screen, where practitioner data is managed.
- The minimum information that must be entered is first and last name. ClientTracker enters "New Practitioner" as a placeholder.
For other important information, you have the option of filling it in later:
- Credentials (e.g. M.D., LAc, P.T., etc.)
- Billing info (License, Federal Tax ID, NPI)*
- *required for the 1500 and Superbill invoices.
The fields above will be a pink color if blank, to alert you to fill in the information. Other information on this screen includes:
- Address, phone, email
- Invoice (1500) and SOAP template defaults
- Personal information
- Optional: Click to use the practitioner's designated insurance address and phone on the 1500, Box 33
Click the OK button when you are finished, and if you haven't yet entered the practitioner credentials or billing info, choose "Do Later" to return to the previous screen.
Note: You can quickly enter basic information about any practitioner and that will be enough to use them in the Calendar, SOAPs, and some other parts of ClientTracker. However, it is essential to 1500 and Superbill invoice functions to enter a practitioner's license, Federal ID and NPI numbers. You can also track practitioner contact information, email, etc.
Practitioner Detail Screen
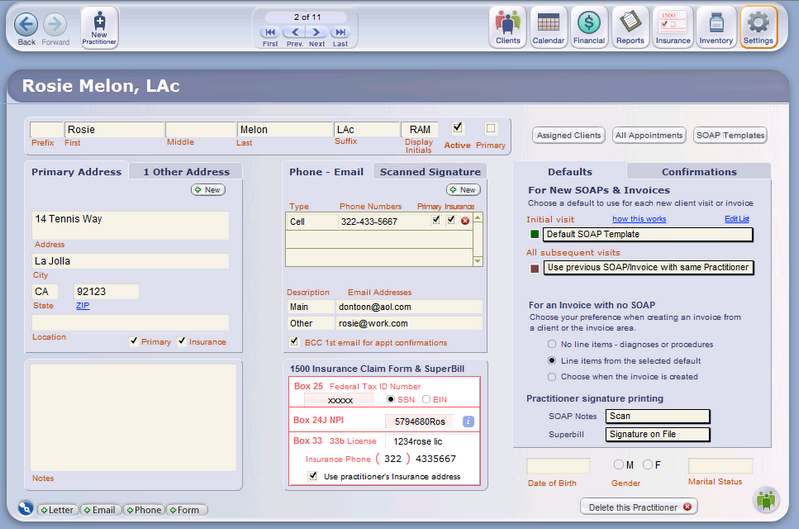
When you click a row in the practitioner list on Settings/Practice, you will access the Detail screen for that practitioner.
Top Section - Enter the practitioner name, suffix (or credentials), and designate as Active and/or Primary within ClientTracker.
Active
- This will make the practitioner's name show in drop-down lists and on
the Column Views of the Calendar, so appointments can be scheduled for
that practitioner (see below).
Primary - (There must be
one primary practitioner.) If a client does not have a default
practitioner specified on their Personal/Default tab, the Practitioner
designated as Primary will be automatically assigned to an appointment,
SOAP or invoice. Of course, you can always change a practitioner on an
appointment, SOAP or Invoice.
Display Initials - These are
used in ClientTracker to assist you in choosing or identifying a
practitioner in a few places, so they should be unique. As an example,
consider two practitioners named Elaine Smith and Edward Sterling. Both
initials will display as ES. You would need to modify one or both to be
unique, so their display initials might be ELS and EDS.
Address
- A practitioner address must be entered if the 1500 form is to fill
properly in box 33. If you enter just one address in the front (Address)
tab, it will automatically be designated as the primary and insurance
address.
- To enter additional addresses, use the 2nd tab (Other Addresses), and click the button. Once there are 2 or more addresses, designate any one of them as the primary, and it will show on the front tab and be used on the 1500. (Note: you can delete any address except the primary with the small "del" button on the 2nd tab.)
Tip: Click on the ZIP link, and a web site will open for looking up the ZIP+4 Code based on the Practitioner's address. You can edit the URL of the web site in Settings area, on the Programs/Utilities tab.
Contact Information - Phone and email addresses are added in the tab in the center of the screen.
-
Phone - The primary phone number displays on the Settings/Practice/ Practitioners tab. One phone number must be designated as primary, and then it can't be deleted unless another is designated as primary.
- Email - Enter up to 2 email addresses. There is no validation, and ClientTracker does not use them anywhere. You can copy them as needed.
- BCC option - Check the box BCC 1st email for appt confirmations and the practitioner will receive a BCC of all Automatic Confirmations of her appointments.
- Only the email in the 1st row is used, and it must be a valid email address to receive a BCC.
Defaults - See <<1050>>
Confirmations - See <<1053>>
Other Info
Personal Info - Enter practitioner Date of Birth, Gender, or Marital Status, if desired.
Buttons
Click the buttons near the top of the screen to see:
-
Show Assigned Clients - Clients for whom this practitioner is designated as the default (a sortable, searchable list)
-
Show All Appointments - Past , current, and future appointments for this practitioner in the Calendar portal, or list view (sortable)
- SOAP Templates - All SOAP Templates assigned to this Practitioner.
On the bottom of the screen:
- Delete This Practitioner - For the permanent deletion of qualifying Practitioner records from Client Tracker. For more info, see <<1049>>.
Active vs. Inactive
Only practitioners with the Active box checked will show on the Calendar Column Views and drop-down lists used to make appointments and other functions in ClientTracker.
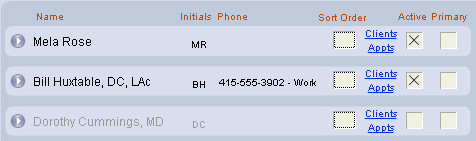
Tip: Often, a sensible option to deleting a practitioner is to deactivate them. You can check or uncheck the Active box in the Practitioners tab on Settings/Practice, or on the Practitioners Detail screen. This will not affect their being the practitioner of record for past or future appointments, reminders, or invoices.
The process of deactivation is governed by these rules:
- You cannot deactivate a practitioner who has future appointments scheduled
- Remedy: Show all the practitioner's appointments in the Calendar,
sort to see future appointments, and reschedule them to another
practitioner
- Remedy: Show all the practitioner's appointments in the Calendar,
sort to see future appointments, and reschedule them to another
practitioner
- You CAN deactivate a practitioner who has only PAST appointments, and meets the other rules
- You cannot deactivate a practitioner who is assigned as the default practitioner for any client
- Remedy: Go to the Practitioner Details screen, view the list of assigned clients, and update the client records as needed.
To deactivate a practitioner, simply uncheck the Active checkbox. To re-activate a practitioner, click the same checkbox.
Delete a Practitioner
If you want to delete a practitioner, click the button on the details screen. You will not be allowed to delete a practitioner if any of the following are true:
- One or more future appointments are scheduled for that practitioner
- Remedy:
Search for appointments in the Provider Details appointment list, and
reassign them to another practitioner or delete them as needed.
- One or more future reminders are created for that practitioner
- Remedy:
Go to Calendar and select to view All Appointments. Then select that
practitioner, locate Reminders in the bottom portal, and reschedule or
delete them as needed.
- The practitioner is set as the Primary practitioner
- Remedy: Create another practitioner record first
- Remedy: Create another practitioner record first
- The practitioner is the last one remaining on the list, or is the last one designated as "Active."
- Remedy: Create another practitioner record first
- Remedy: Create another practitioner record first
- One or more invoices are created for that practitioner
- Remedy: Deactivate practitioner instead of deleting. We recommend this for HIPPA.
- Remedy: Deactivate practitioner instead of deleting. We recommend this for HIPPA.
- One or more SOAPS are created for that practitioner
- Remedy: Deactivate practitioner instead of deleting. We recommend this for HIPPA.
Warning: Deleting a practitioner is permanent, and if you re-enter a practitioner with the same name, he/she will NOT link up to any existing records in ClientTracker.
Default Template for New SOAPs & Invoices - Select a SOAP Template, if desired, to be loaded for this practitioner.
-
For the initial visit with each client, pick a SOAP Template to be used (there is a default)
-
For all subsequent visits, you can select a SOAP Template or click the blue link, Use previous SOAP/Invoice with same Practitioner
-
To see more info about how this affects SOAP Notes, go to <<503>>
- To see more info about how this affects Invoices, go to <<574>>
For an Invoice with No SOAP - Set
your choice for how line items are auto-entered when an Invoice No SOAP
is created. This choice is enacted automatically when there is just one
practitioner in the office so you don't have to select each time a new
Invoice No SOAP is created.
- For more info re Invoice No SOAP, see <<107>>
Practitioner Signature Printing - Set Practitioner signature
printing options for SOAP Notes or the Superbill. There are 4 choices
that can be overridden for any individual SOAP Note or Superbill.
- Default (all choices blank) or Signature line: A signature and date line (to be signed manually after printing)
- No Signature line - Completely blank, showing nothing at all
- Signature On File - Same as above, with the phrase "Signature On File" where the signature would go
- Scan - A scanned graphic of the practitioner's signature (aka "electronic signature")
Billing and Other Information
- The pink & white panel at the bottom of the Practitioner screen contains optional information for
invoicing (if applicable for that practitioner).
-
Box 25 Federal Tax ID Number - Required for the 1500 and Superbill; optional for display on simple invoices, and can be designated as EIN or SSN.
- Box 24J NPI - Enter the practitioner's NPI number here. This number fills in Box 24J (Rendering Provider ID #) on the 1500 form. It can only be changed here.
This number can also be used for Box 33a. To use it in Box 33a, you need to do two things:
- check the box below ?Use practitioner?s Insurance address?
- on the 1500 form, click the Toggle button beside the Name - Box 33
-
33a National Provider Identifier (NPI) - Required for the 1500 and Superbill. (This NPI will also show in Box 24j when this practitioner performs the procedure.)
- 33b License Number - Required for the 1500 and Superbill; optional for display on simple invoices.
- Insurance Phone - from the phone number that has the Insurance box checked. If no phone number has this box checked, this area will be blank.
-
Use practitioner's Insurance address - If needed, check this box to show the practitioner's address in Box 33 of the 1500 claim form. There is a button on the form with which you can toggle between the Practice or Practitioner addresses for each 1500.
Scanned Signature
The Scanned Signature subtab is behind the Practitioner's Phones - Email subtab on the Practitioner Detail screen. Click +New Scan to add or replace an image you have already scanned and saved to your computer.
-- Suggestion: crop your scan to have as little white space as possible... this affects the scaling of the scanned signature image (see sample above)
Image Quality Tips:
- Ideal image size is about 800 x 300 pixels
- Have the practitioner sign a piece of paper with a thick pen, and scan it, then resize it to be about 800 pixels wide and save it
- The image file should be roughly proportionate in size to the space available above the signature on forms
- [Cloud Only]
- Use the system's Browser window to locate a graphic file on your local computer and upload it to the Cloud. See <<854>> for details.
Note: The signature scan becomes part of the data file, and cannot be exported or transferred. If you update ClientTracker to a new version, simply reenter the scan as above.
- For more info about Practitioner signature choices on the SOAP Note, see <<806>>.
- For more info about Practitioner signature choices on the Superbill, see <<809>>.
ClientTracker offers an OPTIONAL feature to use Custom Practitioner Templates for appointment confirmations. New features become available when you convert to this method of managing the confirmation messages your Clients receive.
Features Include:
- Separate Appointment Confirmation Templates for Email, Text, and New Clients
- If needed, you may set up customized information in each Practitioner's templates, according to her preferences
- Custom merge fields are available for Practitioner nickname and any message of your choice
- A new option in each Client's record lets you designate how they receive confirmations: by Email, Text, or Both
How to Convert to Using Practitioner Templates
- The button to convert is found in the Settings area, on the main Program/Defaults tab, in a sub-tab called Appointment Confirmations. Click the More button to see the controls.
- For more information, see <<1044>>
Once you have converted, ClientTracker will use the appropriate template for each appointment's Practitioner.
If at any time, you want to revert to the default appointment confirmation emails instead of the practitioner template, you can. Go to Settings> Program> Appointment Confirmation and click the button that says "more". Click the button that says Use Default Template and you will revert back to one template for all of your practitioners.
- For more info about the Templates themselves, see <<1054>> below
Note: When you first convert, all Practitioner templates are copied from your default Appointment Confirmation template, so they are all the same. The message seen by your Clients will be the same as it was before, until you customize your templates.
Other visible changes after conversion:
Practitioner Details
Controls and new fields for use with Practitioner Templates become available on the Confirmations tab. See <<1054>> below.
Client Personal Screen
The option to designate how each Client receives confirmations becomes visible on the Phone-Email tab.
Settings
The default confirmation option for new Clients becomes visible on the Appointment Confirmations tab. If activated, it will set all new Clients' confirmation choice to Email, Text, or Both.
Templates Manager
All Practitioner Templates will show in the Templates Manager list, found in the Reports area, on the Templates & Marketing tab. This list can be filtered by Category, including the Practitioner name. Select a name to see only their templates in the list. Click a row to view or edit any template.
After converting to Custom Practitioner Templates, all the templates will be the same until you customize them. Every Practitioner will have 3 templates, used for different purposes. There are 3 corresponding buttons to open and view or edit the templates.
New Client- Used when a Client is being seen in ClientTracker for the first time (you will see the Initial Visit flag or icon on appointment lists and the calendar).
- You might want to provide extra info for a new Client, such as forms or directions to your office.
Email - Used when a confirmation is sent to an email address.
Text - Used when a confirmation is sent to a text address. You may want a shorter message for this mode of communication.
Practitioner Confirmations
Before Conversion After Conversion

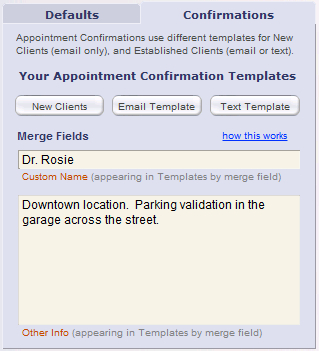
The Confirmations tab on the Practitioner's Detail screen also has a field to enter a Custom Name (for example, "Dr. Mary" instead of the full name used on superbills, etc.).
Another field called Other Info is an optional way to insert any custom text into a template, for example location info.
The above fields are inserted into templates by use of a "merge field." For more info about how merge fields work, see <<1046>>
When you click a button to view or edit a Template, you will have a variety of options on the Compose screen. For more info about how to edit and test Appointment Confirmation Templates, see <<144>>.
If at any time, you want to revert to the default appointment confirmation emails instead of the practitioner template, you can. Go to Settings> Program> Appointment Confirmation and click the button that says "more". Click the button that says Use Default Template and you will revert back to one template for all of your practitioners.
Section Details - Defaults Subtab
In this section, you will find details on the following parts of the Defaults tab:
- <<225>>
- <<236>>
- <<227>>
- <<226>>
- <<228>>
- <<990>>
- <<232>>
- <<872>>
The main Settings/Program tab has five smaller tabs, called subtabs:
Defaults
Set default information for how ClientTracker will function, and what information it will show. (See <<225>> below.)
Financial
Choose options for invoices, 1500 forms, and use of the Register feature. See <<291>> for more info.
Create a custom header for use as letterhead and headers on invoices, and choose other printing options. See <<288>> for more info.
Utilities
File management and backup options. See <<623>> for more info.
Value Lists
Define the contents of drop-down lists from which field values can be chosen throughout ClientTracker. See <<260>> for more info.
Enter an optional city, state, zip code and area code to be automatically entered in new client address record. You can enter partial information if you like; for example, you can enter "913" for a default ZIP code, and then enter the last two digits when filling out client address.

If your practice uses a client ID or chart number, you can choose your preferred name for this system.
- Choose "Chart #," "Folder #" or "Client#" from the drop-down list.
- To enter another identifier, click once to open the drop-down list; then click again in the field to type in it. This title should be no bigger than the available space to ensure it shows correctly on all screens.
- Leave the space blank if you don't use a client identifier.
To use ClientTracker's Automatic Appointment Confirmation system, see <<83>>:
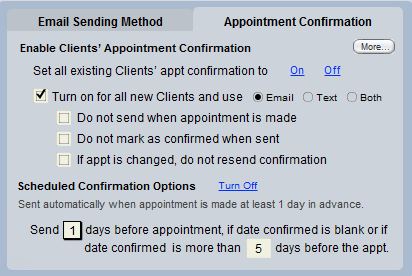
- Set all existing Client email confirmation to On - This will check the box on every Client's record that enables the sending of an automatic email confirmation if the client has a valid email address.
- Click Off to clear that box in each client's record, and disable the system
- See <<83>> for more information.
- Click to see other information about the Automatic Appointment Confirmation Email, including a link to edit the Template, or to preview your Google Map.
- There is an option to show or not show the End Time in the email.
- Include a link to a Google map of your practice location in the footer of every automatic email confirmation. The Google Map will generate from your practice address, which is set in the Settings/Practice tab.
- Click the Preview map link to open your browser and view what email recipients will see if they click the link in their email.
- Click the Preview map link to open your browser and view what email recipients will see if they click the link in their email.
- On the client's Personal screen make sure:
- At least one email is marked "Use"
- The box for Enable appt confirmations is checked.
- Also set up the Sending Email Method as instructed below.

- Method 1 - Send email
- This is an advanced option that uses SMTP protocol, and is intended for use with online email providers that use SSL encryption methods (or no encryption at all).
- Additional setup is required to use this option, and the Set up defaults link will show as red to indicate this.
- This is an advanced option that uses SMTP protocol, and is intended for use with online email providers that use SSL encryption methods (or no encryption at all).
- Method 2 - Do not send email
- You can still keep a record of email sent in ClientTracker, but it will not send email
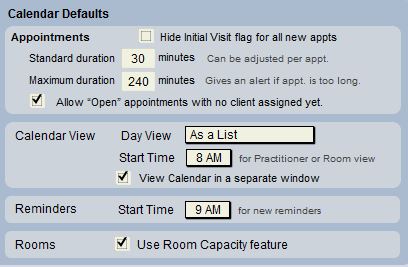
Standard - The number of minutes that appears in this box is the default duration for all new appointments that are created. Set it to the duration that is most common for your appointments (you can always change it for any appointment).
Maximum - ClientTracker will alert you if an appointment is made over this duration.
Allow for open appointments with no client assigned yet. Then easily assign those open appointments to new or existing patients.
New in version 6.2, ClientTracker allows you to make an appointment without assigning a patient. This makes setting up the calendar, a breeze.
Calendar View
Day View - Enter your preferred view of the Calendar when looking at a single day's schedule: Column View by Practitioner, Column View by Room, or List View
Start Time - (for Column View only) Enter the time you would like the schedule to start each day. The schedule is programmed to automatically end each day 12 hours later. Appointments can be made for any time; however, if they are made outside of the start and end times for the Column View, they will be visible only in List View and on printed schedules.
Access calendar in a second window. You can have your calendar open in one window for easy access, while you work on SOAP notes, Invoices, Reports or any other part of ClientTracker in a second window.
Reminders
Start Time - Enter a default start time for new Reminders.
Rooms
Use Room Capacity feature - Check this box to check the Room capacity each time an appointment is made. See <<252>> for more info.
Time Zone
Set your time zone if you plan to export appointments to other calendar applications or devices, to synchronize the times accurately.
Enter your choice for which screen you would like to see first whenever you start ClientTracker. (Ginkgo Software STRONGLY recommends you shut down ClientTracker at the end of each work day, to minimize the possibility of data corruption.)
- Calendar - Opens in the default Day View selected above
- Client List - Opens in the Client List screen for locating a client
Inventory - Checking this box will notify you when ClientTracker is opened if items in your inventory need restocking. For each inventory item you can choose an Order Level, and when your stock of the item reaches that level, ClientTracker alerts you when the program is opened.
Temperature - Values entered on the SOAP note will default to be marked as F (Farenheit) or C (Celsius). This can be changed on any individual SOAP note.
The appearance and contents of SOAP notes can also be customized by using SOAP Temmplates. See <<441>> for more information.
[Version 5.0] Copy products from previous SOAP
When SOAP Notes are copied for a Client's visit, you have the additional option to copy Products. Check the box on the lower right if you also want to copy Products forward. This choice applies to all practitioners.
This will apply to all Practitioners that have "Use previous SOAP/invoice with same Practitioner" selected for subsequent visits with the same client. See <<240>> for more info.
ClientTracker is shipped without passwords. Passwords are optional, but strongly recommended to assist you for HIPAA reasons. Without a password, anyone who can access your computer can also access all your ClientTracker data.
IMPORTANT: If you have upgraded from a previous version that used passwords, you will need to set them to be used the new way before your file is password protected.
Password Setup

Click the
button to go to the Admin Settings screen to set Admin, Staff, Receptionist or Practitioner passwords. Make sure to write down the passwords and keep them in a
safe place. If you forget your password, ClientTracker support can
provide you with a temporary password.
Note: These are ClientTracker passwords, and are different than any passwords used for Cloud or Operating System access.
The 4 levels of access are illustrated by this chart: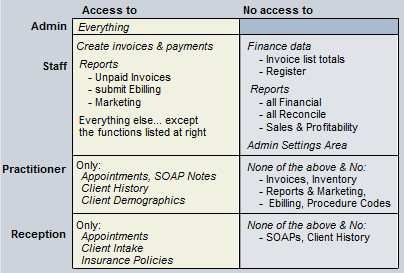
The process works like this
- Determine who will use each password level, and what you want the passwords to be.
- You do not have to use all levels, but one Authorized User must be the Admin level.
- Other password levels cannot be used unless the Admin level is set first.
- Set each password by clicking the Admin, Staff, Practitioner, or Reception buttons.
- When passwords have been set, a green check mark will show on each button.
- After setting the passwords, enter each Authorized User name, and assign a level. Multiple users can be assigned to the same level.
- To test a name and password without closing ClientTracker, click the blue link Test Password.
- Passwords are not activated until you check the "Activate Passwords" box.
- When passwords are activated, users will have to enter the exact User name and Password when they launch the program (Desktop), or after logging in to the remote connection (Cloud).
- The Access Log provides a record of who logged in and when (see <<872>> above for more info).
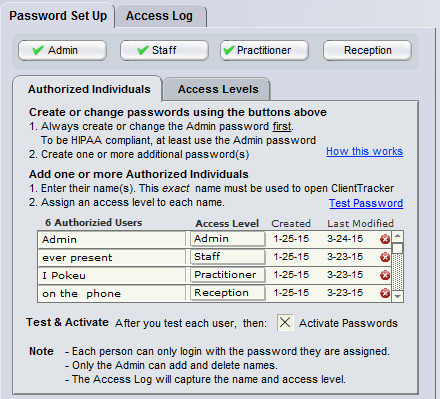
Note: Only Admin access level can get to this Password Setup area. All users have "admin" access (i.e. access to everything in ClientTracker) if passwords are not activated.
Tip: It's a good idea to write down the passwords and keep them in a secure place.
Changing PasswordsTo change a password, click one of the 4 buttons. Enter the Admin password and your new password.
Deactivating a Password
To deactivate a single password level, click one of the 4 buttons. Enter the Admin password and leave the "New Password" fields blank. To deactivate all of them, uncheck the "Activate Passwords" box (this leaves all the passwords in the program but no log in box will appear).
Lost Passwords
ADMIN OPTIONS If the Admin person forgets the admin password, a 1-day temporary password may be issued (to the Admin user only), which will clear all passwords (but not the assignments) and let you start over. Or, do the steps below for an Authorized User to get your Admin password.
AUTHORIZED INDIVIDUALS
If an authorized individual forgets their password, the first step is to contact the Admin level staff member and ask for the password. In other words, the person assigned to the Admin level is responsible for all the passwords.
If the Admin person is not available, or if you forget the Admin password itself,
- In the opening Password dialog, choose "lost pswrd"
- In the in the Lost Password dialog, choose "Help"
- Fill in the Contact Form with your name and position. This also transmits the passwords to Ginkgo Software support so we can assist you.
- AFTER doing steps 1-3 above, call our support number at (877) 727-6174, and identify yourself. To protect the privacy of your data, lost password assistance can only be provided by following these steps.
Important: Passwords will only be provided to a person listed as an Authorized Individual, and only at the level to which they are assigned. If there is any hint that this person is not authorized, Ginkgo Software support will not give any access information.
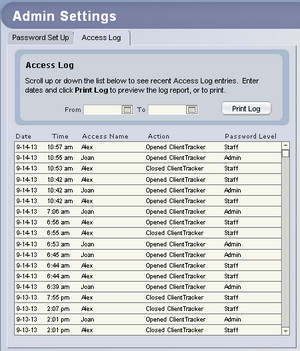
The Access Log shows who logged in to your ClientTracker and when. It provides a simple, printable log that can be limited by date range if desired. This works automatically - there is nothing for you to set it up. However, it is most meaningful when you also use ClientTracker passwords.
To view the Access Log, go to the Settings area on the Program tab. In the Defaults subtab, click the Passwords Setup button. This takes you to the Admin Settings screen. If you have no passwords set up in ClientTracker, anyone can view the Admin Settings screen. Once you have established passwords, only users with Admin access can view this screen and the Access Log.
The Access Log is in the blue tab of the same name, and is displayed as a small list with a scroll bar. It contains only the following information:
- Date
- Time of action
- Name of person opening accessing ClientTracker, but only if you have set passwords.
- The action performed: Opened, Closed, Failed Access Attempt
- Password Level the user signs in with: Admin or Staff. If you haven't set the password(s), then this says "No password"
- Opened ClientTracker
- Closed ClientTracker
- Failed Attempt
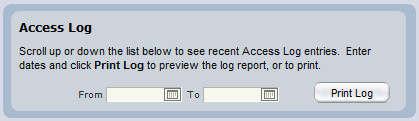
To Print the log, click the Print Log button. You can set a Date From and Date To for a smaller printed list. Entering dates does not affect the display in the scrollable list on the Admin Settings screen.
NOTE: The printout shows a 6th column, Login-User, which displays:
- Cloud - the access User Name on your computer or device
- Desktop - the User Name that is set the very first time you open ClientTracker
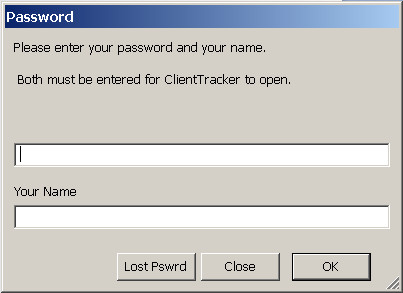
"IMPORTANT: This information is provided as a courtesy to customers still using older versions of ClientTracker. Support is not available for this section of the manual, and we recommend updating to the latest version of ClientTracker. click here for information how to upgrade.
ClientTracker is shipped without passwords. Passwords are optional. You can set one or two passwords: the Admin has access to every part of ClientTracker . The Staff level cannot set or change passwords or run financial reports. Correct entry of a password will be
required every time ClientTracker is opened if you set one or both passwords.
Password Setup
Click the button to go to the Admin Settings screen to set Admin or Staff passwords. Make sure to write down the passwords and keep them in a safe place. If you forget your password, ClientTracker support can provide you with a temporary password.

- Admin Password - Click and type the password twice to confirm. (Passwords can be any length that fits in the entry window, and are NOT case sensitive.) After successful entry, the button will say, Change Password. Clicking it again will require correct entry of the current Admin password before it can be changed.
- Staff Password - Click if you desire a more detailed level of security. The entry and editing procedures are the same. The Staff password can be set only after an Admin password has been entered.
Access Privileges
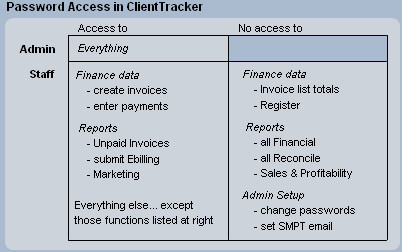
If only an Admin password is set, the only way to open ClientTracker is with the Admin password, which has access to everything. However, use of a Staff password will restrict access to the following areas:
-- Finance Data - Invoice List totals, Register
-- Admin Reports - All Financial and Reconcile reports, including Sales & Profitability for inventory.
Other restrictions not noted above:
Reports
-- Inventory Valuation Detail
-- Reset Inventory Balances
-- Diagnoses Given
-- Procedures Performed
All other areas of ClientTracker would be accessible after Staff login.
Video
Changing a Password
Change a password at any time
with Admin access by clicking the
button on the Settings/Program/Defaults tab. On the
Admin Setup screen, click either button to change a password. You will be asked
to enter the current Admin password, and the new password (twice to confirm).
To set ClientTracker not to use any passwords, leave the new password
fields completely blank for both Staff and Admin, and click .
Note: If you remove the
Admin password, the Staff password will also be cleared
automatically.
Opening ClientTracker with Password Protection
If you have
set any passwords, every time you open ClientTracker a Login dialog box will ask a password.
ClientTracker knows if it is for Admin or Staff. Other Login
options are:
- Click and ClientTracker will close without any access.
- Click to view information about how to contact Ginkgo Software for a temporary password.
![]()
[Version 5.0] A new Name field appears on the Password Login dialog box. This must have a name entered to continue. It will show in the "Access Name" field of the new Access Log (see <<872>> below).
Lost or Incorrect Password
If you have lost or forgotten your Admin password, click button in the Login box for for instructions on how to request a temporary password.
Once you receive your temporary password, open ClientTracker again and click . In the next box, click the button and enter the temporary password EXACTLY as it was received. Next, you will be asked to enter a new password of your choice.
If anyone tries to login more than 5 times with an incorrect password, they will see a warning box with the choice to close ClientTracker or contact Ginkgo Software for a temporary password.
ClientTracker Registration Information
Click View Registration Information to see the current info, including Practice Name and Registration Code. If passwords are set up, this can only be accessed by those with Admin privileges.
The Financial subtab in Settings/Program has the following options:
- <<291>>
- <<448>>
- <<449>>
- <<450>>
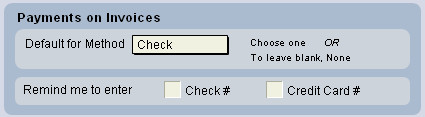
You can set default data to appear in Method field when creating payments - a time saver if this is usually the same thing. As with all defaults, this can be changed to something else on individual invoices.
When creating payments, if you leave the Check # or Credit Card # blank, you have the option of being reminded to fill it in before continuing. Check the appropriate box to enable these reminders.

Checking this box will display the client's account balance on the headers of client screens. The amount shown (if any) would be the total of the amounts due from the client, and any applicable insurance. These amounts can be viewed separately on theClients/Invoices tab.
A small "CR" will also show if the client has available credit for his/her account.

Checking this box enables use of the register. If it is checked, the Register tab appears when you click the Financials icon to view the main list of invoices. Use the optional Register to track withdrawals & deposits, and reconcile bank statements for one account.
See <<123>> for more information on the register.
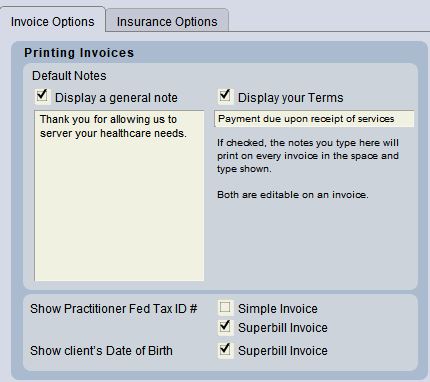
Default Notes
The Simple and Superbill invoice types have spaces for Notes and Terms.
Display a general note - Check the box and enter text to display a default note. Invoice notes are editable on a per-invoice basis, which you can do on the respective entry screen.
Display your Terms - Check this box to display default invoice Terms used by your practice. Terms are also editable on a per-invoice basis.
Note: Your text should not exceed the size of the entry fields, which represent the amount of space available on the printed invoices.
Show Practitioner Federal Tax ID Number
Check Simple invoice or Superbill invoice to display and print the Federal Tax ID Number (if any) of the practitioner for that invoice.
Insurance Options Tab 1500 Forms
Choose whether to print on Blank Paper, or on a Pre-printed Form. The Pre-printed form should be the Health Insurance Claim Form approved by the National Uniform Claim Committee on 02/12.
- If Pre-printed Form is chosen, an additional choice appears if you want to be reminded to load the forms in your printer during the printing process.
-
You can turn off the amount expected from insurance by going to Settings, Program, Financial, Insurance Options.

Details in this section include:
- <<289>>
- <<451>>
ClientTracker allows you to enter practice address, logo, and other information in one place, and provides flexible choices for how they will look on printed documents. If you have pre-printed letterhead, you can use that. You can change the print header settings at any time. ClientTracker ships with the default choices and placement that most closely resemble those in v3.41. See <<289>> below for more info.
The Settings/Print tab is also the place to make choices about the footers of printed SOAP notes, and provides info about pre-printed envelopes. See <<451>>.
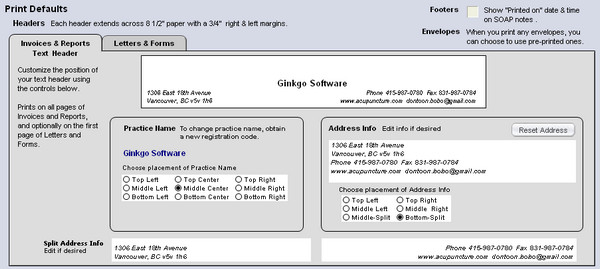
On Settings/Program/Print, there are two smaller tabs; each representing a choice of how you want your print headers to look throughout ClientTracker. Selecting one of these selects the header used on the first page of print layouts for Invoices & Reports, or Letters & Forms.
- Invoices & Reports = Text header only (with choice of text positioning) from your practice information in Settings/Practice,as displayed in the Address Info or Split Address Info areas.
- Letters & Forms = A choice of using either:
- Pre-printed stationery (i.e. no header will print from ClientTracker)
- Invoices & Reports header (text only) to print on blank paper
- Graphic header (i.e. a graphic image you provide) to print on blank paper
Additionally, for Letters & Forms, the "second sheets" (i.e. all pages after the first page) will print with a smaller text header and no practice info. The "second sheet" text header includes:
- Letters = The name of the recipient and the date
- Form = The Name of the Form
Note: All ClientTracker headers extend across 8 1/2" by 11" paper, with a 1/2 to 3/4 inch margin for all sides. The first page header area is about 2 inches high. The second sheet's header area is about 1 inch high.
Invoices & Reports - Text Header
Text header information originates from the Address Info or Split Address Info areas, depending on your choice in the Placement of address info box.
- The default for this info is your Practice Address, phones, and email. Whatever is entered there can be set or restored to the Address Info area by clicking the button.
- You can also select the placement of the Practice Name within the Text Header
On the Invoices & Reports tab, you can change your address and other practice info as it is displayed and printed on the Invoices & Reports header only, by typing whatever you want in the Address Info box, and choosing its placement within the Text Header.
- Click to overwrite anything in this box with your current Practice Address, phones, and email info from Settings/Practice.
Note: The Reset Address button must be clicked the first time you enter your Practice Address and other info, or if you want to change any of that info and have it show on your invoice and report headers.
If you choose a split address placement (e.g. Middle-Split or Bottom-Split), any text changes should be made in the Split Address Info area at the bottom of the tab.
Tip: The placement of the Practice Name and Address Info are separate, and some combinations may cause overlapping. Choose any combination, and the results of your choices will display above.
Letters & Forms - Graphic Header
The Letters & Forms tab lets you use a graphic of your choice as a "letterhead" for the first page only of your Letters and Forms printed from ClientTracker. The Header Preference must be set to "Graphic above" for it to be used.
- The graphic can be black & white or color; depending on the capabilities of your printer.
- The ideal size for the graphic is about 300 pixels high by 1000 pixels wide (about 4 1/8 x 13 7/8 inches, or 35.25 x 10.5 cm). This is a 3:10 ratio.
- The recommended minimum resolution for the graphic is 300 dpi
- Use .jpg or .png file format for best results
Like other images and files used in ClientTracker, the source file must already be located on your computer, so its location can be referenced, or "linked" in ClientTracker. If you move the source file, the link will be broken, but can be re-linked easily.
Link to a Graphic - Click link to your header graphic to begin. Browse your computer to locate the graphic; then double-click it to link.
[ClientTracker Cloud 5.0]
Use the system's Browser window to locate a graphic file on your local computer and upload it to the Cloud. See <<854>> for details.
- After linking, click change header graphic to link another graphic (or find and re-link the original if the link gets broken), or delete to leave the Graphic Header blank.
Select Header Preference for Letters & Forms
The default you set here will be auto-selected in the Print Options pop-up window whenever you choose to print a Letter or Form. You can always select another option to print.
Pre-printed stationery - Will print no header on the first page, so you can use your practice's pre-printed stationery. Use blank sheets or additional stationery as desired for "second sheets" or additional pages.
Invoices & Reports Header - Will print the Text Header that you set up in the Invoices & Reports tab.
Graphic Header - Will print the Graphic Header that you have linked or left blank.
Tip: It is a good idea to test-print and review your selected Print Headers - especially for Letters & Forms - before you produce any "real" communication, invoices, or reports.Footers - Check the box to show the "printed on" date & time in the footer of printed SOAP Notes. Once selected, this info will come from your computer's system date and time. Leave this box unchecked to NOT print this information.
Envelopes - Whenever you print envelopes, you will have a choice of using:
- Pre-printed #10 envelopes = your return address will not be printed by ClientTracker
- Blank envelopes = ClientTracker will print your return address from the Practice Information in Settings/Practice
The Utilities subtab on Settings/Practice has the following options:
- <<456>>
- <<455>>
- <<700>>
- <<452>>
- <<767>>
<<294>>
<<746>>
<<747>>
ClientTracker allows you to link existing files and photos on your computer to client and SOAP records. The files themselves must be stored in a special folder called "ClientTracker Files-Photos." This folders starts out within the main ClientTracker folder and can be moved to any location on your computer or network. With basic file management skills of renaming and moving files to this folder, you can:
- View a client's photo on their Personal screen.
- See <<29>>
- Store files for a client (e.g. scans of forms filled out), and open them directly from ClientTracker in the application that created them
- See <<480>>
- Link and view photos specific to a SOAP Note
- See <<103>>
- Link and open files specific to a SOAP Note (e.g. lab reports)
- See <<101>>
Setting The Default File Path
To link files or photos to ClientTracker, you must use the Default File Path. This is set up on installation, but may need to be set for some computers after installation. Files and photos must always be in the ClientTracker Files-Photos folder, which is located within the ClientTracker 6.0 folder on your computer.
- Windows = C:\Program Files\Ginkgo Software\ClientTracker 6.0\ClientTracker Files-Photos
- Macintosh = Main drive name/Applications/ClientTracker 6.0/ClientTracker Files-Photos
- To set the Default File Path at any time, go to Settings/Program/Utilities and click the button, locate the folder in its new location and select it, then click OK.
You can move the ClientTracker Files-Photos folder to another location at any time, but do NOT change its name. If you move the folder, you can must reset the Default File Path in order to keep the files and photos linked to their respective clients and SOAP Notes.
To link a File or Photo: Click the appropriate button as described in the different sections of this Manual (see above). Browse the ClientTracker Files-Photos folder until you find the target file, then double-click it or select and click Open.
Note: If you move the folder containing your files after they have been linked, a message will appear: "The link to this file is broken." To remedy this, reset the Default File Path immediately to its new location, and all the links will be restored.
Note: A file or photo with odd characters like $ in its file name will not work with the ClientTracker system. Standard file name characters like a period or hyphen are acceptable.
Good file management skills are essential in this age of electronic medial records. We strongly recommend establishing a file naming protocol that makes it easy to identify the client, guarantees unique file names, and is easy to remember for those times when you're naming files "on the fly." Consistency is key.
IMPORTANT: File names must always be unique if they are in the same folder.
Tip: It is helpful to name your files so they are grouped and sorted within the folder.
EXAMPLES:
To sort by last name:
- Smith_John_Blood_Work_10-12-09
- Smith_John_Blood_Work_10-12-31
To sort by chart number:
- 123456_JS_Blood_Work_10-12-09
- 123456_JS_Blood_Work_10-12-31
To sort by date:
- 10_12_09_Smith_John_Blood_Work
- 10_12_31_Smith_John_Blood_Work
Warning: If you ever receive an alert that the file name already exists, USE EXTREME CAUTION not to overwrite the existing file with the new one, or you could wind up with the wrong file linked to the wrong client. This is why unique file names are so important.
Zoom Settings
If you find ClientTracker's text to be too large or small, try adjusting this setting, then click the button to effect the change.

When Zoom Level is set to 150%, the main window of the ClientTracker program will adjust proportionately to the larger screen objects. In other words, the entire program will appear 150% larger.
IMPORTANT: In some Mac OS 10.6, Snow Leopard, ClientTracker's Zoom 150% setting can sometimes cause instability such as program "freezing" or "crashing." If you experience any problems in your computer, please do not use the 150% Zoom; set it back to 100%.
Window Control
Beginning with v4.0.12, ClientTracker will stay the size you choose.
- Mac - Simply drag the window to be any size you want.
- Windows - The window size can be adjusted to fill the entire scree or be smaller size of ClientTracker data window.
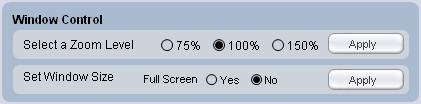
The Full Screen option will fill the screen so you will see blank space at the bottom and right side of ClientTracker.
Note: The fonts and graphics are not scalable, and will not increase in size if the window size is changed. ClientTracker is designed for the smaller window setting. To increase the size of all ClientTracker elements, use the Zoom Settings above.
Tip: You may also want to adjust your screen resolution (e.g. 1024 v 728 pixels), OS display settings, or even the monitor itself to find the ideal size for your monitor and viewing preferences.
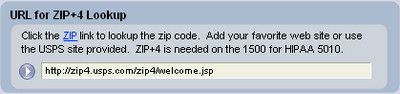
Beginning with version 4.0.20, every place where you enter a ZIP Code has a ZIP link that when clicked will open in your browser a web site. ClientTracker comes with the current URL for the USPS ZIP+4 lookup page, so you can enter the address and find the proper ZIP+4 Code to ensure a valid address for billing insurance.
- As of January 1 2012, the zips in Boxes 32 & 33 on the 1500 claim forms need ZIP+4 Codes to be valid per HIPAA 5010 regulations. These are pulled from the source data in ClientTracker, which is the ZIP field in the Practitioners and your Practice.
Whatever URL you enter will be opened when you click a ZIP link elsewhere in ClientTracker. If you use another lookup site or the URL changes, simply update it here.
Details in this section include:
- <<261>>
- <<980>>
- <<262>>
Value Lists are a finite list of possible choices for entering data in a field. ClientTracker lets you customize what you see as choices in some lists. Customizable lists are located in Settings/Program, in the Value Lists tab. For more info, see <<261>> or <<262>> below.
The sources of Value Lists are:
- Permanent System Lists of choices provided by ClientTracker (e.g. payment types). These are not modifiable.
- Modifiable System Lists populated from records you create and manage in ClientTracker (e.g. names of active practitioners). These are customizable because they act like a list of whatever you have entered into that field.
- Modifiable Value Lists display every value you have entered into the field. These are a pop-up menu of existing values only. To add to the list and enter a new value into the field, select "Other..." at the bottom of the list.
- Custom Value Lists display alphabetically from values you enter in the Value Lists tab:
Practitioners and Providers
- Suffix (e.g. LAc, MD)
- Specialty
SOAP Types
Staff Members
Contact Types - for general contact use
- Clients, Practitioners, and Providers
- Address, Phone, Email Types
- Phone
- Email
- Name Prefix (e.g. Mr. or Mrs.)
- Description for Insurers, Vendors, and Clearing Houses
- Address
- Phone
- Email
On Settings/Program, use the Value Lists tab to access the Custom Value Lists. Simply type any values used by your practice into the respective lists; separated by a Return (Enter). The list fields are scrollable, and set to the maximum display width for the values.
- ClientTracker adds some values to your lists automatically, if they are important to its functions. These cannot be removed from the lists.
- Regardless of the order in which you enter the values, the resulting lists will always display in alphabetical order on the data entry fields where they are used.
- The values in the list should not exceed the width of the entry field
Note: Removing a value from a list does not remove it from any records where that value was used. Some values are available as search criteria in finding records, creating reports, etc. If you want to be able to find records with a certain value; it must be available on the list.
Beginning with version 5.2, you can send text messages from ClientTracker using a special email address (aka "SMS address") defined by the Phone Plan Carrier and composed of 2 parts:
- The area code and phone number of the recipient (numbers only), and
- The SMS domain provided by their Carrier
- www.freecarrierlookup.com will give you the domain needed.
Maintaining an accurate list of carries and domains is helpful to this process. A starting list is provided by ClientTracker; however, you are responsible for keeping it up to date, and adding new entries to the list. The list is located on the Value Lists tab of the Settings / Program area. It is also available in the small Text Address pop-up window when you choose to enter a Text Address on the Clients Personal screen (from the Phone - Email tab).
- A Text Address is supported for Clients only
Go to the last row in the list by using the scroll handle on the side, or click the +New button. Enter both a Carrier name and a Domain. When you enter a text or SMS address, you will pick a Carrier name from the list and the associated Domain is used to build the address. This is easier than having to remember the domains.
To delete an entry from the list, click the red Delete button at the right of its row.
When available for data entry, the Value Lists function in two different ways:
Optional use of the list - Drop-down List
Some value lists that allow ad hoc entry of data in the field; without using the list (e.g. phone or email type). Ad hoc values are not added to the lists. To enter an ad hoc value, click the field again after the list drops down.
In large lists, use the scroll bar to see more values, or you can type ahead to access values beginning with a certain letter.
This type of value list is called a "drop-down list" in this manual.
Mandatory use of the list - Pop-up Menu
Some Value Lists only allow entry of data from a pop-up menu (e.g. Inventory Type). These you can recognize because there is no option to click the field itself -- you must select a value from the menu. For large menus, you can scroll up or down using the small handles at the top or bottom of the menu. After you choose one, if you re-open the menu there is a small check mark next to the value already in the field.
This type of list can be added to by selecting "Other..." and typing the new value in the small pop-up window. The new value gets entered into the field, as well.
This type of value list is called a "pop-up menu" in this manual.
This section contains information about:
- <<255>>
- <<690>>
- <<258>>
- <<837>>
- <<1039>>
Note: The Diagnosis Codes area has been expanded for ICD-10 as of version 6.0 or higher in 2015. See <<1001>> for more info.
ClientTracker comes with standard diagnosis and procedure codes pre-entered. The Diagnosis Codes and Procedure Codes tabs in the Settings area allow you to edit these codes, or add your own codes using the button.
While some codes are provided, the actual codes you use on claims and invoices and on SOAP notes, are your responsibility.

As with most lists, you can click on the header text of each column to sort the visible records by that column, in ascending or descending order. The dates when diagnosis and procedure codes were updated and modified are displayed, as well as a button to delete codes. The updated date refers to the date the codes were imported into ClientTracker from the Ginkgo Software website. The modified date is when they were modified by a user.
You can also mark the diagnosis codes or procedure codes you use most frequently, and these will come to the top of lists where you choose one during data entry.
To edit information in the diagnosis or procedure code List screens, you can click on the description, category, price, or any other field in a code (other than dates), and type new information. If you edit your codes or download updates, the new codes can be entered in new invoices, but previously created invoices are not affected.
The button on the diagnosis code and procedure code list screens allows you to create a new code for your practice. There are also buttons to following a search, and your code lists.
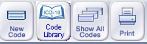

The List screens can be sorted by any column that has a sort symbol.

Use the button to permanently remove a code from its list. (Certain restrictions apply - see info on each type of code below.)
QuickFinder
You can search for specific codes with the QuickFinder at the bottom of the screen, by selecting a target column and typing the words or partial words you want to find in the description. For example, typing "neurological" in a category search displays all records in the neurological category.

Note: The Diagnosis Codes area has been
expanded for ICD-10 as of version 6.0 or higher in 2015. See
<<1001>> for more info. This section pertains to versions earlier than 6.0.
For Diagnosis Codes, you can set the ICD-9 or other Code and Description that will be used when the code is selected on an invoice. For your own information, you can optionally set Category, Pain designation, and/or Modality. Codes can be designated "Frequent," and will sort first alphabetically in lists.

If
you use certain Diagnosis Codes regularly for a type of visit, you
can set default codes in a SOAP Template. For more information on
SOAP Templates, see <<441>>.
Deleting Diagnosis Codes

Use the button to permanently delete any single code from the list.
For procedure codes, you can set the default modifiers, quantity, price, and tax rate class If any) that will be used when the code is selected on an invoice. You should enter your practice's price for each procedure in the Price column before generating any invoices. For more information on setting the tax rates, see <<246>>.Note: A negative Price cannot be entered.
Tip: When you change the price on a Procedure Code, it will be updated on any SOAP Template or future SOAP Note on which it is being used. The same is true if you change the tax rate. (Past procedures on SOAP Notes and invoices will not change in price.)

If you use certain procedure codes regularly for a type of SOAP note, you can set default procedures in a SOAP Template. For more information on SOAP Templates, see <<441>>.
Deleting Procedure Codes
Use the button to permanently delete any code from the list.
[5.2] New Price Change Alert
Starting with version 5.2, there is a "Price Change Alert" checkbox at the bottom of the master Procedure Code List. Check this to alert you when creating an invoice that copies an old price from a previous invoice.

This is accessed from the main Procedure Codes list (not the Reports area). The report offers a choice of a list of Clients who purchased that Procedure, or a list of Invoices on which it appears.
To begin, click the Run Report link in any Procedure Code row to open The Procedures Sold Report pop-up window. Enter a date range (i.e to and from), and choose your report by clicking the or button.
If you choose to view , you will have a further option to view the report results on the Invoice List screen (with all its functions), or print the results as a report.
Note: Procedures appear on this report when they have been added to an invoice, whether or not they are paid.
IMPORTANT - The ICD-10 Update for 2017 goes Into effect on October 1, 2016. This is a required update for any medical practice.
Update to the 2017 ICD-10 Code Set
These instructions only work if your file has been upgraded to 6.1.01 or higher.
- ClientTracker Cloud: we upgraded your file for you and you received an email notifying you of this upgrade.
- ClientTracker Desktop: you were sent a self-serve upgrade. If your file is not yet upgraded, stop and run that upgrade now, according to instructions found in <<1017>>.
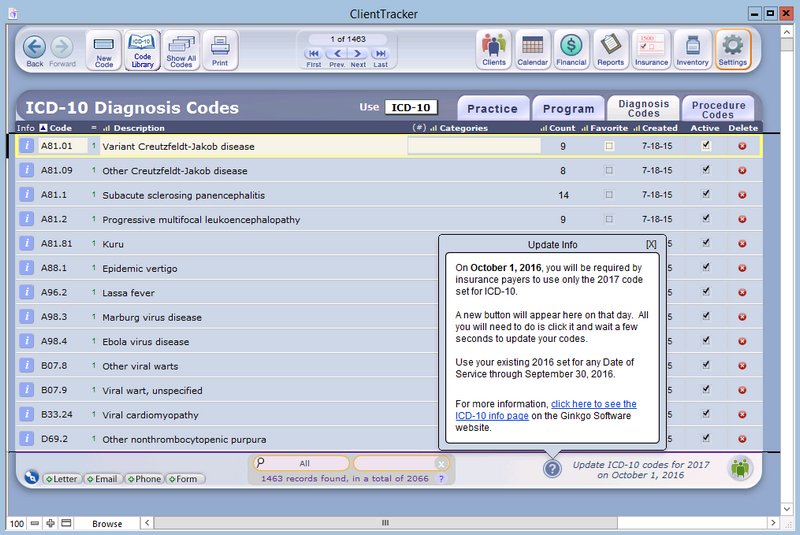
Step 1

When you're ready, click the Update button. The update should take 1-3 minutes to run, depending on the size of your Diagnosis Code list and the speed of your computer. When it's finished, a list of the changed codes will display.
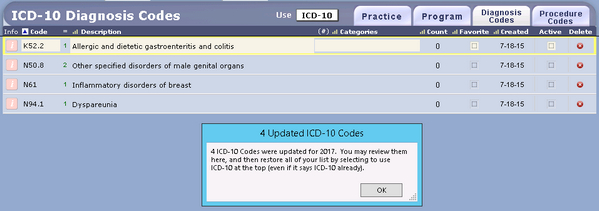
Step 2 - We strongly recommend that you print this list for reference, using the Print button at the top. At any time you can or open the Information popover with the [ i ] button.
Changed codes will have a pink [ i ] button. Brief information about the code changes will appear in the Notes field.
If a code is not to be used starting October 1, 2016, the code and description show in red letters; this is both on this list and the CodeTracker. You may need to still submit claims with a Date of Server for September 30,2016 or earlier. Once you are certain you no longer need this outdated code, please tag it "Inactive". This way it will not clutter up your CodeTracker.
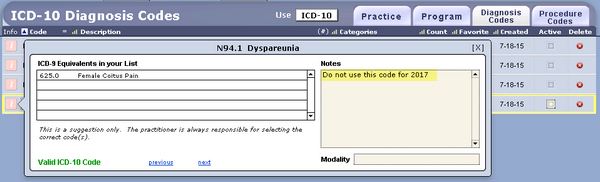
Step 3 - To restore your complete ICD-10 Diagnosis List, click the Show All button.
That's all! Your new codes are now ready to use. For more information about the code changes and when to use them, read our ICD-10 Information page.
Note - Your ClientTracker support covers the functions of your Diagnosis List and CodeTracker only. Questions about "what code to use and when" are not covered by your ClientTracker support.
![]()
The ClientTracker calendar is a system of schedules on which you can create manage client visits to your practice. There are many ways to use it, including list or graphic views, printouts, reminders, and communications.
Details in this section include:
- <<58>>
- <<63>>
- <<59>>
- <<484>>
- <<60>>
- <<62>>
- <<646>>
For information on setting up the calendar in ClientTracker, see <<227>>.
Visit Totals
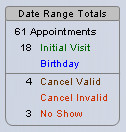
Visit totals are also at the bottom of printed Visit reports and schedules,
Before you go directly to the calendar to start making appointments, you have the choice of having the calendar open in one window or two windows. Having the calendar open in its own window, allows you to go to any other part of ClientTracker and always have the calendar open for reference or quick use.
Go to Settings, Program Default and check the View Calendar in a Separate Window box.
When you first open the calendar, the current day is displayed in the default view you set in Settings/Program. The main choices of view are: Column View (by Practitioner or by Room), or List View (by Practitioner or by Date Range).
The Day, Week, and Month tabs allow you to switch the scope of the schedule. This is handy for looking at upcoming or past appointments, and for seeing when to schedule new appointments.
- Day tab - takes you to the last selected view for the currently selected day.
- Week tab - displays the currently selected week's schedule in column view.
- Month tab - displays the currently selected month in a grid, or calendar page view
Each view is explained in more detail below.
Select a View
Each view screen has one or two drop-down View Selectors to the right of the day and date near the top of the screen. By selecting a view from the drop-down menu, you can choose to view the schedule as appropriate to the chosen view screen.
An appointment can be made easily in any view (see <<65>> for more info). In a List View, the appointments and reminders appear as rows of separate lists. In a Column View, appointments and reminders appear as "bubbles" on the schedule, spanning from their start time to their end time, and displaying the client's name. Depending on the actual view screen, the room or practitioner's initials may also be shown.
Select a Date
There are several ways to select a date, all of which appear on both list or column Day views. There are slight variations for Week or Month, which are discussed below.
- Click a day in the small "date picker" calendar on the left to go to that day. This small monthly calendar indicates the selected day and month, and Today (if appropriate).
- Use the previous [] or next [] arrow buttons just above the date picker calendar to view the same day in a different month.
- Click the date showing just below the monthly calendar for a drop-down calendar date picker. Or, click it a second time to simply enter the target date; then click the magnifying glass to display it.
- In the Control Panel of a Day view screen, click the or arrow buttons to move to the previous or next day.
- In the Control Panel of any Calendar screen, click the icon to quickly return to the current day.
Single Day List
Select View "As a List" from the drop-down menu at the top of the column view by Day to display the calendar as separate portals of all appointments and reminders for that day. The portals can be scrolled up or down, and seen for just one practitioner or All.
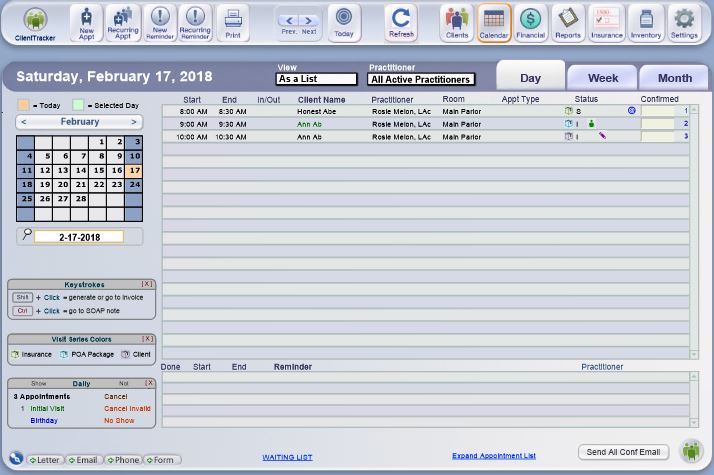
All Appointments
The View "All Appointments" choice in the drop-down view selector will display all future, present, and past appointments in a selected Date Range; with all reminders in a separate portal. This list will default to all appointments from 30 days ago to the current date, to save time loading what might be a long list. You can change the Start and End dates to show any time period.
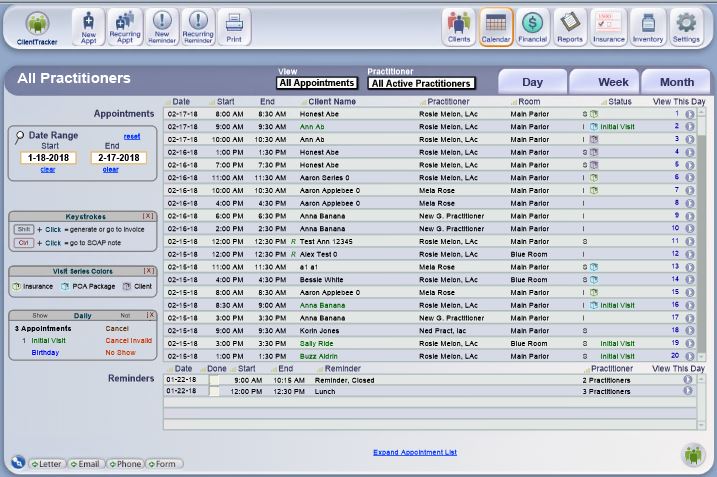
Similarities
In either List view, the Control Panel has the same five main icons as other screens in the Calendar area. For more information on their functions, see the referenced details.
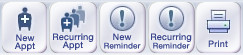
- - See <<65>>
- - See <<78>>
- or - See <<85>>
- - When used from a List View screen, this will print all the appointments and reminders in the portals (i.e. for one or all practitioners). The printed list will be grouped by Day. See <<84>> for more info.
Similar Functions in Portal Rows
Appointments - Click on a portal row to open the Appointment pop-up window for the scheduled visit,
Reminders - Click on a row to open the Reminder pop-up window, or check the Done box (optional) to show the event has been taken care of.
Color Coding of Appointments - When an appointment is displayed in any view, the client name will be in a different color to signify various events.
Other Similar Functions
- Blue = Appointment falls on client's birthday.
- Green = Initial Visit
- Red = No Show
- Red = Canceled Invalid (List view only)
- Gray = Canceled Valid (List view only)
- Use the button to create
a file of appointment data that can be imported into another program or
device. See <<486>>
for more info.
Differences
Day List View
- The icon in the Control Panel will display all appointments and reminders for the current date. You can also use the and buttons in the Record Navigator to see adjacent dates.
- All the date picker options are available on this screen. Selecting a new date will display that day's appointments and reminders in the same portals.
-
If the client has a valid email marked as "Use," an Email icon will show at the right of the row. Click this to send or resend an appointment confirmation email. For more info, see <<83>>.
- There is a Confirmed field at the end of each row, where you can manually enter a date. Click to automatically enter today's date, or modify the date as needed. This date is only entered automatically if you use appointment confirmation emails <<83>> and choose to have it filled when they are sent, and use of the field is optional.
- Hover your mouse over an appointment, and a tool tip will show the client's DOB, phone number, optional ID, and if an invoice has been created, the invoice number and amount. The tool tip will also show if this appointment has been assigned to any of the three visist series, Insurance Series, Client Series or Payment on Account Package Series.
- The pencil, that shows on the list view, indicates that no invoice has been generated for this appointment.
- The Green person, indicates that it is either the first visit in this office or with a specific practitioner.
- Any time you see a package, it indicates that this visit is applied to one of the three types of visit series.
Tip: List View by Day is usually best for reviewing a day's appointments, or checking in clients, as it displays all appointments for one day in a sortable portal that includes sorting by time.
All Appointments View
- This view will load to show all appointments and reminders for the past 30 days. You can change the date range by entering the Start and End date in the QuickFinder fields to the left of the appointments portal. Click reset to set them back to the past 30-day period, or click a clear link to remove a date.
- The columns of the portal lists can be sorted by clicking the headers. For example, the display loads with the most current (descending) appointments and reminders showing first. Click to toggle ascending or descending.
- There is a Go button on the right of each appointment and reminder row. Clicking it will go to the Day List View for that date.
Select View "By Practitioner" or "By Room" from the drop-down view selector, and ClientTracker provides an interactive, graphical display of an appointment book, which can be viewed by Day or Week. The left and right sides represent times of the day, and are called the "time line." The columns can be displayed by practitioner or by room; each with its own column. The View by Room display can also be viewed by practitioner.

If there are two or fewer active practitioners or rooms listed in Settings/Practice, only two columns are displayed. If there are three or more listed, five columns are displayed. The five column view can be scrolled horizontally left or right to accommodate larger numbers of practitioners or rooms, by clicking the narrow horizontal scroll button shown at left. The button for horizontal scrolling will display only if there are more than five practitioners or rooms; depending on the selected view.
In the column views, appointments show as a gray "bubble" spanning a vertical portion of the column from start time to end time. Reminders show as a green bubble, and any bubbles can overlap in the same column.
- Appointments - Can be overlapped or "double booked" for any practitioner, but not for a room. Click the time slot on any column to make an appointment.
- Clicking an existing appointment in a column will open its Appointment pop-up info window. Sometimes, to create an overlapping appointment, it is best to use the button in the Control Panel.
- For more info, see <<65>>
- Clicking an existing appointment in a column will open its Appointment pop-up info window. Sometimes, to create an overlapping appointment, it is best to use the button in the Control Panel.
- Reminders - Can be overlapped in any column. Ctrl-click any time slot to create a new reminder.
- Clicking an existing reminder in a column will open the Reminder pop-up window.
- For more info, see <<85>>
- Reminders can also be used to indicate an appointment slot that is "blocked" or unavailable, but will not prevent the creation of an appointment.
- Clicking an existing reminder in a column will open the Reminder pop-up window.
Note: When appointments and/or reminders overlap on a column view schedule, a small red asterisk [ * ] will show in that time slot.
- If an appointment and reminder are in the same time slot, they will be offset so you can click to see either one.
- If more than one appointment or more than one reminder occupy exactly the same time slot, they will overlap and all of them can only be seen in List View.
Scrolling the Column View Display
In the Day and Week views, regardless of the number of columns, the entire "page" of the calendar can be scrolled up and down in either 1 or 3 hour increments by use of the time line.

To scroll 3 hours, just click the orange triangle at the top or bottom of the time line
To scroll 1 hour, hold down the Shift key while clicking an orange triangle
 Tip: If appointments or reminders exist outside of the viewable area, the orange triangle has a white triangle inside it, as shown.
 The graphic column view starts with the topmost hour being the one selected in Settings/Program, and can be scrolled up (earlier) or down (later) until 12 midnight.
If there are more than five active practitioners or rooms, each will have its own column in the respective Practitioner or Room view, and new horizontal scrolling controls will appear. Only five columns are visible at a time. The columns will scroll as many as five at a time.
Printing from a Column View
![]()
In a Column View, clicking the icon will open the Visit Print Menu pop-up window, from which a variety of appointment schedules can be printed, depending on the view. See <<632>> for more info.
There are a variety of Day Views that show one day's appointments and reminders only. When you first open the calendar, it will show the current day in the view selected as the default in Settings/Program (either column or list view). You can change the view as follows:
- View - display the currently selected date:
- By Practitioner = Column view, with each active practitioner in his/her own column
- By Room = Column view, with each active Room in its own column
- As a List = List view of the currently selected date
- All Appointments = List view of all the appointments and reminders in ClientTracker
- Practitioner - Modify the currently selected view to show a single practitioner (select from the drop-down list of active practitioners), or All Practitioners (click the All link next to the list)
Select a Date
There are several ways to select a date, all of which appear on both list or column Day Views. There are slight variations for Week or Month, which are discussed below.
Note: The green highlight color in the calendar displays signifies the selected day; that is, the day you are currently viewing/working on. In week view or month view, it is the date that will be automatically entered in the new appointment dialog box. By contrast, "Today" is highlighted in peach.
 Use the previous [] or next [] arrow buttons in the Navigation Bar just above the date picker calendar to view the same day in an adjacent month.
 Click the date showing just below the monthly calendar for a drop-down calendar date picker. Or, click it a second time to manually enter the target date; then click the small magnifying glass to display it.

In the Control Panel of a Day or Week view screen, click the or arrow buttons to move to the previous or next day or week.

In the Month view, there are two Navigation Bars that go to the previous or next month or year.
In the Control Panel, click the icon to quickly return to the current day.
Note: When on a Day View, clicking the Print icon will result in a variety of choices and formats for printing a single day's schedule of appointments and reminders. See <<84>> for more info.

Click the Week tab to view the schedule for a whole week in column format. It looks much the same as a column view by Day, except that now there is one column for each day of the week (but only five columns show at a time). The Week view is also scrollable horizontally and vertically. Scroll left to view Monday through Friday. Scroll right, and it shifts to Wednesday through Sunday. Scrolling up or down with the time line works the same way (see "Column Views" above.)
The display can be viewed only by practitioner, showing one or all practitioners. Appointments and reminders for different practitioners and/or rooms may overlap in the display. (If they do, a small red asterisk will appear next to the client name.) This view is most useful when looking at a week's schedule for one practitioner.
When first accessed, the Week view will show Monday through Friday of the week containing the currently selected day, unless the selected day is a Saturday or Sunday, in which case it shows Wednesday through Sunday. The selected day shows with green text in its black header, and the current day shows with orange text.
The Week view displays in different ways than the Day view:
- When you change the selected day in the small monthly calendar or date picker to the left, the Week view may change accordingly.
- Click any column's header, and you will see that day's appointments in the default Day view selected in Settings/Program.
- You can also switch to the last-used Day view for the currently selected day by clicking the "Day" tab at the top
From the Week view, the icon will print a week's schedule of appointments and reminders for the selected practitioner, in a simplified column format.

Click the Month tab to view the Calendar schedule for the entire current month. The Month View looks like a standard calendar, displaying dates with only the first four appointments of the day showing. If there are more than four appointments in that day, a small blue "more" shows at the bottom of that day. Also, if there are reminders for that day, a small green "Reminders" message will show.
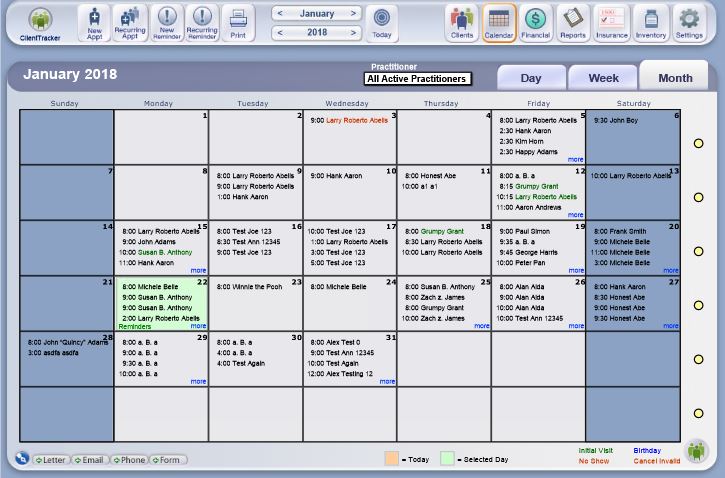
Clicking on a date will take you to the default Day View for that date (the default is set in Settings/Program). Clicking on the yellow dot to the right of any week will take you to the Week View for that week.
In the Functions Bar are month and year navigation bars with previous [] and next [] buttons to display a different month and/or year. The month navigation bar also has a drop-down menu in the middle where you can quickly choose to view another month in the same year.
In Month view, you can display a month's worth of appointments for any single practitioner, or all practitioners (within the limitations of the display). Use the drop-down view selector in the top banner next to the tabs.
Clicking the icon in Month view will print a representative calendar page, showing only the first few appointments for each day in the current month.
Tip: To print a week's schedule of
appointments in a variety of formats, enter the week Start and End dates
in the date range QuickFinder fields on the All Appointments view.
Notes:
When you switch to a Day View, ClientTracker will always load the default view, which you set in Settings/Program Settings. If needed, simply select the same practitioner from the drop-down filter in the new view as needed.
Appointments and reminders can be created from the Month View screen, but their details cannot be viewed or edited except on other calendar screens.
Note: The List and Month views show only scheduled appointments; not open time slots. Use the Day or Week Column Views to look for open appointments.
In the Day or Week view, you can see the columns (and their open appointments) by Room, by a selected Practitioner, or for All Practitioners. If there are more columns than the 5 displayed, use the horizontal scroll bars (explained above) to see more. The selected time range will stay the same as you scroll left or right through the columns.
Use the date picker calendar to go to a new day or week.
For more info about making appointments once you find an open slot, see:
- <<65>>
- <<70>>
- <<78>>
There are two main starting points for creating appointments in ClientTracker.
- From the calendar (see below)
- From the Client/Personal screen (see <<67>>)
- <<66>>
- <<69>>
- <<72>>
- <<70>>
Types of Appointments
Single - Create one appointment for a client
Recurring - Create multiple appointments for one client, sharing practitioner, room, start and end times, SOAP Templates, and other appointment info. See <<78>> for more info.
Tip: See <<646>> for some suggestions for finding open appointments in the Calendar.
Three Basic Steps to Create a Single Appointment from the Calendar
STEP 1 - Open the Appointment Pop-up Window from one of two places:
1. In a Column View screen by Day or by Week, click the button in the Functions Panel or an empty time slot in a column to begin.
- If an appointment already exists in a column view time slot, clicking it will open the pop-up Appointment info window for the existing appointment.
- If only a reminder is in a calendar view time slot, it will be flush right in the column, allowing a small space to the left within the same time slot where you can click to create an appointment.
Note: A new appointment can be made in a Column View screen either by clicking an empty time slot, or Shift-click if there is already an appointment there. Ctrl-click will create a new reminder.
2. In a List View screen, click the button.
STEP 2 - Use the Appointment QuickFinder to Locate a Client
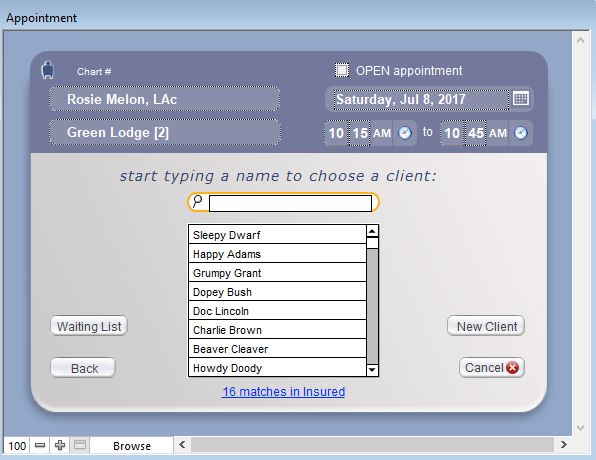
The first pop-up Appointment window you see will tell you to "start typing a name to choose a client." Type a few letters in the QuickFinder, and the portal below will change with each keystroke to display only those clients who have the text as part of their name.
To see matching non-client Insured persons (if any), click the blue link that appears below the clients portal, e.g. "16 matches in insured."
Note: Insured persons are used for Client insurance policies, and cannot be scheduled for appointments. However, you can turn an Insured person into a client by selecting them in the QuickFinder to access their Detail screen. See <<45>> for more info.
If you are sure that the person you are looking for is not displayed, click to create an appointment for a new client (see <<69>>).
Click to close the pop-up window and abort the process.
STEP 3 - Enter Basic Appointment Information (see <<66>> below for more detail)
- Date - Click the date at upper right to select a different date
- Time - Enter a valid start and end time (see below)
- Practitioner - Select a practitioner from the drop-down list
- Room - Select a room from the drop-down list
- Notes - Optional appointment info
Enter appointment information in the main Appointment pop-up window. Required information is marked below with an asterisk (*).
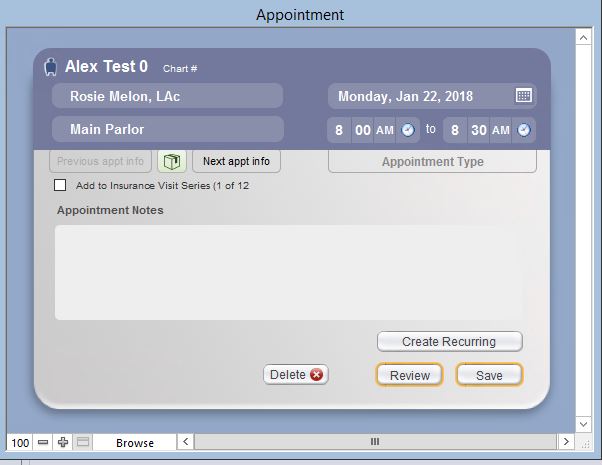
![]()
Client* - Selected from the QuickFinder, client record, or created as a new client. Click the client icon in the pop-up window's banner next to the current client's name to change the client (see example at left).
Date* - Auto-entered from the currently selected date on the calendar. Click the date to change it.
Note: There is no restriction on how far in the future or past an appointment date can be.Practitioner* - Auto-entered from the schedule if you clicked a time slot from a specific practitioner's column to begin. Otherwise, the auto-entry options below will apply. Select or change the practitioner from the pop-up menu.
Practitioner Auto-Entry Options
- If there is only one practitioner, he/she is auto-entered
- If there is more than one practitioner, you can designate one as the primary for auto-entry
- If the client has a default practitioner chosen in Clients/Personal/Defaults, he/she will be auto-entered
Room* - Auto-entered from the schedule if you clicked a time slot from a specific room's column to begin. Otherwise, the auto-entry options below will apply. Select or change the room from the pop-up menu.
Room Auto-Entry Options
- If there is only one room, it will load automatically
- If there is more than one room, you can designate one as the primary room which will load automatically (Settings>Practice>Rooms subtab)
 to choose which series to apply the visit to. For more information about visit series, please see <<1058>>
End Time* - The end time will be automatically set for the default duration according to your choice in Settings/Program. You may also select or change the time from the pop-up menus.
Time Entry Options
- The end time of the appointment can be manually changed as needed. If the start time is edited to be earlier or later, the end time does not change according to the default settings.
- If an appointment is scheduled to exceed the default duration in Settings/Program, you will see a message and given the choice to Cancel or Allow the longer appointment.
- 12 noon = PM, i.e. a 30 minute appointment starting at 11:30 AM ends at 12 PM.
Appointment Type - (Optional) This can be anything you want. Choose from the drop-down menu of values that shows when you click the field, or click again to enter text.
Appointment Notes - (Optional) This is automatically filled with text from the client's Check-In Info from their Personal screen. The text can be added to or edited as needed, and when printing schedules you will have the option to print the notes or not.
SOAP Template - (Not editable in the Appointment pop-up window) If a SOAP Template is set up for the chosen practitioner, it will be assigned to the appointment. This can be changed from the SOAP note. See <<441>> for more info.
Hide Initial Visit Flag - (Conditional) This checkbox shows only if a client is seeing the chosen practitioner for the first time. Checking this box will hide the Initial Visit flag that appears on the calendar, printed schedules, and visit information. See <<63>> for more info.
Button Choices
- Apply all the current appointment information to create a series of recurring appointments. See <<78>> for more info.
- Abort creation of the appointment without warning, and lose all information entered.
- Create the appointment in the schedule, and display more info and options on the Appointment pop-up window. When you click Save, the following events will occur:
- The appointment will be added to the visible calendar display, the client's list of Appointments & SOAPs, and the practitioner's list of appointments.
- If enabled, an automatic appointment confirmation email will be sent to the client. See <<83>> for more info.
- A SOAP note will be created for the appointment, using the SOAP Template indicated.
- The Appointment pop-up will close.
Review - After saving, the pop-up window changes to provide more options:
- Review all the appointment details, and change if needed
- Access client contact information (closes the pop-up)
- Access the SOAP note (closes the pop-up)
- Create an invoice (closes the pop-up)
- For more info, see below
Simply click to close the Appointment pop-up window without any further changes.
Note: In Column Views, the appointment may overlap with other appointments or reminders for a practitioner, as this is allowed by ClientTracker. If this happens, a red asterisk [ * ] will appear next to the client's name. Use List View to see all appointments and reminders in a time slot. See below for more information.
When creating an appointment, you may know you are dealing with a new client (i.e. one never seen before at your practice), or you may need to check if they are already in ClientTracker. The goal is to avoid duplicate entries of clients as much as possible.
ClientTracker allows you to create a new client "on the fly," without leaving the calendar area. Simply click the button or a slot in the calendar to access the QuickFinder in the Appointment pop-up window (see above).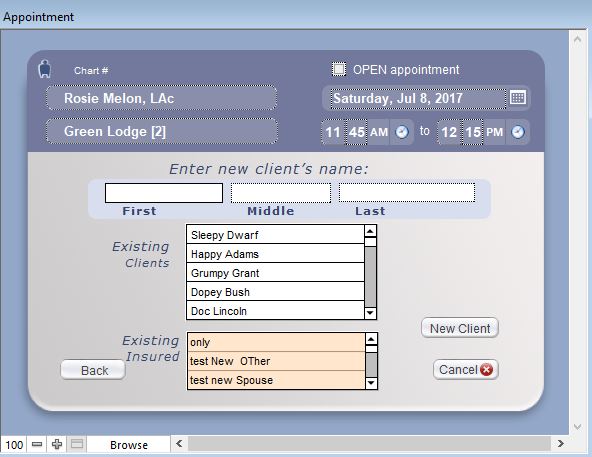
If you are unsure whether a person has been seen before, enter his/her name in the QuickFinder, and see if there are any matches. (Be sure to check for Insured matches in the blue link below the list, if you bill insurance.)
If there are no matches, or if you are certain this is indeed a new client, click the button to switch to a quick entry pop-up.
Tip: A tooltip will display additional information for each match in the QuickFinder portal. If you need to view a client record to see more information, click to close the Appointment window, then go to the Clients area and search for the client the usual way.
![]()
The New Client button will provide a small screen for entering vital information about a new client, as the the appointment is in the process of being made.
Enter at least the first and last name, and a phone number. You can enter more info in the spaces provided, or make the appointment first; then go to the new client's record to add more.
Clicking on this screen will abort both the creation of a new client and the appointment.
Note: If a new client is created from the Appointment pop-up window, clicking the Continue button creates the client record - which will remain in ClientTracker even if the appointment creation is canceled, or the appointment is subsequently deleted.
When a client is seen by a practitioner for the first time in ClientTracker:
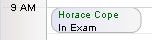
The client's name is colored green in the Column view calendar, and either an "Initial Visit" or "IN" flag will show in other parts of the Calendar and throughout ClientTracker.

- You can hide this Initial Visit flag as needed (see Tip below).
- The SOAP Template designated for initial visits for that practitioner will be applied to the visit.
- If the practitioner has no SOAP Template assigned for initial visits, the Default SOAP Template will be used instead.
- For more information on SOAP Templates, see <<494>>.
Tip: Whenever the first appointment is made for a client, the Appointment pop-up window has a checkbox: "Hide Initial Visit Flag." Select this, for example, for clients you have been seen before, but are scheduling their first appointment in ClientTracker. If this is checked, the client's name will not display in green on the schedule; nor will any other Initial Visit flags show.
Click the icon in the Functions Bar, and select the client for whom you wish to make an appointment.
From the Clients/Personal tab, click the button. This displays the Appointment pop-up window. Follow the process described above to create an appointment.
Differences are:
- You will not be able to see the calendar, but will remain in the Clients area
- The date, times, and room for the appointment will be blank

You can see all past, present, and future Appointments & SOAPs for a client by clicking that tab. From there, you can create a new appointment in the same way as above by clicking the icon in the Control Panel. This method is also available on the SOAP Detail screen.
When creating or editing an appointment, a pop-up message will alert you if there are any scheduling conflicts if the same Room is used. Reminders and appointments can be scheduled in the same time slot according to the guidelines below.
- Rooms can be booked up to their capacity per time slot, which is set on the Settings/Practice tab. See <<252>> for more info.
- Practitioners can be double-booked in the same time slot; limited only by the capacity of the rooms.
Double-Booking (or Group) Appointments - Multiple appointments for the same room, practitioner and/or time slot are possible using the following guidelines:
- From the List view, make the double-booked appointment with icon.
- In Practitioner or Room view, Shift-click on the time spot of your choice (even if it already shows an appointment).
- A subsequent appointment can be made overlapping from a previous time slot.
- Subsequent recurring appointments can be booked as double-booked appointments.
- Double-booking appointments in a Room is possible; up to the capacity set for the room - even with different practitioners.
- In effect, the number of appointments possible for any one practitioner in the same time slot is limited by the combined capacity of rooms in your ClientTracker.
For each of these methods, when the Appointment window pops up, fill out the overlapping times and other info for the second appointment as usual, then click .
Overlapping Appointments in Column View
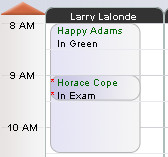
When a Practitioner or Room time slot has more than one appointment, one or more red asterisks [ * ] will appear at the left of each time slot. However, only the most recent appointment made is visible in the Column view screen.
Shift-click the time slot to create a new appointment beginning in that same time slot.
Hover your mouse over the time slot to see a tooltip containing info about all the appointments in any time slot.
To see all overlapping appointments in a time slot, use the List view.
Tip: To track clients who want a cancellation for certain times, create a practitioner called "Waiting List" and create appts for any client wanting an appt at that time.
- <<487>>
- <<488>>
- <<839>>
- <<968>>
- <<994>>
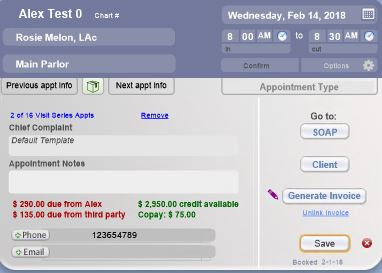
The Appointment pop-up window appears right after a new appointment is created, or opens when you click on an existing appointment. It displays key information about the appointment and provides access to other related functions.
You can also open this Appointment pop-up window from both the SOAP Note list and detail screens. Click on the small yellow Notes image that is left of the appointment date (see example below). Some practices use this to identify why a client is being seen.

Throughout this manual, this is referred to as the "Appointment Info pop-up window."
Information
Many details about the appointment or client are displayed, depending on the type and conditions of the appointment. Most information is not editable from this pop-up. To change anything, click (see <<487>> below).
- The scheduled practitioner, room, date and time are displayed in the header
- If the patient has one or more available series, you will see a package on the appointment pop up. This allows you to assign the appointment to the Insurance Series, Client Series or POA Package Series.
- If this appointment is part of a recurring series, a conditional Recurring Appointment link will provide access to a portal of all the appointments in the series
- This link will show as Next-to-Last or Last Recurring Appointment, as a reminder that a series is nearing its end
- A tooltip will show more info about each recurring appointment in the portal
- See <<78>> below for more info
- The SOAP Template to be used for the appointment is identified
- A status flag, such as "Initial Visit" or "Canceled Valid" will display as appropriate
- Client balance and credit totals will display only if greater than zero
- If any Appointment Notes were made, these will also show
- Phone numbers and email addresses for the client are shown in scrollable rows. If there are more than one, the number of rows is displayed, and small scroll up/down buttons will become available.
- Communication buttons allow you to create a record or compose and send an . (See below).
- (Optional) Use the Confirmed field to enter a date, if this is useful to your practice
Tip: Appointment Notes are auto-filled from the client's Check-In Info field on the Personal screen for every appointment. You can add a note for an individual appointment when you create or edit the appointment.
Tip: Appointment Notes can be seen in 3 places: in tooltips, on printed schedules and on the Appointment Info pop-up window. You may want to put life-threatening issues in all caps to stand out.
Buttons & Links
The Appointment info pop-up window gives you several options:
- = Allows editing of appointment information (see <<487>> for more info)
- = goes to the SOAP note for the appointment (see <<96>> for more info)
- = goes to the Personal screen for the client (see <<26>> for more info)
- = If the appointment has no invoice generated or linked, this will offer the option to generate one (see <<107>> for more info) If an invoice has not been generated, the pencil shows as a reminder to generate one.
- = If the appointment has an invoice already generated, this goes to Invoice Detail screen (see <<105>> for more info)
Communication Buttons - There are five buttons and one blue link available for creating a communication to the client. All of these buttons will close the Appointment pop-up window as well.
Note: An appointment confirmation email may already have been sent automatically. If the client has a valid email, a Resend Confirmation Email link will show. Clicking this will create a new email confirmation message and record in the client's Communication portal.
- A button is displayed next to the client's phone number. Clicking this will open the Phone Call pop-up window.
- An button is displayed next to the client's email address. Clicking this will start a new email communication to that client on the Composer screen.
- The or buttons will take you to the Composer screen to create a letter or form for this client.

The blue Pen Nib button will take you to the Communications List screen, and show all communications for that client.
- For more information about communication, see <<135>>.
Click Save to close the Appointment Info pop-up window.
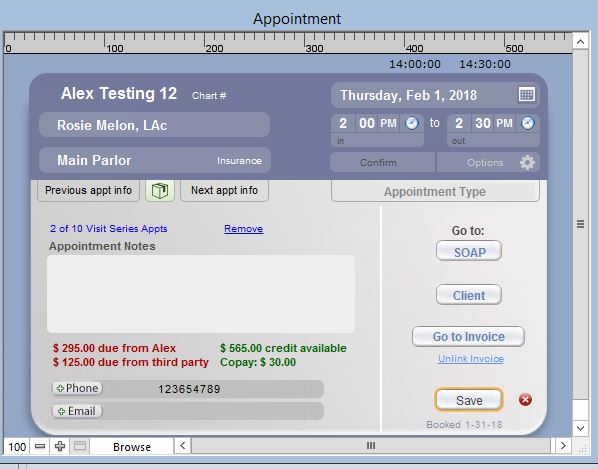
Editing an appointment includes deleting, rescheduling, canceling, changing status, or making other changes to an existing appointment. You can edit a past, current, or future appointment.
The Appointment edit window is only accessible from the Appointment Info pop-up window by clicking the button, after which you can perform the following actions:
Delete the Appointment - Click the button, and a message will ask for confirmation. Choose Yes, and the appointment will be permanently deleted from ClientTracker with no history. If there is already an invoice for this appointment, you will have to void that first before you can delete the appointment.
Appointments that already have an invoice created or linked to the SOAP Note cannot be deleted. The remedy is either to click the Unlink Invoice link on the pop-up, or go to the SOAP Note to review it and unlink the invoice from there. See <<498>> for more info.
Warning: Deleting an appointment will permanently delete any SOAP Notes associated with that appointment, which are part of the client's medical record if the client was seen.
Reschedule the Appointment - You can change any schedule parameter: date, time, room, and practitioner. Once you click , the appointment will move to the new location on the calendar. There will be no record of the change, and you will be given the option to send a new appointment confirmation email to the client.
Cancel the Appointment - Check Canceled Valid or Canceled Invalid and click , and the appointment will be removed from the Column and Month views of the calendar, but will still appear in List views and the client's Appointments & SOAPs screen; with a status of Canceled Valid or Canceled Invalid. (The client's name will be dimmed in the List views.)
Tip: Some practices use "Canceled Valid" to indicate when an appointment was canceled by the office, or by the client within an acceptable time frame. "Canceled Invalid" is intended to be used, for example, if your practice charges for last-minute cancellations.
Flag a No Show - Check No Show and click , and the appointment will remain in the all views of the calendar, and will appear in the client's Appointments & SOAPs screen with a status of No Show. (The client's name will also be colored on the List view.)
Tip: The cumulative statuses of a client's appointment history is tracked on the Client's Personal screen (SOAP Info tab), and from Reports/Templates & Marketing as the Clients' Visit & Invoice Summary.
Making Other Changes - You can always open the Appointment edit pop-up window to add to the Appointment Notes. Be sure to click to save any changes.
- The "Hide Initial Visit Flag" checkbox will show for an Initial Visit, which can be checked at any time. (See <<72>> for more info.)
- If the appointment is part of a recurring series, it can be isolated as a single appointment by clicking the Remove from Series link. To see the portal of all appointments in the series, click the conditional Recurring Appointment link. (See <<78>> for more info.)
In ClientTracker, finding appointments is the same as finding SOAP Notes or visits. All are synonymous as records of clients who will be or have been seen in your practice. An appointment becomes a "visit" in terminology after the appointment time passes. A SOAP Note is a medical record of a client visit.
To find any past, current, or upcoming visits & appointments, go to the Reports screen and run the "Find" report under Appointments & Visits. This opens the Find Appointments & Visits screen, where you can specify a variety of criteria.
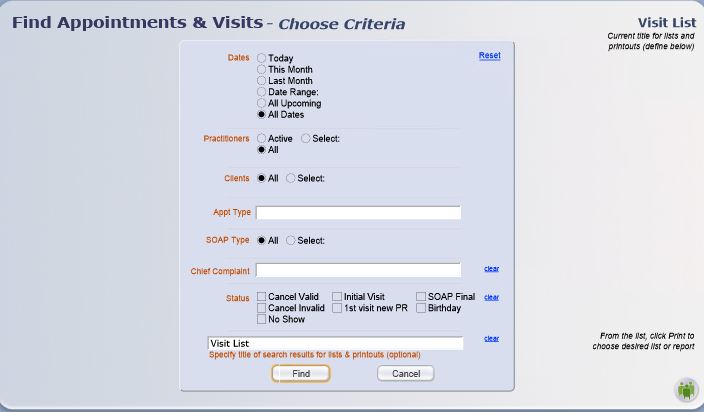
- Dates - Today, This Month, Last Month, All Dates, All Upcoming, or enter a Date Range
- Practitioners - Active, All, or select one from a drop-down menu
- Clients - All, or select one from a pop-up QuickFinder window
- SOAP Type - All, or select from a drop-down list of your categories
- Chief Complaint - Enter optional text to narrow your search to include only visits with SOAP Notes containing that text in the Chief Complaint field.
- Status - Show only those that meet any combination of Initial Visit, Birthday, No Show, Cancel Valid, or Cancel Invalid
You can also specify the title of the displayed results of your find, (also known as a "found set"), which will show as a sortable, editable list. From this list screen, you can choose to print the results with or without a title.
Printing Found Appointments or Visits
Before printing, you can omit any unwanted appointments/visits from
the report by clicking the button.
When ready, click the icon in the
Control Panel to open a pop-up window of "Visit Print Menu" choices.
Change or delete the title of the printout as needed, then select one
option:
Print as Appointments List = Like a schedule;
sorted by date and time; with appointment-related information.
Note: The appointments option is
also available via the Calendar. Clicking from
any Day view of the calendar gives you a preview of the Appointments
List, which you can then print. See <<84>> for more info.
Print as Visits/SOAPs (sorted exactly as you see in your displayed results)
- List (with visit-related information)
- SOAP Notes (one full SOAP Note for each visit)
Click to abort the printing process.
In ClientTracker you can put Clients on the "Waiting List" for an appointment. The controls for putting a Client on the Waiting List are found on their Personal screen. See <<838>> for more info.
The Waiting List Screen
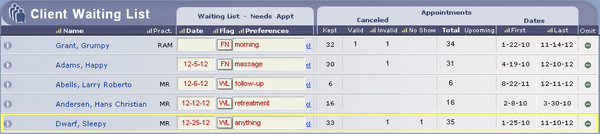
Get to this list by one of four ways:
- From any Calendar view, at the top menu, click on "Waiting List", then choose "Waiting List" from the menu. Or use a combination of keys: Hold down Control + Shift + L.
- From the Appointment pop-up window that is seen when you create an appointment, click the Waiting List button.
- From any Client List screen, click the multi-client icon and choose Client Waiting List from the drop-down menu.
- From any Client Personal screen, click the round Go (arrow) button in the Waiting List area.

On this Client Waiting List screen, you can edit the controls (shown with red text) that indicate why the Client is on the Waiting List. You can also sort the columns to organize your list.
Waiting List Controls
- Date = Target date for appointment
- Flag - Choose one:
- WL = Client requested to be on the Waiting List
- FN = Follow-up Needed
- Preference = A note about what the Client would prefer, or other info
- cl = Remove Client from Waiting List and clear all control fields
Tip: Take a moment to set a few standard "preferences" for your office to use. This way, you can sort the "Preferences" column to group them together. Examples: Anytime, ASAP. Morning, etc.
Make an Appointment from the Waiting List
When you open the Appointment pop-up window to create a new appointment, you can select a Client from a small version of the Waiting List within the pop-up window.
To see the waiting list "pick list," click the Waiting List button, to the left.
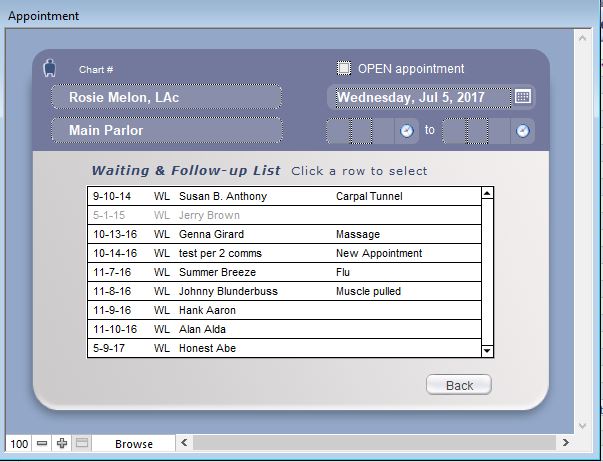
To select a Client for the appointment, click his/her row in the list. You will be asked if you want to remove the Client from the Waiting List, which will remove all the info in the control fields on his/her Personal screen, not delete the client.
Then proceed with making the appointment as usual.
Note: If you choose NOT to remove him/her from the Waiting List, you can still do it manually. After making the appointment, you can do clear the info from either the client's Personal screen or the Waiting List its
Beginning with version 5.2 in late 2014, in the little pop-up Appointment window, you can now quickly enter the Time In and Time Out for a patient. This offers some key advantages.
The calendar list view will show the status of the patient as: not in yet, in, or out
You can measure how long the appointment actually took
- Totals will show on Appointment reports
Appointment Pop-Up Window
The Time In & Out fields are located on the small blue Appointment pop-up window that is accessible from the Calendar or SOAP (including Visit Lists).

At the bottom of the Appointment pop-up, click the Time In or Time Out to enter the current time, and edit it as needed. When the Time Out has been entered, a Total will show below the time out.

Calendar View
The times will be displayed on the Calendar Day List View, in a color-coded manner to visually indicate the status. This is not available on any Graphic view of the Calendar.
- Yellow & Red = Time In (shows when Time Out is blank)
-- This shows AM as 10:15a, and PM as 12:52p - Green = Total time of appointment (calculated as Time Out - Time In)
-- This shows as "m" for minutes if less than an hour
-- If an hour or more, it shows as "h" for hours (see examples above)
Tip: The Time In, Out, and Total will show on the Appointments & Visits Status Report. See <<835>> for more info.
With v6.0 and higher, you can easily copy (or cut) and paste an appointment from one slot to another on the Graphical Calendar only. (There are no "slots" on the Appointment List view.) This is possible in Day, Week, Practitioner, or Room views of the Graphical Calendar.
DefinitionsInstructions
COPY = The original appointment stays in place
CUT = The original appointment is removed (deleted) after the PASTE step
PASTE = Make a new appointment (as many as you like)
KEYBOARD SHORTCUT = Ctrl+Shift+Click (hold down the Ctrl and Shift keys at the same time, and click the desired appointment or slot).
- Ctrl+Shift+Click on an existing appointment on the Graphical Calendar, and a dialog asks if you want to CUT or COPY this appointment.
- Make your choice, then find an empty slot in which you want the new appointment.
- Ctrl+Shift+Click on that slot, and continue holding down the keys until the Appointment window opens with the copied appointment info, and a dialog asks if you want to STOP or CONTINUE and paste more appointments with the same info.
- Choose STOP to end the process, or CONTINUE and repeat steps 2-4.
If you try to copy an appointment that is overlapping with others, only the topmost appointment can be copied.
You cannot paste an appointment into a slot that is already occupied by another appointment.
Details in this section include:
- <<79>>
- <<80>>
Recurring appointments are defined as a related series of appointments, with each starting out having all the same information except for the date. Recurring appointments in a series can be defined to repeat on one or more days per week; separated in increments of one week. This may be useful, for example, when you have a client who will be seeing the same practitioner on the same day(s) of the week; at the same time; on a regular schedule -- such as once every week.
- A series of recurring appointments can contain as many appointments as needed. There is no limit.
- A client can have an unlimited number of concurrent recurring appointment series.
- Appointments in a recurring series can be individually edited and rescheduled, and will remain as part of the series unless manually removed from the series.
- Appointments in a recurring series are evaluated by ClientTracker as individual appointments when checking for schedule conflicts.
- The first appointment for a recurring series cannot be made in the past.
EXAMPLE 1 - Jane Smith will be seen every Tuesday at 1pm, in the exam room. Her insurance pays for six visits, so this would be repeated six times, at a chosen frequency of every 1 week.
EXAMPLE 2 - Bob White needs to be seen twice a week for extended treatments. He is available on Monday and Friday afternoons only. Schedule recurring appointments on Monday and Friday at 1pm, and repeat once a week for 4 weeks. (A total of 8 appointments.)
EXAMPLE 3 - Mary Jones wants to be seen twice a week for a month, but is only available on Tuesday and Thursday; at different times. Because these appointments would not share the same time, they could be scheduled as either two separate series of recurring appointments, or as one - after which some of them would be individually edited to be at different times.
- From any Calendar view, click the icon in the Control Panel, or
- Click the button in the Appointment pop-up window
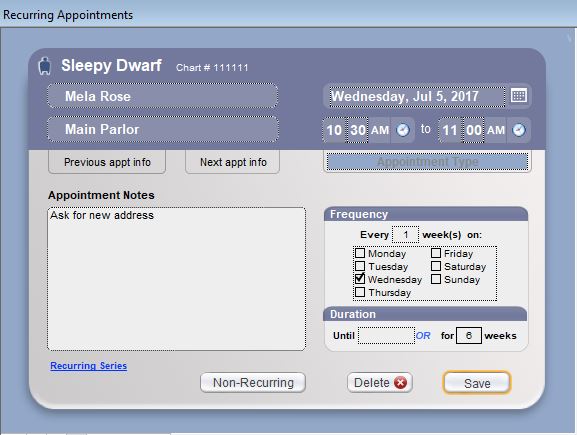
The Recurring Appointment pop-up window works much the same as for a single appointment. There is, however, additional information that must be added.
Note: The Recurring Appointments pop-up window will change to show additional displays that list the appointments being made (when sufficient info has been entered), and any conflicts that may result (after Save is clicked).
IMPORTANT
Whether Recurring Appointments or Recurring Reminders, there is a
lot of work for ClientTracker to do, and while it's doing all that work
the program will not respond. How fast it performs is due to several
factors, including the speed of your computer and how many appointments
or reminders you're trying to make.
When making many Recurring Appointments (for example the same appointment fo several weeks), it's normal for the process to take
3-5 minutes. It's best if you wait until you
don't need ClientTracker for a few minutes, and let it run its full
course so you don't wind up with a partially completed task or data
corruption from a force quit.
Additional information required for a series of Recurring Appointments:
- the Frequency, or increment of recurrence(must be at least 1)
- the day(s) of the week on which appointments will occur
- the Duration, or for how long the appointments will recur
EXAMPLE
- In the Recurring Appointment pop-up window, select a client, date, time, practitioner, and room as usual. The First Appointment Date will be the current date, or the selected date on the calendar.
- Set the Frequency, i.e. "Every __ weeks." This will set the interval between recurrence of the appointments. The number should be at least 1, which is entered automatically. For this example, enter 2. This field cannot be blank.
- Select the day(s) of the week on which you want the recurring appointments to repeat (the First Appointment Date is preselected). For this example, select Monday and Wednesday.
- Set a Duration to establish the number of recurring appointments in the series by defining the time period by end date ("Or until ____"), or in weeks ("For __ weeks"). For this example, enter "for 6 weeks."
- After Duration is set, the "Recurring" display (example below) will list the appointments that are part of the series, based on the parameters you have chosen. In this example, a total of 6 appointments will be made. You can change the parameters, and the displayed list will change, too.
- When you click , a pop-up window will confirm the dates and times of the appointments that will be made. Click to make the appointments, or to go back and change something.
- If there are any room conflicts, a warning message will appear, and you will be taken back to a display of the conflicts. Change the room and/or dates/times to resolve the conflicts.
Recurring Appointment Notes
Once a Recurring Appointment series is saved, all its appointments are linked in a series. With the option, you can choose to delete just the one appointment, or all in the series.
A small R will appear next to each appointment info on calendar and other displays throughout ClientTracker, to signify that this is a recurring appointment.
The same SOAP Template (if any) assigned to the selected practitioner will be applied to all the Recurring Appointments in a series. Changing the practitioner may change the SOAP Template.
- A Duration by date will schedule as many appointments as are possible within the date range beginning with the First Appointment Date (in the header), and ending with the Until date that you enter.
- A Duration by weeks will schedule a recurrence of the selected appointment days equal to the number you enter, and separated by the interval chosen in Frequency. To make recurring appointments just in the current week, both the Frequency and Duration should be 1.
Tip: Type either a number, e.g. "For 6 weeks" or a date, e.g. "Or until 7/24/2008," but not both. Clicking either field will delete any data in the other field.
- You can toggle back and forth from the Recurring Series display to the other Appointment Info by clicking the links.
- You can create a new client "on the fly" to be scheduled using Recurring Appointments. For more info on how this is done, see <<69>>.
- Clicking will abort the creation of a Recurring Appointment series, and permanently delete all information entered.
The details of each recurring appointment are viewed in the same Appointment Info pop-up window as for regular appointments. The entire series can be viewed by clicking the Recurring Appointment link in the pop-up window.
Each appointment in a recurring series is treated as an individual appointment by ClientTracker, but they all remain linked unless you remove one from the series (see below).
Editing recurring appointments is mostly like editing a single appointment (see <<487>>). The following special conditions apply:
- ClientTracker will offer the option to update certain changes in all the future appointments in a series. It looks for 5 things that could be changed: Date, Start and/or End Time, Practitioner, Room. and Status (aka Appt Type).
- If any have changed, a dialog asks if you want apply the same changes to any remaining appts in the series.
- A date change can only be applied if all the appts in the series are the same day of the week. It evaluates +/- days from the original date, and applies this to future appts in the series.
- A dialog asks if you want to resend Appointment Confirmations (ACE). If yes, the ACE includes an update "mini list" of the remaining appts, indicating they have changed*
*If the only change is Room or Status, these are not reflected in ACE
- The Appointment Edit pop-up window has a conditional link that shows, for example, if this is one of 4 Recurring Appointments, the Next-to-Last of 4 Recurring Appointments, or Last of 4 Recurring Appointments in a series. Clicking this will display the portal of all the appointments in the series, which cannot be edited from the portal.
Clicking one of the above links will show a portal of all appointments in the recurring series. This is for informational purposes only, and cannot be edited.
Recurring appointments that have a linked invoice will show with highlighted yellow text in this list. These cannot be deleted until the invoice is unlinked.
Click View List to see all the recurring appointments in the portal as a printable, sortable list, or Close to return to the previous view.
Remove an Appointment from a Recurring Series
Another link in the pop-up window, Remove from Series, will ask when clicked, "Are you sure you want to remove this appointment from its recurring series?"
- Select , and the appointment will appear on all schedules as a single appointment, and will no longer be associated with the series of recurring appointments. For example, removing it will prevent the appointment from being deleted as part of the series.
- Select , and the appointment will remain as part of the series of recurring appointments, and would be deleted if the series is ever deleted.
- The "last" or "second to last" labels for recurring appointments will not count those that were edited as single appointments and thus removed from the series.
- Editing individual appointments in a recurring series will not change information for the rest of the appointments in the series. To edit an entire series of appointments (e.g. change the day for all in the series), simply delete the entire series and create a new series with the desired change.
- If you access the SOAP note for any appointment in a recurring series, a field just below the client's name says whether this is the last or next-to-last appointment in the series.
Tip: To see a list of all appointments (single or recurring from the past, present, and future), go to the client's Appointments & SOAPs tab.
Details in this section include:
- <<1044>>
- <<490>>
- <<1045>>
- <<730>>
- <<834>>
- <<871>>
If enabled, ClientTracker will send an automatic email and/or text confirmation to clients, immediately after an appointment is created. The first confirmation that is sent when the appointment is first put on the calendar, cannot be edited. To enable this feature,
- The Email Sending Method must be set to send emails. See <<426>>
- The client must have an email and/or text address checked as "Use" on their Personal screen. and the Enable appt confirmation box must be checked.
- Your own online email program must be functional.
- The appointment being scheduled must be at least 1 day in the future.
To disable this feature, go to Settings/Program, and look for the Appointment Confirmation tab. Set all Clients' email confirmation to Off, and make sure the checkbox for "Default: Turn on for all new Clients" is unchecked. You can temporarily disable this feature at any time, and re-enable individually, by client or for all of your clients, checking the clients' Enable appt confirmation.
Default or Practitioner Templates
By default, ClientTracker uses one built-in Appointment Confirmation template to send emails and text. To view and customize this template, go to the Templates Manager in the Reports area, on the Templates & Marketing tab.
- You can also get there from the Appointment Confirmation tab in Settings, by clicking the More button and the Edit Default Template link. To see more about how this template works, see <<490>>
- To enable custom Practitioner Templates, including different ones for New Clients, Email, and Text messages, see <<1045>> below.
Scheduled Appointment Confirmations
If you would like ClientTracker to automatically send confirmations 1, 2, or 3 days before the appointment, use the controls on the Appointment Confirmation tab. See <<834>> below for more info.
Manually Send Confirmations
If you need to resend the appointment confirmation email, this can be done anytime up to the day before an appointment, if the above conditions still apply.
- Click an appointment to open the Appointment Info pop-up window, and
click the Resend Confirmation Email link. This link will only appear
when the above conditions are met.
- View any day's schedule on the calendar by List, and look for the blue Email icons in the "Conf Email" column to the right of the list. This icon will only appear when the above conditions are met. Clicking this icon will send the email.
Tip: Use the calendar List view to send reminders to all scheduled clients a few days before their appointments.
You can keep track of when an appointment has been confirmed by entering a date in the "Confirmed" field that appears on the calendar List view, or on the Appointment Info pop-up window. Sending or resending an appointment confirmation email will not automatically enter any date into this field; it is intended only as an optional method to be used if your practice finds it helpful.
Other Things You Can Do
- You may set the practitioner's record to receive a
BCC of all Automatic Email Confirmations generated for her schedule.
See <<1048>> for more info.
- Click to see other information about the Automatic Appointment Confirmation Email, including a link to this manual, or to preview your Google Map.
To edit this template:
- Go to the Reports area and click the Templates & Marketing tab, and click the "Appointment Confirmation" template
- From the Settings/Program/Defaults/Appointment Confirmation tab, click the More button to locate the Edit Default Template link and click it
Tip: If a message says "You have no confirmation template," choose the option to restore it. This message may show even if your ACE Template appears in the list on the Templates & Marketing tab. Do this if you get an error message "There is no text in the body" when attempting to send a confirmation.
- For more information, see <<428>>.

When the automatic sending of appointment confirmation emails is enabled for the default template, it is important to keep the following in mind:
- Only the default Communication Template that comes with ClientTracker can be sent automatically. This template cannot be deleted, but it can be customized. Changing the subject or any merge field (e.g. %%appt_info%%) will alter the performance of the email. The template can be restored to its original format, but any changes you have made will be lost.
- You may select whether to send the email with Start and End Time of the appointment, or just the end time. See <<83>> above for more info.
- If you create your own Communication Template to use for appointment confirmation, it will not be sent automatically by ClientTracker. You would have to type in the appointment information and send it manually. However, an email sent in this manner would be tracked in the client's Communications portal on their Personal screen.
- Of course you can always compose and send your own email to clients, using your own email program, but these emails will not be tracked by ClientTracker.
For more information about using Communication Templates, see <<144>>.
Note: This is an optional feature that you have to deliberately choose in Settings. If you don't choose this option, your ClientTracker will use the Default Template when sending appointment confirmations.
- See <<1054>> for more info about how this feature works and affects appointment confirmations.
- See <<83>> above for more info if you just want to use the ClientTracker default.
How to Convert to Custom Practitioner Templates
When you convert to using Custom Practitioner Templates for confirmations, each active Practitioner will have 3 templates created:
- New Clients
- Text
- For more info about editing and customizing your new templates, see <<1054>>
Steps to Convert
- Go to the Settings area on the Program/Defaults tab, and open the Appointment Confirmations tab
- Click the More button to access the conversion button
- Click the Use Practitioner Templates button, and wait a few seconds (the more active Practitioners you have, the longer it will take)
- Go to your new Practitioner Templates and customize them
Using Default Templates Using Practitioner Templates
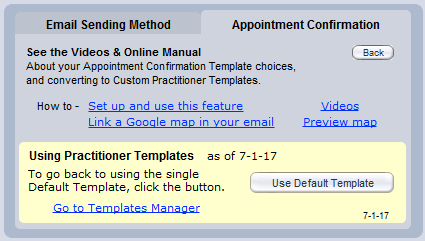
Tip: To switch back to using a single Default Template, click the Use Default Template button. The Practitioner Templates will be saved (but not accessible), in case you want to use them again in the future.
- Go to the Reports area, on the Templates & Marketing tab, and select the Communications Template called "Appointment Confirmation."
- In the Composer screen for the Appointment Confirmation template, click the Merge Fields tab, place your cursor in the body of the email where you want the link to appear, and click "Practice Map" from the list.
Tip: Some email programs may not convert the text of the merge field URL into a clickable link in the recipient's email. We recommend testing by making an appointment for a "client" who has your email set up. You should also include in your template the phrase, "Note: If the above link doesn?t work, copy and paste the entire URL into your browser."
Appointment Confirmation Email (or text) = ACE
Note: If you have enabled ACE, ClientTracker will send it by default when the appointment is made. This section describes an optional feature where you may choose to continue the default function or disable it. You may also tell ClientTracker to send the ACE 1, 2, or 3 days before the appointment.
RULES & EXAMPLES
ACE is sent to qualified recipients (clients) only. A qualified recipient has a valid email marked "Use," and the Enable appt confirmation box checked on the Client Personal screen.
By default, ClientTracker will send an ACE to qualified recipients at the time the appointment is made (except for past or same-day appointments). For more details about how this works, see <<1044>> .
Scheduled ACE can only sent for today's appts or future days.
ClientTracker will send scheduled ACE the first time you login each day, and only if you login. If you don't login because of weekends or holidays, the next time you login ClientTracker will send any ACE that still need to be sent according to the settings.
EXAMPLE 1: You have it set to send ACE 2 days before the appointment. You are closed Saturday and Sunday, so you don't login and no email is sent on those days. When you login on Monday, any ACE for Monday, Tuesday, and Wednesday will be sent.
- If you want to send confirmation email for any current or future day (when it was not sent automatically), go to the Calendar List View for those days and click the button, Send All Conf Email.
IMPORTANT: Open your ClientTracker first thing in the morning to make best use of the scheduled ACE feature, and close it at the end of each business day.
This feature will not work if you have your ClientTracker set to "alert for items to reorder on startup" in the Settings/Program area, on the Defaults tab. If you want to use Scheduled ACE, be sure that box is unchecked.
How to Set Up Scheduled ACE
On the Settings/Program/Default tab, go to the sub-tab: Appointment Confirmation.

Send scheduled ACE [ ] days before the appt
Enter the number 1, 2, or 3 to represent how many days before the appointment you'd like the ACE to be sent. Each day when you login, ClientTracker will find appointments that meet your criteria, and send an ACE to qualified recipients. This may take a few seconds, and a progress screen may show temporarily, depending on appointment volume. Click the clear link to disable this feature.
[ ] Do not send ACE when appt is made
Check this box to override the ClientTracker default, and prevent the sending the ACE at the time the appointment is made. Optionally, you can leave this unchecked and send an ACE twice: when the appointment is made, and again on the designated day before the appointment.
[ ] Do not mark as confirmed when sent
Check this box to NOT enter the current date in the Confirmed Date field for this appointment. Use this if you prefer to fill in that date manually.
To turn off this feature, click the Turn Off link that appears once you have set it up.
Tip: You can also send a batch of ACE for any single day any time you want, on the Calendar Day List View. Click the Send All Conf Email button at the bottom right of the screen, and ClientTracker will evaluate all the appointments on that day's schedule, and send an ACE to qualified recipients. This may take a few seconds if you have many appointments for that day. See <<871>> below.
You can also send a single ACE from two other places:

Click this button on the Calendar Day List View for each recipient
Or on the Appointment pop-up window, click the Send Email icon
If you confirm the appointment by phone or in person, you may just enter the date in the Confirmed field.
Note: Any scheduled ACE will be sent using the Email Sending Method you have chosen in Settings/Program/Defaults. Because multiple emails will be evaluated and sent at one time, this works best if you are using Method 2 (send email using your email provider). For more info about how to set up and test your Email Sending method, see <<660>>.
Appointment Confirmations (ACE) can be sent from the Calendar List View in 2 ways:
- Click on the blue @ button next to the Confirmed field at the right of an appointment (which shows only if the rules below are met)
- Click the Send All Conf Email button (will send to all those who meet the rules below)
Rules for the blue Email button to show and ACE to be sent:
- ACE can be sent sent to qualified recipients (clients) only. A qualified recipient
has a valid email marked "Use," and the Enable appt
confirmation box checked on the Client Personal screen.
- ACE can be sent up to the day of an appointment
- Your email settings must be set to send email, and a test email confirmed. For more info how to do this, see <<426>>.
Send All Confirmations for One Day
If the above rules are met, you can send email to all qualified recipients for any one day by clicking the Send All Conf Email button found at the bottom of the Calendar List View screen. It will send email for whatever list is chosen (a single practitioner or all practitioners).
The Print icon in the Control Panel of all Calendar screens will print appointments in different sets and formats, depending on the current status of the Calendar.
Details in this section include:
- <<632>>
List Views
All Appointments - Prints a schedule showing appointments within the entered Date Range for the selected practitioner, or for all of ClientTracker if "All Active Practitioners" is selected. Uses Visit Print Menu (see <<632>> below).
Day View - Prints a schedule of all the appointments for the currently selected day and practitioner; or All Practitioners. Uses Visit Print Menu (see <<632>> below).
Column Views
By Practitioner - Prints a schedule of all the appointments for the currently selected day and practitioner (or All Practitioners). Uses Visit Print Menu (see <<632>> below).
By Room - Prints a schedule of all the appointments for the currently selected
day, with a choice of printing one page for each room, or all the day's appointments sorted by room.
Week View - This will print on a static 1-page format with 7 columns for the days of the week. Additional pages may print if the schedule is heavily booked. Appointments are listed in time order, with minimal information about each.
Tip: You can also use the Date Range option in the "All Appointments" view to print a schedule for any week, month, or other period.
Month View
The Month View prints in a static 1-page format that closely resembles what you see on the screen.
Calendar printouts are organized like a schedule (unless otherwise noted above), and the appointments are sorted by date and time. The following information is on the schedule:
- Start & end time
- Client name
- Appointment or visit status
- Primary phone number of the client
- Scheduled practitioner and room
- The client ID used by your practice (if enabled)
- Appointment notes
- All Appointments
- Day List
- Column View by Practitioner
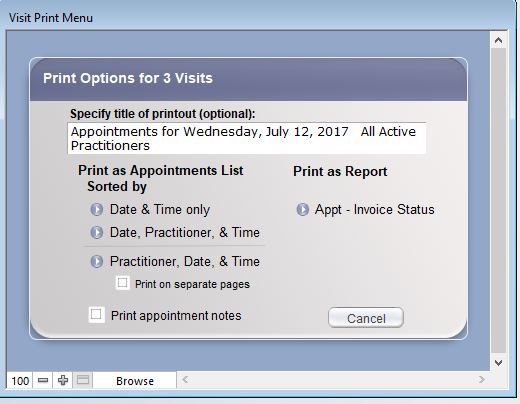
Options available on this screen include:
-- Changing the title of the printed schedule from the one suggested by ClientTracker
-- Selecting the sort order (see below)
-- Choosing to print appointment notes or not
Tip: To print a day's schedule for each practitioner in your practice, select to view each practitioner's schedule in Day View, and print each schedule individually. This will save paper in case updates need to be printed for just one or two practitioners.
Appointment Schedule Sort Order
Date & Time - Prints with sections for each Date, with Reminders at the top and appointments sorted by time within each section.
Date, Practitioner, and Time - Prints with sections for each Date, with Reminders at the top of each section. Within each Date there are subsections for each Practitioner selected, with appointments sorted by time within each subsection.
Practitioner, Date, and Time - Prints with sections for each Practitioner, with Reminders at the top of each section. Within each section there are subsections for each Date selected, with appointments sorted by time within each subsection.
Note: Reminders will be shown in aggregate for all practitioners in a date, or just for each practitioner; depending on the starting view and selected sort order. Reminders for All Practitioners will show in each practitioner's section.
ClientTracker's calendar allows the entry of custom reminders for any time displayed on the calendar. Reminders can be created singly or in a recurring series, and edited or printed just like appointments. Ultimately, you will decide how best to use reminders for your practice.
Details in this section include:
- <<86>>
- <<88>>
- <<87>>
- <<491>>
- <<776>>
Reminders have no function other than to appear on the calendar and printed schedules. It is possible to mark a reminder as "done."
Tip: Reminders can be used to show when a time slot is unavailable and why, e.g. "Lunch." However, the existence of a Reminder used in this way will not prevent scheduling an appointment, in case one is needed at that time.
From the different Calendar screens, you can create a reminder in 2 different ways:
- Column Views only: Ctrl+click on any time slot. (Even if it already has an appointment or reminder.)
- All screens: Click the button in the Control Panel.
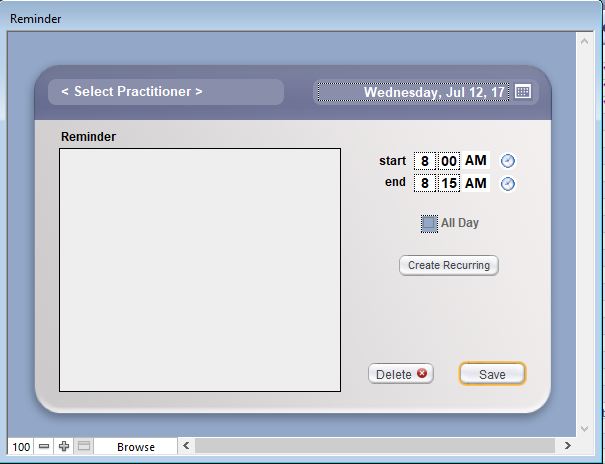
In the pop-up Reminder window, fill in the reminder information.
-- Practitioner will auto-fill if created from a practitioner column.
-- Start and End time. Each reminder has a duration, just like an appointment. The default is 15 minutes. A reminder must have an end time in order to show up on the calendar.
-- Reminder text - This text will show on the calendar, up to the space allotted.
-- Click to abort and erase the reminder, or to keep it.
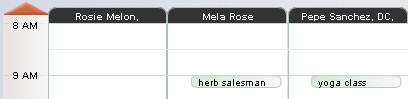
Saved reminders will show as a green bubble on the calendar Column Views, and as a row at the bottom of the List View. On the Month View, a green text flag, Reminders, will show if any have been created for that day. In addition, a flag will notify you if a reminder appears before or after the time range displayed on a Column View.
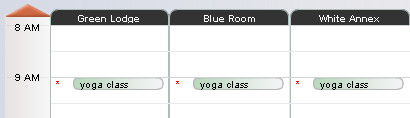
- Reminders will show for all Rooms when in Graphic View by Room; whether made for one practitioner or all.
- If more than one Reminder is made in a time slot for any reason:
- Only the most recently made Reminder will show (with a red asterisk) on the Graphic View by Room.
- When clicking multiple Reminders, you will see the pop-up only for the first one made.
- To see all Reminders in that time slot, go to List View.
Click on a reminder in the calendar Column or List views, and a pop-up window will allow viewing & editing of any reminder information. Reminders can also be marked as Done in this pop-up window, or on the Calendar List View, and they will become dimmed in all views.
Click to save the reminder and close the pop-up window. You can also click to permanently delete the reminder.
Tip: Use the edit feature to quickly "fast forward" a reminder to another date/time (uncheck the Done box as needed).
The rules for recurring reminders are the same as for recurring appointments. For more info, see <<78>>.
Recurring reminders are made in much the same way as a single reminder.
- From any Calendar view, click the icon in the Control Panel, or
- Click the button in the Reminder pop-up window
The Recurring Reminders pop-up window works much the same as for a
single reminder. The only differences are that you also select the
day(s) of the week on which reminders will occur, the Frequency, or increment of recurrence, and the Duration, or for how long the reminders will reoccur.
There are additional displays that list the reminders being made (when sufficient info has been entered).
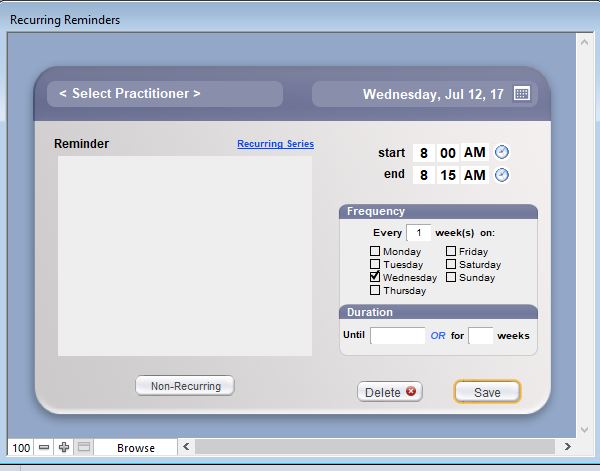
Recurring Reminder Notes
When creating Recurring Appointments or Recurring Reminders, there is a
lot of work for ClientTracker to do, and while it's doing all that work
the program will not respond. How fast it performs is due to several
factors, including the speed of your computer and how many appointments
or reminders you're trying to make.
When making many Recurring Reminders (for example blocking out
a lunch hour for several weeks), it's normal for the process to take
3-5 minutes. It's best if you wait until you
don't need ClientTracker for a few minutes, and let it run its full
course so you don't wind up with a partially completed task or data
corruption from a force quit.
- Once a Recurring Reminder series is saved, all its reminders are linked for editing purposes -- including the option, with which you can choose to delete just the one reminder, or all in the series.
- A small R will appear next to each appointment info on calendar and other displays throughout ClientTracker, to signify that this is a recurring appointment.
- A Duration by date will schedule as many reminders as are possible within the date range beginning with the Date in the header, and ending with the Until date that you enter.
- A Duration by weeks will schedule a recurrence of the selected reminder days equal to the number you enter, and separated by the interval chosen in Frequency.
Tip: Type either a number, e.g. "For 6 weeks" or a date, e.g. "Or until 7/24/2008," but not both. Clicking either field will delete any data in the other field.
- You can toggle back and forth from the Recurring Series display to the other Reminder Info by clicking the links.
- Clicking will abort the creation of a Recurring Appointment series, and permanently delete all information entered.
Each reminder in a recurring series is treated as an individual reminder by ClientTracker. Editing recurring reminders is mostly like editing a single reminder (see above). The entire series can be viewed by clicking the Recurring Reminder link in the pop-up window.
The following special conditions apply:
When you edit a Recurring Reminder, certain changes will prompt ClientTracker to ask if you want to apply those changes to all the future reminders in the series.
- The program looks for 4 things that could be changed: Date, Start and/or end times, Practitioner(s), and the Reminder text.
- If any have changed, a dialog asks if you want apply the same changes to any remaining reminders in the series.
- A date change can only be applied if all the reminders in the series are the same day of the week. It evaluates +/- days from original date, and applies this to future reminders in the series.
- The pop-up window has a conditional link that shows if this is a Recurring Reminder. Clicking this will display the portal of all the reminders in the series, which cannot be edited from the portal.
- Another link in the pop-up window, Remove from Series, will ask when clicked, "Are you sure you want to remove this reminder from its recurring series?"
- Select , and the reminder will no longer be associated with the series of recurring reminders. For example, removing it will prevent the reminder from being deleted as part of the series.
- Select , and the reminder will remain as part of the series of recurring reminders, and would be deleted if the series is ever deleted.
- Editing individual reminders in a recurring series will not change information for the rest of the reminders in the series. To edit an entire series of reminders (e.g. change the day for all in the series), simply delete the entire series and create a new series with the desired change.
Reminders can be used on the Column View schedule as a way to "block" appointments, or to indicate unavailable time slots, e.g. Lunch.
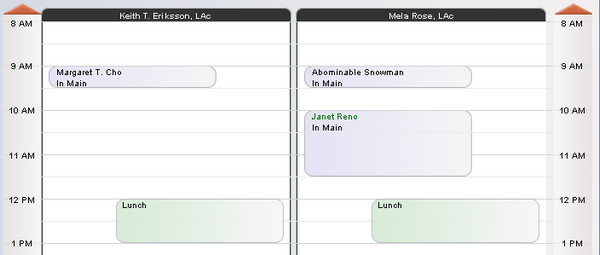
Simply create a Reminder in the time slot(s) that are unavailable, and it can be seen graphically on the Column View schedule.
Tip: Use Recurring Reminders to create a series of blocked time slots, or to establish the schedule of practitioners if they reoccur in a pattern. See <<87>> above for more info.
Tip: The Column View is the best way to view blocked appointments that are indicated by Reminders.
Note: A Reminder will not prevent the making of an appointment in that time slot, so you can override it as needed for your schedule.
Details in this section include:
- <<485>>

From any calendar column or list layout, click the button to export appointments from the calendar to a choice of either .vcs (vCalendar) or .ics (iCalendar) format file on your computer's desktop.
Tip: In version 5.0 or later, this option is available on the List View, in the top menu under File --> Export Appointments.
From there, you can use the file as you wish. For example, you may import it into an PDA or other program where you need to see your schedule.
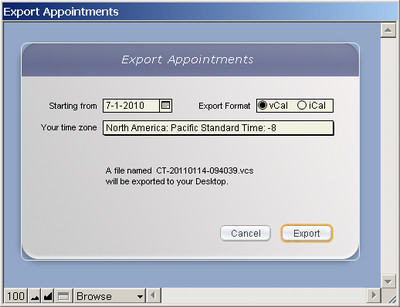
A pop-up window will open with a drop-down calendar from which you can select the Starting Date and Export Format. All appointments from that date forward will be exported to a file on your desktop with the file name and type indicated.
Click to abort the export process.
Tip: The first time you export ClientTracker calendar data, only do a days, in case you make an error on your first try. You may also want to make an additional "ClientTracker" calendar in your Google or other calendar program.You can perform the Export Appointments process as often as you like. The issues regarding how the data in the .vcs or .ics file will be handled by your other calendar program should be explained in its own documentation. Google calendar wants the .ics (iCal) export.
Tip: If you change any info in an existing appointment in ClientTracker, and that appointment has already been exported, the changes should be updated in your other calendar upon import. ClientTracker has been programmed to support this; however, the action may or may not be supported by your other calendar program.
For your appointments to export correctly, you must set the time zone for your practice. Do this in Settings/Program, Calendar Defaults, or when you export the appointments.
Note: The Time Zone for your practice needs to be updated with the change to and from daylight savings.- The appointments are exported to a .ics format file named with a formula that includes the date and time and saved on your desktop.
- At the time of release, version 4.0 of ClientTracker produces a .ics file that should be compatible with Outlook 2007 and higher, and other programs. Check the documentation of other calendar programs.
- If you want to export your appointments to a portable device, you can then sync your device with your calendar application. Or if you have other software that you use to sync your portable device, you may be able to import the import.ics file directly into that software.
- Because ClientTracker tracks items associated with appointments (practitioner, room and defaults for SOAP), importing new appointments or changes in existing appointments from another program or external device into ClientTracker is not possible because these associations would not be kept intact. It is strictly a one-way export from ClientTracker to a file on your desktop; then import into your other calendar and/or device.
ClientTracker Mobile Video
- For more information, or if you have any questions, contact Ginkgo Support.
- <<1063>>
- <<1074>>
- <<1075>>
- <<1077>>
- <<1076>>
First, verify insurance benefits, track that information on the Insurance verification tab.  Enter relevant information when you have verified benefits.
If you entered Verification information previously or "legacy data" you can see this by clicking the "i" button to the right of the word Policy.
Name the insurance verification. We recommend naming verification the type of visit, like Acupuncture.
If you want to track an insurance series, choose the verification name and then for the Authorization Click + New. Name the visit series, we recommend the name/ Reason (back pain, neck pain.)
Then enter the information for that visit series making sure to enter one of the three following, # of visits allowed, dollar amount cap, and\or am expiation date. Once you fill this in and assign visits to the series, ClientTracker will track used and remaining visits.
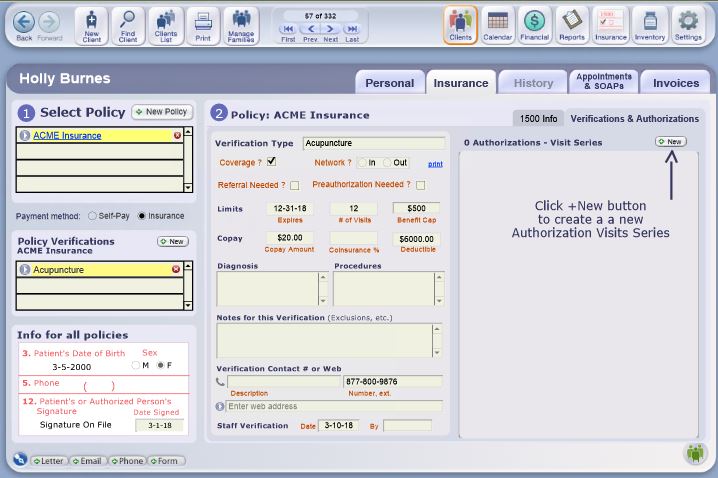
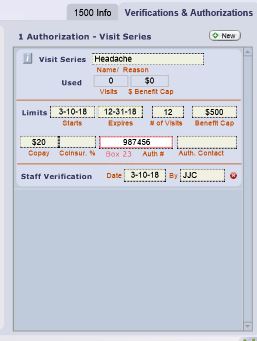
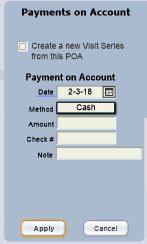
To create a POA package, go to the Client Record, Invoices and Payments on Account tab.
Click New Payment and check the Create new visit series from this POA box. This is intended for Non-Insurance or Patient Pre-Paid visit packages.
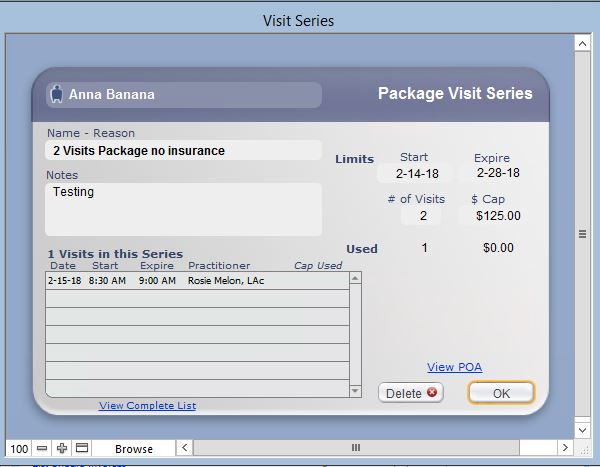
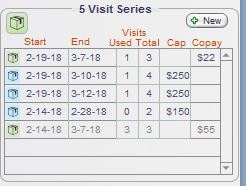
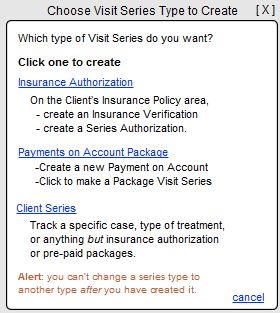
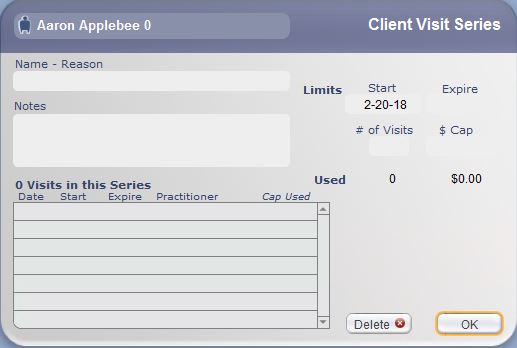
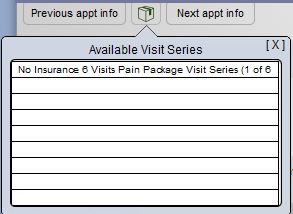
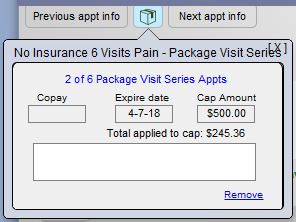


![]()
The Clients icon in the main Functions Bar will take you to the Client List screen, where you can quickly locate a single client from a list of all active clients. This is also an optional startup screen, which can be selected under Settings/Program/Defaults.
This section of the manual has the following details:
- <<522>>
- <<473>>
- <<23>>
- <<24>>
- <<521>>
- <<749>>
- <<523>>
- <<963>>
The Clients Control Panel has five main icons:
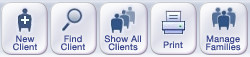
- - To create a new client after checking for duplicates (see <<473>>)
- - Goes to the Client QuickFinder screen. From there, an Advanced Find may also be performed (see <<23>>)
- - Goes to the main list of all clients in ClientTracker (including incative ones), with information about the client such as appointment dates, account balance, and so on (see <<522>>)
- This becomes the button on the list screen itself, which can be used to restore the entire list after narrowing its contents
- - Opens a menu of print options for a single client, or for multiple clients from the main list (see <<521>>)
- - Goes to the main screen to create or edit Families, or groups of related clients (see <<523>>)
Once you have accessed a specific client's record, there are five main screens in that client's area; represented by five navigation tabs:

- The Personal screen, where most of the information about a client is entered and stored. Clicking a row in the Client QuickFinder or Clients List will take you here.
- The Insurance screen, where you can enter information about any insurance policies used by a client
- The History screen, for recording medical history, allergies, etc. about a client
- The Appointments & SOAPs screen, which is a view-only, sortable list of all client visits
- Past visits will usually have a SOAP Note, and are often referred to as "SOAPs"
- Future visits will usually not have a SOAP Note, and are often referred to as "appointments"
- The Invoices screen, where information about client invoices, statements, and payments can be found and entered
Note: The tab titles are gray if there is no information in them.
This is a sortable list of all active client records in ClientTracker that is accessible by clicking the icon in the Control Panel of the clients area. It is also the screen on which results of an Advanced Find are displayed.
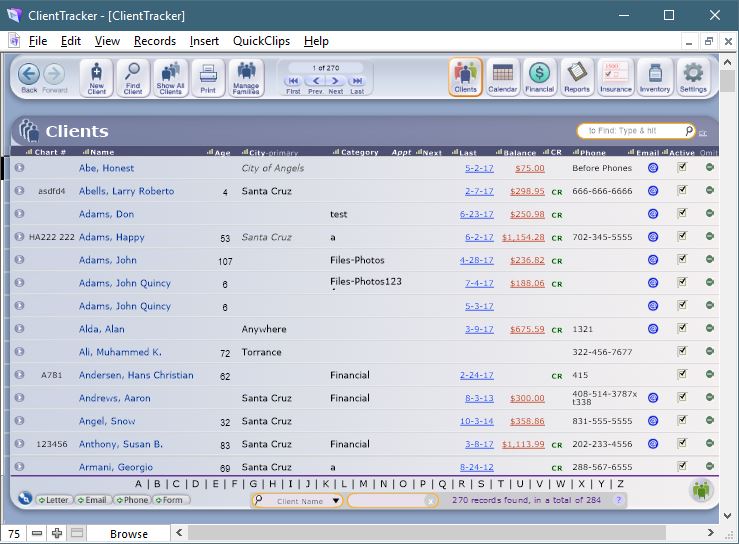
List Functions
Control Panel - This functions as described above.
The list is sortable by clicking headers marked with the sort symbol. Toggle between ascending or descending sorts, and Shift+click to reset.

- Use the QuickFinder to quickly narrow the list of clients based on what you type, and keyed on the various columns of the list. See <<553>> for more info.

Beginning in version 6.0, there is also Search Bar at the top right of
the list, which searches on the Client Name when you type a
value and press Enter.
View Selector
Available views include:
- Client List - Takes you back to the Client List view
- Source of Clients - From where were clients referred?
- Client Summary - Statistics about invoices, appointments, and invoices
- For more info see <<219>>.
- Clients Who Made Referrals - Info about clients who referred other clients
- For more info see <<437>>.
- Client Waiting List - Info about clients who referred other clients
- For more info see <<437>>.
Row Actions (Left to Right)
- The currently selected row may or may not be highlighted with a yellow border. To highlight it, go to Settings/Program/Utilities and in List Views, click Yes and Apply.
- If you have designated a Client ID (e.g. Chart #), this column can be edited for each client.
Click the Go button
or the left side of a client's row (or the whole row) to see the detail, or Personal screen of any client- Click the Next or Last appointment link to open the Appointment pop-up window for each
- Click the red Balance link (if any) to view the client's Invoices screen
- A small green CR will show if the client has any available credits
 to send an email to a client (this does not show unless there is a valid email address marked as 'Use' on the client's Personal screen)
- Clients can be marked Active, or inactivated by unchecking the box
Click to remove a record temporarily from the list, for example, before printing. If you omit a record, when you leave and go back to this page, the record will show again.
The currently selected row may or may not be highlighted with a yellow border. To highlight it, go to Settings/Program/Utilities and in List Views, click Yes and Apply.
Click the icon in the Control Panel of any client screen to open a pop-up window, where you can enter all or part of the client's name. This pop-up window has two small QuickFinder portals that will show any existing Clients or Non-Client Insured people who match what you have typed. This is an important step to reduce the number of duplicate entries, and to avoid having to enter unnecessary information.
Tip: Hover your mouse over any name in a portal, and a tooltip will show more information about that person.
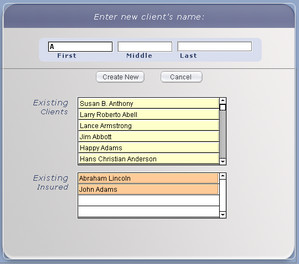
If you see a match, click the person's name:
Client - Will go to that client's Personal screen, where you can verify the client's identity and use the record, or click the button againInsured - Will go to the detail screen for the Non-Client Insured person, where you can click the button to use their information as a client, or the button to return to the Clients area. See <<41>> for more info.
If you are sure that there are no matches, you can click the button at any time. Any text you have entered will be used in the new client's name fields.
A new client record must have a first and last name, and at least one phone number to be used.
Note: A new client can also be created "on the fly" during the creation of an appointment in the Calendar. For more information, see <<69>>.
This utility at the bottom of the Clients List screen is the fastest way to find a single client. Its display and functions are intended to help you narrow your search, and to see more information about a single client, or a found set of clients. For additional search criteria, or to find a group of clients matching combined criteria, click the icon in the Control Panel. See <<24>> below.

Tip: Begin typing any part of a client's name in the QuickFinder, and the list will change with each keystroke, showing all clients whose first, last, or middle names match the typed text. The list can be sorted for better viewing of the results.
The left, or "Target" field of the QuickFinder has a drop-down menu of the column headers on the List. Select a column from the pop-up menu, and start typing search criteria in the right field to filter the list results.
When you see the matching client(s) in the list, you can perform any of the same functions as described for the Client List above.
Tip: To return to the full Client List after using the QuickFinder, click the (x) button at the right of the QuickFinder panel.
Click the on the Control Panel, and you will be able to find one or more clients that match multiple, flexible criteria. This is the method for creating a Birthday List.
The Choose Criteria selections involve four decisions, or categories:
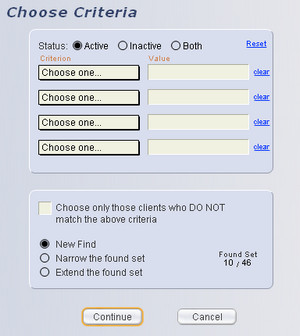
Status - Select if you want to find Active or Inactive clients, or both (all clients). One of these must always be selected.
Criteria - Choose up to four criteria from the drop-down menu, and enter a pertinent value. For example, the criterion "Birth Month" expects the name of a month. Use a symbol before a value to further define or limit your results. You can combine up to four criteria, and search for clients who match (or do not match) all of them. Use optional search operators to define your values (see below).
Criteria Match - Check this box only if you want to find clients who DO NOT match the above criteria.
Type of Find - Select if these criteria will be a New Find, will Narrow the found set, or Extend the found set.
Optionally, you may enter Search Criteria to expand your search criteria. See <<556>> for more info.
Tips About Finding Clients:-- A "found set" is a set of records that results from a Find. The resulting found set will be displayed on the main Clients List screen, from which you can print labels, lists, envelopes, etc.
-- Make a Birthday List by finding clients whose birthdays fall in a chosen month. Searching on the specific DOB is not possible in this version. The DOB will show on the "Basic List," which can be printed from the Client List screen.
-- To make a reusable Birthday Letter template and send it as a letter or email, you would create a Communications Template, then create a new communication with multiple recipients. Clients whose birthdays fall in a specific month can be added as a group of multiple recipients. See <<161>> for more info.
Type of Find - Use these choices to determine the effect your search will have on the previous found set (if any).
- New Find - Replaces the found set with the search results.
- Narrow the found set - Finds matching criteria within the existing found set, and omits the others.
- Extend the found set - Adds to the existing found set any records that match the new criteria.
You can go back to the Advanced Find screen repeatedly, and narrow or extend your found set as often as needed.
When you are ready, click the button to view the Advanced Find results. If there are no records that match your criteria, you will get a message box, and be returned to the Advanced Find screen.
Tip: The number of records in the found set will display on the Clients List in the Record Navigator, along with the total number of records available (e.g. 25 of 50). Another display is in the QuickFinder on the Clients List, e.g. "25 records found, in a total of 50." In addition, the results display as "Found Set 25/50" near the bottom of the Advanced Find screen.
Click the icon from most client screens to open the Print Menu pop-up window, from which a variety of information about one client (or a list of clients, if you are on a List screen) can be printed.
Print Options for All Screens
- Envelopes - Print a single #10 plain or pre-printed envelope for the current client, or all in a list.
- Labels - Print a Mailing 30-up label (Avery 5160, 1" x 2-5/8") or a Shipping label (Avery 5453, 3" x 4") for the current client, or all in a list.
- Client Information - Print a summary of Personal Info or any client History for the current client, or all in a list.
Client Personal Options (available only on the Personal screen)
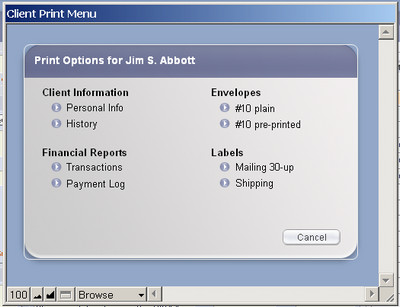
- Personal Info - Opens a dialog box with 2 choices:
- Office - Prints much like the Personal screen itself, with name, age, category, etc. Intended only for in-house use (not to be seen by client)
- Client - Shows only the client's contact, family, and insurance info (e.g. for use in verifying this info)
- History - Prints a simple text document of the large field on the Initial tab of the History screen
Financial Reports
- Transactions - Goes to the Transactions Report setup screen, with the client already selected
- Payment Log - Goes to the Payment Log Report setup screen, with the client already selected
Client List Options (available only on client List screens)
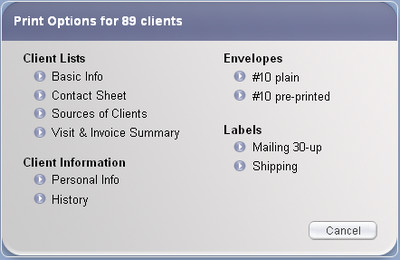
- Basic Info - Prints much like the Main List itself, with name, age, category, etc.
- Contact Sheet - Prints a list with address, phone, and email info for each client.
- Source of Clients - Prints info about each client similar to that seen on the Source of Clients view.
- Visit & Info Summary - Prints info about each client similar to that seen on the Visit & Info Summary view.
Other Options (available only on client screens other than List)
- Financial Reports - Print a Transactions or Payment Log for the current client. For more info about running these reports, see <<607>>.
Note: When viewing the list of client Appointments & SOAPs, these print options will not be available. Instead, the icon will print a list of the appointments & SOAPs.
To export a preset list of data about any group, or "found set" of clients. The data will be exported not just for the client you are currently viewing, but for all in the found set.
- If you are on the Client List, the found set will be all the clients shown on the list, and noted in the Record Navigator in the Control Panel at the top of the screen, e.g. "1 of 21" will export records for all 21 clients on the current list.
- If you are in a Client's Personal screen, you will still export for all the clients shown on the Record Navigator.
The data to be exported cannot be changed, except in the export file you create. You can edit your export file any way you choose, and that's not part of ClientTracker's functions.
How To Export Client Data
- On the top Main Menu, select File, and then Export Client Data
- A new window will open, "Export Records to File"
- Select the type of file you wish to export to, its name, and location
- Click Save to create the file and export the data
- Optional: Before saving, you can check a box to:
- Automatically open the file after saving
- Create email with file as an attachment
- Note: This is not a ClientTracker email
How to Export Client Email
Exports all client records in the current found set as a tab-separated or other type of file. Choose the location and type of file in the dialog box that opens. The file will contain only client names and email marked "Use" (if any).
- On the top Main Menu, select File, and then Export Client Emails
- Follow steps 2-4 above
The icon in the Control Panel takes you to the Families list screen, where you can view all families in ClientTracker, create a new family, or access other details about families. See <<481>> for more detail on family functions.
Tip: The Manage Families functions are often more meaningful and direct when accessed from a specific client's record.
Sometimes you may be asked to print out a client's entire medical record. For most, that means invoices and medical history. In the old days, one would copy the entire paper chart for an attorney when requested.
There is no "magic button" in ClientTracker to print out the equivalent of the full medical record in one click. That is certainly a goal, and is one of many items on our list to enhance ClientTracker.
Here is a list of what you might do. We recommend making PDFs to save paper, and if you have Adobe software, you can merge several PDFs into one file as needed.
- Print the Personal & History info - Click Print on the Personal screen for these choices
- Print all SOAP Notes - On the Appointments & SOAPs tab, click Print and choose to "Print All"
- Print all Invoices - Click the client's Invoices tab, and the Complete List
link at the bottom of the "Invoices & Statements" subtab. From the
full list, click Print and choose "Individual Invoices" A paper-saving
substitute for this is the Transactions report.
The Client Personal tab contains fields for all usual personal information: name, address, date of birth, social security number, gender, and so on. You should fill out this screen as completely as needed for your practice. ClientTracker uses this information for sorting information and generating reports.
Index of Fields and Functions on the Client's Personal Screen:
- <<475>>
- <<1059>>
- <<31>>
- <<27>>
- <<476>>
- <<477>>
- <<479>>
- <<29>>
- <<28>>
- <<480>>
- <<481>>
- <<30>>
- <<482>>
- <<478>>
- <<838>>
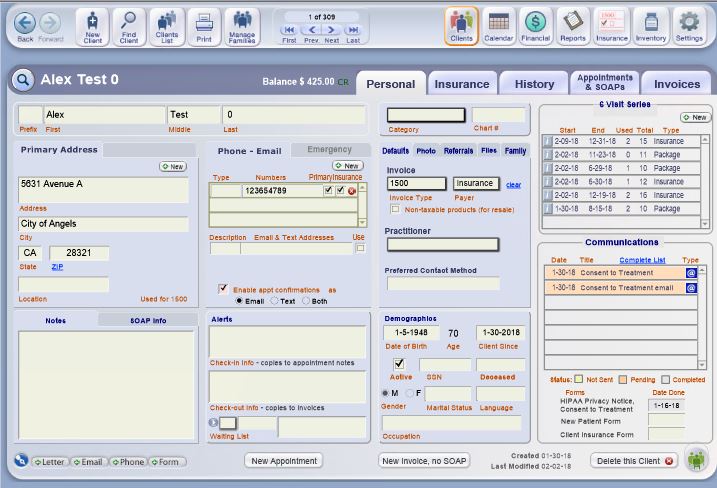
Name
Prefix - Optional prefix available for communications (user-defined list)*
First, Middle, Last Name - Used throughout ClientTracker
Category
This is an optional, user-defined list* used for sorting or finding clients
Client ID
If you choose to use a Client ID, a field and label of the name you entered will appear next to Category. After that, you can enter the value manually in the space provided for each client. To set this up, see <<225>>. If you haven't set this up, you won't see it.
- This value will show in Box 26 of the 1500, if you bill insurance. See <<578>> for more info.
You can track your patient's visits in one of three visit series types.
Click the + New button, to create a visit series.

Insurance Authorization Series. This will track the insurance company limits for a specific patient and treatment type. You can track number of visits, expiration date and dollar cap amount. For more information, please see <<1060>>
Payments on Account Package, Go to the Client record, Invoices and Payment on Account Tab. Click New Payment and Check the Create New Visit series from this Payments on Account box. This is intended for cash visit packages. You can track number of Visits, Dollar Cap amount and expiration date. For more information, please see <<1061>>
Client Series is a series of visits not connected with pre-authorized insurance series or pre-paid package. This can be used to track the number of visits, dollar amount or expiration date for treatment types. For more information, please see <<1062>>
Clients can have multiple addresses, but only one can be designated as Primary. The first address tab, called Primary Address, shows the address that will be used for communication - including labels and envelopes. To create this first address, click in any field or click the button.
Tip: a default city, state, and zip can be set up for all new clients in <<225>>.
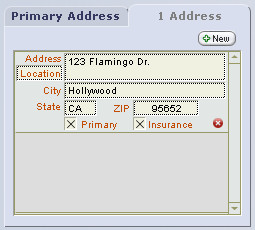
The second address tab shows the primary, plus any additional addresses entered for that client. It will change its title to show how many addresses there are. This second tab is invisible until there is at least one address. The addresses are stacked in a portal, and can be scrolled up or down if there are more than two.
The first address created is automatically marked as the Primary and Insurance address, and can only be unmarked or switched to another address on the second tab. When an address is designated for insurance use, it will be used on insurance policies and/or 1500 forms.
When there is no primary address at all, the first tab will say, "Primary Address Needed." This is intended to be an alert during check-in or editing a client.
The Location field shows a user-defined list of descriptors, such as Home, Work, etc. ClientTracker adds to this list a "bad" tag [xBADx], which can be used to mark an address as bad, or not to be used. Choosing this tag will result in an alert on the tab that says, "BAD ADDRESS." A xBADx or incomplete primary address shows on the Client List in italics for an additional alert. It will, however, print on your invoices.
To delete an address, click the delete button on the second tab. An address marked as primary cannot be deleted, but it can be designated xBADx.
Tip: Your practice will decide how to best manage addresses and other client contact information, using the tools provided by ClientTracker. For more tips, see <<477>> below.
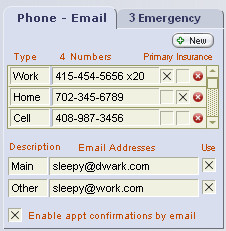
Client phone numbers are displayed on a portal in the Phone - Email tab. A row for the first phone number is automatically created for a new client, because at least one phone number is needed for a client to be valid. Click the button to enter additional phone numbers.
Tip: Phone numbers should be entered in the format 123-456-7890 for best display in ClientTracker, The area code can be set up to enter automatically. See <<225>>.The first phone number created is automatically marked as the Primary and Insurance phone number, and can be unmarked at any time. A phone number designated as primary cannot be deleted.
When a phone number is designated for insurance use, it will be used on insurance policies and/or 1500 forms. When there is more than one phone number, you can choose which one to mark as primary, and which to use for insurance, by checking the boxes on its row.
There is a drop-down menu for each Phone Type, where you can choose from a list you set up, or click again in the field to enter an ad hoc descriptor.
Tip: Do not list any phone numbers that you or the client do not want to be called. Phone numbers in this portal show throughout ClientTracker, and "do not use" numbers can be stored in the Notes field, if desired.
Enter Email or Text Addresses
When you create a new client, there is a blank row for their email or text address. Enter a Description, and when you click the Email Address field, a small pop-up box will open for data entry and validation. The pop-up you see depends on the Description.
Email (home, work, etc.) - After entry, the email address will be checked for validity according to common standards for email. See <<433>> for more info.
Text - The Text Address pop-up opens. Enter the Text Address directly, or build one by typing the number (without dashes) and choosing a carrier from the drop-down list, which is available in the Carrier List tab within the pop-up, or in Settings / Program, on the Value Lists tab. See <<980>> for more info.
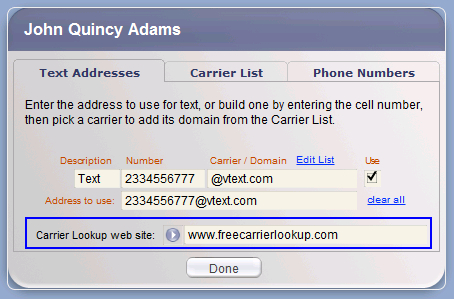
Tip: Enter a preferred website for looking up text carriers by entering just the phone number. ClientTracker offers a default site" www.freecarrierlookup.com" which is another company's website and subject to change. You may update or change this website anytime.
Note: Once a valid Text Address is entered, it works just like an email in ClientTracker, with the exception of attachments, which are not possible for a text message. Just like an email, you need to use a valid Text Address for the message to be sent. It is a good idea to confirm a Text Address with your clients before depending on it for communication.
IMPORTANT: You may mark an email address as "Use" or uncheck the box to designate it as "do not use."
- A red email address means it is invalid, and cannot be marked "Use"
Tip: You may decide to keep as a placeholder any email that is determined to be invalid, e.g. to await further information, but you cannot mark an invalid email as "Use."
Enable Appointment Confirmations
Check the Enable appt confirmations box to enable a client to receive automatic email or text confirmations of scheduled appointments. If this is enabled, a confirmation can be sent automatically at the time an appointment is made. See <<1044>> for more info.
- If the Enable appt confirmations box is checked, but none of the email addresses are marked "Use," all the check boxes will turn pink and no confirmation will be sent automatically
The choices appear slightly different for enabling
Appointment Confirmations if you have chosen to stay with using
ClientTracker's ONE Default Template, or Custom Practitioner Templates.
Default Confirmation Template Custom Practitioner Templates
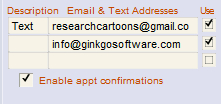
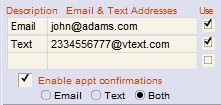
The
difference allows you to select the Client's preference for receiving
Appointment Confirmations: by Email, Text, or Both. (If 'Both' is
chosen, two messages will be sent.) The Custom Practitioner Templates
also allow composing a different message for email and text. See
<<1044>> for more info.
Note: Whatever you choose, the Enable appt confirmations box must be checked.
Address
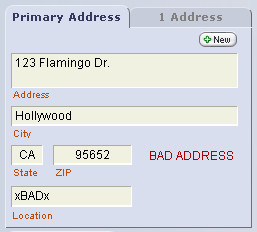 ClientTracker provides a "xBADx" value for Address Location (or Description), which will show a "BAD ADDRESS" flag on the client's Personal screen. When mail is returned or an address is unusable, mark its Location as xBADx to alert your staff.
Other, optional things you might want to do:
- If the xBADx address is marked as Primary, uncheck it so it won't be printed.
- Add a note to the Check-in Info field, which will be used for appointment notes and can serve as a reminder to get a new address from the client.
Phone Number
If a phone number is unusable, we recommend you remove it from its place, and perhaps save it in the Notes field. Optionally, you can enter into the Phone Type whatever you want, e.g. "BAD," or some other value of your choosing. The value lists for client or company Phone Types are on Settings/Program/Value Lists.
If a Phone Number still exists in the portal, it displays in tooltips. You may want to simply delete unusable phone numbers. You can uncheck the Primary designation for any or all phone numbers, but be aware that ClientTracker uses the primary phone number in printed Appointment Lists and list screen displays.
Email Address
Only email addresses marked "Use" will be used in ClientTracker, according to your chosen email sending method. There is a separate email validation process to reduce the chance of an email bounce-back due to formatting. See <<433>> for more info.
Setting client defaults on the Defaults tab is optional, but can make data entry and processing faster. Whenever a default is applied, it can be changed if needed.
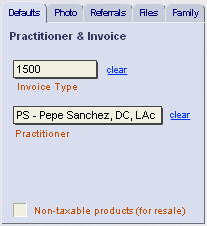
Invoice Type - Select Simple, Superbill, or 1500 as the type of invoice that will be generated for a client.
Practitioner - Select the practitioner who will see this client most often. The practitioner will be automatically designated when the client makes an appointment, unless it is made directly on another practitioner's schedule.
Note: A practitioner cannot be deleted if he/she is designated as the Default for any client. You would have to first remove these defaults before you can delete a practitioner.
Non-taxable products (for resale) - check this box, and taxes will not be added to any products added to invoices for this client.
If you have a picture of your client on your computer, you can add it to the client record by clicking the button at the top of the Photo tab.
When you click , it opens the "Please choose a photo" pop-up window and shows the contents of the ClientTracker Files-Photos folder. Select the desired photo. If it is not in the ClientTracker Files-Photos folder already, a pop-up message will ask you if you want to move or copy it to its new location.
[ClientTracker Cloud 5.0]
Use the system's Browser window to
locate a graphic file on your local computer and upload it to the
Cloud. See <<854>> for details.
Click the button to delete the photo link. This removes the link, but does not delete the actual photo file from its location on your computer.
To replace an existing photo with a new one, simply click the button and repeat the process. The new link will override the old one, and the original photo will remain in its folder.
Photos can also be added to specific client SOAP Notes. For more information, see <<103>>.
Warning: The photo will no longer display if you: rename the photo, move the photo outside of ClientTracker Files-Photos folder, or move the ClientTracker Files-Photos folder. The remedy for the latter is to reset the Default File Path in Settings/Program/Utilities, or relink the photo. See <<455>> for details.
The Referrals tab has two small subtabs inside it: Referred By for tracking information about who referred this client, and Referrals Made to show other clients that have been referred by this client.
Referred By tab
 There are four fields for entering optional information about how the client was referred to your practice.
Provider - Click this to select the referring provider from a list of those who are already entered in ClientTracker. Click the Edit List link if you need to add a new Provider. This information is also intended for processing Thank You communication and reports.
Note: When using a provider for a referral, their information may used in other areas of the program. For instance, the referring provider's license number is required for 1500 forms.
When either a client or provider is entered in the Referred By tab, a small TY Letter needed link will appear under their name. Click this to generate a Thank You letter or email at any time, or you can choose to run a report to show all clients or providers who need Thank You letters on Reports/Templates & Marketing. This link will change to show the date a Thank You letter or email was sent, and will open the letter when clicked. See <<436>> or <<437>> for more info.
- Person - Use this field to indicate if the client was referred by a person not in your ClientTracker.
- Source - This is an optional field, intended for entry of an identifiable source from which the client first heard about your practice. This could be a business, an advertisement, an event, or anything you like. This shows on the "Sources of Clients" list and report.
Note: A new Thank You communication will always include the names of all eligible referred clients, i.e. those who have not yet been included on a Thank You for that referrer. You can choose which clients to include in the Thank You (see above).
After a Thank You has been sent for a referring Client or Provider, the blue link under their name changes to: TY Sent (date). Clicking on this will show the completed communication. For more info on functions regarding completed communications, see <<165>>.
Referrals Made tab
This subtab shows a portal of clients that have been referred by this client. The total number shows in the tab title.
The date a TY Letter was sent will show automatically. You can also enter this date manually to override ClientTracker's handling of referrals needing a Thank You letter. For example, you may enter a date for a thank you made outside of ClientTracker, and this will show on the Referred By tab, under the name of the referring person.
Client files are actually "file links" because ClientTracker links to a file that already exists on your computer. These file links are stored on the client Personal screen, in the Files tab. If you have the application for a file, you can click a linked file in ClientTracker and open it in its application. You can view a PDF or view and edit a word processing document.
Note: Before you link a file, name it properly for placement in ClientTracker Files-Photos folder. This folder is found the Default File Path located in Settings/Program/Utilities. See <<455>>
To add a file to the Files portal, click the button. This opens to the "Please choose a file" pop-up window and shows the contents of the ClientTracker Files-Photos folder. Locate the file, or click to abort the process. You can store a link to any type of file.
If you select a file that is not in the ClientTracker Files-Photos folder, Default File Path folder, a warning message asks you if you want to move or copy the file to its new location.
[ClientTracker Cloud 5.0]
Use the system's Browser window to
locate a graphic file on your local computer and upload it to the
Cloud. See <<854>> for details.
The Files Portal
After adding a file link, the name of the file shows in the Files portal.
- To see file details in a tooltip, hover your mouse over the small button to the left of the file name.
- Click this button to access the File Link pop-up window, where any information such as notes about the file can be managed.
- Choose to enter an optional category (e.g. letter, lab report, form, etc.) and/or a brief description of the file.
- Write any Notes you need for the file, which will show in the tooltip described below.
- Click Replace File Link to
re-open the Please choose a file pop-up window, and browse your computer's file
directory for another file, which will replace the existing file as a
link.
- Click to save the file link and any additional info.
- Choose to enter an optional category (e.g. letter, lab report, form, etc.) and/or a brief description of the file.
- Click this button to access the File Link pop-up window, where any information such as notes about the file can be managed.
- The file name in the list serves as a link to the actual file. A tooltip shows its filepath. If you click the file name, the file will open in its parent application so you can view it, change it, etc.
- Click Complete List to view all of the file links for this client in a sortable list.
- This list includes file links attached to SOAP Notes. (The Files portal does not show these.) For more info, see <<101>>
To delete a file link, click the small delete button to the right of the file name. This will delete the link to the file, but will not delete the actual file from your computer.
Warning: The file will no longer be linked, if you rename the file, move outside of the ClientTracker Files-Photos folder or move the ClientTracker Files-Photos folder to a new location. The remedy is to reset the Default File Path in Settings/Program/Utilities, or relink the file. See <<455>> for details.
When a parent or spouse pays for treatment for another family member, it can be useful to organize clients into families in ClientTracker. Payments on Account entered under one family member can be disbursed to invoices for other family members. The Family tab on the Client Personal screen enables you to manage families. A message in italics will tell you whether a client has been added to a family, and any family members will show in the list below. Click the row of any family member to view their Personal screen.
![]() A list screen of Family records can also be reached by clicking the icon in the Control Panel.
A list screen of Family records can also be reached by clicking the icon in the Control Panel.
To add a client to a family, click Add to an existing Family, or Form a new Family under the portal to begin.
Add to an Existing Family - This displays a list of families to choose from. Click a row to select, or click to abort. You can also if you don't see the right one.
Form a New Family - This opens the Families screen, and creates a new record to be filled out.
- When a new family is formed from a client's Personal screen, that client is automatically added as a family member, and any available credit for the client becomes available for use by family members.
- The family name must be unique, or an alert will show. To avoid duplicate names, the default name includes the name of the client, for example, "John Smith's Family." You can change this to be anything you like.
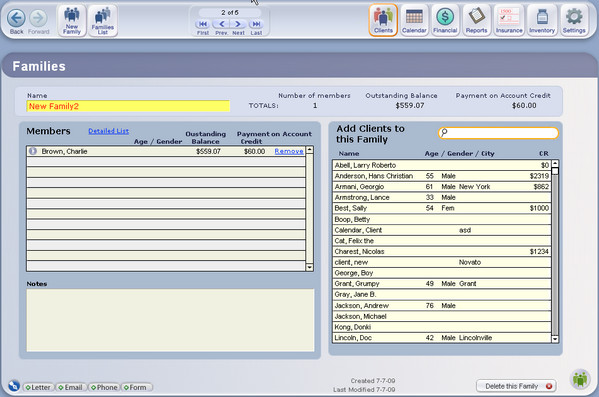
- A larger portal on this screen shows clients who have been added as members of the family. Click the row of any family member to view their Personal screen.
- Only other clients in ClientTracker can be family Members.
- To add clients to the family, use the QuickFinder area on the right of the screen. Start typing any person's name, and the list will become more specific. Click any row to add a client. On the ensuing portal row for Members, you can click to Remove any client (this does not delete the client's main ClientTracker record.)
- Click to permanently delete the Family. This cannot be done if there are any members.
- To view a list of all Families, click the icon in the Control Panel at the top of the screen.
- There is a large Notes field for optional use.
Tip: To quickly access families, use the Manage Families icon on the Control Panel of client screens, or the Edit Family link that appears on the Family tab after a client has been added to a family.
The Communications Portal on the right side of the client's Personal screen shows a sorted list of all communications created for which that client is a recipient.
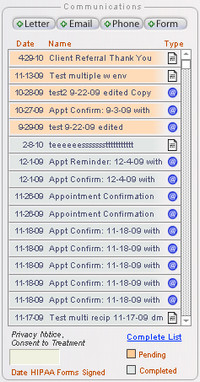 The portal is sorted to show Pending communication first (light orange highlight); sorted by the Date last modified. Completed communication is grouped next; sorted by Date completed. The Type column shows an icon representing what kind of communication it is: a Letter, Form, Email, or Phone call. Hover your mouse over a row to see the first few lines of the communication.
Click on any row to view the communication, based on its status.
Pending - Go to the Compose screen to edit or complete the communication.Completed - Go to the Info screen to view, reprint, resend, or edit the communication.
Just above the Communications portal are four of the Comm Panel buttons, to create a new Letter, Form, Phone, or Email for the client.
Click the Complete List link to view all the client's communications in a sortable list.
When a new client record is created, any Communication Template marked as auto-create will be made, and added to the Communications portal as Pending - to serve as a reminder.
For example, ClientTracker includes System Templates for the Receipt of Privacy Practices form and the Consent to Treatment form. It is assumed that your practice needs to have these forms signed by each new client. For more information on Communication Templates, see <<149>>.
For complete information about how to manage communications in ClientTracker, see <<430>>.
Date HIPAA Forms Signed
HIPAA requires all patients to sign separately for the Privacy Notice and Consent to Treatment. These can be combined on one form or you can have two separate forms. ClientTracker provides a Communications Template for each; which you can modify for your use. When your client signs for both of these, enter the date in the lower right corner of the client?s Personal screen. If you have existing forms that you use for your clients to sign, when you get all required documents back signed you would enter the date signed.
Client Notes
There is a large field for notes about any client, in a Notes tab just below the Address. In addition, you can add text to the Check-In Info field, and this will be added to the appointment notes whenever an appointment is made for that client.
SOAP Info
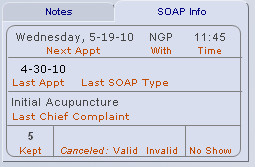
The SOAP Info tab displays statistics and other information about each client's SOAP history, including:
Date, SOAP Type, and Chief Complaint for the client's last appointment
Number of appointments Kept, Canceled (both valid and invalid), and No Shows.
Personal Data
Enter personal data about the client that will be used in other places throughout ClienTracker, such as:
- Date of Birth, Gender, and Occupation
- Client Since (an optional, non-automatic field)
- Active - Uncheck this box to make a client Inactive
- SSN (Social Security Number)
- Date Deceased
- Marital Status and Language
- Check-In Info will be copied into each new Appointment pop-up window as "Appointment Notes," and may optionally print on schedules
![]() Client Alerts & Demographics
Client Alerts & Demographics
The lower part of the Client Personal screen is divided into 2 new areas. Functions with an asterisk (*) are the same as for 4.0, and are described above.
Alerts
- Check-In Info*
- Checkout Info - Whatever you enter in this field will display on the entry screen for all the Client's invoices (but will not print). Use this for alerts or messages to be seen as the Client is checking out.
- Waiting List Controls (new, see <<838>> below)
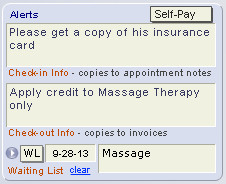
Demographics
- Date of Birth, Gender, and Occupation*
- Client Since (an optional, non-automatic field)*
- Active - Uncheck this box to make a client Inactive*
- SSN (Social Security Number)*
- Date Deceased*
- Marital Status and Language*
The Comm Panel and three other buttons can be found at the bottom of the client's Personal screen.
Comm Panel - This will create a communication with the current client as a recipient, or show a list of all communication for that client.
- This creates a new appointment for the client, and prompts you for the date and duration of the appointment. The practitioner listed on the Defaults tab is used for the appointment; otherwise one would have to be selected.
- This is useful for creating invoices that are not related to an appointment, such as for products only. To generate an invoice for an appointment, it is better to do so from the Appointment pop-up window or the SOAP Note itself.
- A pop-up window will ask you to confirm the practitioner for the No SOAP invoice, and choose to either:
- Create a blank invoice with no line items - diagnoses, procedures, or products, or
- Create an invoice using the designated templates for the provider. See <<503>> for more info.
- Will permanently delete a client record after confirmation, if the following conditions are met:
- You are not operating ClientTracker in Demo mode
- The client has not had any appointments made, or invoices generated
Tip: It is wise to manage clients by making them Inactive instead of deleting them. Only clients who have never been seen should be deleted, and then only if there is no chance of them coming back, or if you do not need to save any information entered. Deleting a client is permanent. Inactivating them gives you the option of reactivating them later, and saving data entry time. An inactive client will not show on many lists, or will appear with their name in gray.
You can manage a Waiting List for clients who want or need an appointment in the future. This section describes the controls on the Client Personal screen for adding a Client to the Waiting List and how to enter accompanying information.
Waiting List Controls
- Go button - Click to see the entire Waiting List on a large screen
- Flag - Choose one:
- WL = Client requested to be on the Waiting List
- FN = Follow-up Needed
- Date = Target date for appointment
- Preference = A note about what the Client would prefer, or other info
- clear = Remove Client from Waiting List and clear all control fields
For more info about using the Waiting List to make appointments, see <<839>>.
The client's Insurance tab is the place to add one or more insurance polices for the client, and to fill out information used on the client's insurance forms (1500s) for those policies.
This sections contains the following details:
- <<33>>
- <<34>>
- <<569>>
- <<41>>
- <<38>>
- <<984>>
- <<39>>
The Insurance tab is organized into helpful sections:
(1) Select Policy ? This shows a list of all insurance policies created for the client. If you select one from the list, the information for that policy appears on the right.
(2) Edit Policy for (Name of Policy) ? This is a blank area for clients with no insurance policies. When you create a policy, it shows information about the "Insured" and the insurance company for the policy selected in (1).
Note: In these instructions, "Insured" is used as a noun to represent the policyholder on the insurance card; not as an adjective. The Insured can be a client or non-client.
The information is divided into sub-sections.
- Policy 1500 Info - to be used on the 1500 form
- Policy Details
- Company Contact Info
For more info on creating 1500 claim forms, see <<119>>.
Tip: A good practice is to create insurance polices for clients before creating claim forms (a.k.a."1500s"). This will save time and ensure the correct data is in place.
Self-Pay vs. Insurance
This is a small, optional feature that does not affect any billing. Marking one of these choices will display an initial on appointment screens and printouts in the Calendar.
- Self-Pay = will display an "S"
- Insurance = will display an "I"
- Box 3 ? Patient's date of birth and gender
- Changing this info will also change it on the client's Personal screen
- Box 5 - Phone (numerals only)
- Edit on client record as needed. Do not begin a phone number with 1 or 0.
- Box 8 ? Patient status (marital and employment)
- NOTE: As of v5.2, this information is in a 2nd tab for the 08-05 Claim, as it is not needed on the 02-12 Claim
- Changing this info will also change it on the client's Personal screen
- Box 12 ? Patient?s Authorization to Release Information
- The patient?s or authorized person?s signature indicates there is an authorization on file for the release of any medical or other information necessary to process and/or adjudicate the claim.
- This covers all 1500 claims. Enter the date the client signed on lower left corner of the client?s Insurance screen, or on the lower right of the Personal screen.
- Changing this date will also change it on the client's Personal screen
Add a New Policy
 To add an insurance policy to a client record, click on the button, then select an insurance company by clicking its name in the "Select Insurance Company" pop-up window that appears. You can type all or part of the name in the QuickFinder to filter the list.
 Tip: If the desired insurance company does not show in the list, you will need to create it before proceeding by clicking the small blue link in the pop-up window just beneath the QuickFinder portal. After setting up the new insurance company, use the Back button to return to the client's Insurance tab, and select the new company as above.
Once selected, the insurance company's information will show in the Company Contact Info section. Continue by filling out the Policy 1500 Info and optional Policy Details (see below.)
- See <<464>> for how to set up an Insurance Company
Edit an Existing Policy
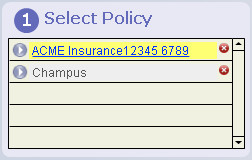
To edit an insurance policy, click on the policy name in the portal under (1) Select Policy. Active policies show in blue and inactive policies in gray. When you select a policy, it will move to the top of the portal and be highlighted in yellow, as shown. The right side of the screen (2) will show the information for the selected policy, where you can edit the information as needed.
- Delete a policy (if no claims have been created using it) by clicking on the delete button to the right of the company name.
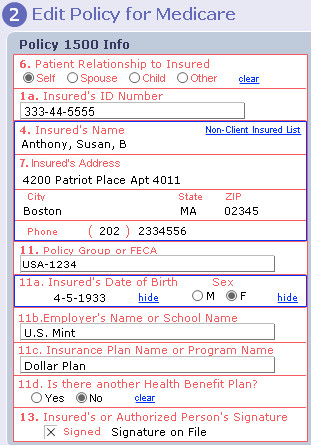
Box 6 - Patient Relationship to Insured
-- Selecting "Self" will fill the boxes referring to "Insured" with info from the client record
-- Selecting anything else will open the Select Insured pop-up window, from which you can select a client or other person to be used as Insured, or create a new Insured record (see <<41>> below for details)
-- Depending on the insurance company preferences, the Insured info might say "Same" or be in all caps.
Box 1a - Insured's ID Number: the ID # of the person who holds the policy or the dependent patient if they have been issued a unique identifier by the insurer
Box 4 & 7* - Insured's Name & Address: the person who holds the policy
Box 11 - Policy Group or FECA
Box 11a* - Insured's Date of Birth
Box 11b* - Employer's Name or School Name (NOTE: as of v5.2, this is no longer needed for Box 11b, and has been replaced with an optional "Other Claim ID")
Box 11c - Insurance Plan Name or Program Name
-- Enter information from the insurance card or policy of the insured person.
Note: Sections marked with an asterisk above will auto-fill from the source indicated in Box 6. The info is not editable in these fields; however, clicking Box 4 or 11a will open the record of the Insured.
Box 11d - is there another Health Benefit Plan?
- Check Yes or No as applicable to the client's insurance coverage.
- The insured?s or authorized person?s signature indicates that there is a signature on file authorizing payment of medical benefits. This is specific to the client?s each individual insurance policy. No date is needed, just click the check box.
- Active clients entered in ClientTracker (white rows) with an insurance policy, or
- Other "Non-Client Insured" people already entered in ClientTracker (orange rows)
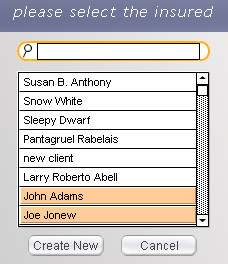
Type in any letters to filter the list, and click on a name to designate that person as the "insured" on the client's insurance policy. The information used to fill Box 4 address would be from their address (if any) that has been designated as "Insurance."
Click to add a new Insured record, if the required person is not on the list. Or click to close the pop-up window.
To view a list of all Non-Client Insured people, click the Non-Client Insured List link in Box 4
Important: For a Non-Client Insured to show in this QuickFinder list, the Non-Client Insured must have an address. If you know the person exists but doesn't show in the QuickFinder, go to the list from Settings/Practice and add the address there.
Note: In these instructions, "Insured" is used as a noun to represent the policyholder or person on the insurance card; not as an adjective.
Non-Client Insured Records
ClientTracker provides the option to create records of people who are not clients, whose info will be used solely in the role as Insured. One Insured record can be used on as many client insurance policies as needed. When you click , the screen to "Enter info for new Insured" looks very similar to a client's Personal screen, but naturally focuses only on information that is needed for the 1500 claim form.
Note: A Non-Client Insured person may be part of the client's family, but is different from a Family Member in ClientTracker. The former are just used for insurance purposes, while the latter must also be a client so they can share payments. See <<481>> for more info.
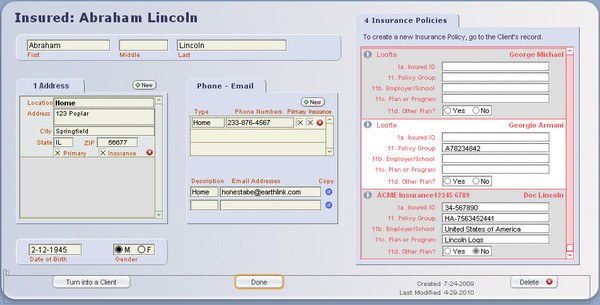
Fill out the Insured's name, address, phone numbers, date of birth, and gender ? all of which function like those for a client, and will be used on the 1500. Optionally, you can add email addresses to facilitate contacting the Insured if any questions come up.
Tip: You can click on the ZIP link, and a web site will open for looking up the ZIP+4 Code based on the Insured's address. You can edit the URL of the web site in Settings area, on the Programs/Utilities tab.
On the right is a list of Insurance Policies for which this person is designated as the Insured. You can edit this information as needed; however, keep in mind:
- If you change any info
here, it will change in the corresponding sections of the client's (a.k.a. patient's) current Insurance Policy,
and will be used for all subsequent 1500 claims. Changing this
information will not affect 1500 claims already submitted.
- To remove an Insured record from a Client Insurance Policy, go to the Client's Insurance tab and click clear next to Box 6. This will remove the Insured from the Policy, but leave both records intact.
To delete an Insured record, click the button on the lower right of the Insured screen. The Insured must not be used on any client Insurance Policies. To delete an Insured record that is used on policies, first click the button for each policy, replace the Insured on the client's policy with the correct information or click clear next to Box 6, (thus removing the Insured from that policy), and then click the button to return to the Insured.
Using the Insured on the Client Insurance Screen
Once an Insured has been selected or created, the information pertinent to a 1500 will show in the boxes on the client's Insurance screen. Click the Insured info (e.g. name & address area in Box 4) or Edit Insured to open the Insured screen for viewing or editing.
To change to a different Insured person for any Client Insurance Policy, simply click the Box 6 area as other than Self, and the Select Insured pop-up window will reappear. Click on any name, and that person's Insured info will replace whatever was there. Remember to also change the other information: Box 1a Insured's ID Number, and most of the 11 boxes.
Turning an Insured Record Into a Client
During creation of a new client, if you see a new client is already in ClientTracker as an Insured record (the orange row), you should use the info already entered to create a new client record. This is important to retain the link between the client's Personal info and that used for 1500 claims as the Insured.
To find a Non-Client Insured person, go to Settings/Practice; click button. Locate the person from this list. From there, click the button on the right of their row, and the Insured info will be transferred to a new client record, and the former Insured record will be deleted. Any Client Insurance Polices on which that person was used as Insured will still be connected to the new Client record.
- See <<23>> for more info about creating and filling out a new Client record.
Tip: If you first create a new client, and realize that they are also in ClientTracker as an Insured record, go to the Insurance tab for the Client using them as Insured, and follow the instructions above to delete the obsolete Insured record for that person. Then re-select the Insured to be the new client record.
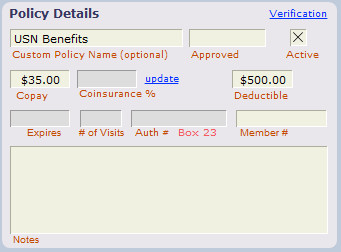
Policy Name - Defaults to the name of the insurance company. Change it as needed.
Active ? This must be checked for the policy's insurance company to show in the pop-up menu of available policies on the 1500 form data entry screen. You may choose to have inactive policies for an insurer that remains active; or vice versa.
The rest of the fields are optional - you may use them for your reference. The fields in blue are only available if you create an Insurance Verification Worksheet for the policy (see <<984>>)
- Approved ? date field
- Co-Pay ? Amount that would be auto-filled when a payment is made as a co-pay
- Coinsurance % - For your records only; if used by the policy (enter as a decimal; e.g. .2 = 20%)
- Deductible ? A dollar amount you can keep track of manually, if desired
- Expires - The date that benefits expire on the current policy
- # of Visits - A cap (if any) on the number of Visits allowed by the policy
- Auth # - Box 23 - Enter an authorization number if needed for Box 23
- Member # - An optional field if needed for the policy
- Notes ? A scrollable field for notes about the policy
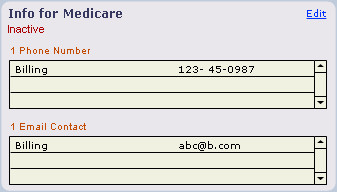
Also displayed in portals are phone numbers and email contacts. These are for reference only, and can be edited on the portal rows, or on the Insurance Company record by clicking the blue link, Edit.
For information on adding or editing insurance company information, see <<464>>.
The Insurance Verification Worksheet is an optional place to record the details of a client's policy, and the verified elements of coverage. It is not connected to any other part of ClientTracker (e.g. it does not "count" visits or dollar amounts towards policy limitations). However, it can be printed out and shared with other staff members or the client as needed.
Create a Verification Worksheet
Click the Verification link on the Policy Details panel to access the worksheet area. It will not let you enter anything until you click the +New button. Each time you click the +New button, a new blank worksheet is created for the currently selected policy. Use the scroll handle to see a vertical scrolling display of other worksheets. The most recently created worksheet will show at the top.
- Click close to go back to the Policy Details panel
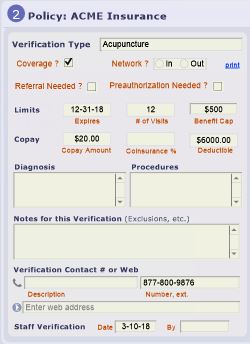
You may not use all of these fields, or you might use them for other purposes. It's up to you. The only information on the worksheet that is used somewhere else in ClientTracker is the Auth # for Box 23 of the 1500.
Staff Authorization - Date & Done ByUse the print link to print the worksheet you see in the scrollable window. With v5.3 and higher, you may choose to send this report as a PDF attachment (see <<992>> for more info).
Authorization -# (number) & Done By
Coverage - Check if the policy covers some services
Referral Needed - Check if true
Network? - Select In or Out to show the practitioner's status
Benefit Limits - Fill in any that apply: Expiration, # of Visits, Time Period, Benefit Cap
Copay, Coinsurance % - Fill in if applicable
Deductible - Fill in Annual and Remaining, if applicable
The fields below will look up from corresponding fields on the Insurer record (on the Coverage tab), and can be modified afterwards:
-- Diagnosis and Procedures - Fill in if specific codes are covered (or not covered)
-- Notes - This could be "Exclusions & other info" or whatever info you want
-- Verification Contact # or Web - Enter either a phone number or web page (URL) used to verify the policy. If a URL is entered, the Go button will open it in your browser.
Tip: Show this to your biller to learn the best ways to collect and use the verification information. For expert guidance, we recommend the web site Insurance Billing Made Easy.
The Client's History tab shows information about a client's history in subtabs:
- <<42>> - also known as a Medical History
- <<625>> - portals summarizing a client's clinical history as entered in
ClientTracker
- <<814>> - For info you don't want printed with the Initial History
This screen can be used to record the client's medical history, medications, allergies, and so on. If you need a paper copy, click the button in the upper left. To add notes to the client history, click on any area and type. This screen can be accessed via the client's History tab.

There are optional fields for you to enter the date the client history was taken, or updated.
Click to edit the standard text that appears on the History/Initial tab for new clients. This text will be used to create a new, blank History form for each new client, but will not change those created before you make these changes.
Note: Your changes to the History form do not affect any existing SOAP Notes, because the info is part of the client's permanent record. The History tab can be accessed from any SOAP.
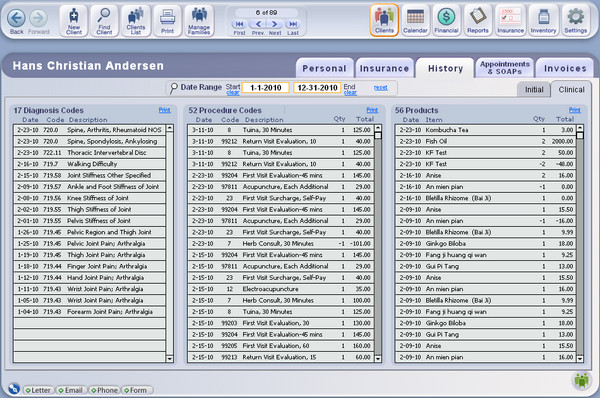
To display the portal contents for a specific time period, enter the Start and End dates in the Date Range fields at the top of the tab. The portal contents can be printed by clicking the Print link at the top. You can also run other reports to monitor a client's clinical activity:
- Diagnoses Given - <<609>>
- Procedures Done - <<610>>
- Transactions Report - <<200>>
This tab is provided as a place to put optional, private information about a Client. It is not available to print from ClientTracker, to protect the Client's privacy.

You can also enter Private Notes about a Client on any SOAP Note, when applicable to any presentation. See <<812>> for more info.
The Appointments & SOAPs tab shows you a list of appointments and SOAP Notes for the client, with the appointment date and time. Remember that an appointment and SOAP Note are the same record, but have different uses in ClientTracker.
- Appointment = A visit that has not happened yet. From the Appointment pop-up window (available in the Calendar, Client area, and SOAP screens), you can create or view an invoice or SOAP Note associated with a client visit.
- SOAP Note = The medical record of a visit, including clinical and other information.
Appointments & SOAPs List
When the Appointment & SOAPs tab is clicked, all of a client's appointments and SOAP Notes display as rows, with the most current dates first. The list can be sorted by Date, Chief Complaint, SOAP Type, Practitioner, Status, or by Invoice number.
Control Panel Actions
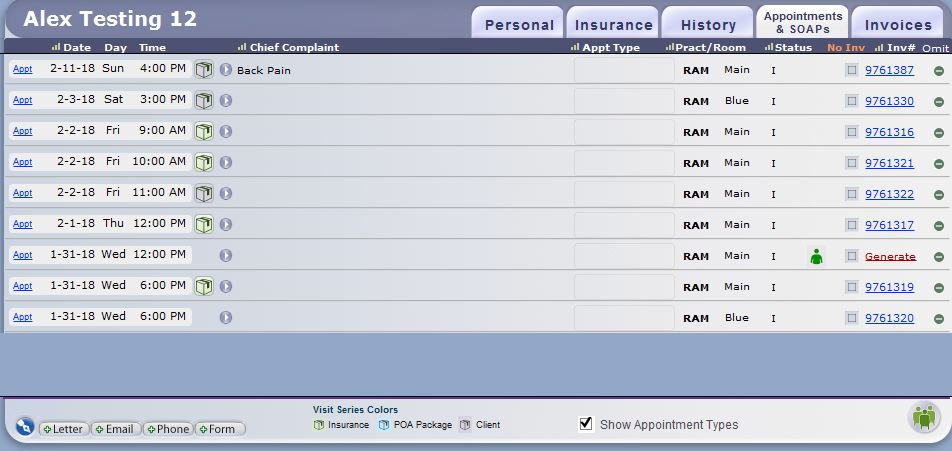
The icon will take you to the "Find Appointments & Visits" screen, where you can enter detailed criteria to find any visit, including those for other clients.
The icon will reset the list to show all SOAP Notes for the current client; sorted by date and time.
The icon will print a list of the currently displayed appointments & SOAPs
- To print all Client SOAP Notes, click the Find SOAP button and search for the desired SOAPs by date range or other criteria.
- You have a choice of printing a list, or printing all the Client's SOAP Notes from this button.
- You can send the SOAPs by email as a PDF attachment. See <<992>> for more info.
Appointments and SOAPs List Actions

Clicking on the appointment bubble will open the Appointment pop-up window for any visit.
Click the Go button or row to see a detailed view of any SOAP note (blank, partially completed, or completed).
- If an invoice has not yet been created, click Generate to create one. Otherwise, the invoice number shows, and clicking that will open the invoice. For more info about generating an invoice, see <<107>>.
Click to remove a record from the list temporarily; e.g. to print only selected visits.
If there are any photos or files linked to a SOAP note, the respective icons will show
- The Status of a SOAP note is also the status of an appointment
- Upcoming = If the appointment/SOAP is in the future
- Today = If the appointment/SOAP is today
- Birthday! = Shows when the visit occurs on the client's date of birth
- Initial Visit = The first client visit for any particular practitioner. This is automatic, but can be hidden when creating the appointment.
- Cancel Invalid, Cancel Valid, or No Show = These can be selected on the Edit Appointment pop-up, or on the SOAP note.
The client's Invoices tab is the place for entering Payments on Account made by clients or family members. Basically, if a lump sum payment is received to be applied to old balances from several invoices, this is the place to do it. If a payment is received for one specific invoice, you should enter it on the invoice.
Details in this section include:
- <<46>>
- <<47>>
- <<48>>
- <<570>>
- <<49>>
- <<571>>
- <<965>>
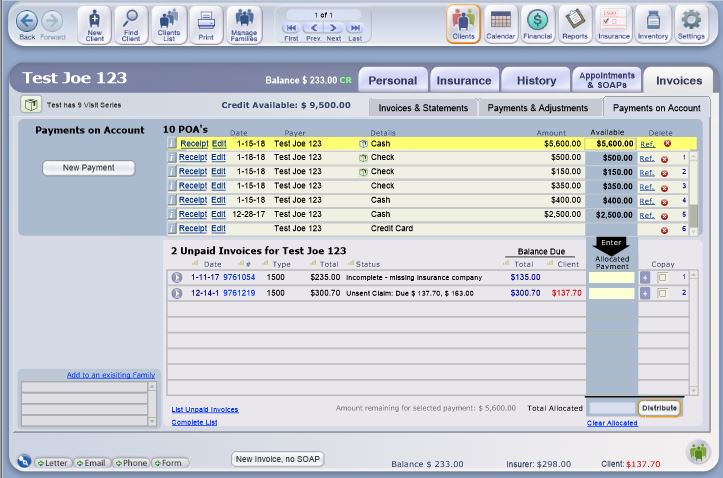
- The Invoices & Statements subtab displays a large portal of invoices for the current client, along with the payment status of each invoice. From this subtab you can print an account statement and invoices for the client.
- The Payments on Account subtab shows the same invoices, but with a utility for making payments on the account and distributing them to one or more invoices. If the client is part of a Family, you can also view its members, and access the Family record.
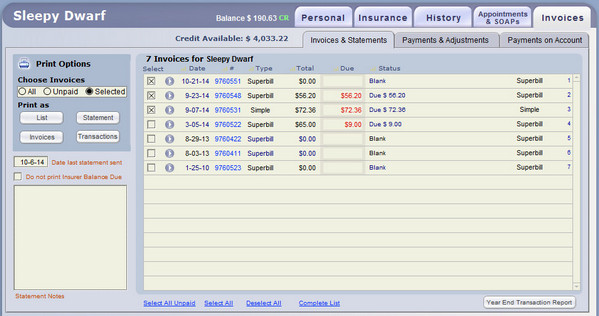
[Version 5.0] Print Invoices in a Variety of Sets and Formats
In the Print Options section to the left, choose which invoices you want to print and how you want to print them. Your choices correspond to the invoices displayed on the Invoices & Statements subtab.
Batch Print Client Statements - To print all statements that include invoices with a balance due from the Client, go to Reports and run the "Unpaid Invoices" report with the choice of "Clients." See <<185>> for more info.
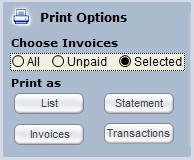
Choose Invoices
All = All invoices for this client; paid or unpaid
Unpaid = All Unpaid invoices (with any balance due from Client or Third Party)
Selected = Only the invoices you select from the list on the right, by checking the box on the left of each row.
Print Formats - buttons available
- List = A simple list showing dates, practitioner, and balance info totaled
- Statement = A mailable Client Statement (to email a statement, see <<965>> below)
- Invoices = Individual invoices (usually one per page) - to email an invoice, see <<992>>
- Transactions = A Transactions Report (see <<200>> for more info about this report) - to email this report, see <<992>>
Other Statement Functions
Date Last Statement Sent - Fills in automatically when you print a statement, and can be edited as needed. This date can be used to find clients on the Clients List.
Do Not Print Insurer Balance Due = Omits this value (if any) from the Statement, and shows only amount due from the Client.
Statement Notes (optional) - Whatever you type here will show on the printed Statement. The space available on the printout is limited to the size of this entry field.
Tip: You can also print statements from the invoice list for a found set of invoices. This can include multiple clients with their paid and unpaid invoices.
Year End Transactions Report - The lower right corner of this tab has a button that can be used to quickly provide a year end report of all client invoices and payments. This is sometimes referred to as a "tax report," and is printed in the format of a Transactions Report Detail.
- Click the button, enter the tax year, then click OK. The resulting report can be printed on paper, or sent to the Client as a PDF email attachment (see <<991> or <<992>> for more info on PDF files made from ClientTracker).
[Version 5.0] Payments & Adjustments Tab
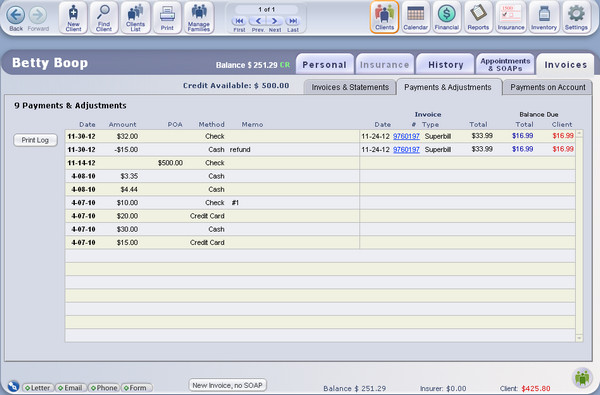
This tab displays a list of all the Payments and Adjustments made for a client on any invoice. The most recent ones are displayed first. The columns are not sortable.
- Click a blue underlined invoice # link to go to any invoice.
- Click the Print Log button to print a simple list, or log, of all the Payments & Adjustments for the Client
The Payments On Account panel at the top of the subtab shows all payments made to the account, the remaining balance available to distribute. You can use the balance available to pay any outstanding invoices listed beneath the panel.
- For more info on working with POAs and distributing them, see <<48>> below.

POAs can be distributed across families. For example, if Homer Simpson and Bart Simpson are in the same family, a POA can be entered in Homer Simpson's record and distributed to invoices for both Homer Simpson and Bart Simpson; from their respective Invoices screens. There is a small portal at the lower left showing the members of the client's family (if any).
- Click a family member to switch to the Invoices screen for that client
- Click Edit Family to view the Detail screen for that Family
- Click Add to an existing family if you want to make the client a member of a Family
- Click the icon at in the Control Panel to access the Family list and functions
- See <<481>> for more information on families

At the top of the screen, the Balance Due is shown. Also displayed is the total Credit Available for this client (or the shared amount for a family if the client is a member of a family). The Credit Available is the total of all POAs that remain to be distributed to invoices.
- Click the button to enter a new POA (see below)
Enter information about the payment into the boxes in the "Payment Palette," or Payment on Account box, that appears beneath the button.
If Credit Card is chosen as the payment Method, additional fields will appear to enter more info.
Click at any time to close the Payment Palette, and any info entered will be cleared.
Note: POAs are credited to the client's account in general, and can be applied to invoices as needed. If the client is a member of a Family, all client POAs are pooled for that Family.
- Date - Enter using the drop-down calendar, or click on the blue-underlined text of "date" to auto-enter the current date, or click again to enter a date manually.
- Method - Choose between Cash, Check, Credit Card, or EFT. If you select Credit Card, additional fields will show in the Palette.
- Amount - Enter the payment amount. Dollar signs are not needed.
- Check Number - Enter the check number here, if the payment is by check.
- Note - This blank field can be used for any information of your choice.
- CC Number - Enter the first 2 digits, and last four digits, and the type of card will appear.
- CC Exp. Date - Enter the expiration date in a format that is meaningful to you.
- CC Approved - Enter an approval number or other info as needed.
Once you have confirmed that all information in the Payment Palette boxes is complete and correct, click the button at the bottom of the box. This adds the payment as a credit on the client's account. If you want to cancel the process, click the button (this will permanently delete all info in the boxes).
POAs with remaining funds to distribute will sort first. To select any POA, use the small scroll handles on the far right of the portal to locate the POA, then click its row and it will move to the top and be highlighted as the selected POA.
Note: POAs that have been fully distributed (i.e. have no funds to distribute) cannot be selected, but you can view their details with the [i] button.
The following actions can be performed with the selected POA:
- Distribute - Allocate all funds or portions of the POA to outstanding invoices (see <<49>> below).
- View POA Details - Click the [i] button to view POA Details, including all distributions or refunds (see below).
- Print a Receipt - Click POA Receipt to print a receipt.
- Edit the POA - Click Edit to open the POA in the Payment Palette, where its details can be edited if it has not yet been distributed.
- Issue a Refund - Click Ref. on the far right to open the Issue Refund pop-up window (see <<571>> below).
- Delete the POA - Click the delete button at the far right of the highlighted row. Only POAs that have not been distributed or refunded in any way can be deleted.
Payment On Account Details
This screen shows the original info about the POA, any funds remaining, and a portal of "what was done with it" - in the form of distributions used to pay invoices, or refunds. The portal has plenty of lines available, but most POAs will need just a few. You get here by clicking on thebutton at the left of a POA record.
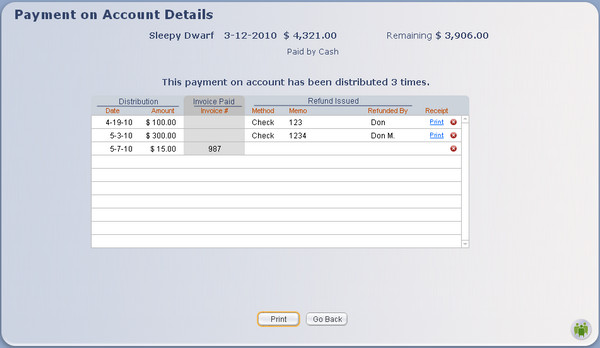
Things you can do on this screen include:
- - Print out the detail and all its distributions
- - Go Back to the client's Invoices screen
- Print a Receipt for a Refund - The Print link shows only for refunds
- Edit the date it was distributed.
Delete - This will delete the distribution or refund, and change the remaining funds for the payment. This will also affect the client's balance due, and the Total Due of the invoice to which the POA was distributed.Step 1 - Select the POA you wish to distribute
Click on the payment to select it, and it highlights in yellow and moves to the top. If the client has multiple POAs with funds to be distributed, select and distribute them one at a time.
Step 2 - Allocate payment amounts for invoices

Type the payment amount into the "Allocated Payment" box on any invoice(s) you want to pay. Next to each box is a button labeled [+]. Clicking this button will automatically enter a choice of:
(a) The full amount due from the client for that invoice, up to the amount remaining in the selected POA.(b) If the Copay box is checked to the right of the [+] button, one or two payments will be made to the invoice. One if the amount is equal to the amount of the Copay for the client Insurance Policy selected for that invoice. Two if the amount is greater than the copay: one for the copay and one for the remainder of the amount.
Continue entering allocated payments until the POA has no more funds, or the available invoices are all paid. You may leave the POA partially distributed.
Note: The Client column under Balance Due includes the amount due from the client in red numbers, when applicable. This will reduce as POA funds are distributed to the invoice.
Note: ClientTracker will not warn you if the amount you enter is greater than the total expected or available. Use your own discretion and caution when entering distribution amounts. ClientTracker will not apply more than what is due on an invoice, or more than what is available in the POA.
Step 3 - Check the total
The "Total Allocated" box is the sum of all amounts entered for all invoices. This sum will not be more than the Amount Available for the selected POA.
If you need to clear all Allocated Payments, click the Clear Allocated link at the bottom.

Tip: If you ever see a "ghost" total in the Total Allocated box, for which there is no corresponding amount in the Allocated Payment boxes above, hold down the Ctrl key and click the Clear Allocated link.
Step 4 - Distribute the Allocated Payments
Click the button, and all Allocated Payments entered from the selected POA are applied to the corresponding invoices.
If you want to distribute another POA repeat steps 1 through 4. (The next POA with available funds will auto-select.) You can partially or completely pay any number of outstanding invoices in this manner, up to the total amount of credit from POAs in the client's account.
- For more information on invoices see <<107>>.
Any Payment on Account (POA) that has a remaining balance can have all or part of that balance processed as a refund.
In any POA row, click Ref. to open the Issue Refund pop-up window.
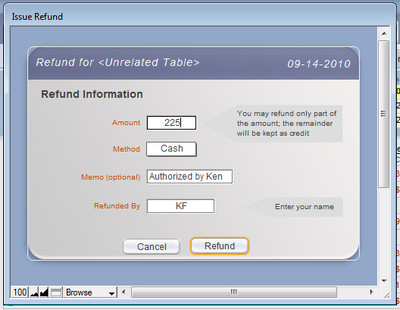
- Enter the Amount of the refund
- The total amount remaining on the POA will enter automatically. You may refund only part of the amount by changing it. The remainder will be kept as credit.
- Enter the Method of the refund from the drop-down list, or click again to enter an ad hoc value
- Enter a Memo, if desired
- Enter whom the refund was Issued By (e.g. your name or initials)
- Click the button to issue the refund, or to abort
After a refund has been issued, it can be viewed on the POA Details screen (see above). The date can be changed, but all other info is non-editable. If needed, the entire refund row can be deleted from the portal on the POA Details screen, by clicking the small delete button at the right of its row.
Tip: If you are using the Register, a corresponding manual Withdrawal entry should be made in the amount of the refund. This is not done automatically by ClientTracker.
Automatic Method
You can send a Statement to a Client by email (as a PDF attachment). See <<992>> for more info.
Manual Method
You can do this in a semi-automated way, if you have PDF creation software installed on your computer.
- Choose to print the statement from the client's Invoices screen*
- In your Print window, select "Print to PDF" from the list of available printers
- Save the PDF to a secure place on your computer
- Click the Email button for that client (lower left corner of the screen)
- On the email Compose screen, use a template you have prepared, e.g. "Here is your statement"
- On the Attachments tab of the email, attach the PDF you made by navigating to the folder where you saved it
- Send the email, and ClientTracker retains a record of it
*When you print a statement, ClientTracker fills in the "Date Last Statement Sent" for your reference
The following details are in this section:
- <<497>>
- <<493>>
- <<495>>
- <<496>>
The SOAP Note (aka Chart Note) is an integral part of a client's medical record. This is the place to enter all clinical and other info about the client's visit. It is also the link between a client and the invoice resulting from this visit.
ClientTracker automatically creates a SOAP Note for all appointments. An Appointment contains the initial SOAP info: date, time, and practitioner. So first is the appointment, then the visit, then the SOAP Note containing all the details of the visit. They are one and the same record in ClientTracker.
Any time before, during or immediately following a scheduled appointment, the practitioner can fill out the SOAP Note by:
- Clicking on the appointment in the calendar and open the Appointment Info pop-up window; then click the button, or
- Clicking any appointment in the list on the Appointments & SOAPs tab of the client record
Frequently-used templates for
SOAP Notes can be set up, so that the clinical details, procedures, etc. will be
automatically created to be used as a starting point for a new visit. Of course, the information on any SOAP can
always be edited, and can even be saved as a new template. For more information, see <<494>>.
From the SOAP Note screen, many actions related to a client visit can be performed.
- Record clinical and treatment notes, e.g. pulses, points needled
- Import information from a SOAP Template, or from a previous SOAP Note for that client
- Generate a new invoice, or link the SOAP Note to an existing invoice
- Access the client's History and other client information
- Select diagnoses, procedures, and products for the visit, which are shared by the invoice linked to the SOAP Note
- Link client files or photos to the SOAP Note
- Create communications related to the SOAP Note, and link them to the client's record
- View appointment details and create a new appointment as needed
- Find other SOAP Notes and print them, or just the current one
There are two ways to view a list of SOAP Notes.
(1) By clicking the Appointments & SOAPs tab for any client

(2) By performing a "Find" in Appointments & Visits or the "Visits with No Invoice" report on the Reports tab

The list screen displays the selected SOAP Notes, with their appointment dates and times. Functions on this screen include:
- Click on the appointment bubble to open the Appointment Info pop-up window
- Click on the rest of a row to view the SOAP Note detail
- Click Generate on the far right of a row to create an invoice linked to the SOAP Note, which will share any diagnoses, procedures, and products added to either one
- Once an invoice has been generated, its number displays instead (e.g. 3325), and clicking it will open the invoice
- For more information about how a SOAP Note is related to a linked invoice, see <<499>>.
- Click to remove a SOAP Note from a visible list, for example if you want to print only certain ones
- Click on the Date, Chief Complaint, SOAP Type, Pract(itioner), Inv(oice), Status, or Inv. # column headers to sort the list
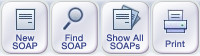
Other options are available in the Control Panel area of the Function Bar:
- - Creates a new appointment and its SOAP note (see <<65>>)
- - Opens the Find Appointments & Visits screen (see <<196>>)
- - (Available in the client area only) This will show all SOAP Notes for a particular client, with the most recent first.
- - Offers different options, depending on where you are
- In a Client's Record - Prints a list of the SOAP Notes, dates, times, and chief complaint
- After Running the "Find" Report - Opens the Visit Print Menu, with options for printing that include:
- Print as a list of appointments (like a schedule)
- Print a list of the SOAP Notes, dates, times, and chief complaint
- Print full details of each SOAP Note in the list
A SOAP Note is created:
- Automatically for all scheduled appointments, see <<65>>
- On demand with the icon in the Control Panel of the Visits area
- Optionally from an invoice if it was made without an appointment
Create a SOAP Note with the Icon
![]()
The appointment information is integral to a SOAP Note, so that must be made first. On the SOAP Note or SOAP list click the icon and create the appointment info for this SOAP. After the appointment has been made, click the button from the Appointment Info pop-up window.
- For more info about appointments, see <<66>>
Create a SOAP Note from an Invoice
If an invoice was made without an appointment, a SOAP Note may need to be generated later. For example, if the invoice was created from the client's Personal screen with the button, or from the icon in the Control Panel of the invoice area, a linked SOAP Note can be created by clicking the button on the upper right side of the invoice.
- For more info about invoices, see <<107>>.
- For more info about linking a SOAP Note to an invoice, see <<498>>.
Auto-Fill a SOAP Note from a SOAP Template
When a new SOAP Note is created, it is auto-filled with information from several sources that make it easy and very flexible to customize the client's medical record.
- If no other option is selected, the SOAP Note information is filled out from the Default SOAP Template, also known as a "system template."
- If the practitioner for the visit has preferred SOAP Templates assigned on her record, these will be used. For example, the SOAP Note the previous visit for any client is one of the preference options.
- At any time, information from any previous client visit or SOAP Template can be selected on the Templates side tab of the SOAP Note, which would overwrite any existing information in the SOAP Note.
- For more information on SOAP Templates, see <<494>>.
There are two main methods for finding one or more SOAP Notes:
![]()
1) Click the icon on the Control Panel of a SOAP Note or list of appointments and SOAPS
2) Run the "Find" report for Appointments & Visits on the Reports tab
Tip: If you're looking for one particular SOAP on a known date, look for the appointment on the Calendar, and click the button on the Appointment Info pop-up window. If you know the client, click the Appointments & SOAPs tab and locate it on their list.
On the Find Appointments and Visits layout, you can search by a variety of criteria. For more info, see <<488>>. Once the search results are displayed in a list view, click the row (avoiding the appointment bubble), and the SOAP Note will open.
One other way is to run the "Visits with No Invoice" report on the Reports tab, which is intended to let you view a SOAP Note from the resulting list if necessary, and generate invoices as needed.
Warning: A SOAP Note has information required to be retained under HIPAA regulations. Once a SOAP is deleted, it cannot be restored.
To delete a SOAP, use the button on the main SOAP screen in the lower right corner.
Remember these important considerations when deleting a SOAP Note:
- Deleting a SOAP Note permanently deletes the appointment that it represents from the calendar, and from the client's record.
- A SOAP Note (and the appointment it represents) cannot be deleted if there is a linked invoice with payments
- A past, present, or future SOAP Note (and the appointment it represents) can be deleted if it has no payments associated with it
Details in this section include:
- <<96>>
- <<811>>
- <<516>>
- <<705>>
- <<99>>
- <<745>>
- <<806>>
- <<964>>
- <<812>>
- <<815>>
- <<817>>
- <<948>>
- <<949>>
- <<969>>
- <<995>>
A SOAP Note can be filled out anytime after an appointment is made - even after it has passed. The practitioner can access the SOAP Note, or detail screen, in three ways:
1) Click on the button in the Appointment Info pop-up window that opens from a calendar appointment.
2) Click a row in the list from the client's Appointments & SOAPs tab, or from the list resulting from a search or report. After accessing the detail screen, click the Record Navigator buttons to move forward or backward in the sequence of SOAP Notes.
3) After an invoice has been created, click the button on the upper right side of the invoice. For more info on creating a SOAP Note from an invoice, see <<493>>.
Information is added to the SOAP Note by use of a SOAP Template, typing into the fields of the detail screen, clicking the anatomical chart, or linking other information to it. Each of these is explained below.
Information is saved automatically as you move from field to field, or go to a different tab or area of ClientTracker. There is also a Save button at the top next the the generate or go to invoice button.
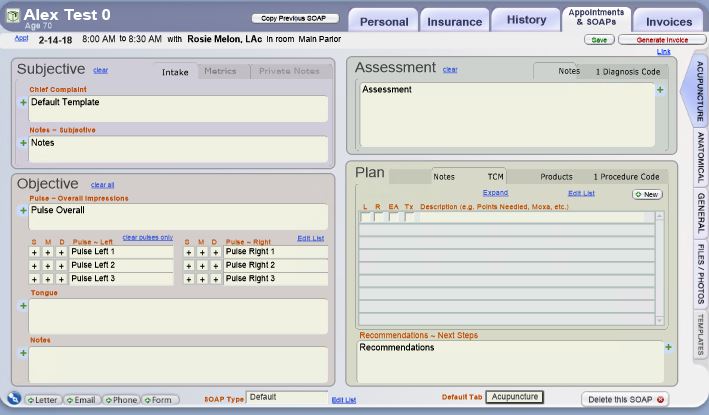
Parts of a SOAP Note
The SOAP Note detail screen is set up with layers of tabs to move quickly to different parts of the note. The default order for these tabs, i.e. which one shows on top, is set for the SOAP Template from which the note originated.

Side Tabs - Different areas of the SOAP Note are accessed by tabs that run vertically along the right edge of the SOAP Note.
-- SOAP, or clinical information, can be entered by using the Acupuncture, Anatomical, or General tabs.
-- Link information to the SOAP Note or create communications related to the visit from the Photos/Files tab.
-- Use the Templates tab to manage the SOAP Template of origin for this SOAP note or view a previous SOAP Note for reference or to apply to the current SOAP.
Sub Tabs - These give access to the different parts of a Side Tab, i.e. Subjective, Objective, Assessment, and Plan.
Appointment information is displayed at the top of the SOAP Note, just under the client's name. Clicking this appointment bubble opens the Appointment Info pop-up window, from which you can click to change the appointment info. Changing the practitioner, room, or other appointment information also changes it for the SOAP Note, but not for any linked invoice.
To the right of the appointment info is a button to Generate Invoice, or if one has already been generated or linked, it says: . Use this or the Link / Unlink controls to manage the invoice to which the SOAP Note is linked. A SOAP Note can be linked to only one invoice. For more info, see <<498>>.

At the bottom of the SOAP Note are the familiar Comm Panel buttons for creating a communication to the client. The Type field (a.k.a. "SOAP Type") has a pop-up menu of choices that you can manage in Settings/Program/Value Lists, or by clicking the Edit List link.
The button is in the lower-right corner. See <<496>> for important information.
Default Main Tab - At the bottom of the SOAP Note screen or on the SOAP Control Tab found on the main Files-Photos tab, you can designate the Main Tab you wish to view first when you come to the SOAP Note screen. This choice overrides any choice designated on the SOAP Template.
The five main data entry areas of the SOAP Note screen are accessed via the vertical side tabs along the right edge of the screen. Three of these tabs are divided into four main areas: Subjective, Objective, Assessment and Plan. These three tabs are different views (depending on your preference) for entering similar information about the client's visit and can be used interchangeably. Preferences as to which tab shows on top can be set in the SOAP Template of origin. (See <<494>> for more info.)
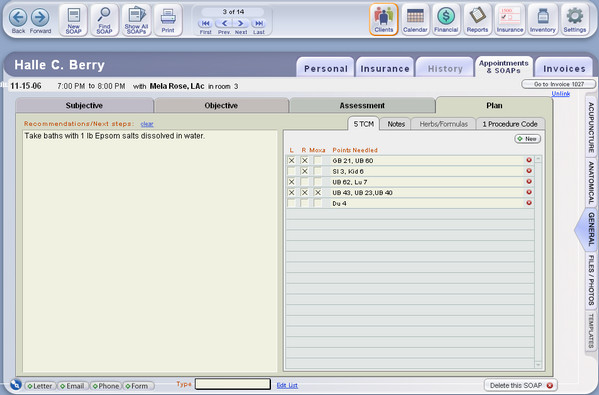
Tip: You can format the text in a SOAP Note; in any field that accepts text. Your formatted text will transfer to the printed SOAP Note. See <<738>> for more info.
Acupuncture Tab ? The Subjective, Objective, Assessment and Plan areas are divided into four sections, or panels, on a single tab. If needed, use the clear links to clear all data from all text fields in that section.
- Subjective panel - Enter chief complaint and any notes about the client's subjective presentation.
- Objective panel - Record pulses, tongue, and other notes from the objective examination.
- Assessment panel - Enter an assessment on the Notes tab, and select as many Diagnosis Codes as you need* by clicking the button, and selecting from a QuickFinder. Any diagnoses in this portal will show on the linked invoice.
- Click Edit List to manage your list of Diagnosis Codes
Keyboard Shortcuts for entry of Line Items
On each invoice and SOAP screen, use key strokes to bring up the QuickFinder for Diagnosis & Procedure Codes and Products. To be reminded of this on each screen, at the top menu, look at Records, Choose New... and then the little menu:
- Ctrl+Shift+D to enter a new Diagnosis Code
- Ctrl+Shift+P to enter a new Procedure Code
- Ctrl+Shift+G to enter a new Product item
[5.1] Add Multiple Diagnosis Codes (or other line items) with the Multi-Pick Tool
The Multi-Pick option on the pop-up Quickfinder lets you select multiple Diagnosis Codes, Procedure Codes, or Products while the pop-up is open, and add them all to the SOAP at one time.
+ See <<949>> below for details
You can also simply type in new or existing diagnosis codes and have the option to add new codes to the list, right from the SOAP note.
Plan panel - Use the Recommendations/Next Steps field and the sub tabs to enter information.
Use CodeTracker to add Diagnosis Codes to a SOAP
See <<1001>> for more info
- TCM - Click the button to create a new row in the portal to record Points Needled
- Notes - A large Notes field is available
- Herbs/Formulas - Enter Herbs/Formulas Prescribed, and/or add products to the portal by using the button, and selecting from a QuickFinder. Adjust the quantity as needed. Any products in this portal will show on the linked invoice.
- Click Edit List to manage your list of Inventory
The Herbs/Formulas tab has new functions related to formulas, including a pop-up Formula Label creator. Also:
+ Click the small Go button on a Product row to see that item's
Inventory Detail screen
+ Hold the Ctrl key down (Command on a Mac), and copy instructions
from the Inventory Item record
- Procedure Codes- Enter as many Procedure Codes as you need* by clicking the button, and selecting from a QuickFinder. Edit the modifiers and price as needed. Any procedures in this portal will show on the linked invoice.
- Click Edit List to manage your list of Procedure Codes
You can also simply type in new or existing procedure codes and have the option to add new codes to the list, right from the SOAP Note.
*Note: If the billing will be done on a 1500 claim form, it only displays a limited number of four diagnoses and six procedures from one or more linked SOAP notes. See <<119>> for more info.
Anatomical Tab ? A large, detailed, graphical anatomical chart makes it easy to enter Objective notes for specific areas of the body, and the other Subjective, Assessment and Plan areas are also available.
- Click on an area of the body, and its description will be entered in red text in the Objective Notes subtab.
- Use the up/down arrows to shift the anatomical chart to the upper or lower areas of the body.
General Tab ? The Subjective, Objective, Assessment and Plan areas each have larger fields and are divided into subtabs. Otherwise, the information that can be entered is the same as for the Acupuncture tab, with 2 exceptions on the Objective subtab.
- Vital Signs (Respiratory Rate, Blood Pressure, and Temperature)
- BMI Calculator (Height, Weight, and Body Mass Index percentage)
The Body Mass Index (BMI) Calculator quickly lets you calculate and record the BMI for a patient
+ See <<948>> below for details
Tip: Diagnosis codes, procedures, products, TCM (points needled), and other SOAP Note information can be set up as part of a SOAP Template to be auto-entered for various types of visits. See <<494>> for more info.
Photos/Files Tab ? Use this tab to link photos and files to a SOAP note (see <<499>>), or to create the Suggested Communications for the visit.
- Suggested Communications can only be assigned to a SOAP Note from the SOAP Template of origin. Clicking a row will create the communication, using the ClientTracker Communications Module. These suggestions are intended to remind practitioners to fill out certain forms, or process other communication related to a certain type of client visit. Enter an optional Created date to show it was done.
Use the delete button to remove a suggested communication from the portal, if it is not needed.
- See <<494>> or <<153>> for more info.

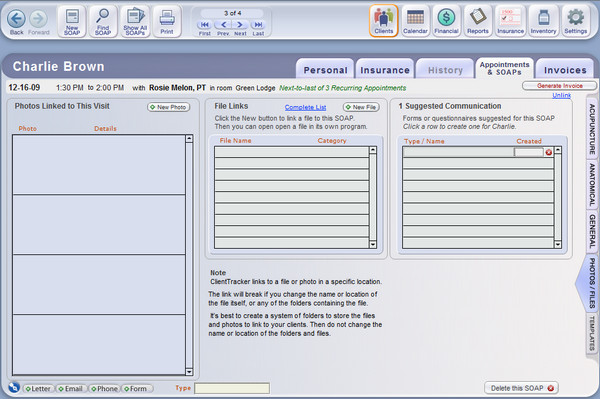
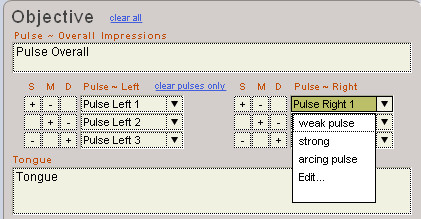
User-Defined Value Lists on the SOAP Note
Click a Pulse field to enter a value manually, or click the little arrow at the right of the field to open a customizable value list, aka "drop-down list." The drop-down list shows any custom values you want; in any order.
Click "Edit..." to open a small value list pop-up window and add, subtract, or reorder your values.
PULSE ENTRY TIPS
Tip: A hyphen on a row by itself will create a separator line in the list.
Tip: When the drop-down list is open, you can type ahead to select any value and press Enter to enter it into the field.
Tip: Click the field itself (shown below), not the little arrow, to add a value that you don't want to keep on your list.

Note: A separate drop-down list with similar action is available in the Points Needled list, on the "TCM" tab (or whatever you have named it), on the main Acupuncture tab.
See <<827>> for more info.
See <<828>> for more info.
SOAP Notes and lists of SOAP notes can be printed in various ways in ClientTracker.
![]()
From the on the Control Panel on the SOAP Note detail screen, SOAP Notes will print only the data from the note in a prearranged format; not as a graphical representation of what you see on the screen.
Tip: The SOAP can be sent by email as a PDF attachmemt. See <<992>> for more info.
- From the list of SOAP Notes for a client, the button will print all those displayed as a list, or a batch of full SOAPs.
- From a list of SOAP Notes resulting from a report or clicking icon, the button will open a pop-up Print Menu window, from which you can choose to print the SOAPs on the list
- As a list of appointments
- As a list of SOAP Notes, with chief complaint
- As a series of SOAP Note detail forms - one for each row in the list
- As a list of appointments
You can customize some aspects of how your SOAP Notes will print in the Plan section; both individually and as a default.
On the Files/Photos tab of any SOAP Note is a smaller tab of controls for print preferences:
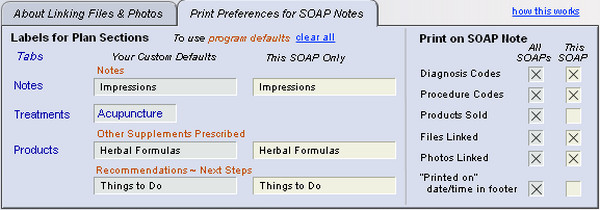
To keep the system defaults printed by ClientTracker automatically, do nothing. To revert to the system defaults after you have made changes, click clear all.
To customize a label for all your SOAP Notes, type a value under Your Custom Defaults, and it will automatically load into the This SOAP Only column, too. You can also type a unique value under This SOAP Only to make a label for just this one SOAP, and it won't affect other SOAPs.
Where to find the items for which you are changing labels:
- Notes - The field in the Plan section on the Notes subtab that has an orange label "Notes" on the entry screen
- Treatments - The 2nd subtab on the entry screen with a portal of treatments you can add as needed. This will always print on the SOAP Note if anything is entered here.
- Other Supplements Prescribed - The field in the Plan section on the Products subtab that has an orange label "Other Supplements Prescribed" on the entry screen
- Recommendations - Next Steps - The field in the Plan section on the Products subtab that has an orange label "Recommendations - Next Steps" on the entry screen
ClientTracker will print a label on the SOAP Note for different items added on the entry screen, e.g. adding 2 Products will result in a label "2 Products Sold" and an abbreviated list of the products. The text of these labels can't be changed, but you can choose to print them or not.
Print on SOAP Note
The default is that all the boxes are checked to print on All SOAPs and This SOAP. Uncheck a box to NOT print the info. You can also choose to print or not for just This SOAP.
- Diagnosis Codes
- Procedure Codes
- Products Sold
- Files Linked
- Photos Linked
- "Printed on" date/time in footer of each page
There are additional choices in the "Print on SOAP Note" section re the new Private Notes field. Check to print this on all SOAPs or just This SOAP. Leave unchecked and the Private Notes will not print.
- For more info, see <<812>> below.
First Set Up Practitioner Signature and Preferences
Signatures are managed for each individual practitioner; on their Detail screen. See <<1050>>
Manage the Practitioner Signature on the Printed SOAP Note
Go to the Files-Photos tab to access the SOAP Control subtab. Under "Print Signature & Date" you can do the following:
1. Enter a Date that the SOAP was signed, which will appear on the printed SOAP for Signature On File or Scan choices.
2. Override the default practitioner signature choices for this SOAP only, by selecting a different option. A preview of what the signature will look like on the printed SOAP appears below.
You have 4 choices for how the practitioner signature can appear on printed SOAP Notes:
- Default (all choices blank): A signature and date line (to be signed manually after printing)
- SOF - Same as above, with the phrase "Signature On File" where the signature would go
- Scan - A scanned graphic of the practitioner's signature (aka "electronic signature")
- No Sig Line - Completely blank, showing nothing at all
How it works: Enter a SOAP Final Date, and a red border appears around the SOAP screen, indicating it is final. You can still make changes to the SOAP Note if you need to. Use the clear link to clear the date if needed.
Tip: You can see which SOAP Notes have a SOAP Final Date by hovering your mouse over the "Status" field on any Visit List. For example, run a report for all the day's visits, then hover over each in turn to see if it's marked final. The "S" or "I" initial to the left of Status will also have a green box to provide a visual cue.
Appointment & Invoice Status Report will show you any SOAPs marked Final. See <<835>> for more info.
Tip: The Find Visits & Appointments screen also has a "SOAP Final" choice to locate all those with a SOAP Final Date.
Use this field to enter sensitive information about the client that you want as part of your SOAP Notes database, but may or may not want to print. This is an additional safeguard of the patient's privacy.
On the Acupuncture tab, the Private Notes tab is found behind the Intake tab, in the Subjective area.
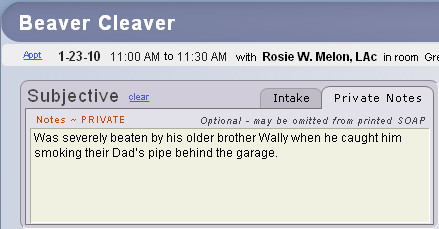
On the General tab, the Private Notes tab is found on the Subjective subtab, with an option to Hide the notes from view.

Note: To prevent private information from printing, check the box on the Print Preferences for SOAP Notes tab, found on the main Files-Photos tab. See <<745>> above for more info.
There is also a separate Private History field on the Client History screen, which is unrelated to any individual SOAP. See <<814>> for more info.
To access the Free Form SOAP Note, click the vertical General tab on the right of the SOAP and choose Free Form SOAP vertical tab on right
Tip: Use this field for practice types or services other than Acupuncturist. You can set this as a Default Main Tab if you always want to see this field first when you come to a SOAP Note. See <<92>> above for more info.
To print, click the Print button to open the Visit Print Menu pop-up, and click the "Free Form SOAP choice.
- On the Acupuncture tab, access a small version of this field in the Plan section, inside the Notes subtab.
- On the General tab, use the vertical buttons on the right to access a larger Client Instructions field, which is good for formatting text, and is closer in size to how the printed handout will appear.

Tips, Ideas, & Data Entry Shortcuts:
- Use
the QuickClips tool to quickly add segments of text to Client
Instructions, such as seasonal or marketing info, promotions, health
tips, requests for feedback, etc. For more info about QuickClips, see <<819>>.
- A small calendar icon is above the Client
Instructions field on the SOAP Note entry screen. When clicked, it will
insert the client's next appointment info (if any) at the position of
your cursor in the Client Instructions field.

- There is also a small Inventory ("I") icon that when clicked will enter your choice of
- a list of any Products added to the SOAP, formatted as a list of ingredients, or
- the full formula label text (see <<821>>)
- Text in the Client Instructions field can be formatted using the text formatting tools in the main (top) menu, under "Format."
- Use
Ctrl+C to copy the Client Instructions text when finished, then create
an Email communication to the client and paste the text in the body.
(Note: Email text is sent as plain text only from ClientTracker, and
cannot be formatted.)
- Print formatted Client Instructions as a PDF; then attach it to an email. See <<750>> for more info.
- Remember, you can also attach any electronic file to a SOAP Note. If you already have handouts and other materials that are clinically important, they can be recorded on the Files-Photos tab. See <<101>> for more info.
When you click Print for a SOAP Note, you have a choice to print just the SOAP Note, the SOAP Note + and Client Instructions, or just the Client Instructions alone.
Note: The Client Instructions contents will copy forward, along with other SOAP info, if that option is set up for the Practitioner.
SOAP Template
Client Instructions also appear on SOAP Templates, where you can enter info that will be the same for all clients for whom that template is used. Anything you enter in the SOAP Template will be copied when it's applied to the SOAP. See <<818>> for more info.
The Objective sub tab on the main General tab of the SOAP Note has a built in Body Mass Index (BMI) Calculator, just beneath the Vital Signs. The Weight field has been moved to this panel, as it it part of the BMI calculation.

Enter Height as a numeric value only, and indicate if this is inches (in) or centimeters (cm). Then enter Weight as a numeric value, and indicate pounds (lb) or kilograms (kg). ClientTracker does the rest! Just click the calculate link on the right to see the BMI percentage.
- If the BMI exceeds 30%, it will show in red
- The values for Height and Weight must both be entered in the English system (in / lb), or the Metric system (cm / kg).
- Click clear bmi only to erase the values if desired, or save them as a permanent part of the SOAP.
- If there is a value in the BMI field, a small section will be added to the printed SOAP Note to show the BMI Calculation. Otherwise, Height and/or Weight will be grouped with the Vital Signs.
Design and Print a Formula Label
For those who use groups of Products regularly as constituent ingredients for a "formula" prescribed for a patient or Client, ClientTracker offers a system to set up and customize a label that can contain any information you want.
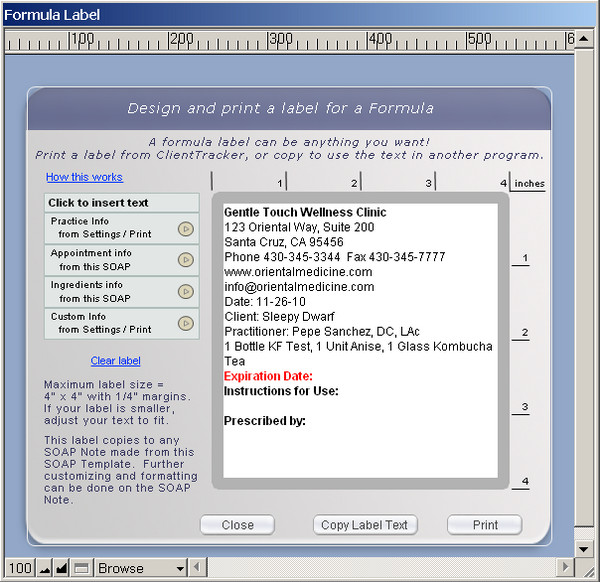
Formula Labels are made on a SOAP Template or SOAP Note, and have your basic info created in the Settings area.
Settings
Options to set up custom text to be used on Formula Labels are in the Settings area, on the Program tab. Go to the smaller subtab Print, then choose Labels.
For your convenience, on the Labels subtab you can set up the initial format and text to be to be used as the building blocks for all Formula Labels. A label usually has 4 parts.
Part 1 - Your practice information, including name, address, phone, and even fax, email, and/or web site. All of this info is copied from the Practice tab of Settings when you click the Reset Practice Info button. From there, you can add or remove text, format it, or customize it in any way for use in formula labels.Create a Formula Label
Part 2 - Visit (SOAP) Information - A label for a prescribed formula needs the date of the visit, and the names of the Client and Practitioner. These are not set up in Settings, but are options for the SOAP Note. See below for more information.
Part 3 - Ingredients of a formula are the Products added to a SOAP Template or SOAP Note. See below for more information.
Part 4 - Additional Information of your choice. You may want to include an Expiration Date and/or Instructions for Use on your formula label. Enter and format in Settings any repeatable information you'd like to add to your labels.
To open the Formula Label pop-up window, click the Formula icon on the Products tab (Acupuncture or General view).
On the Formula Label pop-up window, design the label text and formatting you'd like to be printed on a label. You can enter predetermined text, and/or freely type in your own text. Elements can be entered anywhere in the space provided, and can be made larger, smaller, and/or moved around to suit your needs.
Click the small blue arrow (or whole box) to enter a block of text at your cursor position.
Practice Information - from the Settings controls for a Formula Label
Ingredient Info - all Products added to this SOAP Template in the order they appear, including Quantity, Unit, and Name.
Tip: You may want to enter a Product item in Inventory that acts as a "title" for the formula. See XXX for more info.
Custom Information - from the Additional Information area of the Settings controls for a Formula Label.
BUTTONS ON THE POP-UP
- Save whatever is entered and close the pop-up
- Copies the whole contents of the label so you can paste it into another program, for example one where you already have label printing set up.
- Offers a preview of how your label will look, and a Floating Preview Palette for printing.
Note: The Formula Label text will print on whatever printer you choose from your computer's list of available printers. It will print on plain paper or a label loaded in your printer. ClientTracker just sends the print info out; where it winds up is a function of the printer you choose and paper or label you load into the printer.
The Formula Label is programmed to print on a label that is up to 4 inches wide, and up to 4 inches deep. If your label is smaller, adjust the text and formatting in the Formula Template pop-up so that it will fit.
Generate and Print a Formula Label from a SOAP Note
When a SOAP Template is applied to a SOAP Note in any way, the label information is copied and ready to use in the context of that Client's visit.
- For more info about how SOAP Templates are applied, see XXX
The SOAP Note's Templates tab (vertical tab on the right side) has a list of SOAP Templates. Those designated as a Formula Template have dark blue names and the formula icon. When the Apply link is clicked for any SOAP Template in the list, you have the option of copying all information from the SOAP Template, or just the Products.
Warning: When you apply an entire SOAP Template to a SOAP Note, it will overwrite any existing information.
Tip: Applying just the Products from a SOAP Template is a quick way to add a group of Products that constitute a formula.
To open the Formula Label pop-up, click the Formula icon on the Products tab (Acupuncture or General view).
The Formula Label pop-up associated with a SOAP Note is very similar to the one for a SOAP Template (see link below); with one additional option:
- Click Visit Info to enter the Date and names of the Client and Practitioner associated with that SOAP.
IMPORTANT: When a Formula Label is made from a SOAP Note, it becomes part of that "medical record," and is stored with all other SOAP Note information.
Information on the Formula Label will be copied to the next SOAP Note for that Client (with the same Practitioner), just like any other SOAP info. This can be a big time saver; however, care must be taken to ensure that the label information is correct for each visit, if applicable.
Tip: To view a Formula Label for a past SOAP Note, click the Formula icon found on the Products tab to open the pop-up window.
Insert Product Info as Text in Client Instructions
There is a quick shortcut to enter info about the Products on a SOAP Note into the Client Instructions, where you can edit, format, or copy it for other use. See <<817>> for more info.
Make a Formula Label Template on a SOAP Template
SOAP Templates can be used as "Formula Templates." and you can also manage a "Formula Label" from there, which acts as a template for all SOAP Notes made from that SOAP Template. See <<821>> for more info.
Tip: "Line items" are Diagnosis Codes, Procedure Codes, and Products. Any line items you add to the SOAP Note will be shared by the invoice.
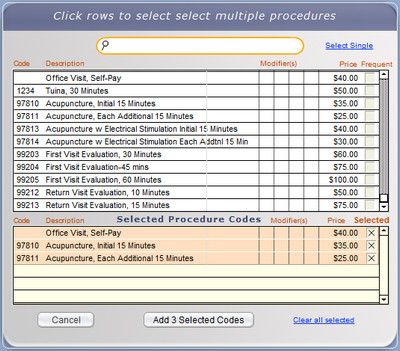
You can add multiple line items to a SOAP Note while the Quickfinder pop-up remains open. The Quickfinder opens when you click the +New button on the SOAP Note to add Diagnosis Codes, Procedure Codes, or Products.
- Click the Multi-Pick link to access the picking tool
- Find and select the items from the top list the same way you would for a single item, by typing into the Quickfinder and clicking a row
- When you click a row to select, it is added to the Selected list below
- Uncheck the box at the right of an item's row if you want to remove it from the Selected list
- Click the Add Selected button to add all the items in the Selected list to the SOAP
- Click Cancel to not add anything (the selected items will be cleared)
The Subjective and Plan areas of the SOAP have places to enter your choice of metrics. These are intended for comparison of a before and after numeric value, e.g. pain scale 1-10. These are blank when you first see them - enter your question, and it will become part of the drop-down list so you may add it to other SOAPs when needed.
- Subjective - Click on the new Metrics tab to enter.
- Plan - Click on the Notes tab, and the Metric sub-tab.
METRICS "BEFORE"
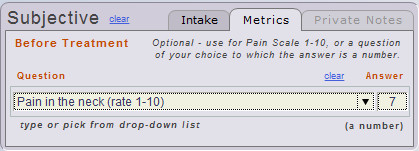
METRICS "AFTER"
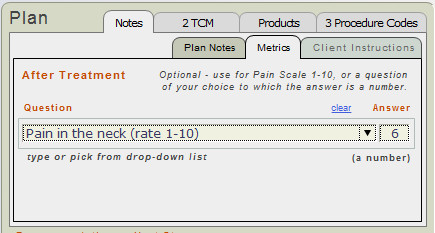
There are 2 entry fields. One is a place to enter your question, e.g. "How would you rate your pain, on a scale from 1-10?" The other is to enter a numeric value (numbers only). The question and value will print in the Subjective (before) and Plan (after) areas of the SOAP.
- There must be a "before" entry in the Subjective area first, and then the "after" data in the Plan area can be entered.
- Click clear to remove your entries in either area.
The evaluation of "attendant time" is becoming more common with insurers. They sometimes want to know the time the practitioner was actually with the patient; not just how long they were in the office. Measuring the start and end time of each treatment procedure allows a total to be calculated. The TCM (aka "Points Needled") section of the SOAP in ClientTracker now lets you track the time for any treatment - not just acupuncture.
On the TCM tab of the SOAP Note detail screen is a list of treatments that you enter for each visit. (You can name this tab whatever you want - see <<745>>)
- Click the Expand link to see the Time information
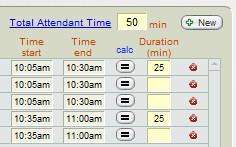
Enter one treatment per row. For each treatment, you have the option of recording the Position, Time Start, Time End, and Duration. To calculate the total time spent for each treatment (from Time Start to Time End), click the small [=] button, or enter a value of your own. When all treatments and times have been entered, you can calculate the Total Attendant Time at the top by clicking the blue link.
- Time Start and End values should be entered as time, e.g. "10:45am"
- Totals are calculated in minutes
- Times entered and Totals will show on the printed SOAP
Details in this section include:
- <<829>>
- <<827>>
- <<852>>
- <<828>>
- ClientTracker is programmed to copy whatever is the Client's previous SOAP Note with the same Practitioner, even if it the appointment was canceled or was a no show.
- At any time, if the SOAP Note copied is not the desired one, simply go to the Templates tab on the SOAP Note and apply the desired previous SOAP.
IMPORTANT CHANGES IN VERSION 6.2.04
Make sure your practitioner setting is set to automatically copy "Use previo
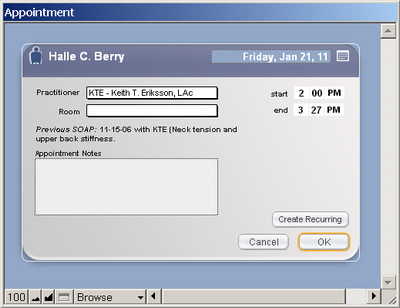
Each practitioner has a template designated for Initial Visits or Subsequent Visits with the same client. For latter, you can choose to "Use previous SOAP/Invoice with same Practitioner."
See <<503>> for more info about setting up the designated templates for a practitioner.
For each practitioner, ClientTracker is shipped with the Default SOAP Template preselected. You can keep this designation, or create new templates and assign them.
Tip: To make a blank SOAP Note for new appointments, create a completely blank SOAP Template and designate it a practitioner. The Default SOAP Template comes as a blank and can be edited. See <<494>> for more info about SOAP Templates.
When the appointment is made, a SOAP Note is stored in the program for that visit. Click the button in the Appointment window after the appointment is made to view or work with the SOAP Note. If the template or previous visit had line items such as diagnoses, procedures, or points needled, these will be auto-filled on the new SOAP Note.
[5.0] Remember,this does not happen until you go to the SOAP Note on the day of the visit, or click the Copy Previous SOAP button (see <<852>> below).
Products are are auto-filled.
Tip: Once you are working with the SOAP Note, you can always overwrite it with info from a previous visit or SOAP Template. See <<516>> for more info.
Important Points
- ClientTracker automatically creates a SOAP Note for all appointments, whether you fill it in or not.
- An Appointment contains the initial SOAP info: date, time, practitioner and room.
- So first is the appointment, then the visit, then the SOAP Note containing all the details of the visit. They are one and the same record in ClientTracker.
- Only Diagnoses and Procedures are copied automatically from a previous SOAP or invoice.
- SOAP Notes and invoices share the same Diagnoses, Procedures, and Products. These are often referred to as "line items." The logic for this is that these line items are part of the medical history and should also be part of the SOAP note.
There are 2 different methods to generate a SOAP Note.
From an Appointment
- When you make an appointment, a SOAP Note is generated automatically, even if you don't fill the SOAP Note fields.
- This appointment/SOAP record will inherit the Diagnoses and
Procedures from the previous
appointment/SOAP with the same practitioner, if the practitioner's record is set to use the Previous
SOAP/Invoice for all subsequent visits.
New SOAP button
When you use the New SOAP button, you are presented with the Appointment pop-up window. This is because an appointment and SOAP are always connected, even if you don't use the Calendar in ClientTracker.
- This appointment/SOAP record will inherit the Diagnoses and
Procedures from the previous
appointment/SOAP with the same practitioner, if the practitioner's record is set to use the Previous
SOAP/Invoice for all subsequent visits.
You can access a SOAP from two main places:
1. the Appointment Info Pop-up
Click on the appointment in the calendar and click the SOAP button
2. SOAP/Visit list (for example, the Client Appointments & SOAPs tab)
Click the center of any row to access the SOAP Note.
The previous SOAP will copy at the time the appointment is made. If you make a series of Recurring Appointments, all of them will copy whatever is the previous appointment at that time. When you get to the later appointments in the series, this may be outdated info, and can be easily replaced with the most current previous SOAP info. See <<827>> below for more info.
The Copy Previous SOAP button is a powerful tool that can make filling out a SOAP Note much faster. With this power comes responsibility to use it only when appropriate, and to be careful not to overwrite any information you are required to save for HIPAA compliance.
The Copy Previous SOAP button is located near the top of the SOAP Note detail screen, next to the Personal tab. It does not appear or function if:
- The SOAP Note is marked FINAL, or
- There is no previous SOAP Note for this Client with the same practitioner.
- A patient comes in for only herbs, there is no appointment but you create an invoice only.
When you click the Copy Previous SOAP button, a pop-up window with the same name opens, showing a summary of the previous SOAP's date, chief complaint, and Diagnosis and Procedure Codes. ClientTracker considers a client's previous SOAP Note to be the most recent one from a previous date with the same practitioner.
Tip: To see complete detail on a previous SOAP, look on the Templates tab. See <<828>> below.
Options on the Copy Previous SOAP pop-up window include:
- Click Copy from Previous to close the pop-up and perform the action
- Click View all Previous SOAPs to see a list of all previous SOAPs on the Templates tab
- Click Cancel to close the pop-up window and do nothing
When you click Copy from Previous in the pop-up window, all the data fields from the previous SOAP Note will be copied to the current one, including Client Instructions and Formula Label, if any. Line items including Diagnosis & Procedure Codes, Products, TCM (Points Needled), and Communication Reminders will also be copied. Any linked files or photos will not be copied forward.
NOTE:
- If there is any existing data on the current SOAP Note, you will be warned before the previous SOAP Note is copied. This action will overwrite any existing data on the current SOAP Note. Once the Copy Previous SOAP button has been used, you cannot revert back to the contents of the original SOAP. Use this feature with caution and discretion!
- If there is an invoice generated already and linked to the SOAP Note, any line items (Diagnosis & Procedure Codes, Products) shared by the invoice will not be altered or copied from the previous SOAP Note; even if the linked invoice is blank.
Templates tab ? Use this tab to apply info from this client's previous SOAP Notes, or to apply a SOAP Template to this SOAP Note.
Previous SOAP Notes

- Overwrite the information on the current SOAP with information from a client's previous SOAP Note by selecting Apply from
the portal under the client's name. Use the QuickFinder to narrow
the portal contents by Chief Complaint, or click the headings to sort.
- Click a row to view the details of any previous SOAP Note (no editing possible)
- A highlighted row is the origin of this SOAP Note
SOAP Templates
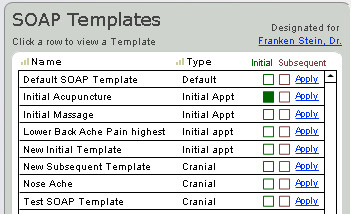
The
SOAP Templates portal highlights the row of the template of origin for
the current SOAP Note. It shows the SOAP Template type and whether it is
the Initial or Subsequent default SOAP Template for the practitioner of
record.
Click a row in the portal to view or edit the SOAP Template. Any changes made to the template of origin in this way will not be applied to the current SOAP Note, unless the Apply function is used.
The colored boxes show default SOAP Templates for the practitioner of record. These are changed only on the Detail screen of the practitioner, which is accessible by clicking the practitioner's name just above the portal.
- Green = Used for a client's initial visit with that practitioner
- Maroon = Used for all subsequent visits
See <<494>> for more info.
Warning: Using the Apply function will permanently overwrite any existing information on the current SOAP Note, and cannot be undone. There are confirmation messages to help prevent accidental loss of data.
Rules regarding the Apply function:
- IMPORTANT: Once applied, the overwritten changes cannot be undone.
- When a past SOAP or template is applied as a source, most
information on the current SOAP Note will be replaced with the source
data, including Diagnoses, Procedures, Products, TCM (Points Needled), and
Suggested Communication.
- Any Photos or Files linked to the current SOAP Note would not be affected.
- You will be given the option to apply the products from the previous SOAP or leave them off.
- Any Photos or Files linked to the current SOAP Note would not be affected.
- If the SOAP Note you're working on is in the past, it should not be overwritten using the Apply function if it is a HIPAA-protected record of a client visit.
- If you try to apply a previous SOAP, a warning message will appear so you can or the changes.
- Applying a SOAP Template to a past SOAP Note is not allowed.
- Applying a SOAP Template to any SOAP Note is not allowed IF there is a payment on the linked invoice, or it has a Date Claim Sent
- The Apply function is allowed only if the SOAP Note is linked to a modifiable invoice, because any corresponding diagnoses, procedures, and products on the invoice would be affected.
- A modifiable invoice is one that is not paid in full, has no insurance payments, and has not been submitted as a 1500 claim.
- You can apply a previous SOAP Note or SOAP Template even if an invoice has been generated.
- In this instance, the line items shared by the invoice will not be changed, but the other SOAP fields will get filled.
- A modifiable invoice is one that is not paid in full, has no insurance payments, and has not been submitted as a 1500 claim.
Tip: The first few times you use the Apply function, we recommend you first save the current SOAP Note as a temporary SOAP Template. That way, if you make a mistake, you could always revert to the original data (except for Products) by applying the saved template.
To save the current SOAP Note as a SOAP Template, click the button just above the portal of previous SOAPs.
- This will save most of the information on the current SOAP Note as a
template you can apply later, but will not include any Products. SOAP
Templates do not have Products.
- Photos and Files linked to the SOAP Note cannot be saved in a template.
- The name of the client and date of the SOAP Note of origin will be added to the Notes field in the resulting SOAP Template for reference.
Details in this section include:
- <<498>>
- <<101>>
- <<103>>
- <<500>>
The SOAP Note is a record of one client visit and all the events or information associated with it. ClientTracker supports the association of additional information -- even files stored elsewhere on your computer system -- by linking them all in a display on the SOAP Note itself. Information linked to a SOAP is not printable with the SOAP Note details, but a notation, e.g. "2 photos linked to this visit" is printed.
As a medical record, the SOAP and its linked information can encompass the entire cycle of information related to a client visit, including forms filled out ahead of time or brought to the appointment, clinical evaluations, photos, and documents done during the visit, billing records, and follow-up such as lab results, consults, or patient diaries.
The following information can be linked to a SOAP:
- Invoice - The invoice for a SOAP shares the line items that are billable, or needed for billing, such as diagnoses, procedures, and products.
- Files - Any type of electronic file can be linked to a SOAP Note in ClientTracker, and the file is easily referenced and can be opened from ClientTracker by the software that created it.
- Photos - Digital images can be linked to and displayed from a SOAP Note, with optional added comments or other information about the image.
An invoice shows all the diagnoses, procedures, and products (a.k.a "line items") from that SOAP Note, whether the invoice is created new or linked to a SOAP Note. Line Items are shared by SOAP Notes and invoices, so a change made in one place will show and print in the other.
A new invoice can be generated for a SOAP from three places:
- On the Appointment Info pop-up window, click the button. If one has not yet been created, you are asked if you want to create one.
- On the SOAP Note detail screen, the upper right, click the Generate Invoice button
- On the SOAP list, click the Generate button on the far right of the list
Unless the client has a default invoice type, you are asked which type of invoice you want to create (i.e. Simple, Superbill, or 1500). For more info on invoice types and creating an invoice, see <<107>>.
Link an Invoice to a SOAP Note
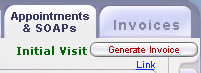
You can also link a SOAP to an existing invoice that resulted from another SOAP. This way, it's possible to bill for several visits on one invoice, as governed by the rules below.
On the SOAP Note detail, click Link, which appears just below the Generate Invoice button. If an invoice is already linked to the SOAP Note, the button says "Go to Invoice (number)," and below that, Unlink. When you click Unlink, the invoice is checked for payments or credits before unlinking. If an invoice has payments or credits, the SOAP Note cannot be unlinked.
When you click Link, a list appears of all qualifying invoices for the client (see below).
- Click a button or row to link an invoice and return to the SOAP Note
- To see a detail screen of the invoice, click the button
- To go back, click the button at the bottom of the screen
If a SOAP Note is already linked to an invoice and you want to link it to another invoice instead, first click Unlink, which will unlink the SOAP Note (if allowed by the rules below). The link will change to Link, and you can proceed as described above.
To manage multiple SOAP Notes that are linked to an invoice from the perspective of the invoice, see <<111>>.
Rules Governing Linked SOAP Notes and Invoices
- A SOAP Note can be linked to only one invoice. An Invoice can display multiple linked SOAPs
- Invoices created without a SOAP are not available for linking (if needed, a SOAP Note can be generated from the invoice. See <<111>>.)
- A SOAP Note can be only be linked to a qualifying invoice which is one that:
- is not paid in full
- has no insurance payments
- has not been submitted as a 1500 claim.
- is not paid in full
- Once linked, a SOAP Note can only be unlinked if the invoice is completely unpaid.
- Linking can only be done from the SOAP Note detail screen. Unlinking can be done from the appointment pop up on the calendar or the SOAP note detail.
- When Diagnoses and Procedures are shared by a linked SOAP Note and Invoice, the dates of these line items can be changed by changing the date of the SOAP Note (i.e. the date of the appointment) on the SOAP Note itself.
- This can also be done in the Appointment pop-up window, which is offered as an option when the Date field of a line item is clicked on an invoice.
- If this is done, the dates of all the line items linked to the SOAP Note will be updated.
- The date of an invoice can be changed at any time, and this will not affect the dates of any line items; nor its linked SOAP Note(s).
- An invoice can be linked to multiple SOAP Notes, and the diagnoses, procedures, and products remain on their respective SOAP Notes, but combine on the invoice.
- If an invoice is linked to 2 or more SOAP Notes, new diagnoses, procedures, and products can be added only from the SOAP Note, and once added, will appear on the invoice.
- When an invoice is linked to one SOAP, the button on the invoice detail screen opens the SOAP directly
- When an invoice is linked to multiple SOAP Notes, the button says (x being the number of SOAP Notes) and opens a list, from which you select the SOAP Note to view, or click the button to return
ClientTracker supports linking external files to SOAP Notes. These can be lab reports, documents, email text files ? virtually any file on your computer. A link, or reference, is made to a file that already exists on your computer, after which it can be opened and viewed in the parent application. There is a separate method for attaching and viewing digital photos (see <<103>> below).
[ClientTracker Cloud 5.0]
Use the system's Browser window to
locate a graphic file on your local computer and upload it to the
Cloud. See <<854>> for details.
Files linked to a client's SOAP Note will not show in the list on the client's Personal tab. To see a complete list of the files for any SOAP Note, click the blue Complete List link above that portal.
Note: The photo will be placed in the Default File Path when you link it. If it is not in the ClientTracker Files-Photos folder already, a pop-up message will ask you if you want to move or copy it to its new location. See <<455>>
The first time you do this in ClientTracker, you will have to browse your computer file directory to locate the ClientTracker Files-Photos folder, located in the main ClientTracker v6.0 folder. After that, the Insert File dialog should open to that folder automatically.
The File Link Process
On any SOAP Note, click the side tab, Photos/Files. In the center section of the tab is a portal for adding and viewing File Links.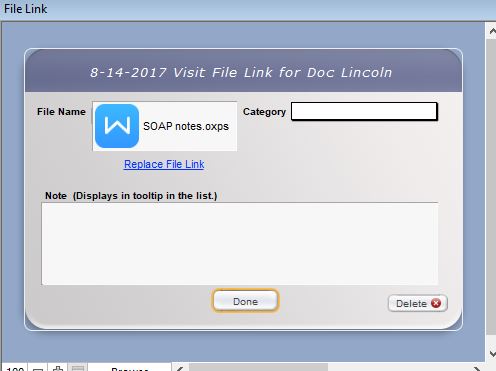
To link a file to the SOAP Note, click the button above the portal. From there, the process is the same as adding a file link to the list on a client's Personal tab. From the Insert File pop-up window, browse your hard drive and choose a file associated with the current SOAP Note by double clicking it, or selecting it and clicking . Click to abort the File Link process.
Warning: Do not change any of the information in the Insert File pop-up window, especially the box that says "Store only a reference to the file," which is checked automatically.
The File Link Portal
In the center of the Photos/Files tab is a scrollable portal of all files that have been linked to the SOAP Note.
- Click the button next to each file name to see expanded info about the file in the File Link pop-up window
- Click the file name, and it will open in its parent application
- Hover your mouse over the file name to view a tooltip of any notes you added about the file
- Enter a Category from the pop-up menu to classify the file, or select "Other..." to enter a new value and add it to the menu.
Click the delete button on the right to delete the file link. This does not delete the actual file on your computer.
- Click Complete List to view a sortable list of all past & present file links; for the current SOAP Note. From there, click the button to return.
The File Link Pop-Up Window
When a file has been linked, its icon, name, and other optional info will appear in this pop-up when the button is clicked on the SOAP Note portal.
The following additional functions are available here:
-- Click the file icon to open it in its parent application (i.e. the program that created it). If the parent application is not available on your computer, the file cannot be opened.-- Choose an optional Category from the pop-up menu to classify the file, or select "Other..." to enter a new value and add it to the menu.
-- Enter a brief description and/or notes about the file link, which will show in the tooltip on the File Link portal and print on the SOAP Note details.
-- Click Replace File Link to browse your computer again, and replace the file link after confirmation.
-- Click the button to delete the file link. This does not delete the actual file on your computer.
Note: The contents of files linked to a SOAP Note are not printed with the SOAP Note details, but a message will be printed if there are any, e.g. "2 Files Linked to This Visit" along with each file's category, notes, and filepath.
- See <<480>> for more info on files linked to the client's record in general.
 To link a viewable photo to a client's SOAP Note, click the button on the Photos/Files tab of the SOAP Note detail screen. Browse your computer file directory to locate the photo. This process is the same as for linking a file - see above for more info.
[ClientTracker Cloud 5.0]
Use the system's Browser window to
locate a graphic file on your local computer and upload it to the
Cloud. See <<854>> for details.
Note: The photo will be placed in the Default File Path when you link it. If it is not in the ClientTracker Files-Photos folder already, a pop-up message will ask you if you want to move or copy it to its new location. See <<455>>
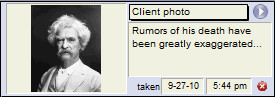
After linking a photo, use the portal, "Photos Linked to This Visit" to enter optional photo details, or perform other functions.
After linking, a thumbnail photo image will show in the portal.
To see a larger view of the photo in a pop-up window with larger fields to enter data, click the button
- To see the largest photo image in a pop-up window with no data entry fields, click the thumbnail itself.
- To replace the photo (keeping all the same details), click the button in this enlarged pop-up window.
- Enter an optional Category (e.g. symptom, wound, etc.) from the pop-up menu. Select "Other..." to enter a new value and add it to the menu.
- Enter an optional brief description of the photo in the space provided.
- Taken ? Date and time the photo was taken (the current date & time will load automatically, and can be typed over if needed).
To delete a photo, click the delete button to the right of the photo details, or the button. This does not delete the actual photo from your computer.
Note: Photos linked to a SOAP Note are not printed with the SOAP Note details, but the info is printed if there are any, e.g. "2 Photos Linked to This Visit," along with category, notes and filepath.
Note: ClientTracker creates a link, or reference, to the actual file's location on your hard drive or another computer on your network The link will break if you change the name or location of the file itself, or any of the folders containing the file. For more info about managing file reference locations, see <<455>>.
The contents of the Suggested Communication portal on the Photos/Files tab are Communication Templates -- created from the SOAP Template of origin.
The Communication Templates listed in the portal are suggestions for the practitioner to create communication (e.g. a questionnaire) related to the visit. Unlike photos and files, however, the communication is not automatically linked to the SOAP Note.
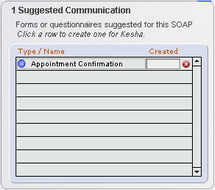
Simply click the row to create a communication for the client from the Communication Template listed. Enter an optional Created date in its row, to show it was done, or use the delete button to remove it from the portal.
This may be a useful system to remind practitioners to have the client fill out forms for certain types of visits, or to send the client a follow-up communication.
To best use this system, follow these steps:
1. Create a Communication Template to be used during a certain type of client visit2. Create a SOAP Template for that type of visit or go to existing SOAP Templates.
3. On the Template Settings tab, where it says "Communications for This Template," click and select the Communication Template from the drop-down menu in the new row added. See <<504>> for more info.
4. From the practitioner's Detail screen, assign the SOAP Template to be used for initial and/or subsequent visits. See <<503>> for more info.
5. When an appointment is made, the practitioner's default SOAP Template will be assigned automatically, and the Communications Template will show as a link in the portal of the Photos/Files tab on the SOAP Note detail screen.
Notes to Consider
A SOAP Template can also be applied directly to the SOAP Note anytime, which would overwrite any existing info on the SOAP Note and replace it with that of the SOAP Template; including its Suggested Communications. This is done on the Templates tab of the SOAP Note detail screen.
A communication created in this way will show in the Communications portal on the client's Personal screen. It can be started, saved as pending, and completed just like any other communication in ClientTracker. For more info, see <<153>>, or <<144>>.
Here are some ideas for linking completed communication to the SOAP Note:
- Forms - Print the form and after it is filled out, mark it as signed and scan the form.
- Letters or other text documents - Print the form, and when your own computer's Print dialog box opens, select a "save as file" option from your list of printers, e.g. Adobe PDF, Notes, .rtf, .txt, or other files.
- Email - Save email as a .txt or .html file, or use the Print command to "save as file" as described above.
- Phone - Copy the phone notes and paste into a .txt or .doc file.
In all the above ideas, the resulting files can be linked to a SOAP Note. Of course, these are subject to the capabilities of your own computer software and hardware.
The SOAP Note has a number of flexible new features to manage herbal formulas composed of ingredients.
Details included in this section
- <<823>>
- <<824>>
- <<825>>
A systematic approach to managing and tracking formulas of constituent ingredients is possible. The components may include:
- Inventory items of constituent ingredients
- Inventory items that act as a Formula Title, with instructions how to use the formula
- SOAP templates designated as Formula Templates
- Functions on the SOAP Note to manage formulas prescribed for Clients
- Formula Label default info on Settings/Program/Print/Labels
- Create an Inventory item for each ingredient in a formula. Set up the Unit so indicate measure; e.g. grams.
- Create an Inventory item for the Formula Title. Add Instructions for use that can be copied to Client Instructions when the formula is prescribed.
- Set up a master template for the Formula Label. Go to Settings/Program/Print/Labels, and format your practice info and additional info as you want on your labels. Maximum label size is 4 inches square.
- Create a Formula Template as a SOAP Template. It can be part of a SOAP template or have just the Formula template. Add the ingredients or "Products", including the Formula Title "product." You can also set up Client Instructions for that formula.
- Manage a Client's formula on the SOAP Note:
Advantages of This System
- Apply a Formula Template with just Products on the SOAP template to a SOAP Note that is already filled out.
- Click the Formula icon on the Products tab of the SOAP to open the pop-up Formula Label window, and compose/print your label.
- Ctrl+click on the Go button for the product used as a Formula Title to copy its instructions, and paste them in the label and/or Client Instructions.
-- Track your Clients who received a formula by running the Product Sold Report for the item used as a Formula Title.
-- Flexibly create Formula Templates, and adjust the ingredients and amounts after they have been copied to the SOAP Note.
-- Compose detailed, formatted Client Instructions from your templates, Formula Title items, and/or even use the QuickClips feature, and print as a handout.
-- The Formula Label and Client Instructions are retained with the SOAP Note as a clinical record. On the printed SOAP Note, only the "products" are shown.
For those who use groups of Products regularly as constituent ingredients for a "formula" prescribed for a patient or Client, ClientTracker offers a system to set up and customize a label that can contain any information you want.

Formula Labels are made on a SOAP Template or SOAP Note, and have your basic info created in the Settings area.
Settings
Options to set up custom text to be used on Formula Labels are in the Settings area, on the Program tab. Go to the smaller subtab Print, then choose Labels.
For your convenience, on the Labels subtab you can set up the initial format and text to be to be used as the building blocks for all Formula Labels. A label usually has 4 parts.
Part 1 - Your practice information, including name, address, phone, and even fax, email, and/or web site. All of this info is copied from the Practice tab of Settings when you click the button. From there, you can add or remove text, format it, or customize it in any way for use in formula labels.
Part 2 - Visit (SOAP) Information - A label for a prescribed formula needs the date of the visit, and the names of the Client and Practitioner. These are not set up in Settings, but are options for the SOAP Note. See below for more information.
Part 3 - Ingredients of a formula are the Products added to a SOAP Template or SOAP Note. See below for more information.
Part 4 - Additional Information of your choice. You may want to include an Expiration Date and/or Instructions for Use on your formula label. Enter and format in Settings any repeatable information you'd like to add to your labels.
Create a Formula Label on the SOAP Note
A Formula Label can be created on the SOAP Note using one of three methods:
- Copy Formula Label information from a SOAP Template before you begin charting.
- Copy just the Products from a SOAP Template or Formula Template; at any time.
- Add Products to the SOAP Note and compose your Formula Label from scratch.
Method 1. Copy Formula Label Information from a SOAP Template
When a SOAP Template is applied to a SOAP Note in any way, the label information is copied and ready to use in the context of that Client's visit. This also overwrites everything else on the SOAP Note, so it's best to do this at the beginning (before you start charting).
- For more info about how SOAP Templates are applied, see <<822>>
Method 2. Copy just the Products from a SOAP Template or Formula Template
The SOAP Note's Templates tab (vertical tab on the right side) has a list of SOAP Templates. Those designated as a Formula Template have dark blue names and the formula icon. When the Apply link is clicked for any SOAP Template in the list, you have the option of copying all information from the SOAP Template, or just the Products.
Warning: When you apply an entire SOAP Template to a SOAP Note, it will overwrite any existing information.
Tip: Applying just the Products from a SOAP Template is a quick way to add a group of Products that constitute a formula.
Tip: After Products have been added to a SOAP Note, go to the invoice to move them up or down to change the order. (You need to generate an invoice first.) See <<107>> for more info.
- For more info about setting up a SOAP Template as a Formula Template, see <<821>>.
Method 3. Add Products to the SOAP Note and compose a Formula Label
First, add all the Products to your SOAP Note that comprise the formula, and adjust the Quantity as needed.

To open the Formula Label pop-up window, click the Formula icon on the Products tab (Acupuncture or General view).
On the Formula Label pop-up window, design the label text and formatting you'd like to be printed on a label. You can enter predetermined text, and/or freely type in your own text. Elements can be entered anywhere in the space provided, and can be made larger, smaller, and/or moved around to suit your needs.
Click the small blue arrow (or whole box) to enter a block of text at your cursor position.
Practice Information - from the Settings controls for a Formula Label
Ingredient Info - all Products added to this SOAP Note in the order they appear, including Quantity, Unit, and Name.
Tip: You may want to enter a Product item in Inventory that acts as a "title" for the formula, and allows you to store instructions for use. See <<824>> below for more info.
Visit Info enters the Date and names of the Client and Practitioner associated with that SOAP.
Custom Information - from the Additional Information area of the Settings controls for a Formula Label.
BUTTONS ON THE POP-UP
- Save whatever is entered and close the pop-up
- Copies the whole contents of the label so you can paste it into another program, for example one where you already have label printing set up.
- Offers a preview of how your label will look, and a Floating Preview Palette for printing.
Note: The Formula Label text will print on whatever printer you choose from your computer's list of available printers. It will print on plain paper or a label loaded in your printer. ClientTracker just sends the print info out; where it winds up is a function of the printer you choose and paper or label you load into the printer.
The Formula Label prints on a label that is up to 4 inches wide, and up to 4 inches deep. If your label is smaller, adjust the text and formatting in the Formula Label pop-up so that it will fit.
IMPORTANT: When a Formula Label is made from a SOAP Note, it becomes part of that "medical record," and is stored with all other SOAP Note information.
Information on the Formula Label will be copied to the next SOAP Note for that Client (with the same Practitioner), just like any other SOAP info. This can be a big time saver; however, care must be taken to ensure that the label information is correct for each visit, if applicable.
Tip: To view a Formula Label for a past SOAP Note, click the Formula icon found on the Products tab to open the pop-up window.
Insert Product Info as Text in Client Instructions
There is also a quick shortcut to enter into the Client Instructions all the Formula Label, or just info about the Products on a SOAP Note. After entering, you can edit, format, or copy it for other use. See <<817>> for more info.
- The name of the item used as a Formula Title can appear first with the list of constituent ingredients in printed SOAP Notes, invoices, Formula Labels, and Client Instructions.
- By using the Formula Title on a SOAP Note or invoice, you can track who was prescribed that formula by running the Product Sold Report for the Formula Title item.
- Info such as expiration date, instructions for using the formula, etc. can be stored in the title item's record, and copied to the SOAP Template, SOAP Note, Formula Label, or Client Instructions.
Tip: Use the title item's instructions for short text blocks that will fit on your label. For longer, detailed, or formatted instructions, use the Client Instructions in a SOAP Template designated as a Formula Template.
- You can store Expiration Date or other important info in the instructions for a title item, and duplicate it to be a new title item each time you have a new batch, lot, or expiration date to track.
Leave most everything blank except the Item's name, type, and instructions. You may want to start the name with "Formula" or something so they all group together in your pick list (aka QuickFinder) and other lists in ClientTracker.
Leave the Unit and Sale Price blank, and make the Tax
Fill in the Instructions field with text you'd like to copy and use on a SOAP Template or SOAP Note whenever that formula is prescribed.
Details in this section include:
- <<441>>
- <<501>>
- <<503>>
- <<504>>
- <<692>>
- <<818>>
- <<821>>
- <<832>>
ClientTracker provides a time saving function of designing and managing templates you use most often in your practice. You can easily apply one to your SOAP Notes.
- Create an unlimited number of SOAP Templates which can be selected for any client visit, and applied before, during, or after the visit.
- Assign SOAP Templates to practitioners to be used as the default SOAP Note when seeing a client for an initial visit or subsequent visits.
- Optionally, SOAP Templates can be created for different presentations or types of visits, and selected by the practitioner at the time of the visit.
Default SOAP Template
ClientTracker comes with one SOAP Template: "Default SOAP Template." This template is blank except for its name, type and description. Leave it blank if you do not want to work with this feature. Otherwise, edit this template to suit your needs. If you don't assign any Defaults to a practitioner, this template is automatically used.
Warning: Please avoid the use of the word "default" in any SOAP Type values you create. This word is best be reserved for the Default SOAP Template alone.
How SOAP Templates Are Applied
The hierarchy for automatic application of SOAP Templates is as follows:
- If a practitioner has no SOAP Templates designated, the Default SOAP Template will be applied automatically by ClientTracker.
- If a practitioner has NOT seen a client before and has a designated template for Initial Visits, this will be used.
- If a practitioner HAS seen a client before, and has a designation for Subsequent Visits, this will be used.
Tip: If your practice does not want to use SOAP Templates and requires only a blank SOAP Note for client visits and invoices, leave the Default Template blank or clear any information you may have added.
To get to the SOAP Templates List, click the button from
- the Settings/Practice screen
- any practitioner's detail screen
- the Templates tab of a client's SOAP Note
- any row to open from the SOAP Templates list
- any SOAP Template (row) in the portal on the Templates tab of a client's SOAP Note
- the square colored button for any practitioner's designated SOAP Template on the practitioner's detail screen
The SOAP Templates List
The SOAP Templates list is sortable by Name, SOAP Type, Active, or Date Modified. The Control Panel has icons to create a , templates, or a list of the templates on your screen. Click a row to view the detail screen for any template, which looks and behaves in most ways just like a SOAP Note. The main differences with a SOAP Template are:
- You cannot add Products, Files, Photos, or anatomical areas
- You can add Diagnosis and Procedure Codes, Suggested Communications, or Points Needled to a SOAP Template. These will be transferred to any SOAP Note when the template is applied.
Create SOAP Templates
There are three ways to create a new SOAP Template:

1) Go to any screen in the SOAP Templates area and click the icon in the Functions Bar to create a completely blank SOAP Template
2) From the SOAP Template detail screen, copy the existing SOAP Template by clicking the icon in the Functions Bar.

3) From any client's SOAP Note on the Templates tab, click the button.
Note: When saving a SOAP Note as a new SOAP Template, any Diagnoses, Procedures, TCM (Points Needled), Products, Files, and Photos in portals will NOT be copied to the new SOAP Template. These would need to be added for the new template.
Delete SOAP Templates
To permanently delete any SOAP Template you have created, click the button on the lower right of the SOAP Template.
Tip: You may find it more convenient to make a SOAP Template inactive by unchecking the Active box on the Template Settings tab, and it will no longer show on drop-down lists. Deleting a SOAP Template is permanent and may lose a lot of work. IMPORTANT: The Default SOAP Template cannot be inactivated because it is used by ClientTracker.Rules about deleting SOAP Templates:
- The Default SOAP Template provided by ClientTracker cannot be deleted
- When a SOAP Template is deleted, any of the line items added to the template (e.g. Diagnoses, Procedures, or TCM) will also be deleted
- A SOAP Template cannot be deleted if a practitioner is using it (see the portal of "Practitioners using this template" on the Template Settings tab)
- To fix this, click any practitioner name to go to their details page and remove the designation by selecting another template (choose the Default SOAP Template if no other is wanted)
- Deleting a SOAP Template does not affect any SOAP Notes that have already been made from that template, so you may want to check for any future appointments using that template on each practitioner's schedule
- To fix this, click any practitioner name to go to their details page and remove the designation by selecting another template (choose the Default SOAP Template if no other is wanted)
SOAP Template Info
The SOAP Template detail screen is arranged very similar to a SOAP Note. Fill out the details for a typical visit, much as you would for an actual SOAP Note. You may want to enter reminder text, or notes about what to do. See <<92>> for more info. The top of the SOAP Template screen can be used to enter information about the template itself:

- Enter a Name, SOAP Type, and Description to help organize your SOAP Templates.
- Select a SOAP Type from the pop-up menu. To add values to the menu, go to Settings/Program/Value Lists, or click the Edit List link.
- Only the SOAP Type will be transferred to a SOAP Note created from the template.
- These three fields also show on the SOAP Template list screen for reference.
Tip: Use the SOAP Type field to group SOAP Templates by intended use, discipline, therapy, or even practitioner, after which they can be sorted on the list screen.
Template Settings Tab
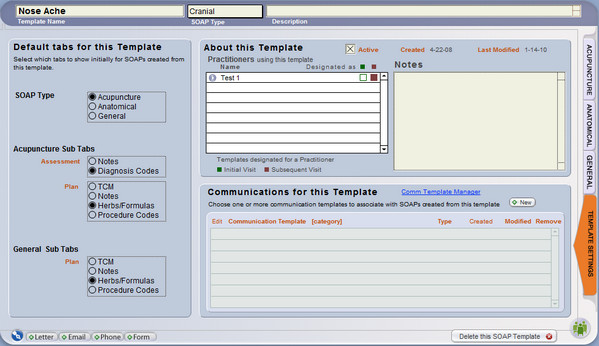
Default tabs for this Template - Select which side tabs and subtabs will show for SOAPs created from this template.
About this Template - Make sure the Active box is checked, if you want to use the SOAP template. Uncheck this box if you no longer want a SOAP Template to appear in any drop-down lists (instead of deleting it). You may also:
- Write optional notes about the SOAP Template
- View the date created, last modified, or practitioners using the template
- View the designated SOAP Templates for practitioners, by the colored squares on a portal row:
- Green - Designated for a client's initial visit with that practitioner
- Maroon - Designated for all subsequent visits
Note: For a new SOAP Template, the portal of "Practitioners using this template" will be blank. To designate a new template for use by one or more practitioners, go to the Settings/Practice portal of practitioners. See <<503>> for more info.
Communications for this Template - Assign ClientTracker Communication Templates (i.e. forms, letters and emails) to any SOAP Template, as a reminder to create them for a client. See <<504>> below for more info.
Acupuncture, Anatomical, and General Tabs
Tip: You can format the text in a SOAP Template; in any field that accepts text. Your formatted text will transfer to SOAP Notes made from the Template. See <<738>> for more info.
These tabs work the same way as they do for a SOAP Note, with the following exceptions:
- Products cannot be assigned to a SOAP Template.
- The images on the Anatomical tab are for reference only - parts of the body must be entered manually in the Objective Notes field.
- For more information on applying a SOAP Template to a current SOAP Note, see <<516>>.
- For more info about designating a SOAP Template for use by a practitioner, see <<503>> below.
You can also designate Communication Templates to be linked to a SOAP Template. These serve as a reminder of "suggested communication" that may need to be completed as part of a visit. These entries provide a quick way to create them.
Note: The reminders are not actual communications, but links to create one from a chosen Communication Template.
Link Communication Templates to SOAP Templates

On the Template Settings tab of the SOAP Template, under "Communications for this Template," click the button to create a blank row.
Click the Go button to view or edit the contents of the Communication Template. A tooltip shows the contents of the communication if you hover your mouse over its name.

Click the Remove button to remove a Communication Template from the portal. (This does not delete the actual Communication Template.)
Note: When you link a Communication Template to a SOAP Template in this way, the Communication Template cannot be deleted from ClientTracker until this link is removed by using the Remove button above.
When a SOAP Template is used for a SOAP Note, the Communication Templates will show in a portal on the Photos/Files tab, from which the actual communications can be created for the client as needed.
Once created, the resulting communications are not linked to the SOAP Note or SOAP Template, but will show in the client's Communications portal on their Personal screen.
Tip: Completed communications can be saved as a file and linked to specific SOAP Notes. For more info, see <<101>>.
Practitioners have specialties and preferences. With ClientTracker, you can cater to these preferences by choosing a SOAP Template as the default for all client initial visits for that practitioner, and for all subsequent visits.
Tip: The choices for a practitioner are automatically set to the Default SOAP Template until you change them. The Default SOAP Template is blank until you edit it.
Access the practitioner's detail screen from the portal on Settings/Practice.
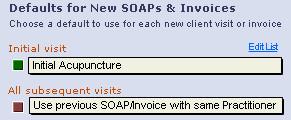
- Select a SOAP Template from the pop-up menus for Initial Visit, and All Subsequent Visits
- Pop-up menus display only Active SOAP Templates
- Pop-up menus display only Active SOAP Templates
- After selecting, click the colored square buttons to view or edit the SOAP Template, and the Back button to return if needed.
- Green - Designated SOAP Template for a client's Initial Visit with that practitioner
- Maroon - Designated SOAP Template for All Subsequent Visits with that practitioner
- For subsequent visits, you have the option to select Use previous SOAP/Invoice with same practitioner and the information from a client's last SOAP Note with the same practitioner will be copied when a new SOAP is created.
- Most items associated with SOAP and invoice on the last visit, i.e. diagnoses, procedures, and points needled, are copied to the new visit, and will appear on its invoice (after the invoice is generated).
- Products, Photos, and Files are not copied.
- All clinical information is copied to the new SOAP Note.
- Most items associated with SOAP and invoice on the last visit, i.e. diagnoses, procedures, and points needled, are copied to the new visit, and will appear on its invoice (after the invoice is generated).
- The Default SOAP Template will be used if a practitioner has not been set up with any other designation. This is set as the designated SOAP Template when a new practitioner is created. If you designate something else, you can always re-select the Default from the list.
- To see more info about how this affects Invoices, go to <<574>>
Note: Default SOAP Templates for practitioners are applied only at the time the appointment is made, or at the time an invoice is made if the invoice was created without an appointment.
SOAP Templates can be used as "Invoice Templates" if you choose to create invoices without SOAP Notes or if you create appointments and do not fill out SOAP Notes. Set up one or more SOAP Templates according to the instructions in this section, and set them for use by practitioners for different types of visits.
Note: SOAP Templates do not have products line items. Products are not applied to invoices from a previous SOAP Note or template. They have to be added to a linked SOAP Note or on the invoice itself. To use a previous invoice's products, you can duplicate the invoice.
From Appointments
Every appointment has a SOAP Note automatically created with the defaults for each practitioner. This includes the Diagnosis and Procedure Code line items. These line items are shared by an appointment and any invoice created from it. This sharing of line items enables you to set up "Invoice Templates" to be used as you see fit.
When an invoice is generated from the Appointment pop-up window or SOAP Note, the Diagnosis and Procedure codes and Product line items for that SOAP Note will be used on the invoice. Just as a SOAP Template can be used to create much of the info on a SOAP Note, it can also be used to generate the Diagnosis and Procedure Code line items on an invoice.
Tip: Even if you don't fill out the SOAP Notes in ClientTracker, you may find it useful to link them as "blanks" to an invoice. By doing this, you can access the Templates tab of the SOAP Note, and populate the invoice with line items from any past SOAP Note or SOAP Template.
From Invoice with No SOAP
Create this from a client's record using the button or from icon in the control bar of any invoice screen.
Diagnosis and Procedure Code line items for an Invoice with No SOAP
On the practitioner's Detail screen, you can choose how the Diagnosis and Procedure Code line items will be applied to an invoice created with no SOAP. The choice you make will be reaffirmed in the "Generate Invoice with no Appt" pop-up, and you'll have the chance to change it there.
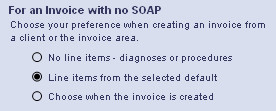
No line items - Will create a blank invoice.
Line items from the selected default - Will apply the line items from the practitioner's default, either the SOAP Template or previous Invoice No SOAP.
Choose when the invoice is created - This sets no default, and you can choose at the time the Invoice No SOAP is created.
These choices show on the "Generate Invoice with no Appt" window, and can be confirmed or changed before you create the invoice:
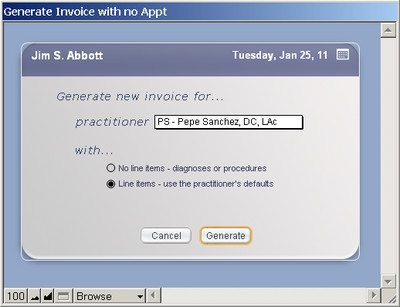
Other info:
See <<516>> for more info on the Templates tab of the SOAP Note
See <<504>> above for more info on the defaults for practitioners and SOAP Templates.
Note: When you create an Invoice No SOAP and the practitioner is set to "Use previous SOAP/Invoice with same Practitioner," the Diagnosis and Procedure Codes line items will be copied from the previous Invoice with No SOAP, not the invoice which was made from previous appointment/SOAP note.
An optional field on the SOAP Template lets you compose instructions of any length, to be copied to any SOAP made from that template so it can be printed out after the visit and provided to the client. This field can contain any text that you want, and can be formatted in many ways.
- On the Acupuncture tab, access a small version of this field in the Plan section, inside the Notes subtab.
- On the General tab, use the vertical buttons on the right to access a larger Client Instructions field, which is good for formatting text, and is closer in size to how the printed handout will appear.
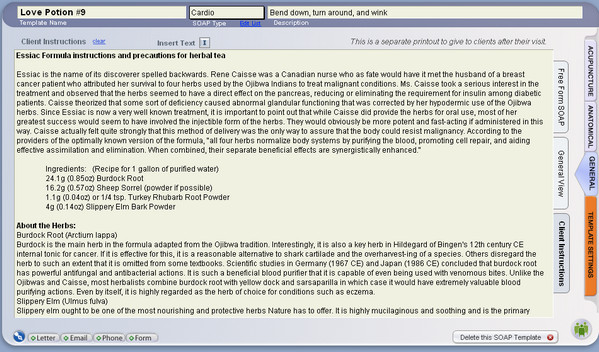
Tips, Ideas, & Data Entry Shortcuts:
- Use
the QuickClips tool to quickly add segments of text to Client
Instructions, such as seasonal or marketing info, promotions, health
tips, requests for feedback, etc. For more info about QuickClips, see <<819>>
- Click the small Inventory ("I") icon tol enter your choice of
- a list of any Products added to the SOAP Template, formatted as a list of ingredients, or
- the full formula label text (see <<821>>)
- Text in the Client Instructions field can be formatted using the text formatting tools in the main (top) menu, under "Format."
If your office use groups of Products regularly as constituent ingredients for a "formula" prescribed for a patient or Client, ClientTracker provides a system to set up and customize a label on the SOAP Template that can contain any information you want. This can then be copied to any SOAP Note by applying the template. Avery 5164 (4" x 3 1/3") is the most popular size.
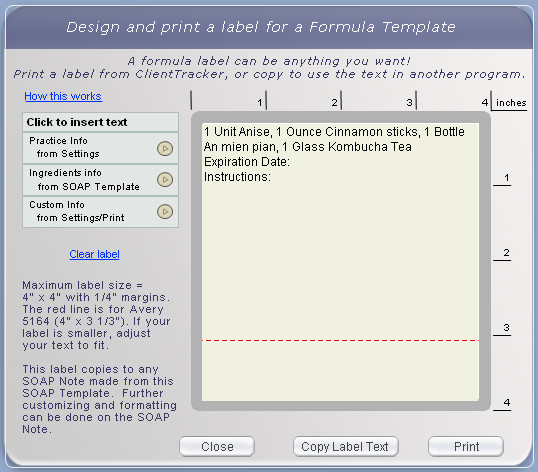
Note: Formula Labels are made on a SOAP Template or SOAP Note, and can have your basic info created in the Settings/Programs/Print area.
 To designate a SOAP Template as a Formula Template, check the box at the top of the Template Settings tab. The formula icon will appear next to it, and on all lists where this SOAP Template appears.
Formula Label Settings
Options to set up custom text to be used on Formula Labels are in the Settings area, on the Program tab. Go to the smaller subtab Print, then choose Labels.
Use the Labels subtab to set up the initial format and text to be to be used as the building blocks for all Formula Labels. A label usually has 4 parts.
Part 1 - Your practice information, including name, address, phone, and even fax, email, and/or web site. All of this info is copied from the Practice tab of Settings when you click the Reset Practice Info button. From there, you can add or remove text, format it, or customize it in any way for use in formula labels.Create a Formula Label
Part 2 - Visit (SOAP) Information - A label for a prescribed formula needs the date of the visit, and the names of the Client and Practitioner. These are not set up in Settings, but are options for the SOAP Note. See below for more information.
Part 3 - Ingredients of a formula are the Products added to a SOAP Template or SOAP Note. See below for more information.
Part 4 - Additional Information of your choice. You may want to include an Expiration Date and/or Instructions for Use on your formula label. Enter and format in Settings any repeatable information you'd like to add to your labels.
FIRST, add your ingredients, aka Products, on the Herbs/Formulas tab, in the order you want them to be listed. The order can be changed on an invoice (after the template has been applied to a SOAP Note.)
NEXT, open the Formula Label pop-up window by clicking the Formula icon on the Herbs/Formulas tab (Acupuncture or General view).
The Formula Label pop-up window can be opened whether or not you have designated the SOAP Template as a Formula Template.
On the Formula Label pop-up window, design the label text and formatting you'd like to be copied to a SOAP Note derived from this SOAP Template. You can enter predetermined text, and/or freely type in your own text. Elements can be entered anywhere in the space provided, and can be made larger, smaller, and/or moved around to suit your needs.
Tip: You can also use the Client Instructions part of a SOAP Template to store and format information to be given to the patient regarding this formula. This may save space on the label. See <<817>> for more info.
Click the small blue arrow (or whole box) to enter a block of text at your cursor position.
Practice Information - from the Settings controls for a Formula Label
Ingredient Info - all Products added to this SOAP Template in the order they appear, including Quantity, Unit, and Name.
Tip: You may want to enter a Product item in Inventory that acts as a "title" for the formula. See <<824>> for more info.
Custom Information - from the Additional Information area of the Settings controls for a Formula Label.
BUTTONS ON THE POP-UP
- Save whatever is entered and close the pop-up
- Copies the whole contents of the label so you can paste it into another program, for example one where you may already have label printing set up.
- Offers a preview of how your label will look, and a Floating Preview Palette for printing.
Note: The Formula Label text will print as ONE LABEL on whatever printer you choose from your computer's list of available printers. It will print on plain paper or a label sheet loaded in your printer. ClientTracker just sends the print info out; where it winds up is a function of the printer you choose and paper or label you load into the printer.
The Formula Label prints on a label that is up to 4 inches wide, and up to 4 inches deep. If your label is smaller, adjust the text and formatting in the Formula Template pop-up so that it will fit.
For more info on how the Formula Label is used on the SOAP Note, see <<823>>
A SOAP Template can be designated as a Formula Template, by checking the box found on the Template Settings tab.
When you check this box, the Formula icon appears next to it. The icon also appears on the SOAP Template list view, and on the small list of SOAP Templates seen on the SOAP Note (Templates tab).How to Set up a Formula Template
Consider how you will use the template before you set it up. When you Apply a template from the SOAP Note (on the Templates tab), you are offered 2 choices:
- Apply the entire template -- this overwrites every field on the SOAP Note with information from the SOAP Template.
- Copy just the Products -- this will copy ONLY the data related to a Formula Template:
- The items in the Herbs/Formulas list, replacing whatever might already be there.
- The Formula Label data, replacing whatever might already be there.
- Client Instructions - due to the amount of work that might be invested, if there is any text in the Client Instructions of the SOAP Note, you will be asked to confirm before overwriting. See <<817>> for more info.
If you plan to Apply the entire template, you may want to fill out the fields on the SOAP Template to reflect other clinical elements of a visit where that formula would be prescribed. For example, a formula used for fertility could include clinical questions, reminders, and even forms related to the fertility workup.
Tip: If you Copy just the products, and there is other info on the SOAP Template you want to use without overwriting all the fields on the SOAP Note, go to the SOAP Template and copy the info, then use the Back button to return to the SOAP Note and paste it.How to Enter Formula Ingredients
First, select the item you are using as a Formula Title, if you have one set up. See <<824>> for more info.
Next, select each item in the order you want it to appear on the SOAP Note, i.e. as a list of ingredients. Ingredient lists are traditionally in descending order of prevalence; in other words, the ingredients that make up the greatest percentage of the formula are used first.
Tip: Herbs/Formulas added to a SOAP Template or SOAP Note cannot have their order changed without deleting them and re-entering. On the SOAP Note, however, you can make an invoice on which the items can easily be reordered, if desired. It saves the most time if you set the formula ingredients in proper order from the beginning.Tip: You can make inventory items that are not really sold, but are used as standard ingredients in a formula, such as water, coloring, or flavoring. You may or may not want to mark these as "non-inventory" items.- For more info about Inventory items, see <<457>>
About Price
The Price can be changed on a SOAP Template to reflect the pricing for your Formula. For example, you can have an item with a price for when you sell it individually, and when you use it in a formula, you want one price for the entire formula; not individual prices for each item.
- Set your Formula Title item to have the price for the entire formula, or change it on the SOAP Template
- On the SOAP Template, change the Price of each ingredient item to be zero
To revert any item's Price to whatever is current, remove all data so the field is blank, and click in a neutral space to see the change.
About Quantity and Unit
The Quantity and Unit of an item will appear on a Formula Label, and can be edited on the SOAP Note if the formula is adjusted or custom made for a patient. Quantity appears on the SOAP Template and SOAP Note. "Unit" refers to unit of measure, e.g. grams, teaspoons, etc., and is set up on the Inventory item. If you have one ingredient that varies as to its unit of measure, create an item for each type of unit.
Details in this section include:
- <<999>>
- <<1014>>
- <<1015>>
IMPORTANT: All the information in this section assumes that you are using the most current version of ClientTracker, and that your subscription is current. ICD-10 codes will not work properly with any version of ClientTracker prior to v6.0.
ICD-10 FAQs
1. I am getting claims rejected. What do I do?
Please see <<1014>> below for billing tips and info.
2. ClientTracker is showing incorrect equivalents. How can I change that?
The equivalents are based on General Equivalent Mapping (GEM) data provided by the Centers for Disease Control (CDC), the government agency overseeing the ICD-10 codes. ClientTracker uses these codes because that's the standard data the whole country is using. The GEM data is "behind the scenes," and not modifiable by the user. Yes, some of them seem rather silly. Did anyone really expect the government to get it right the first time? :-)
- The health care provider is always responsible for choosing the correct diagnosis code - if the equivalents are not accurate, don't use them.
- Many equivalents are intentionally "approximate" because the ICD-10 codes have a higher degree of specificity.
- The good news is: the need to convert from ICD-9 to ICD-10 will fade away soon, and providers will get used to the ICD-10 codes they use the most, without having to use equivalents.
3. I already have ClientTracker. How will I get the new ICD-10 codes?
With your current subscription you are entitled to every upgrade. The version 6 upgrade containing the ICD-10 codes will be released after careful quality control, but still in plenty of time before you actually need to use ICD-10 codes on October 1.
- See <<1015>> below for more information about the do-it-yourself upgrade
- If your subscription has expired, you need to renew it to get this update. Contact Ginkgo Software support for more information
4. Do I need to take a seminar or course to prepare for ICD-10?
It's your choice, and we do recommend learning about the new ICD-10 codes as much as possible... they are the "language" with which you will communicate to payers and other providers. If you take insurance, it would be a very good idea to take a seminar so you are familiar with the coding nuances that ICD-10 presents, and especially how it impacts the ways you may need to change how you chart your SOAP notes.
ClientTracker and Ginkgo Software do not provide any ICD-10 training. Our software offers excellent tools for choosing and tracking the codes you decide to use. Which ones you use are dependent on your knowledge as a practitioner, and the requirements of the payer.
Overall, we strongly recommend being prepared with basic knowledge about the ICD-10 codes before October 1, and being further prepared to learn more as the payers dictate what they want after October 1.
5. How do I know which codes to use?
Which code set you use (ICD-9 or ICD-10) depends on the Date of Service (DOS). As of October 1, 2015, anyone who is subject to HIPAA laws must use only the new ICD-10 codes for all patient documentation, including SOAP Notes, 1500 claims, Superbills, and the like.
- For DOS before October 1, 2015 use ICD-9 codes ONLY
- For DOS on October 1 or thereafter, use ICD-10 codes ONLY
- Do not mix ICD code sets on a superbill or 1500 claim form
6. How do I get the new ICD-10 codes into ClientTracker?
ICD-10 Codes are a type of data that is entered into ClientTracker. You may enter them manually one at a time, but the typical practice needs over 1,000 codes so this could take a long time! If you have a current ClientTracker subscription you will save many hours of precious time.
- New purchases of ClientTracker come with a set of over 600 ICD-9 codes that are useful to a typical acupuncture practice, and over 2,500 equivalent or additional ICD-10 codes.
- Upgrade purchases will have their ICD-9 code set analyzed during data transfer, and an equivalent set of ICD-10 codes is installed automatically.
7. How does ClientTracker make ICD-10 codes easier?
ClientTracker has new benefits called "Premium Features" to save you time in many ways. These benefits are available with your current subscription.
- Custom Import - When you upgrade from a previous version, your ICD-9 code set is analyzed, and an equivalent set of ICD-10 codes is installed automatically.
- Code Library - Access and search the full code set, and download only the ones you want.
- Real-Time Code Checking - Enter any code manually, and ClientTracker checks it with the official ICD-10 code set* and makes sure it has the background data needed to function properly in ClientTracker.
- CodeTracker - Quickly find ICD-10 codes by starting with your familiar ICD-9 codes! Find codes by body part, official* categories, or by your own custom categories.
- Code Converter - When ClientTracker copies ICD-9 diagnosis codes from previous visits, the handy Code Converter tool lets you quickly select an equivalent or appropriate ICD-10 code.
- If you think you are seeing an incorrect equivalent, see #2 above for more info
Note: Once you are using ICD-10 codes, it is your responsibility to know which code(s) to select. Many online courses and educational materials are available to help you. Ginkgo Software support does not include any advice regarding which code(s) to use.
9. Do I also have to use the ICD-10 procedure codes?NO. As of October 1, 2015, there are two different ICD-10 code sets in use. ICD-10-CM is the diagnosis code set that is required. CMS also has made available the ICD-10-PCS set, but this is not required. Their web site says:
- "ICD-10-PCS will only be used for facility reporting of hospital inpatient procedures and will not affect the use of CPT."
*Disclaimer
The "official" ICD-10 code set is governed by US and International health care agencies, and is subject to changes, updates, and interpretation by third party payers. Ginkgo Software is committed to maintaining the most up-to-date code library possible (with your current subscription), however we are not responsible for any misdiagnosis or other errors that result from use of the code set provided.
ClientTracker does not "choose" any diagnosis code for you; nor does it diagnose a patient's condition. It is the provider's responsibility to select appropriate diagnosis codes in all instances. CodeTracker and other resources make suggestions as to possible equivalents, based on data provided by CMS and CDC. The increased complexity and specificity of ICD-10 codes requires education and training about how to use them properly. Ginkgo Software (and your ClientTracker subscription) does not provide this level of training.
Center for Medicare Services (the governing body even if you don't bill Medicare)
- ICD-10 Information page
-
Road to ICD-10 page (especially helpful for small practices)
Insurance Billing Made Easy
An acupuncturist's site about billing, providing expert advice that has been tested in real life!
Ginkgo Software is not a billing service, nor do we provide support for making the right billing choices. However, in the interest of helping our customers to make the ICD-10 transition smoothly, here are several common issues and how to remedy them in ClientTracker.
1. Do what your payer tells you to do
Not all entities are required to use ICD-10, which can make things confusing. In rare cases, your state Worker's Compensation agency may still require ICD-9 codes. It's a good idea to check with all your common payers so you get paid on time!
In the new CodeTracker, it's very simple to switch from ICD-9 to ICD-10 codes when you are adding them to a SOAP or invoice.
2. Use the correct code set based on the Date of Service (DOS)
- Claims billed for DOS before 10-1-15 must use ICD-9 codes only
- Claims billed for DOS on 10-1-15 or later must use only ICD-10 codes
- Do not mix code sets on the same claim
- If you have a patient with DOS before and after 10-1-15, use 2 separate claims
3. Designate which code set you're using as a default in ClientTracker
Go to the Diagnosis List and select either "ICD-10" or "ICD-9" depending on which code set you want ClientTracker to use as the default.
- Up to 10-1-15, this should be ICD-9
- After 10-1-15, you will probably want ICD-10 as the default
- If your DOS is before 10-1-15 and you send the claim after 10-1-15, you still need to use ICD-9 codes, and you may need to manually change the indicator to "9" in Box 21.
Thank you for using ClientTracker and keeping your subscription current so we can provide you with timely updates and new features!
When Will I Get the Upgrade?
UPDATE 9-23-15 - We are in the final stages of completing the installers! Please keep contact to Ginkgo Software to a minimum so we can get this out to everyone! THANK YOU!
You will be sent a do-it-yourself installer and complete instructions by email before the October 1 deadline. You will not need to actually use the ICD-10 codes until October 1. If you would like to learn about the codes and how they will work in ClientTracker, see <<998>>.
- Please make sure Ginkgo Software email does not go to your SPAM folder
- Reading and following the instructions is more important than ever for this upgrade
The Upgrade will Be 2 Steps
Each step will take 10-30 minutes, depending on the size of your file. Each step will require an action from you in the beginning, and then it will run unattended until the end.
- Step 1 - Save your existing ClientTracker for safekeeping, and convert it to the new, faster platform that allows more features
- Step 2 - Transfer your data safely from the old to the new version. All your existing data and settings will be retained.
READ THE INSTRUCTIONS - We cannot say this enough!
- See <<960>> for complete do-it-yourself upgrade instructions
Please anticipate that our support resources will be heavily impacted because the government is requiring that everyone must use the new codes on the same day.
Answers to many common questions can be found much faster in the online resources provided - including this manual. Customers will be assisted in the order that requests are received. Those who wait until October 1 to run the do-it-yourself installer may have to wait much longer for assistance.
There have been several enhancements made to the Diagnosis Code List in ClientTracker for version 6.0 and higher. These features are available with or without a subscription.
A complete, searchable Code Library is also available from within ClientTracker. This feature allows you to download selected ICD-10 codes directly into your ClientTracker (with lots of useful background data used by Code Tracker).
Details in this section include:
- <<1003>>
- <<1004>>
- <<1005>>
Go to the main Diagnosis Code list in 2 ways:
- Use the large Diagnosis Code tab found in the Settings area, or
- Click any Edit List link found in places throughout ClientTracker where Diagnosis Codes are used.
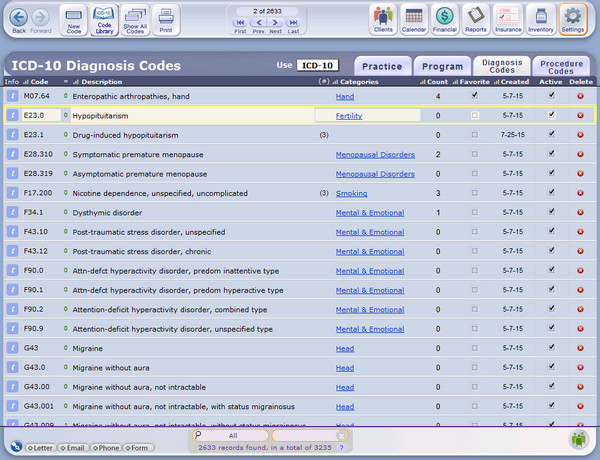
List Buttons & Tools
To edit information in the diagnosis or procedure code List screens, you can click on the description, category, price, or any other field in a code (other than dates), and type new information. If you edit your codes or download updates, the new codes can be entered in new invoices, but codes entered in previously created invoices are not affected.
Top - Control Panel
The button on the diagnosis code and procedure code list screens allows you to create a new code for your practice. There are also buttons to open the Code Library*, to following a search, and to your code lists.
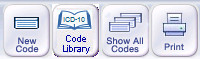
Switch between using ICD-9 or ICD-10 lists (or both) by changing the "Use" selection in the purple banner. You may choose codes from either set when you are on a SOAP or invoice. Your choice will affect what codes are displayed on the Diagnosis Codes List.
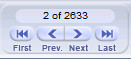
Use the Record Navigator to move up and down your list, or to see how many are currently displayed.
Bottom - QuickFinder
You can search for specific codes with the QuickFinder at the bottom of the screen, by selecting a target column and typing the words or partial words you want to find in the description. For example, typing "neurological" in a category search displays all records in the neurological category.

Column Headings

The Diagnosis List can be sorted by any column that has a sort symbol. Click a heading to sort the list ascending or descending by that column. Shift+click to clear the sort.
- Info - Click the [ i ] button to see more info about each code, including equivalents, (see below)
- Code - This is the first thing you should enter for a new code when you click the New Code button
- = - The small green number next to Description indicates how many equivalents there are
- Description - The official description is copied from the Code Library when you enter a proper code, or you can type your own
- Categories - An optional way to organize your codes, and set them up to be easier to find with CodeTracker* See below for more info.
- Count = The number of times a code has been used in ClientTracker
- Favorite - Check this box for your favorite codes, and they will rise to the top of pick lists
- Created - The date the code was added to ClientTracker
- Active - Uncheck this box when you don't want a code to show in the pick lists
- Delete - Use this to permanently delete a code from ClientTracker. This will not delete any instances where the code was used on a SOAP or invoice.
There are 2 ways to see more information about a code on your Diagnosis List:

Click the [ i ] button at the left of a row to open a popover panel containing Equivalents, Notes, and Modality.
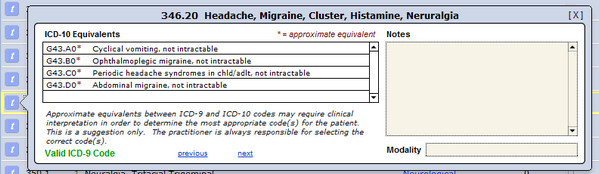
Tip: Equivalents are shown based only on codes you have in your list; not any codes that may exist. The equivalents are sometimes approximate, and come from official sources that are not controlled by Ginkgo Software or ClientTracker.
Categories
Click on any blue underlined category (or the space where it would be) to open another popover where you may enter your own, custom categories.
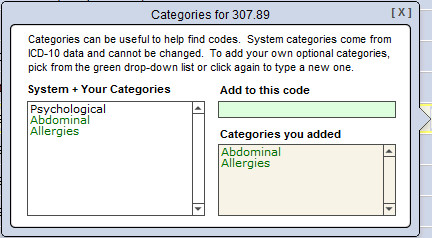
Categories are primarily used in CodeTracker, which is a Premium Feature available with your current subscription. See <<1000>> for more info. Categories may also be used to search for codes in the QuickFinder at the bottom of the Diagnosis List, which is always available.
To add a new Category, click in the green field. The first time you click, a drop-down pick list opens, showing all the categories currenlty entered in ClientTracker. Click again to type something new, which will be added to the pick list. Categories you add are shown below for each code.
The contents of the drop-down pick list are not directly editable. If a category is used for any code, it will show in the list. To remove from the pick list any categories you have added, remove the category from all codes.
Tip: Categories can be used for just about anything you like, for example conditions (Smoking), presentations (Back Pain), or specialty (Fertility). use your imagination!
Beginning with ClientTracker 6.0, you have direct access to every ICD-10 Diagnosis Code used in the U.S.; without leaving your ClientTracker! Even better, you can download them in batches without having to enter them all by hand. The codes you see in your Diagnosis Code List are the ones you have chosen to use in your practice, or that have been provided as a "starter list" by Ginkgo Software. If you need to add more ICD-10 codes to your List, it's handy to get them from the built-in Code Library.
The Code Library is a premium feature, and is available with your current subscription. You can always add codes "the old fashioned way" by looking them up in a book or online resource and entering them by hand one at a time. Only ICD-10 codes are available in the Code Library at this time. If you need any ICD-9 codes, find them in your usual sources and enter them by hand on the main Diagnosis List, using the New Code button.
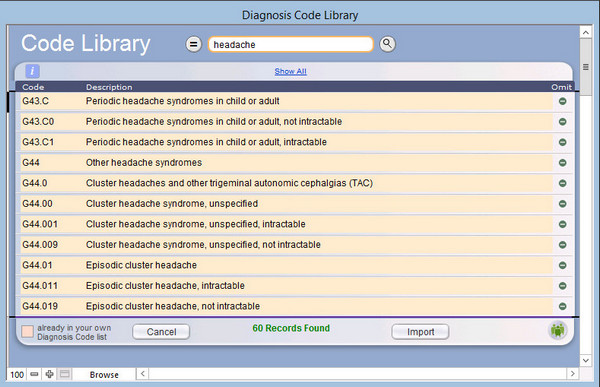
To access the Code Library, click the button in the Control Panel at the top left of your main Diagnosis List screen. A list will display over 118 thousand ICD-10 codes from which to choose. Downloading many codes can be slow, and having too many in your ClientTracker Diagnosis List can affect performance, so there is a limit to download up to 100 codes at a time.
Rows in the list are highlighted orange if the code already exists in your ClientTracker.
Tip: It is recommended to keep less than 10,000 codes in your ClientTracker Diagnosis List.
There are two ways to search for codes: by QuickFinder, and by equivalents.
- QuickFinder - Type any word or code into the orange QuickFinder oval at the top, and click the round search button to narrow the list.
- Equivalents - Click the ( = ) button to the left of the Quickfinder, and type a valid ICD-9 code in the oval, then click the round search button.
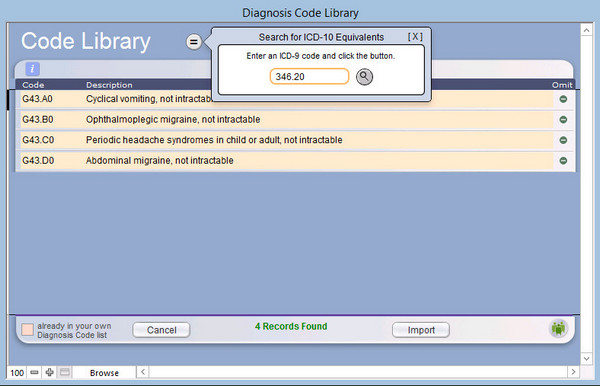
To omit any found codes from your download, use the omit button at the far left of the row. When you have the codes you want, click the Import button. The codes and other background data will be added to your Diagnosis List, and can be used immediately.
Tip: Keeping your subscription current is now more important than ever! As the official ICD-10 codes are updated or changed by the government, Ginkgo Software will periodically modify the contents of the Code Library at its own discretion.
CodeTracker offers great flexibility in searching and managing the diagnosis codes you use most. During the transition to ICD-10 in 2015, its many time-saving features will be especially helpful.
Details in this section include:
- <<1006>>
- <<1007>>
- <<1008>>
- <<1009>>
- <<1010>>
- <<1011>>
- <<1012>>
ALWAYS with CodeTracker, you can select a code quickly from a pick list by clicking its row. Shift+click on the row to add just the one code instantly.
CodeTracker opens in place of the standard Diagnosis Picker used in previous versions of ClientTracker, as long as your subscription is current. If you'd rather use the standard Diagnosis Picker, go to Settings/Program, and on the Financial tab check the box "Do not use CodeTracker."
There are many tools and features in CodeTracker, and you may or may not use them all. The goal is to help you find the correct diagnosis codes as quickly as possible. With a little practice, you will find the pathway that works fastest for you.
Tip: You can practice with CodeTracker without actually adding any codes to your SOAP or Invoice. Just click the clear all selected link at the bottom, and don't click the "Add" button.
Basic Function
The pick list works the same as the old-style Diagnosis Picker. Click any row to select it and add to the list at the bottom of CodeTracker. When you have all the codes you want, click the Add button to add them to your SOAP or Invoice, in the order selected. Check the optional "Favorite" box to have a code rise to the top of the list when it meets the search criteria.
- Uncheck the Selected box in the "Selected Diagnosis Codes" list to remove just that one code from being added.
- Click clear all selected to start over.
- Click Edit List to close CodeTracker and return to the main Diagnosis List, which is the source of CodeTracker's pick list.
- To pick just one code directly, close CodeTracker, and add that one code to your SOAP or Invoice, hold the Shift key down and click on any row.
Click the [ i ] button on any CodeTracker section to see basic info about how to use it.
Choose the code set that displays in the pick list first by clicking an option in the purple banner. This choice is independent of the choice made on your main Diagnosis List.
Tip: You might find it easier at first to display the ICD-9 code set with which you are familiar, and use it to search for equivalent ICD-10 codes. Later, you may use the ICD-10 code set exclusively.
Narrow the pick list by typing in the QuickFinder for code or description, and/or
Choose from the optional Category QuickFinder's drop-down list.
You may use both QuickFinders in combination; however, the logic may not work as expected, depending on the data available for the codes.
Click the small white "x" to clear either QuickFinder.
The Breakout Arrow: Going to the next level
One of the powerful features of CodeTracker is to show you multiple coding options. The gray "breakout" arrow at the right of a code's row will show you more options related to that code.
- If viewing the ICD-9 code set, the arrow is labeled "Equivalents," and will show any equivalent ICD-10 diagnosis codes in a side-by-side list. A small green number tells you if there are any equivalents, and how many.
- If viewing the ICD-10 code set, the arrow is labeled "Specificity," and shows you a side-by-side list where you can narrow or expand the specificity level to see related codes.
ALWAYS with CodeTracker, you can select a code quickly from a pick list by clicking its row. Shift+click on the row to add just the one code instantly.
Note: This is a temporary process, and will become less and less common as ICD-9 codes will no longer be used for dates of service on or later than October 1, 2015. These instructions presume that it's already past this date. To find an ICD-10 code, you may find it useful to start with the ICD-9 codes with which you are familiar, or you may start with the ICD-10 list. It's your choice!
Start with ICD-9 Codes
- Click the ICD-9 choice in the selector to show your complete set in the pick list
- Narrow your list to find the ICD-9 code(s) you would normally use
- Click the breakout arrow of a code to see its ICD-10 equivalents
![]()
Equivalent ICD-10 codes (if any) will show in a new pick list on the right side. Click the one(s) you want, or click the breakout arrow on another ICD-9 code on the left. Codes you select will be added to the "Selected" list at the bottom of CodeTracker.
To really "drill down" and see ICD-10 codes that are related to each other by specificity, click the breakout arrow for any code in the ICD-10 Equivalents List.
See <<1008>> below for more info about specificity.
Warning: Do not mix ICD-9 or ICD-10 codes in your Selected list. ClientTracker will not allow adding mixed code sets to a SOAP or Invoice from CodeTracker.
ALWAYS with CodeTracker, you can select a code quickly from a pick list by clicking its row. Shift+click on the row to add just the one code instantly.
Note: These instructions assume you are familiar with the ICD-10 codes and how to use them properly. CodeTracker is only a tool for finding and selecting the right code based on your knowledge as a provider and/or billing coder.
Start with ICD-10 Codes
- Click the ICD-10 choice in the selector to show your complete set in the pick list
- Narrow your list to find the ICD-10 code(s) you would normally use
- Click the breakout arrow of a code to see its ICD-10 equivalents
![]()
Above the Specificity list is an oval field containing the code you have chosen to compare. Click the breakout arrow for another code on the other list (on the left) to compare a different code.
Under the code are four colored dots, ranging from Low to High specificity. Click a dot to compare the first 3 digits (Low), up to 6 digits (High), as shown in the list below. If there are no matching codes in your ClientTracker, the list below will be blank.
The lower the specificity, the more codes will be displayed. This is so you can see all the codes in the related "family."
Higher specificity is useful for seeing if there are other choices to be made that are closer to the code you are comparing.
Tip: Use the Specificity option when you want to see the available options for codes that may have different qualifiers, such as an extra 7th digit. Refer to your ICD-10 experience or reference sources to determine which is the correct code to use, then select it by clicking its row.
ALWAYS with CodeTracker, you can select a code quickly from a pick list by clicking its row. Shift+click on the row to add just the one code instantly.
IMPORTANT: This feature works with ICD-10 Codes only.
Note: For this feature to work properly, there must be categories assigned to your codes. ICD-10 codes from the Code Library or an Upgrade typically have few categories, so you may want to categorize your favorite codes to take advantage of this feature. To add categories to a code, see <<1001>> for more info.
Click the Body button at the top right of CodeTracker to access the Body Diagram. The Body Diagram is of course set up to search by body part. See <<1010>> below for more info about creating custom categories for your use.
At first, you will see the same list of codes based on any search criteria you may already have entered elsewhere. The list with its two orange QuickFinders works the same as for the main list; it's just a little smaller.
The Category Quickfinder drop-down list contains all the categories currently assigned to codes in your ClientTracker list. You may also click one of the blue dots corresponding to a body part on the diagrams. Each part has a label you can see when you hover your mouse over the dot.
-- The body part is entered in both QuickFinders, so you can search by description as well as category.
-- The text is the exact category you should use if you are entering them with the intent of using the Body Diagram to find them.
You may also use your own custom categories on the diagram - see <<1010>> below for more info.
ALWAYS with CodeTracker, you can select a code quickly from a pick list by clicking its row. Shift+click on the row to add just the one code instantly.
Note: For this feature to work properly, there must be categories assigned to your codes. ICD-10 codes from the Code Library or an Upgrade typically have few categories, so you may want to categorize your favorite codes to take advantage of this feature. To add categories to a code, see <<1001>> for more info.
On the Body view of CodeTracker, the spaces between the body diagrams are reserved for you to create your own "favorite" category searches. These are called "category shortcuts." Whatever you type in these fields may be used to search for Diagnosis Codes with the same category.
This can be useful to isolate codes used by specialty, for a specific condition, or the ones you use most often.
You need to assign categories to the Diagnosis Codes in your main list for this to work properly. See <<1001>> for more info.
To enter or change a category shortcut, hold the Shift key down and click the space shown by a dotted line, or the blue underlined category. A drop-down list will open, showing you all the categories available in your Diagnosis List, to make sure you select a category that is already in use.
Pick a category from the drop-down list, and your new shortcut is ready to use.
To use the shortcut, simply click it without holding down the Shift key, and it will be added to the Category Quickfinder, and any matching codes will be displayed in the list below.
Tip: There is limited space available to display the shortcut text, but you can enter longer ones if needed.
If you often assign the same combinations of diagnosis codes to a SOAP or invoice, the Code Combo feature is a handy way to organize them and select them all at the same time - without searching for the codes individually.
- The Code Combos are a Premium Feature that is available with your current subscription
First, select the codes you want in your combo, in the preferred order. Then click Save on the Code Combos panel, and give your Combo a name.
How to Edit a Combo
You cannot edit a combo directly, but you can select it so the codes are in the Selected list, then edit the contents of the list and click Save again, saving the results as a new Combo.
To select a combo for use, click its row in the list and all the codes in the combo will be added to the Selected list below (adding to whatever might be there already).
- When you're ready, click "Add Selected Codes" to add them all to your SOAP or invoice
- Shift + click will add all the codes in the combo instantly
On the list, you can open more detail about a Combo by clicking the blue [ i ] button on the left of its row.
- Delete unwanted combos by clicking the red x at the right of its row. This deletes the combo only; not the actual codes.
Tip: Combos can be used for either ICD-9 or ICD-10 codes, but not for a mix from both sets. All combos will show regardless of whether you have ICD-9 or ICD-10 chosen in the selector at the top of CodeTracker.
If you like to use a website for coding reference or instructions, you can enter the web URL in CodeTracker and open the site in your browser by clicking the Web button.
Shift+click on the button to enter or edit the URL, and an optional name, then click Open Site.
Thereafter, just click the Web button to open the site.
Tip: This is a convenience only. Web sites do not interact with CodeTracker in any way.
The Code Converter is a useful way to convert ICD-9 codes to ICD-10 codes when they are already on your SOAP or Invoice.
ClientTracker users have enjoyed for many years our feature that copies Diagnosis Codes and other info from a previous SOAP or Invoice. But what if the previous codes were ICD-9, and now you need to use ICD-10?
Tip: You can always delete unwanted codes and pick new ones, but the Code Converter makes this much easier!

Click the small gray Convert button just above the Diagnosis list on any SOAP or Invoice to open the Code Converter pop-up.
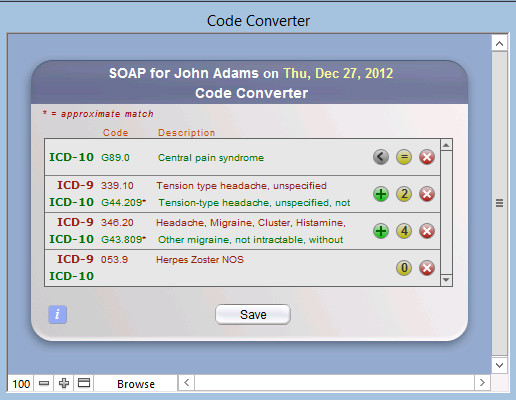
A list of the existing codes will show if there are any direct equivalents. You have 3 options:
1. Click the green ( + ) button to convert to the suggested ICD-10 code.
2. Click the yellow button (if it has a number) to view more details (see below). The number indicates how many possible equivalent codes there are in your ClientTracker Diagnosis List.
3. Delete the code from your SOAP or Invoice by clicking the red ( x ) button.
Tip: Once converted, a code may be reverted back to its original if you make a mistake. Click the gray Revert button with the back ( < ) arrow.
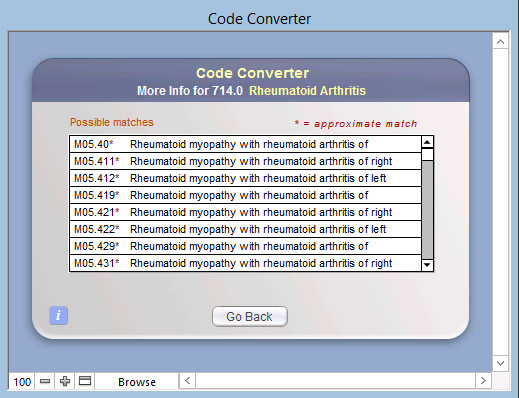
When you click the yellow button to view details, a list of equivalents appears. Click any of the codes in the list to convert directly to that code.
This option works best when you have multiple equivalents from which to choose. If there are many, scroll up and down the list to see them all.
Tip: After you have converted any ICD-9 codes to ICD-10, the new ones will copy forward from that point on (if you use the Copy Previous feature).
Note: Code Converter is not available on a SOAP Template. If you have templates set up with ICD-9 codes, you will need to change those by deleting the old codes, and using CodeTracker to find new ones.
The Financial area is where Invoices are created and managed. It is also where you access the Register, if you have chosen to use it in the Settings/Program/Financial tab.
This section will introduce you to the screens and functions available in the Financial area. Details in this section include:
- <<605>>
- <<105>>
- <<439>>

When you click the icon from any Functions Bar, you see a list of all invoices and two tabs: the Invoices tab and the (optional) Register tab.
Note: The Register tab is not visible if you have not enabled use of the register in the Settings/Program/Financial tab. See <<123>> for more info.
The Invoices List Screen
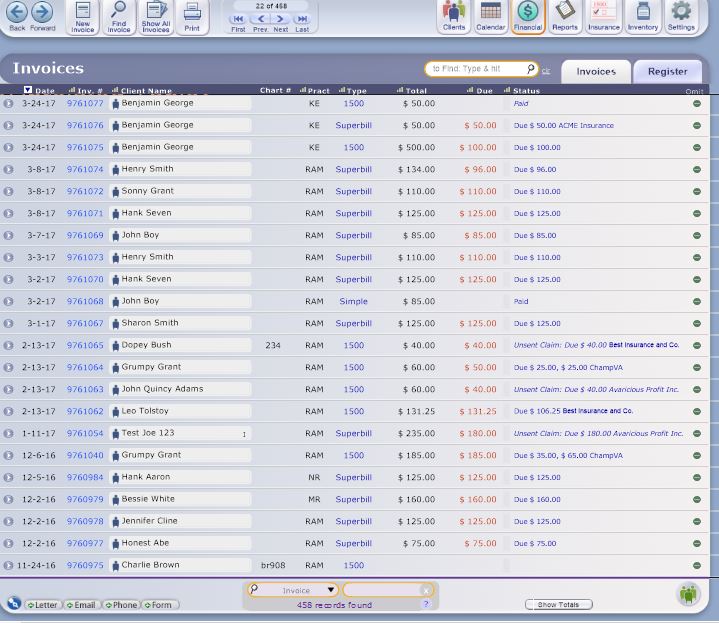
Clicking the Financial icon or Invoices tab (from the Register) displays a list of all invoices in ClientTracker. Use the scroll bar on the right side of the window to move through the list.
New Invoice - Creates a new invoice by opening a pop-up QuckFinder to select first a client; then an invoice type. See <<107>> for more info.
Tip: If you use SOAP Notes, the best way to generate a new invoice is from a SOAP Note related to a client visit, as described in <<498>>. If you don't need the invoice associated with a SOAP Note, click this New Invoice button on the Control Panel. An invoice generated in this way has a button allowing you to create a SOAP Note any time you wish.
Find Invoice - Goes to the Find Invoice screen, to search for one or more invoices by your choice of criteria. See <<105>> below.
Show All Invoices - Resets the list to show all invoices sorted by invoice number.
Print - Opens an Invoice Print Menu pop-up window, with options for printing for the invoices showing in the list (i.e. the current Found Set).
Print Options:
- Optional Title - You may change the title if you choose to print as a List.
- Invoice List - A simple report listing the invoices and information from the List screen. (An optional title can be entered for the report.)
- Individual Invoices - Prints a complete invoice for each row of the List screen; according to type.
- Note: There is no Floating Preview Palette for this option, and you will be prompted to change paper in your printer if the print job includes a 1500.
- Client Statements - Prints a statement for each client appearing on the List screen.
- Insurer List - Prints a list of invoices for one Insurer, with billing info. You should perform a Find for the Insurer's invoices first.
- Client Envelopes & Client Labels - Select an option to print plain or pre-printed envelopes; or mailing or shipping labels for each client appearing on the List screen who has a valid address.
Other List Functions:
- Click on any invoice's row in the list to view the invoice Detail screen.
Click the client icon to go to the client's Personal screen.
Omit an invoice temporarily from the list (i.e. to not include it in a printout) by clicking the button at the far right of the row.
Note: Invoices can be voided or deleted. See <<636>> for more info.
As in most lists, you can click on the column headers to sort the currently visible records by that category. One click of the header text sorts by that category in ascending order; a second click sorts in descending order. Shift + click on the header will remove the sort.
To view totals for invoices, click the button at the bottom of the screen.
Note: If passwords are enabled, the Show Totals option is available only to the Admin user.
Use the QuickFinder at the bottom of the list to narrow the visible list of invoices based on criteria you select. For more info see <<553>>.
There is also Search Bar at the top right of the list, which searches on the Invoice Number, Date, and Client Name when you type a value and press Enter.
Insurance Billing Made Easy: A Step by Step Guide
Interested in better understanding how insurance billing works? Considering billing insurance in your practice but don't know where to start? Or perhaps you feel like insurance billing is just too complex and overwhelming? A devoted ClientTracker user, Rebecca Hurwood, is determined to demystify insurance billing with her ebook - Insurance Billing Made Easy: A Step by Step Guide for Acupuncturists and CAM Providers. If you haven't checked it out, please visit the book website at www.insurancebillingmadeeasy.com - special offers available!
Clicking the icon in the Control Panel of the Financial area takes you to a utility screen where you can enter simple or complex criteria to search for invoices.
Tip: Use the QuickFinder at the bottom of the Invoice List screen to perform fast, simple searches such as by Invoice Number.
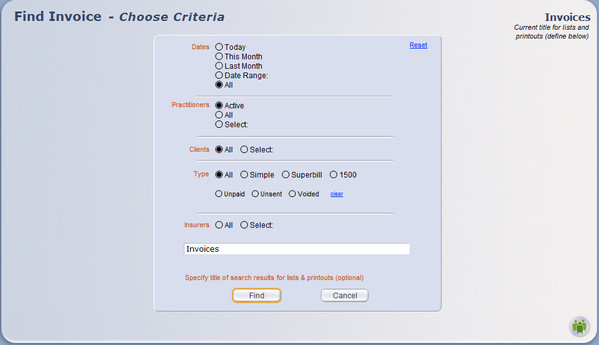
The Find Invoice screen will show the last criteria used during your current session. If you log off ClientTracker, the criteria will be reset to the system defaults the next time you log on. The default criteria are shown in green in these instructions. Click Reset at any time to restore the default criteria.
- Dates - Choose: Today, This Month, Last Month, Date Range, or All. When Date Range is clicked, enter a date From and To in the designated fields.
- Practitioners - Choose: Active, All, or Select. Choosing Select will show a pop-up menu from which to choose from a list of all practitioners in ClientTracker (active or inactive).
- Clients - Choose All, or Select. Choosing Select will open a pop-up QuickFinder window, from which you can choose from a list of all clients in ClientTracker (active or inactive).
- Type - Choose: All, Simple, Superbill, or 1500. You may also choose additional sub-criteria: Unpaid or Voided (plus Unsent for 1500 type).
- Insurers - Choose: All or Select. Choosing Select will show a pop-up menu from which you can choose from a list of all Insurers in ClientTracker (active or inactive).
- Title - (Optional) Enter a custom title for the results of your Find, which will display on the List screen and printouts until you leave that screen.
Information about an invoice is entered on its Detail screen. Some information may be automatically generated for an invoice; for example, diagnoses, procedures, and products from a SOAP Note. ClientTracker will default to apply the line items from a client's previous invoice, if no other information is primary.
Note: Depending on the size of your computer monitor, you may need to scroll down to see all of an invoice Detail screen. Use the scroll bar on the right side of the main window to see the bottom portion of invoices.
Simple invoices are for accounts paid directly; not involving insurance companies.
- For more info on Simple invoices, see <<111>>.
Superbill invoices are for accounts to be paid partly or completely by insurance companies, and have additional fields for insurance information. This is often the type of invoice a practice would print for a client to seek reimbursement from their insurance.
- For more info on Superbill invoices, see <<111>>.
1500 invoices or claim forms (formerly known as "CMS-1500") are a federally standardized form for filing insurance claims for medical services. Instead of entering diagnosis and procedure descriptions, codes are used to designate items. ClientTracker makes this easier by allowing you to select diagnoses and procedures from a list, and then filling in the appropriate code. Always enter insurance account information for clients before creating 1500 forms.
- For more info on 1500 invoices, see <<119>>.
Tip: You can change the type of the invoice at any time by clicking one of the Change Invoice buttons near the top of any invoice Details screen. Certain restrictions may apply - see the links above for each type. You can also set a default invoice type for a client.
Invoice Number
The beginning invoice number is set when you register ClientTracker. It cannot be changed thereafter. Invoices can be voided or deleted, with the following effects on the numbers.
If the most recent invoice is deleted, its number will be re-used for the next invoice.
- Any other delete invoice would leave a gap in the
sequence of numbers.
- Voided invoices retain their numbers in sequence.
Note: Other invoice settings are available on the Settings/Program/Financial tab.
Oldest Display Date in Invoice List
If you accumulate many invoices in ClientTracker over time, you may not want to show old invoices, and display only those past a certain date. To do this, enter a date for "Do not show invoices created before."
- This setting affects all places where a list of invoices display, including the Client/Invoices, Clearinghouses' E-Billing, and Insurance Payments screens
- If this field is empty, all invoices in ClientTracker will show as appropriate
- If you perform a Find or use the QuickFinder, the Oldest Display date will be ignored
- Invoices with outstanding balances will show regardless of the Archive Date
Payments on Invoices
Select a default Method, and each time you enter a payment on an invoice, it will auto-fill your choice. The pop-up menu of choices is a system value list and cannot be edited.
You can also set ClientTracker to remind you to enter Check # and Credit Card # when entering those methods of payment.
Printing Invoices
There are two kinds of Default Notes you can customize to appear on invoices. The printing of the text is limited to only what fits in the visible entry boxes.
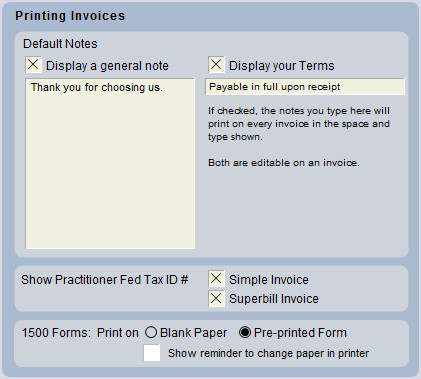
Display a general note - This can be edited on each invoice, and can contain any message you like, i.e. "Thank you for using Gentle Touch Acupuncture."
Display your Terms - This is also editable on each invoice, and is intended to display payment terms.
Show Practitioner Fed Tax ID # - Check a box to print this number in the headers of a Simple or Superbill invoices.
1500 Forms - Choose to print the 1500 claim form on blank paper, or a pre-printed form.
This section has details about creating or generating invoices, and other details as follows:
- <<574>>
- <<636>>
- <<743>>
- <<865>>
- <<816>>
Generate an Invoice
The usual order of generating an invoice is:
- Create an appointment for a client in the Calendar. This automatically creates a blank SOAP Note for that client. For more info, see <<65>>.
- After the appointment is made, access the SOAP Note for that visit by clicking the button in the Appointment pop-up window. From the SOAP Note, you can generate an invoice for that treatment by clicking the button.
- OR, you can click the button direct from the Appointment pop-up. If an invoice has not been generated yet, you will be offered the option to do so.
IMPORTANT: Any Diagnosis & Procedure Codes and Products (a.k.a. "line items") are shared by the SOAP Note and Invoice, and will appear in both places.
Notes:
- Once an invoice has been generated, it is linked to the SOAP Note, and the button on the SOAP Note detail screen will say, "Go to Invoice (number)."
- To link a SOAP Note to an existing invoice, click Link just below this button.
- Click to Unlink, and the button becomes available again.
- For more info about generating and/or linking invoices from the point of view of a SOAP Note, see <<499>>.
Other Ways to Generate an Invoice
From the list of all Appointments & SOAPs in a client's record, you can easily see which appointments need an invoice. Click the Generate link that appears on the far right to begin, and select an invoice type from the pop-up window. For more information on the client's Appointments & SOAPs List screen, see <<43>>.
To create an invoice not linked to any SOAP Note:
- From a specific client's Personal tab, click the button. The default practitioner for that client (if any) will be assigned to the invoice automatically, or you will be prompted to select one. A default practitioner can be set for any client on their Personal screen; Defaults tab. The practitioner of record for an invoice can be changed on the invoice Detail screen.
- OR, for any client, click the button in the Control Panel of the Financial area. First you will be asked to select a client, and then confirm the practitioner.
- You will have the option to create a new, blank invoice (i.e. no line items), or to apply the practitioner's designated templates to automatically generate line items. See <<574>> for more info.
- OR, click the icon in the Control Panel of an invoice Detail screen
Filling Out an Invoice
Some of the information on an invoice may be entered automatically from the records of a client, insurance company, insurance policy, and SOAP Note. This may also come from the previous invoice for that client. (See below for details.)
Often, an invoice needs to be supplemented or filled out manually. The methods for filling out an invoice are different based on the type.
- For more information on the different types of invoices, see:
- Simple or Superbill - <<111>>
- 1500 - <<119>>
Invoices can be set up for clients so that much of the same information is entered each time. Invoices share their diagnoses, procedures, and products (collectively known as "line items") with SOAP Notes. When a SOAP Note is generated from a SOAP Template, the corresponding invoice -- once generated or linked -- will share the same line items.
Using this sharing system, there are several different methods to create a new invoice with the same line items as a client's previous invoice -- either before, during, or after the SOAP Note is filled out. There is also a method to duplicate any invoice for the same or different client, which may be done without a linked SOAP Note.
- Before - When an appointment is made, the practitioner's designated SOAP Template (or a previous SOAP Note) will be applied, and the line items from that template will be shared by the invoice.
- If the client has been seen by the practitioner before, and the designated template for All subsequent visits is set to "Use previous SOAP/Invoice with the same practitioner," then the most recent SOAP Note (before today's date) for that client/practitioner will be used as a template.
- If you create an invoice with no SOAP by using the button in the Clients or invoices area, the invoice will auto-fill with line items from the previous invoice with no SOAP Note. In other words, the method of creating an invoice ignores previous SOAP Notes and invoices made from appointments.
- Products are not auto-filled on any invoice, but can be duplicated onto a new invoice (see "After" below).
- Templates for practitioners are designated on their Detail screen. See <<503>> for more info.
- Before or During
- At any time after an appointment is made, any client's previous SOAP
Note can be applied as a template, by choosing from the portal on the Templates tab of the SOAP Note screen. As SOAP Notes and invoices share line items, this would also apply to the line items on the invoice.
- For more information, see <<516>>.
- After - Any qualifying invoice can be duplicated (for the same or different client) by clicking the icon in the Control Panel of the invoice's Detail screen. See below for more info.
Duplicate Invoices
Duplicating a qualified invoice will create a new invoice (for the same or different client), with all the same line items and other information from the original -- except for payments and insurance info. Naturally, any new invoice would add the new charges to a client's account.
- Qualifying invoices are those that are linked to only one SOAP Note. You will be given a choice whether to duplicate the Products on a qualifying invoice.
- Click the icon in the Control Panel of any invoice's Detail screen, and choose whether to generate the new, duplicate invoice for the or client.
- If for the same client, a new invoice with the same practitioner, line items, discounts, and notes will be generated instantly.
- If applicable, the insurance company and policy will also be duplicated.
- If for a different client, you need to first select a client from the pop-up QuickFinder, after which a new invoice with the same line items, discounts, and notes will be generated instantly.
- The practitioner, insurance company and policy will NOT be duplicated for a different client.
Once duplicated, the new invoice and its line items will all have the current date, and it behaves just like any other invoice. You can edit the line items or other information as needed, print, and make payments. An invoice created in error can be deleted or voided. See <<636>> below for more info.
ClientTracker allows you to void or delete an invoice that has been generated, according to certain rules. Once an invoice has been voided or deleted, it cannot be restored. You would have to generate another invoice instead.

To void or delete an invoice, begin by clicking the button on the lower right of its Detail screen.
Rules for Voiding an Invoice
- An invoice cannot be voided or deleted if:
- It
has been paid in full, or
- There have been payments made on
it, or
- Payments have been distributed to it, or
- Credits have been issued and show in the Payments portal
- In
other words, the Payments portal must be empty
- Voided or deleted
invoices do not show on the client's Invoices portal
Voiding or deleting an invoice will cause the following things to happen:
- If there are any visits (SOAP Notes) linked to that invoice, they will be unlinked but not affected in any other way. In other words, you will no longer be able to view the invoice(s) from the SOAP, using the button
- If there
are any line items listed on the invoice, e.g. Diagnoses, Procedures,
or Goods, they will automatically be deleted from the invoice, but will still show on any formerly linked SOAP Note(s).
A voided invoice can only be a blank invoice. The effect is that you do not need to
delete the line items before voiding; they will be deleted for you.
- The Invoice List view will show the invoice's information as dimmed, and
its Status will change to VOID and show the details of the voiding.
- A
large "VOID" will appear on the invoice detail screen.
- An invoice that has been voided may be permanently deleted, by clicking the button again.
Find Voided Invoices
- On
the invoices List screen, select "Status" in the QuickFinder, and enter
"void" (or part of the word) to list matching invoices.
- Click in the Control Panel and select criteria including the Type: "Voided"
Automatic Method
Invoices can be saved as a PDF and sent as an email attachment in just a few easy steps. See <<992>> for more info.
Manual Method
In older versions of ClientTracker, you can attach an electronic file to an email. You need to have PDF software to save a ClientTracker invoice printout as a PDF, or a scanner to scan a printed invoice.
- Mac - All Macs come with the option to choose to print to PDF. They also have a "Mail PDF" option, which produces a print image in the body of an email outside of ClientTracker. See your Mac instructions for more info.
- Windows - If you don't already have the software, search for Print to PDF Software, free and low cost options. Install it and set it up to be one of your "printers". After you have installed some PDF software, the choice to Save as PDF (or equivalent) will show in your computer's Print window.
- Click the icon for the invoice
- Click when you are ready to save the image you see in the Floating Preview Palette.
- In your computer's Print dialog box, select the option for Printer to be "Print as PDF" or other, similar option.
- Choose the location to print (Save) the PDF and name the PDF file.
Tip: To easily name the PDF file, hold the Shift key down when you click on the invoice Print button. This puts data in the Clipboard that you can paste when it is time to name the PDF in #4 above. The pasted data will look like this: INV 2370 8-29-11 Smith, John $210, and you can edit it as you like before you save the PDF.
Tip: When you save the PDF, make a note of its location, or create a special folder for all invoice PDFs and name it clearly.
Step 2 Attach the invoice to an email - Use your own email program, or use the Attachment tab for an email sent from ClientTracker.
- For details on how to attach any file to an email in ClientTracker, see <<750>>.
- HIPAA requires that communication to a patient must be stored in their secure medical record.
- An invoice attached to an email may reveal sensitive information like diagnosis, treatments received, etc. Use your discretion wisely.
Track an Invoice Sent by Another Email Program
If you don't want to use ClientTracker to directly email an invoice to a client, you can track an email sent outside of ClientTracker.
1. Create an electronic file of the invoice, either as a PDF or scanned image.
2. Generate an email in your own email program (outside of ClientTracker) and attach the invoice.
3. Create a record of the communication in ClientTracker.
- See <<657>> for more info.
- See <<480>> for more info.
NOTE: This information applies ONLY if you are using ClientTracker Cloud
Sending an invoice to a patient is easier in the Cloud!
- Click the Print button from any invoice, and stop at the preview.
- Click either the Save As PDF link at the top of the small blue window entitled "Floating Preview Palette," or the button that looks like an envelope on the lower left.
- ClientTracker will automatically save the PDF and name it with the customer name, date, and invoice number.
- The result is you wind up on the Compose screen for a new email to be sent to that Client, and the PDF invoice is automatically attached (in the Attachments tab on the left of the screen).
- Compose your email and send it.
Tip: Make an Email Communications Template to be used for the subject and body of the email, and you can apply that to your draft email in a couple of clicks! See <<147>> for more info.
How to Resend an Invoice Using this Method
If corrections
need to be made, or the client did not receive the first one, you may
need to resend the invoice. The file name includes the date of the invoice,
so you will get an alert because a file with that name already exists, and it cannot be resent.
Tip: Change the invoice date (at the top) from what was the original, and it should resend.
Some offices like the invoice date to be always the same. Some might change the invoice date if
a correction needs to be made, or if it was resent. For some, the date
of the invoice is the "date issued." For others, they may want the
invoice date to be always the "date of service." (At any rate you could
change it back after sending.)
Note: There is a Copy Previous Invoice button at the top left of all invoice entry screens. See <<951>> for details on how to copy the previous invoice manually, if the automatic method below does not happen. Usually, the automatic method does not happen because of how previous data was entered.
Important Points
- ClientTracker automatically creates a SOAP Note for all appointments, whether you fill it in or not.
- An
Appointment contains the initial SOAP Note info: date, time, practitioner and room.
- First the appointment is made, then the SOAP
Note containing all the details of the appointment. They are one and the
same record in ClientTracker.
- SOAP Notes and invoices share the same Diagnoses, Procedures, and
Products in. These are often referred to as "line items." The
logic for this is that these line items are part of the medical history
and should primarily be part of the SOAP note.
- When you generate an invoice from an appointment or SOAP Note, it will use the line items (if any) that are on the SOAP Note.
- If there are no line items for your invoice you can copy the previous invoice with the same client and practitioner.
- Use the Copy Previous Invoice button at the top left of the invoice entry layout.
Two Methods to Generate Invoices
As there are 2 different methods to generate an invoice, there are two different "memories" for what line items show up on an invoice, depending on how the invoice is generated. This is designed as a convenience, and cannot anticipate all the variables in actual use.
From an Appointment/SOAP
- When you make an appointment, a SOAP Note is generated automatically, even if you don't fill the SOAP Note fields.
- This appointment/SOAP record will inherit the Diagnoses and
Procedures from the previous invoice generated from an
appointment/SOAP, if the Practitioner is set to use the Previous
SOAP/Invoice for all subsequent visits.
- When you generate an invoice from the new appointment/SOAP, it will share the same line items as the SOAP.
- It will also copy data from the SOAP Note fields if you filled these in.
- Note: If the Client has a previous "No SOAP" invoice, and it is more recent than the last invoice generated from an appointment/SOAP, then nothing will be inherited by the new invoice.
New Invoice, No SOAP
The Invoice No SOAP function is designed to be used rarely: for those times when an invoice is needed without an actual patient visit; e.g. when a patient walks in just to buy herbs. The Invoice No SOAP function should be only if you do not use ClientTracker's Appointments or SOAP functions.
- An invoice generated with the
Invoice No SOAP method will inherit the Diagnoses and Procedures from the previous
invoice created this way, not from the previous invoice generated from an appointment/SOAP.
- Note: If the Client has an invoice generated from Appointment/SOAP Note, and it is more recent than the last "No SOAP" invoice, then nothing will be copied to the new invoice.
- Products are not copied from a previous Invoice No SOAP. If you want the products, use the Duplicate Invoice process, which is optimum for repeat orders of Products. The new invoice will always be an Invoice No SOAP when you do this. See <<574>> for more info.
Tip: You can turn a "No SOAP" invoice into an Appointment/SOAP invoice by using the Generate SOAP button. An existing Appointment/SOAP cannot be linked to a "No SOAP" invoice.
New Invoice Best Practice if you create Appointments and/or SOAPs
You can generate an invoice from two main places:
1. the Appointment Info Pop-up
Click on the appointment in the calendar and click either:
- the Generate Invoice button
- Go to the SOAP; then click Generate Invoice in the upper right corner of the SOAP Note screen.
Click the Generate link at the end of the row. Get to the list via:
- On a patient's record, go to her Appointments & SOAPs tab.
- In Reports, choose to run the Visits with No Invoice report. Click the Generate link at the end of the row.
Overall, it is best to pick one method of creating invoices and stick with it.
New Invoice Best Practice if you do not use Appointments and/or SOAPs
1. Generate the invoice from the Client's record. Click the button
2. On any invoice screen, click the icon in the functions bar.
IMPORTANT: This method will copy the Diagnosis and Procedures from the last invoice made from an Invoice No SOAP. It will ignore any invoice made with Appointment/SOAP method.
Practitioner Settings
For ClientTracker to copy any info from a previous SOAP or invoice, your practitioners need to be set to "Use previous SOAP/Invoice" for subsequent visits. If a SOAP Template has been selected for this setting, its line items and other info will be used instead.
- See <<1050>> for more info.
This section discusses how to enter data and manage Simple and Superbill invoice types. Some of the information also applies to the 1500 invoice type, as well. Details in this section include:
- <<113>>
- <<114>>
- <<115>>
- <<608>>
- <<755>>
- <<117>>
- <<118>>
- <<760>>
- <<809>>
- <<840>>
- <<950>>
- <<951>>
- <<981>>
Superbill invoices are for accounts to be paid partly or completely by insurance companies, and have additional fields for insurance information.
Note: Some functions on a Superbill are not available on a Simple invoice. These are explained below. Otherwise, these instructions apply to both types.
Simple type invoices are similar to Superbill invoices except that Simple invoices do not have spaces for insurance company, policy number, and date of birth at the top, or the practitioner's name, license number, or signature line at the bottom.
Superbill Top Section

Invoice Information
- The client personal information is auto-filled from the record of the client selected, and cannot be changed. If you need to change the selected client, first void or delete the invoice; then create another.
- The invoice date is auto-filled if you generate an invoice from a SOAP Note or appointment. This can be changed as needed.
- The invoice number field is auto-filled with an incremental number that cannot be changed.
- Click clr to have no Insurance Policy for the invoice if the client will be the only payer.
- If the client has no active Insurance Policy, the Insurance Co. label will be gray, and if clicked, the field will say
"no values defined." - If the client has only one active Insurance
Policy, the menu for selection will have only the one option. Add
another active Insurance Policy the client's Insurance tab, and it will show in the menu.
- If the client has more than one active Insurance Policy, you may click the Insurance Co. field if you need to select a different one.
- You can add a Place of Service (POS) code to a superbill. Click the "POS" field in the Insurance area and enter "11" for your facility, or other code as needed.
- You can print a superbill without printing the products.
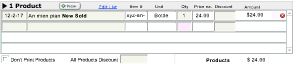
ClientTracker will print a blank signature line on the lower left of a Superbill. Under this line the Practitioner name, NPI, and License Number will show if they are entered in the Practitioner record. See <<240>> for more info.
- Tip: More signature choices are available. See <<809>> for more info.
SOAP Note Access
 The right side of the Detail screen has a number of controls. At the top is a button that allows access to the SOAP Note(s) linked to the invoice (if any).
- If one SOAP Note is linked, the button reads , and takes you directly there.
- If more than one is linked, the button reads , and takes you to a list from which you can select one of them to view.
- If you are working with an invoice not linked with any SOAP note, the button reads , and when clicked asks for information describing the client visit (i.e. appointment), including date, practitioner, time, room, etc.
Change Invoice Type
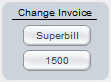
In the Change Invoice panel are buttons giving you the option of changing the invoice type at any time, with the caveat that there can be no more than 4 Diagnosis or 6 Procedure Codes on a 1500 invoice. Changing the type will take you to the appropriate Detail screen.
Note: Changing the invoice type to a 1500 may require double-checking the accuracy of the information, especially if you are billing for more than one date.
Insurance Payer Information (Superbill only)
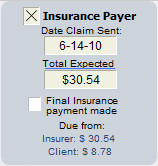
If the invoice will be partially or fully paid by an Insurer, click the Insurance Payer checkbox to display the small control panel.
-- Date Claim Sent - This fills automatically when e-billing is used, or you can enter it manually. This is important, because many invoice functions in ClientTracker are not possible after a claim has been sent for payment. The date can be removed if necessary.
-- Total Expected - This amount calculates from the total of just the procedures entered on an invoice, minus any Copay amount for the client's insurance policy. You may also enter a manual amount in the field, as long as it does not exceed the invoice Total Due. Click the underlined Total Due to revert to the calculated amount. This is used as a guideline when entering insurance payments.
-- Check the Final Insurance payment made box when appropriate (optional)
Payments
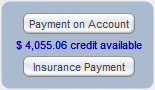
Payment on Account - Click to enter a payment for the client (on the Payments on Account subtab of their Invoices screen). This would be used for a payment that is considered a pre-payment, or not associated with the current invoice. For more info, see <<47>>.
When a client has a credit available in their Payments On Account area, the Payments on Account button will have a red label, underneath which the amount of credit available will show in red.
(not available on Simple invoices) - Click to enter a payment from the insurance company of record for the invoice (on the company's Payments tab). This would be used to enter a payment that is not associated with just the current invoice. For more info, see <<468>>.
Payment Palette - To enter a quick payment for this invoice, begin typing in the small tabs and fields provided in the blue Payment Palette. For more info, see <<638>>.
Voiding or Deleting an Invoice
Click the button at the bottom right to void or delete an invoice. Certain rules and restrictions apply. See <<636>> for more info.
Tip: The five Comm Panel buttons are available on the lower left of invoice Detail screens to create a communication for the invoice's client of record. See <<155>> for more info.
Use CodeTracker to add Diagnosis Codes to an Invoice
See <<1001>> for more info
Note: Simple invoices do not have a portal to enter Diagnosis Codes.

Near the top of Superbill invoices is a portal for adding Diagnosis Codes. Click the button and pick from the QuickFinder pop-up by clicking the row of the desired code. You can narrow the portal list by typing part of any diagnosis into the QuickFinder. Click Edit List to manage your list of Diagnosis Codes in ClientTracker. See <<690>> for more info.
Power User Tip: Use Ctrl+Shift+D to enter a new Diagnosis without using your mouse. (On a Mac use Command+Shift+D)
Tip: Hover your mouse over an item in the QuickFinder pop-up to see more details about the item, such as Vendor and Current Average Cost. Designate items as "Frequent" to make them appear at the top of the list for faster entry.

Click the small Expand button to see a larger portal of diagnoses. After you have selected a diagnosis, you can click in its row to change the description, if needed.
To change the order of the line items on the invoice, click the gray up/down arrow for a row (next to the delete button) and drag it to its new location. Use the Expand button to access more than 4 rows at a time.
Now you can add multiple Diagnosis Codes to an invoice while the Quickfinder pop-up remains open. See <<950>> below for details.
Note: The date of a Diagnosis can only be changed from the SOAP Note or appointment. For convenience, the Appointment pop-up window is accessible by clicking the Date field.
You can enter as many Diagnosis Codes as are needed (up to 30), and they will all show on the printed invoice. Use the scroll bar at the far right of the portal to view more than four codes. Diagnoses can also be entered for different dates, if the Superbill is intended to represent multiple client visits.
- If you have created SOAP Notes first, and more than one are linked to the invoice, the diagnoses from the linked SOAP Notes will show with their respective dates.
To delete a diagnosis code that has been added, click the red delete button at the right of its row.
If you have more than one item and want to delete all of them, click the blue Delete All link above the delete buttons.
You can also simply type in new or existing diagnosis codes and have the option to add new codes to the list, right from the Invoice.
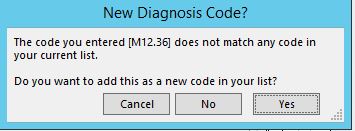
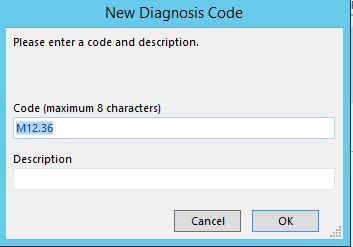
To add Procedure Codes to a Simple or Superbill invoice, click the button and pick from the QuickFinder pop-up by clicking the row of the desired procedure. You can narrow the portal list by typing part of the description in the QuickFinder. Click Edit List to manage your list of Procedure Codes in ClientTracker. See <<254>> for more info.
You can also simply type in new or existing procedure codes and have the option to add new codes to the list, right from the invoice.
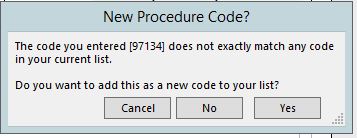

Power User Tip: Use Ctrl+Shift+P to enter a new Procedure without using your mouse. On a Mac use Command+Shift+P.
Click
the small Expand button to see a larger portal of Procedure Codes. After you
have selected a procedure, you can click in its row to change or enter information about that item (see below).
You can enter as many Procedure Codes as are needed (up to 60), and they will all
show on the printed invoice. Use the scroll bar at the far right of
the portal to view more than four codes. ![]()
To change the order of the line items on the invoice, click the
gray up/down arrow for a row (next to the delete button) and drag it to
its new location. Use the Expand button to access more than 4 rows at a
time.
Now you can add multiple Procedure Codes to an invoice
while the Quickfinder pop-up remains open. See <<950>>
below for details.
Note: If you want to change a Superbill type invoice to a 1500 type, there can only be a maximum of six Procedures. The remedy is to reduce the number to six or less by deleting the extra line items.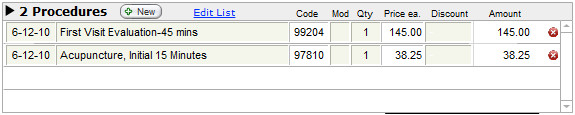
Information for Each Procedure Line Item
Procedure Date - This is the date the procedures were performed. This is auto-entered to be the same date as the invoice, but can be changed (if there is no linked SOAP Note) by picking from the drop-down calendar.
- If you plan to create a SOAP Note later, it is best to enter the procedures from there.
Description, Code, and Modifier - These all auto-enter from the selected Procedure Code, and can be edited as needed (except for Code).
Quantity - New procedures are given a quantity of "1" by default, which can be changed to a positive or negative number (but not zero). The Quantity is multiplied by the Price ea. to calculate the Amount.
Price ea. - The set price is entered from the selected procedure, and is multiplied by the Quantity. The Price ea. itself cannot be edited.
Discount - Enter an optional line item discount in decimal numerals, or a whole number with a percent sign (%). The discount cannot be greater than the Amount. See <<608>> below for more info.
Warning: Changing any line item Qty, Price, or Discount info after an invoice has been paid in full will alter the Invoice Total, which could result in a Total Due that requires further adjustment.
To delete a Procedure Code that has been added, click the delete button at the right of its row. This will permanently delete any changes entered for that line item, and will reduce the invoice total.
If you have more than one item and want to delete all of them, click the blue Delete All link above the delete buttons.
Use the button to add any Products which were sold to the client, by picking from the pop-up QuickFinder. The list of products your practice sells, if applicable, is managed in the Inventory area. Click Edit List to access this area. See <<457>> for more information.
Power User Tips: Use Ctrl+Shift+G to enter a new Product without using your mouse. On a Mac use Command+Shift+G.
Click the small Expand button to see a larger portal of Products. After you have selected a product, you can click in its row to change or enter information about that item (see below).
You can enter as many products as are needed (up to 60), and they will all show on the printed invoice. Use the scroll bar at the far right of the portal to view more than four.
To change the order of the line items on the invoice, click the gray up/down arrow for a row (next to the delete button) and drag it to its new location. Use the Expand button to access more than 4 rows at a time.
Now you can add multiple Products to an invoice while the Quickfinder pop-up remains open. See <<950>> below for details.
You can also simply type in new or existing products and have the option to add new products to the list, right from the invoice.
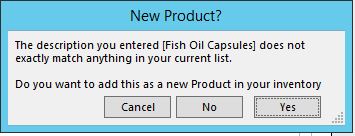
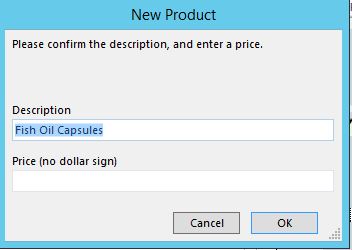
Tip: ClientTracker will track the inventory levels of products you sell, and automatically remove products sold from the amount On Hand. It can even alert you to re-order when your products in stock reach a chosen level. See <<459>> for more information.
Information for Each Product Line Item
Date - The date the Products were sold. You can change this using a drop-down calendar if the invoice is not linked to a SOAP.
- If you plan on creating a SOAP later, it is best to enter your products there.
Description, Sold By - These enter from the selected Product, and cannot be edited on an invoice.
Quantity - New products are given a quantity of "1" by default, which can be changed to a negative or positive number (but not zero). Entry of decimal numbers up to 5 characters is supported. The Quantity is multiplied by the Price ea. to calculate the Amount.
Price ea. - The set price is entered from the selected product, and multiplied by the Quantity. However, the Price ea. itself cannot be edited.
Discount - Enter an optional line item discount in decimal numerals, or a whole number with a percent sign (%). The discount cannot be greater than the Amount. See <<608>> below for more info.
Warning: Changing any line item Qty, Price, or Discount info after an invoice has been paid in full will alter the Invoice Total, which could result in a Total Due that requires further adjustment.
To delete a Product that has been added, click the delete button at the right of its row. This will permanently delete any changes entered for that line item, and will reduce the invoice total.
If you have more than one item and want to delete all of them, click the blue Delete All link above the delete buttons.
Discounts can be given to the Procedures and/or Goods line items on invoices in two ways.
1. Enter a line item Discount.
- Enter an optional line item discount in decimal
numerals, or a whole number with a percent sign (%). The Discount
cannot be greater than the Amount.
- Decimal numerals are calculated as amounts, and will be subtracted from the Amount of the line item.
- Percentages are subtracted from the Amount as a percentage of the Amount.
- EXAMPLE: A 10% discount on $100 results in an Amount of $90.

- An additional discount can be entered for the entire Products section; using the same percent or decimal method as for line items. This is calculated from the Subtotal just below the Products portal
- Any discount entered in this field would be in addition to the line item discounts already applied before the Subtotal is calculated.
- If 100% or the full Subtotal amount is entered, this becomes a No Charge Invoice
No Charge Invoice
A No Charge Invoice is defined as one that has charges but no payments, and the Total Due is zero. An alert message "NO CHARGE INVOICE" will show next to the Invoice Total, but not on any printed invoices. A No Charge Invoice is accomplished in two ways:
- Enter 100% or the full amount of the Subtotal below the Procedures and/or Products portals. This will make the total for that section to be zero.
- If there are line items for both Procedures and Products, this must be done for both.
- Click the No Charge Invoice box in the Adj. tab of the Payment Palette, and 100% will be entered below either the Procedures or Products portals; or both.
- An invoice that has already had Payments made on it cannot be turned into a No Charge invoice.
Warning: Changing a discount after an invoice has been paid in full will alter the Invoice Total, which could result in a Total Due that requires further adjustment.
When you generate an Invoice, ClientTracker assumes you are also using SOAP Notes. ideally, generate an invoice from an appointment or its SOAP Note whenever possible. The invoice and SOAP Note will share the "line items," e.g. Diagnoses, Procedures, and Products.
You can link multiple SOAP Notes to an invoice, and the invoice will show all the line items with the dates of their respective SOAP Notes. When an invoice is generated from, or linked to a SOAP Note, the dates of service are the dates of the respective SOAP Notes (aka appointments), and can only be changed from SOAP Note. This preserves the integrity of the billed services with the actual clinical procedures performed.
- For more info, see <<498>>.
- Thereafter, on an invoice with more than one date in its line items, the warning will not show, making entry of multiple dates of service faster.
Sales Tax on Invoices
All Procedure Codes and Products can have sales tax rates assigned to them in their respective source records, or be designated non-taxable. The sales tax (if any) will calculate on the invoice as aggregate subtotals of all taxable line items in the Procedures and/or Products sections; inclusive of any different rates. The sales tax displays just below each section, and before their respective Subtotals.

A summary of the different rates and their respective totals displays on the invoices near the Total. You can override the taxable status of all procedures or products for the current invoice only by checking one or both of the No tax boxes.
Sales tax rates are designated for your practice on the Settings/Practice tab. See <<246>> for more info.
Note: In order for tax calculations to be correct, you need to set up tax rates for Products and Procedures before creating the invoice. If the tax rates for an item need to be changed, the item will have to be deleted and re-added to the invoice to show the changes.
Invoice Subtotals and Totals
The invoice is automatically totaled as you add procedures and products. There is a subtotal for each of the Procedures and Products sections. Taxes are added to the subtotal to make the Invoice Total (before Payments).
Below the Payments section is the Total Due, which is the total of the invoice minus any payments that have been entered. See <<639>> below for more info on entering payments.
Invoice Notes and Terms
There are two areas for adding notes to an invoice.
1. The tabs labeled Printed Notes and Private Notes are located near the bottom of the invoice, and each behaves differently.
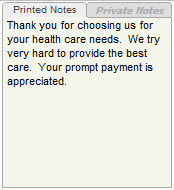
Printed Notes are auto-filled from default text you set up in the Settings/Program/Financial tab, and can be edited for each invoice (up to the space allotted). As the name suggests, these will be printed on the invoice.
Private Notes are for your practice's use and will not be printed on the invoice.
2. Terms are located near the top of the invoice, and are also auto-filled from default text you set up in the Settings/Program/Financial tab, and can be edited for each invoice (up to the space allotted). These will show on the printed invoices, as well. For more info, see <<450>>.
Practitioner and Signature (Superbill only)
On Superbill invoices, there is a signature line on the lower left, showing the name and license info of the practitioner of record for the visit.

- On the entry screen, you can change the practitioner for the invoice if there is no SOAP or appointment linked to the invoice. Click the Change Practitioner link and select from the pop-up menu of active practitioners.
- If there is one or more SOAPs or an appointment linked to the invoice, you can only change the practitioner from one of those entry screens.
- The NPI and License number come from the Practitioner's record. The Tax ID comes from Settings / Practice.
Click the icon in the Control Panel of any invoice Detail screen to print just that invoice.
To print multiple invoices, there are two options:
- On the Invoice List screen, clicking the icon will open an Invoice Print Menu of choices, including the options to print all the invoices in the list. (See below)
- On a client's Invoices screen, Statements tab, clickto print
- On any invoice Detail screen, click in the Control Panel to search by criteria, and any found invoices will show on the invoice List screen.
- Click in the Control Panel to open the Print Menu pop-up window.
- Click the option "Invoices," and all those in the found set will print, formatted as to their respective types.
- For other print options in the Print Menu, see <<106>>.
A client'd date of birth is not set to show on a simple or superbill invoice, by default. If you want the date of birth to show on the superbill without entering insurance information, then go to, Settings, Program, Financial. At the bottom, check the box to show date of birth on superbill invoice. The DOB is usually only needed for an insurance claim.
First Set Up Practitioner Signature and Preferences
Signatures are managed for each individual practitioner; on their Detail screen. See <<1052>>
You have 4 choices for how the practitioner signature can appear on the Superbill.
- Default (all choices blank): A signature and date line (to be signed manually after printing)
- SOF - Same as above, with the phrase "Signature On File" where the signature would go
- Scan - A scanned graphic of the practitioner's signature (aka "electronic signature") - must be in .jpg format, and cropped to be as close to the signature as possible
- No Sig Line - Completely blank, showing nothing at all
Signature Control
At the bottom left of the entry screen is a preview of what the signature area will look like on the printed invoice. To change the settings for this invoice, click the Signature Control tab to the left. On this tab you can:
- Click the practitioner's blue link name to access her record and default settings for signature.
- Change the signature option for ALL invoices (i.e. default) for this practitioner
- Override the default signature option for THIS invoice only
- Go back to see the signature preview
Enter and manage the Checkout Info on the Client's Personal screen, in the Alerts section. On an invoice entry screen, the text will show in red just above the Payments section. Checkout info will not print on any invoice.
Tip: "Line items" are Diagnosis Codes, Procedure Codes, and Products. Any line items you add to the Invoice will be shared by the linked SOAP Note (if any).

You can add multiple line items to an invoice while the Quickfinder pop-up remains open. The Quickfinder opens when you click the +New button on the invoice entry screen to add Diagnosis Codes, Procedure Codes, or Products.
- Click the Multi-Pick link to access the picking tool
- Find
and select the items from the top list the same way you would for a
single item, by typing into the Quickfinder and clicking a row
- When you click a row to select, it is added to the Selected list below
- Uncheck the box at the right of an item's row if you want to remove it from the Selected list
- Click the Add Selected button to add all the items in the Selected list to the SOAP
- Click Cancel to not add anything (the selected items will be cleared)

The Copy Previous Invoice button works only if 2 conditions are met:
- The invoice cannot already have any Diagnosis, Procedures, or Products line items, and
- The previous invoice must be for the same client and practitioner
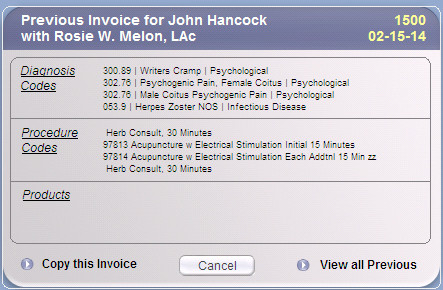
Copy this Invoice - All Diagnosis, Procedures, and Products will copy from the previous invoice, including modifiers and discounts. In all instances, it is the user's responsibility to make sure the newly copied invoice accurately reflects the current situation.
View all Previous - Goes to the Invoice List screen, displaying all previous invoices for the same Client and Practitioner.
Cancel - Close the pop-up window and do nothing.
Tip: To copy any previous invoice, do not create a new one yet, but go to the invoice you wish to copy and use the Duplicate Invoice button in the top left Control Panel. See <<574>> for more info.
The Copy From Previous button's actions cannot be undone, but the line items can be cleared or the invoice voided in the usual way.
You can use an optional barcode scanner (not provided with ClientTracker) to add products to an invoice.
Some rules to be aware of before you try this feature are:
- The barcode scanner (aka "wand") is not part of ClientTracker, and its functions are not supported by Ginkgo Software. You are responsible for buying your own devices, and knowing how to use them.
- For the barcode lookup feature to work, you need to have the barcode set up in the item in your Inventory area first. See <<460>> for more details.
- There is no feature to print barcode labels at this time. This is designed to work with products that have an established UPC, or Universal Product Code.

To open the Barcode Scan pop-up window, click the barcode button found next to the Products area of an invoice. The Barcode Scan pop-up looks like a larger Products list, and has a yellow field to enter the bar code first.
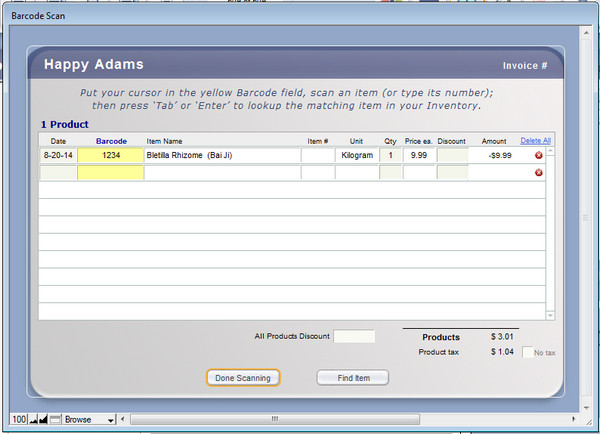
- Place your cursor in the yellow barcode field (click it), and scan the item. If the UPC does not scan into the field, you may enter it manually by typing the numbers.
- To look up the details from the item's record in ClientTracker, press tab or Enter to exit the barcode field.
- Use your keyboard and mouse as usual to change details such as Date, Quantity, or Price. Other fields are not editable, just like on the invoice.
Add an Item
If you are SURE you have a product that is not in ClientTracker yet, this handy feature lets you add an item to the invoice and your Inventory List at the same time! To access this feature, you need to start with an attempted scan. If a match is not found, choose "Add Item" in the message box.
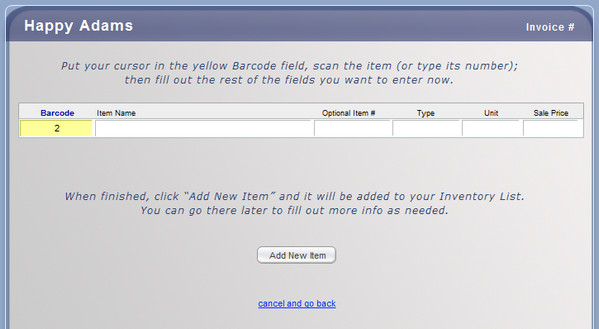
Enter the basic info about the new item, and click the Add New Item button. You will return to the Barcode Scan section of the pop-up, with the new item added.
Note: There are no warnings or controls if you add an item that is already in your ClientTracker, so BE CAREFUL not to enter duplicates. Once an item has been sold on an invoice, it cannot be deleted from Inventory. Duplicate items cannot be "merged." You may go to the Inventory area later and fill out the complete record, if desired.
Find an Item
If you want to look for an item using the regular QuickFinder pop-up, first scan all the items that can be scanned. Then click the Find Item button, and you will switch to the QuickFinder pop-up. For more info, see <<115>>.
Details in this section include:
- <<752>>
- <<588>>
- <<592>>
- <<593>>
- <<594>>
- <<595>>
- <<596>>
- <<597>>
- <<598>>
- <<861>>
- <<843>>
- <<599>>
- <<619>>
- <<620>>
- <<740>>
Use Your Mouse to Move Around the 1500 Data Entry Screen
If you use the Tab button on your keyboard to move around when you get to the 1500 data entry screen, it takes you to the first enterable field: Box 10b to enter the Place (state). Continued tabbing takes you to the rest of the enterable boxes, then on to each line of the frequently used Boxes for 24.
The tab doesn't start with Box 1a or Box 2 because these areas, or fields, are not enterable on the 1500 screen. The data is filled in automatically from other sources in ClientTracker. If you do use the Tab key, you must use your mouse to check or uncheck boxes -- you can't tab into a checkbox.
For fastest data entry, use of your mouse is recommended on the 1500 data entry screen.
A 1500 invoice can have a maximum of twelve unique Diagnosis Codes. These usually come from the SOAP Note for the visit that is being billed for on the 1500. If there is more than one SOAP Note linked to a 1500, or if a code is entered more than once, any duplicate Diagnosis Codes will show only once. Any of up to 6 Procedures can be "pointed" to a Diagnosis Code in Box 24e.

Use the button on the 1500 or Details tab of the data entry screen to enter a Diagnosis Code. The new code gets added in the order they are selected of the Code in lines A-L of Box 21. It's a good idea to recheck the Box 24e pointers if you add any Diagnosis Codes after Procedures have been entered.
Once added, some information about a diagnosis can be edited, or the entire code deleted, but only on the Diagnosis portal of the Details tab. If you click thebutton to the left of a code in Box 21 of the 1500 tab, you will be taken to the Details tab, where you can also add new codes. Above the Diagnosis portal is a display of how the codes will appear on the 1500. All codes added will show in the portal; with up to 12 unique codes allowed on a 1500.
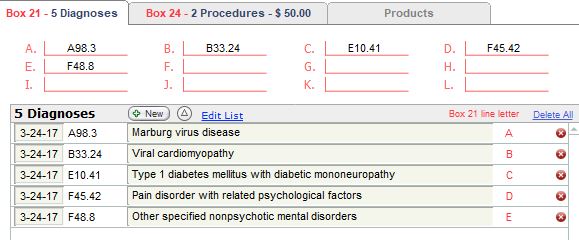
- Each row of the portal shows the Box 21 line number to which it has been assigned. Duplicate entries will share the same line number.
- On the 1500 tab, if there are duplicate codes, the number of duplicates will show in parenthesis just to the left of the code.
- The descriptions of the Codes may have different names (as shown in the example). Only the Code itself is evaluated for duplicates.
The 1500 allows for six Procedure Codes per form in the six lines of Box 24. A 1500 is most often used for a single SOAP Note (or visit), with all the procedure codes having that same date. If the 1500 invoice is linked to multiple SOAP Notes, it could represent up to six visits if each visit had only one procedure code, or 3 visits with 2 procedures, or any combination. It is your choice -- up to the limitations of the form.

Note: Procedures can have different information edited, from the 1500 tab or the Details tab. They show the same procedures; however, the info on the 1500 tab pertains to the 1500 Claim Form, and on the Details tab is more practice-oriented information.
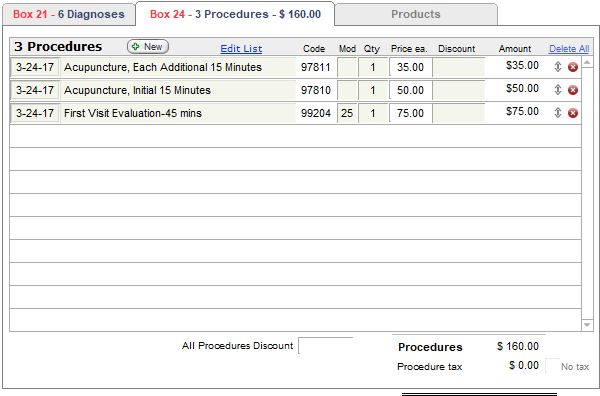
Box Notes re Procedure Codes on a 1500 invoice from Multiple SOAP Notes
24a - If the 1500 is not linked to any SOAP Notes, you can edit the "Date To" to combine identical procedures performed over multiple, consecutive days. This is an advanced billing technique, and we strongly recommend consulting the 1500 Instructions.
- If there is one or more SOAP Notes linked to a 1500, the date that the procedure was performed is presumed to be the date of the client visit. For this reason, the date can be changed by changing the date on the SOAP Note itself.
- This can also be done in the Appointment pop-up window, which is offered as an option when the Date field of a Procedure line item is clicked.
- If this is done, the dates of all the Diagnosis and Procedure line items on the 1500 invoice that are linked to that SOAP Note will be updated.
24b - Place of Service is a 2-digit code. ClientTracker provides 11 (office) and 12 (home) as codes in a drop-down list. You can enter any ad hoc value to add to the list. The complete list can be found at
24e - Diagnosis Pointer is a set of letters A through L, in any combination, which indicate for which diagnosis the procedure was performed. ClientTracker offers a drop-down list of various combinations for your use.
24f & 24g - See <<597>> below
24h - EPSDT Family Plan will toggle as Y (Yes) or blank. Enter a Y if the procedure was performed for EPSDT. You can set "Y" as a default for all 1500s at the bottom of the screen.
24i - This optional, 2-character qualifier auto-enters from the record of the Insurer of record for the SOAP Note. This can only be manually changed on the 1500, and the auto-enter can be set up or changed on the Insurer's Detail screen.
24j - will show information about the practitioner of record for that SOAP Note, if it is has been entered on the practitioner's Detail screen. For more info, see <<1048>>.
24l (pink area) - This is a place to manually enter another ID for the rendering practitioner, as required by the Insurer. See your 1500 instructions for more info.
Multiple SOAP Notes are linked to a single 1500 invoice by using the small Link control on the upper right of the SOAP Note entry screen, below the button that says Generate Invoice, or . For more information, see <<498>>.
See also <<594>> below for more info.
Most insurance companies do not reimburse for products or herbs. If they do, they will want a specific Procedure Code -- e.g. for moxibustion sticks used in a procedure.
You can enter enter products sold by your practice in the Inventory area of ClientTracker. How you do this is completely up to you, and what works best for your practice. The resulting list of these products is available when creating an invoice. For more info, see <<457>>.
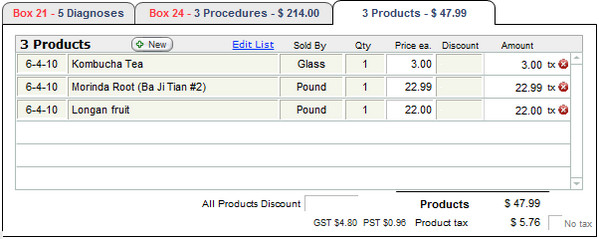
A 1500 invoice is usually generated from a SOAP Note. If there are any Herbs/Formulas in the Plan area of the SOAP Note, these will appear on the Details tab of the 1500, in the Products portal. You can have an unlimited number of products in this portal, just like on the Simple or Superbill invoices.
IMPORTANT: If you click the Print icon from this tab, you will print a Superbill invoice; including all the diagnoses, procedures, and products. For more info, see <<115>>.
If you are creating a 1500 invoice without a SOAP Note, you have a choice of either creating a separate Simple invoice for the sale of products or adding them to the Products portal in the Details tab of the 1500, by use of the button. We recommend creating a separate Simple invoice, as it helps to keep the payments very clear.
It is usually advisable to create the SOAP Note first, record the clinical findings, and add diagnoses, procedures, and products sold from there. However, there may be times when you have filled out a 1500 without a SOAP Note, and want to create one.

The primary method is to click the button near the top of the 1500.
Diagnoses, Procedures, and Products are shared by invoices and SOAP Notes. If you have added any of these to a 1500, they would be added to the SOAP Note as well.
If the procedures on a 1500 have been performed by more than one practitioner, these would all be changed to the practitioner of record for the entire invoice, which will become the practitioner of record for the SOAP Note as well. After creating the SOAP Note, you can return to the 1500 and change the practitioner for any procedure by clicking box 24j.
Information for Billing Multiple Dates on One 1500
If you have entered Procedures with different dates in Box 24, you cannot create a SOAP Note from the 1500. If you click the create SOAP Note button, you will get a message saying this is not possible. If you enter procedures with different dates on a 1500 that has no SOAP Note yet, you will receive a one-time warning that the SOAP Notes should be created first if you want one), and the procedures entered separately on each SOAP Note. Then, each SOAP Note can be linked to the 1500, using the method described in <<498>>.
The Insurer Payer panel was created to clearly track and report on what is expected and paid from the insurance company versus the client. On the 1500, the most complete info can be found at the top of the Details tab. This was designed for when you expect money in from an insurance company, and therefore would most often be used on the 1500.
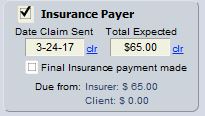
The Insurer Payer box is checked automatically when a 1500 invoice is created. You can change that at any time. On the Superbill, you can also manually adjust this box. Changing the invoice type to Simple will uncheck the Insurer Payer box.
The Total Expected and amounts are automatically set to be the total of Procedures, less any Copay. Products are calculated to be due from the Client. You can manually adjust the "due" amounts in several ways:
- Click in the Total Expected field and enter the desired amount.
- Change the Qty of Procedures or Products (products will show as due from the client).
- Enter a discount for a Procedure or Product on the Details tab.
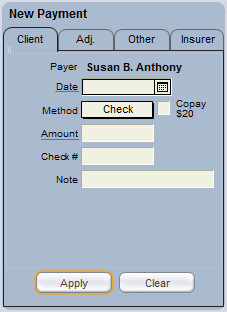
The amount "Due from Client" will reflect any Copay that is entered on the Insurance Policy of record for the invoice.
When you create a new client payment in the Payment Palette and click the Copay box, any Copay amount in the Insurance Policy will fill in automatically. Fill in the Method, Amount, and any other desired Payment fields as usual.
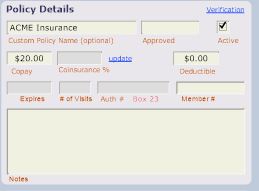
The Transaction Log report in its Detail printout shows what is Due from the Client and from the Insurer. Both the Detail and Summary views show the grand total due from Client and from the Insurer.
Showing the Co-pay on the 1500 Form
Box 29 is the place to show any patient payments on a 1500. Most insurance companies don't want to see a number in this box (contact your payers to find out exactly what they want). If needed, you have several choices as to what would show here.

At the bottom of the 1500 Data Entry screen is a light blue Defaults area. Set your preference here for how Box 29 displays for the current invoice only.
Blank or Preprinted 1500 Forms
You can choose whether to print on a blank sheet of paper or preprinted forms. Go to the Settings/Program/Financial tab, and select an option.
- Blank = the data and form image will print on a blank sheet of paper. The form image is in red ink, so a color printer is needed.
- Preprinted = Forms that you obtain from www.nucc.org. Data will print according to your printer's alignment of the form, and settings that you can enter (see below).
Save As an Electronic File
If you have PDF software, you can print the image of the 1500 form with data as a .PDF file. You should select the option above for Blank paper, and when your print dialog shows, select the option to print as a PDF instead of using your printer.
Adjust Printer Alignment
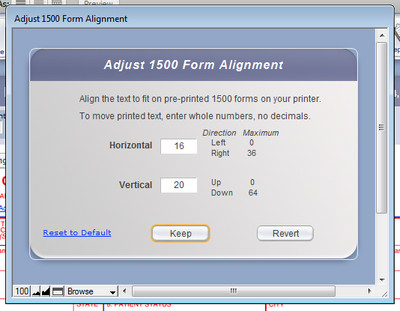
DO A TEST: First try adjusting the paper tray in your printer and print on blank paper to see how it prints. Superimpose the printout on a pre-printed 1500 so you don't waste forms. (Or make copies of an actual form and use those for testing.) Your printer may also have other alignment controls you could try.
To adjust the printout in ClientTracker, click the Adjust Printer Alignment link near the top of the 1500 Data Entry screen, and a pop-up window will open. Enter whole numbers only in the boxes to move the printed data horizontally or vertically on the page.
The system defaults for these settings are different for Windows or Mac:
Windows DefaultsHorizontal SettingsMac Defaults
- Horizontal = 16 (about 3/8" left)
- Vertical = 20 (about 1/2" down)
- Horizontal = 18 (about 3/8" left)
- Vertical = 11 (about 1/4" down)
Left - The printed data cannot be moved farther left than zero.
Right - Enter a number no greater than 36 to move the printed data to the right.
Vertical Settings
Up - Enter a number no less than zero to move the printed data higher on the page.
Down - Enter a number no greater than 64 to move the printed data lower on the page.
(Note: Mac systems may not print well with a number over 20)
- Click to use the settings as entered. Any numbers you enter will remain until changed.
- Click to change them back to what they were when the pop-up window was opened.
- Click Reset to Default to reset the numbers to the system defaults.
Boxes 24f and 24g - EXAMPLE

Multiple method - For example in the graphic to the right, we see charges for 2 units of a procedure, which are $145 each. In the Multiple method of calculation, box F shows the unit cost ($145) multiplied by the number of units (2) or $290.

Unit method - This example also shows charges for 2 units of the same procedure. Now box F shows the unit cost, $145, rather than unit cost times the quantity. The total at the bottom will add up correctly either way.

Tip: To set how box 24f works for the insurance company of record, scroll to the bottom of a 1500 form and click the white box next to "24.F Charges preference," to toggle between "Unit" and "Multiple". You can also change this on the insurance company's Detail screen.
For procedures entered on SOAP Notes, or on the 1500 invoice, the display fields for Boxes 24b, 24c, 24g, and 24h will be blank unless you have set up defaults on the bottom of the 1500 Data Entry screen.
Select from the appropriate pop-up menu to enter a value that will be used for all procedures that display on a 1500 invoice. Changing these will not affect any invoices already created, but would take effect on the next invoice. Of course, the values can always be edited for each Procedure Code line, on the 1500 Data Entry screen.
Box 27 is intended for government claims only (e.g. Medicare, CHAMPUS, etc.), to indicate that the Service Provider agrees to accept assignment under the terms of the insurance program. Leave this blank if you do not bill government programs. For more information, see your 1500 instructions.
If you need to enter "provider taxonomy," this can be done in 2 places on the 1500.
- Box 17a (from the Referring Provider's record)
- Box 32b (manually entered)
Referring Provider Box 17a
If you have a Referring Provider that you only use with a Provider Taxonomy code, enter the code on the Referring Provider detail, in the field provided. Click the drop-down list to choose "ZZ" and enter the code as Identifier #.
Service Facility Location Information - Box 32b
Enter this manually on the 1500 by clicking the field and selecting "ZZ Provider Taxonomy" from the drop-down list. This value will copy forward to the next 1500 for the same client/provider.
Note: Billing requirements of various payers and programs may vary and change with time. Check with your payer to confirm what is needed for your claims. Ginkgo Software provides information here, it is up to you to insure it is correct for each insurance company.
Date of Service
Box 10d or 19 "For Local Use Only" may be used to enter a date of service for Worker's Compensation claims. Check with your payer to find out their specific requirements.
Rendering Provider ID aka "Provider Taxonomy"
In the pink section of a procedure in Box 24, click in the Box 24i, and choose ZZ from the list of Qualifiers. Then in the pink section, click in Box 24J to enter your provider ID.

If you mail claims instead of e-billing, you can manually enter the Date Claim Sent on the either tab of the 1500, and ClientTracker will perform the following actions:
-- A message "(Date Claim Sent) mailed to (Insurance Company)" is entered as a new line at the beginning of Private Notes.
-- If you delete this date, the Private Notes remain unchanged, and you may edit them as needed.
-- If there is no Insurance Company selected for the claim, a warning message will appear.
When you click, it first puts in "today's" date. The next click puts you in the field to put in a date of your choice. If you printed more than one 1500, then use the Next button in the Function Bar to quickly go to the next 1500 to fill in that date sent.
The practitioner of record for the 1500 can only be changed on the 1500 if it is not linked to a SOAP or appointment. Otherwise, you would change the practitioner in one of those screens.

To change the practitioner, click the field below box 33, and select from the pop-up menu of active practitioners.
Note: If there are practitioners for any Procedures that are different than the invoice's practitioner of record (in Box 24j the Procedure row), these will need to be reconfirmed after this process.
To submit claims on the 1500 form, you need two authorized signatures (besides the practitioner's).

Box 12 - Patient?s or Authorized Person's Signature
The patient?s or authorized person?s signature indicates there is an authorization on file for the release of any medical or other information necessary to process and/or adjudicate the claim.
If this has been done and recorded in ClientTracker, this box shows "Signature on File," and the date the client signed, from lower right corner of the client?s Insurance screen. If this says "Patient's Signature Needed," click the box to access the client's Insurance screen and make the necessary changes. be sure to click when you return.
This is recorded on either the client's Personal or Insurance screen. See <<33>> for more info.
Box 13 - Insured's or Authorized Person's Signature
The insured?s or authorized person?s signature indicates that there is a signature on file authorizing payment of medical benefits on the insurance policy.
This is specific to each individual insurance policy, and is tracked on the client?s Insurance screen in area 2 at the bottom in the bottom of the screen. No date is needed, just click the check box.
Address (Client, Insured Person, and Practitioner = "source records")
The address that will show on a 1500 needs to have its little Insurance box checked. When there is only one address entered, this box will automatically be checked. If you add more than one, or uncheck that box, you will need to designate which address to use, and refresh the information on any Client Insurance Policies and 1500s where that address will be needed.
- The Insurance checkbox is located on the 2nd tab for Addresses.
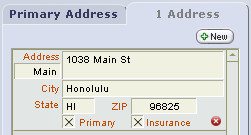
- To refresh address info on the Client Insurance Policy, click the Self choice in Box 6 on the Client Insurance tab.
- On the 1500, click the button.
Phone numbers also have an Insurance checkbox, for the same purpose. In addition, the 1500 requires an Area Code. If a phone number is entered without an Area Code, it will be incompletely applied and the Area Code box will turn pink. (Required fields that need data show as pink on the 1500 entry screen.)
- You can enter a phone in any format: 415-345-4444, 4153454444, or (415) 345-4444, as long as it has an Area Code.
- You can set a default area code to be entered when a new Address is created. Go to the Settings area, on the Program tab and enter it under Clients' Default Information.
- If you change any phone number or mark a new one for Insurance, you will need to refresh information on the Insurance Policy and the 1500.
In ClientTracker, the 1500 is referred to as an "invoice." It is printed on a form called the "1500," or "Health Insurance Claim Form," version 02-12. For this reason, it is commonly referred to as a "claim form" by many insurers and clearing houses. The 1500 Detail, or Data Entry screen is designed to look like the form.
Details in this section include:
- <<120>>
- <<122>>
- <<121>>
- <<577>>
- <<645>>
- <<578>>
- <<643>>
- <<952>>
02-12 Version (Required April 1. 2014): click here
<<882>>
Preparing to Fill Out a 1500
To save you time and typing, 1500 invoices are generated with a number of items filled in for you (if you have entered the information ahead of time). To move around the enterable areas of the form, we suggest using your mouse; not the Tab key. For more info, see <<586>>.
Warning: A 1500 invoice will be rejected by most payers without complete and accurate information. ClientTracker is set up to facilitate the entry of this info before a 1500 is generated and submitted for payment. For more info, see <<368>>.
Here is a summary of information that should be completed before generating a 1500:
- Practice Info (on Settings/Practice)
- Practice name, address, phone, and NPI
- See <<245>> for more info
- Practice name, address, phone, and NPI
- Client (a.k.a. "patient") name and personal information (on the client's Personal page)
- Name, address, date of birth, sex, and 1500 occupation
- See <<26>> for more info
- Name, address, date of birth, sex, and 1500 occupation
- Practitioner information related to the 1500 (on each practitioner's Detail page, which is accessible via the practitioner portal on Settings/Practice)
- Name, address, phone, NPI and/or license number
- See <<240>> for more info
- Name, address, phone, NPI and/or license number
- Referring provider information related to the 1500 (on each provider's Detail page, which is accessible via the button on Settings/Practice)
- Name, NPI and/or license number
- See <<447>> for more info
- Insurance company information, including company preferences for how information is displayed on the 1500 (on the List and Detail screens)
- See <<464>> for more info
- See <<464>> for more info
- Information about the insurance policy being used by the client (on the client's Insurance screen)
- See <<569>> for more info
- See <<569>> for more info
- Information about the policyholder, or insured, if not the client (created and edited from the client's Insurance screen)
- See <<41>> for more info
If you click on some areas of the form, you are prompted to go to the relevant area in the program to change the information. This prevents discrepancies between information in the client record or client's insurance accounts records and the 1500 form. You can also go to these areas using the and buttons at the top of the form.
Tip: If you change anything about the client's insurance account, you may need to refresh the data on invoices created before the change was made. To do this, click the button at the top of the invoice. If you are experiencing any issues involving old data showing on invoices, give this a try first. (if you use this button you will lose your current found set and wind up working with just the current invoice.)
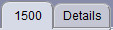
The 1500 screen is divided into two main tabs.
- 1500 - Laid out just like a 1500 form, with additional buttons and controls.
- Details - Access to 1500 details like line items and the Payment Palette related to the client visit(s) that are linked to the 1500 invoice. See below for more info.
The Functions Bar of a 1500 invoice has the same choices as a Simple or Superbill invoice.
Printing the 1500 Invoice![]()
The icon will print a 1500 claim form when the 1500 tab is open. Before printing 1500 forms you can choose whether to print on blank paper or preprinted forms as a default. This is done in the Settings/Programs/Financial tab. Most companies accept either.
Note: If the Details tab is open and there are Products on the invoice, the Print icon will print the information shown on that tab as a Superbill invoice. See <<122>> below for more info.
If you are printing on a pre-printed form, and find that your printer is not properly aligning the printed text with the form blanks, you can use the Adjust Printer Alignment link at the top of the page. It prompts you to enter incremental numbers in a pop-up window to shift the printout horizontally or vertically until it is correct. See <<596>> for more info.
Saving the 1500 Form
ClientTracker automatically saves information entered on the 1500 invoice, or form.
Other 1500 Functions
Insurance Company - When you create a 1500 invoice, the first active Insurance Policy in the client's list (on their Insurance screen) will be auto-selected, and the address of the insurance company will show. See <<464>> for more info.
- If the client has no active Insurance Policy, the Insurance Company label will be gray, and if clicked, the field will say
"no values defined." A message will tell you to click the button. If the client has only one active Insurance Policy, the menu for selection will have only the one option. Add another active Insurance Policy the client's Insurancetab, and it will show as an option in the menu. - If the client has more than one active Insurance Policy, click the Insurance Company field to select another.
- Use this button to access the client's Insurance screen, or to view the insurance policy being used for this 1500. This would be the first policy marked Active on the client's Insurance screen. The insurance company issuing this policy is the "insurance company of record" for the 1500.
- If the client has no active Insurance Policy, the button label will be red and say: "Set Up Insurance Policy"
- This will display the Detail screen of the insurance company of record for the 1500.
- If the client has no active Insurance Policy, or one has not been selected, the button label will be gray and say: "No Insurance Company"
Insurance Payer settings and invoice info- See <<122>> below, about the Details tab.
Other Functions
- Use this button to update information on the 1500 after it has been updated in any of the source screens, i.e. insurance policy, client or insured info, etc.
- This takes you to a single SOAP Note that is linked to the invoice. If multiple SOAP Notes are linked, it displays as "Go to x SOAP Notes," with "x" being the number of invoices. Multiple invoices are displayed on a list from which you can choose which SOAP Note to look at.
- If a SOAP Note has not yet been created for, or linked to this invoice, the button will say instead. The process of creating a SOAP Note after filling out the 1500 can have some effects on your data. For more info, see <<594>>.
- This button takes you to the E-Billing screen of the clearing house assigned to the insurance company of record for the 1500. See <<377>> for complete instructions on this process.
Change Invoice - At any time, you can click a button in this small panel to change the 1500 to a or invoice type.
- Use this button at the bottom right of the 1500 to void or delete the entire invoice. The same rules apply for voiding a 1500 invoice as for Simple or Superbill types; with the addition that a 1500 cannot be voided or deleted if it has been sent as a claim. See <<636>> for more info.
Comm Panel - At the bottom left of the screen are buttons to generate a communication with the invoice's client as the recipient. See <<153>> for more info.
The Details tab is where payments and adjustments are entered for a 1500 invoice. It also provides a place to view a summary of charges, discounts, and taxes related to the invoice. It is the only place to enter Products, although these do not show on the 1500 claim form.
Insurance Payer Information
- The Insurance Payer checkbox is autofilled, as a 1500 invoice is used primarily to bill insurance.
- Date Claim Sent - This fills automatically when e-billing is used along with a notation in the Private Notes field. You can also enter it manually. See <<599>> for more info.
- Total Expected - This amount calculates from the total of the invoice, minus any Copay amount entered for the client's insurance policy. You can click the field to enter an amount manually, but it cannot be more than the Total Due on the invoice. Click Total Expected at any time to re-enter the calculated amount.
- You can turn off the amount expected from insurance by going to Settings, Program, Financial, Insurance Options.
- Check the Final Insurance payment made box when appropriate (optional).
- Any separate amounts due from the insurer and client are displayed.
- See <<595>> for more info.
The Invoice Display
The Diagnoses subtab shows a portal of the Diagnosis Codes that have been entered for the visit, and a display of how they will be printed on the 1500. You can enter any codes by clicking the New button; however, the 1500 will display and print only unique, non-duplicate codes. See <<577>> below for more info.
The Procedures subtab displays a portal of the Procedure Codes that have been entered for the visit. You can add, edit, delete, or enter discounts for Procedures on this portal.
Warning: Any changes made to the Procedure or Diagnosis Codes on these portals (except discounts) will also change the corresponding information on the 1500 claim form and SOAP Note of origin.
The Products subtab displays any products purchased during the client visit. If you need to enter products separate from the visit(s) from which the 1500 is generated, it is a better practice to enter them on a separate invoice. For more info, see <<593>>.
Tip: Often, when referring to the 1500 as an invoice, the Diagnosis Codes, Procedure Codes, and Products are called "line items." Line Items for more than one visit - even on different days - can be combined on one 1500. See <<592>> for more info.
Tip: When the invoice has Products and you are on the Details tab, the Print icon in the Control Panel will print a Superbill invoice with all line items on the invoice, including products.
The other controls and displays on this tab are similar to those found on a Simple or Superbill invoice. For more info about the discount and sales tax displays, see <<117>>.
Invoice Payments
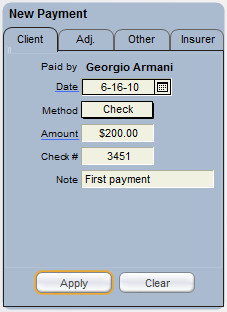
Payments are entered using the Payment Palette and managed on the Payments portal, just like the ones on the Superbill invoice. For more info, see <<638>>. This system is the best way to enter payments received for a single invoice.
To enter payments made by a client for multiple invoices, see <<49>>.
To enter payments made by an insurance company for multiple invoices (or claim forms), see <<468>>.
Tip: To have the total of payments made on the Payments tab show in box 29 (Amount Paid) on the 1500 form, see the instructions for that box below in <<578>>.
The 1500 tab of this invoice Detail screen is set up to look just like the 1500 Health Insurance Claim Form. Each area of the 1500 claim form is numbered. The numbered areas are referred to as "boxes." As mentioned above, much of the form is intended to be auto-entered from preexisting, or "source" information.
The auto-filled information from other sources cannot be edited in most areas of the 1500 screen. These areas have a thin blue border on the entry screen, and the Sources of their info are described below. If these areas are clicked, a message will ask you if you want to go to the source screen to change anything. If you do go somewhere else, click the button in the Functions Bar to return to the 1500 screen. Click the button if you have changed any source info, so it will be updated on the 1500 form.
Note: All of the information on the 1500 is important, but ClientTracker provides special reminders for critical info. If blank and needing to be filled in, the data entry fields on the form will show as a solid pink box.

Box 1 - Type of Health Insurance
Source = The insurance company's 1500 tab of preferences on its Detail screen
-- See <<463>> for more info
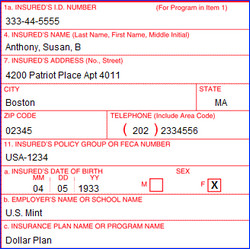
Boxes 1a, 4, 7, and 11a-c - Insured Information
Source = Policy info on the client's Insurance screen, and the Insured's Detail screen.
The Insured's phone number must be checked as "Insurance" to show in its area of Box 7.
-- See <<41>> for more info
Boxes 2, 3, 6, and 8 - Patient Information
Source = The client's Personal screen, and/or the Policy info on their Insurance screen.
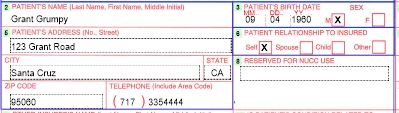
Tip: The patient's Address and Phone Number must be checked as "Insurance" on their record to show in this area.
-- See <<31>> for more info about addresses
-- See <<27>> for more info about phone numbers
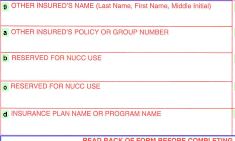
Box 9 - Other Insured Information
This can be filled out, if required, as related to coverage from a second insurance program. Once entered, this data is auto-filled in subsequently created 1500 forms for the same client, and can be changed at any time. See also 11d below.
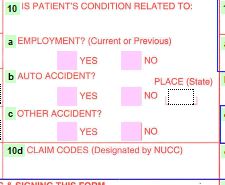
Box 10 - Patient's Condition
Enter information here about factors related to the client's condition.

Box 11d - Other Health Plan
Source = Policy info on the client's Insurance screen; or manually check this if the client is covered by a second health benefit plan. If yes, the insurance company may also require info in Box 9.
Boxes 12 and 13 - Signature on File?
Source = Client and Policy info on the client's Insurance screen
-- See <<620>> for more information
Physician or Supplier Information
Note: The bottom half of the 1500 can also be referred to as the "visit information," as it pertains to one or more client visits. Remember, an invoice can be linked to more than one SOAP Note. For more info, see <<498>>.

These should be filled out manually, as applicable, with information related to the client's current illness or condition.
Boxes 17, 17a, and 17b - Name of Referring Physician or Other Source
Source - This is auto-filled with the name of the provider in the client's Personal screen, on the Referrals tab. If this is blank, you can pick from a pop-up menu of active referral providers in ClientTracker. This list can be managed by clicking the Edit List link.
- Boxes 17a and 17b would be auto-filled first from the previous 1500, then from the record of the referral provider. Clicking these boxes will offer the choice of going there. See <<447>> for more info.

Boxes 19 and 20 - Reserved for Local Use
These are provided on the form for your own use, and can be filled in manually as needed.
Diagnosis Codes
Box 21, lines 1-4 - Diagnosis Codes
Source - These would typically be auto-filled from the Diagnosis Codes from the client's previous invoice. You can manually enter up to a maximum of four unique Diagnosis Codes on a 1500 by clicking the button, and choosing from the pop-up QuickFinder window. Click the Edit List link to manage the list of Diagnosis Codes.
ClientTracker displays the description of the code in italics for your reference only. It doesn't print out or get submitted electronically, only the numerical codes is submitted, as the official instructions specifically say "Do not provide narrative description in this field."
Note: If multiple SOAP Notes share a Diagnosis Code, or if a duplicate code is entered more than once, it will be displayed only once on the 1500 tab, printed form, or electronic billing file for Box 21.
Tip: Go to the Details tab to access an editable portal of all Diagnosis Codes entered. Codes can be entered on either tab. See <<588>> for more info.
To delete a Diagnosis Code, click the small delete button that appears to the left of its line number on the 1500 tab. This takes you to the Details tab; click on the right of its portal row on the Details tab. This also deletes the Diagnosis Code from its linked SOAP Note.
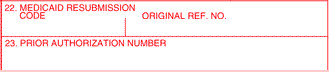
Boxes 22 and 23 - Information related to Medicaid (if applicable)
If these boxes need information for billing, you can enter it manually.
Box 24 - Procedure Codes
Source - Like Diagnosis Codes, the procedures for a 1500 would typically be auto-filled from those on one or more linked SOAP Notes, or from the client's previous invoice. You can enter up to a maximum of six procedures on a 1500; from one or multiple client visits. These will show as lines in Box 24 of the 1500, with additional info required that can only be entered there. For more detailed info, see <<592>>.
You can manually enter procedures for the client by clicking the button (in Box 24a), and choosing from the pop-up QuickFinder window. Procedure information can be edited on the 1500 tab or Details tab, but the 1500 tab is more comprehensive.
- 1500 tab - edit information related to the 1500, such as dates, modifiers, diagnosis pointers, rendering providers, and other info (see below).
- Details tab - edit description, quantity, price, and apply discounts like other invoices.
To delete a procedure, click the small delete button that appears just below a line number on the 1500, or on the right of the portal row on the Details tab. This will also delete the procedure from its linked SOAP Note.
Specific areas for each procedure can be edited in Box 24 (all enterable except as noted):
- 24a - Beginning and end dates of each procedure
- See <<592>>
for more info about editing these dates
- 24a (pink area) is available for additional data, as required by the client's insurance company.
- 24b - Place of service code
- 24c - Enter "Y" if this was an emergency procedure
- 24d - The CPT or Procedure Code is not editable, but you can edit the modifiers as needed
- 24e - Each procedure needs to be pointed to one or more diagnoses by the diagnosis line number 1-4. Pick a diagnosis or a combination of diagnoses that this procedure treated by clicking the box and selecting the appropriate combination of numbers.
- 24f - Charges will auto-enter from the the SOAP Note or Procedure Code of origin, and may be edited if required.
- 24g - Enter days or units for the procedure
- See <<597>>
for more info.
- See <<597>>
for more info.
- 24h - Enter "Y" if this was an EPSDT/Family Plan procedure
- 24i - A 2-digit Qualifier will be auto-entered from the Detail screen of the insurance company for the client's policy. Use the and buttons to change the auto-entry.
- 24j (pink area) is available for manual entry of a non-NPI identifier, if required by the client's insurance company.
- 24j - The ID qualifier and numbers are auto-entered from the Detail screen of the practitioner of record for the SOAP, or you can select an active practitioner manually (for just that procedure) from a pop-up menu by clicking 24j. The ID qualifiers and numbers are not modifiable on the 1500.
- For more info, see <<240>> and <<592>>.
Tip: At the bottom of the form, in the area marked "Defaults for boxes," you can enter default data for 24b, 24c, 24h, or 27, to be entered in future 1500 forms. For more info, see <<598>>.
Miscellaneous Info

Box 25 - Federal Tax ID Number
Source - The practioner's record
Box 26 - Patient's Account Number
Source - If you use a client ID or patient account numbers, the number assigned to the client will auto-enter here. See <<475>> for more info.
Box 27 - Accept Assignment?
This is left blank in most cases (see your 1500 instructions for more info). If needed, you can check either "Yes" or "No," and these will copy forward for the next 1500 for that client. Or set the default (in the gray area below Box 31) if you always want it to be "Yes" or "No."
Invoice Totals

Box 28 - Total Charge
The calculated total of all charges submitted on the 1500 in Box 24f. This cannot be edited. To change the total, adjust the Default for units in 24g or the way 24f works for the insurance company.

Box 29 - Amount Paid - The amount the patient and/or other insurance carrier has paid to you already for these services. By default, this box is blank to handle the different circumstances of when you submit the 1500.
To display an amount in this box, scroll down a little bit to the Defaults area and see "This invoice only: Box 29" below the form. Click in "Show payment" field to choose one of the following:
- "No" - The default, leaves the box empty
- "Copay" - The copay amount paid by client for this 1500. (This only works if the copay has already been entered on the the client's Insurance screen for the insurance policy, and a payment has been entered on the Details tab as a copay.)
- "Custom" - Choose this and then enter the amount in box 29 on the form. This does not include any payments already made on this 1500.
- "All payments" - The total of all payments made toward this invoice, as shown on the Payments tab
Calculated as the difference between Box 28 and Box 29. This cannot be modified.
Practice & Practitioner Info
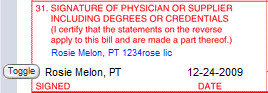
Box 31 - Signature
Source - The name of the Default practitioner for the client is auto-entered in this or if the 1500 invoice is linked to a SOAP Note, the practitioner for that visit.
The name and license number of the practitioner of record shows just above the signature line. Click the practitioner's name to view their Detail screen. Click the button to choose a display for the signature line itself:
- The full name and credentials of the practitioner (default), or
- The abbreviation "SOF" (signature on file), or
- Last Name, First Name of the practitioner
- Blank (to be signed after printing)
Note: The date shown in Box 31 is the date of the 1500 invoice. Click it to use a pop-up calendar to change the date, if necessary.
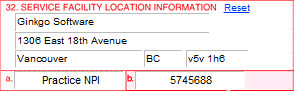
Box 32 - Service Facility Location
This is the name and address of the facility or place where the treatment was performed, and the NPI number associated with the facility. All the information in Box 32 auto-fills from the data filled in Settings/Practice tab.
For a different name or address, click in each of the fields to enter different data. For the next 1500 for this same client with the same practitioner, this manually entered data will be remembered. To make the practice address show again, click the Reset link.
IMPORTANT Starting January 2012, the new HIPAA 5010 rule requires the zip to have all 9 digits.
Box 32a - This will auto-fill with the Practice NPI. If you click in the field and type something, this will replace the Practice NPI for that invoice only.
Box 32b - If the client's insurance company requires a different qualifier and ID for the facility, this can be manually entered.
Source - The 2-character qualifier can be entered on the Detail screen of the insurance company, for auto-entry as a reminder.
Source - The practice address is filled in automatically, or you can manually enter address information. If you change the practice address, click the button.
Box 33 - Practitioner who performed the services
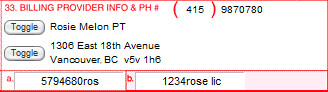
Source - This is auto-filled with either the practitioner or the practice name, address and NPI. To auto-fill for the practitioner: on the practitioner's Detail screen, check the box "Use practitioner's insurance address." If the practitioner has two or more addresses, make sure the correct address has the "Insurance" box checked. Starting January 2012, the new HIPAA 5010 rule requires the zip to have all 9 digits.
Note: Starting January 2012, most insurance companies will require your 1500 to follow the new HIPAA 5010 regulations for Box 33. The Billing Provider must be as follows:
-- If you do business as a corporation, this must be your corporation's name, address and NPI. For most practice's this will be the same as the Practice, Box 32, NPI. The Practitioner's NPI will still show in Box 24J
-- If the practitioner performs the services and will be paid does business an independent, non-incorporated individual, then the Practitioner's name, address and NPI may be used.
You have a variety of choices for how information is displayed in Box.33:
- To select a different practitioner for the 1500 invoice, select from the Change Practitioner pop-up menu just below.
- To display the practitioner's name as last name first, go to the Insurer detail screen and check that box on the 1500 tab. (It is an Insurer preference.)
- To display the name and NPI of the practice instead of the practitioner, click the button to the left of the name. Click it again to switch back to the practitioner.
- You can also use the button next to the address to switch between the practice address, and the practitioner's "insurance" address.
- Note: if you changed the Facility name address in Box 32 to be different from your default in Settings, this is the data that will show when you use the buttons for Box 33.
Box 33b - Other number for practitioner that an insurance company may require
Source - By default this contains the license number for the practitioner preceded by 'OB', which designates the state license number, IF you have set this to be filled on the insurance company's 1500 tab. Not all insurance companies require this. Other numbers can be entered here manually and will appear on future 1500 forms for that client.
- See your official 1500 instructions for more information.
When the 1500 is complete and ready to be sent for payment, you have two choices:

1. Electronic billing using a clearing house can be initiated for a single 1500, or in a batch. Click the button at the top of the 1500 data entry screen to get started.
- See <<377>> for more info
2. Printing the 1500 and mailing it to an insurance company is also an option. With the 1500 tab showing, click the icon and follow the prompts.
- See <<596>> for more info
Note: This feature is available only in version 5.1 and higher.
ClientTracker will often copy a previous claim form (aka "invoice") automatically based on your settings or user habits. If this is not done and you want to copy the previous invoice manually, look for the new button on the top left area of the invoice screen.
The Copy Previous Invoice button works only if 2 conditions are met:
- The claim cannot already have any Diagnosis, Procedures, or Products line items, and
- The previous claim must be for the same client and practitioner
The Copy From Previous button's actions cannot be undone, but the line items can be cleared or the invoice voided in the usual way.
NOTE TO THE READER: These instructions are somewhat redundant to the other sections in the manual about using the insurance claim form. The many little sections are used to link from the pop-up "1500 Instructions" found in version 5.1 and higher.
These instructions pertain to the 02-12 version of the HCFA CMS-1500 claim form, which is referred to as a "1500" type invoice in ClientTracker.
- If you have previously used the old 08-05 version of the 1500 in ClientTracker, see <<954>> below
- For general instructions on how the 1500 works in ClientTracker, see <<119>>
- To view the official NUCC Instructions (version 1.1, June 2013) click here
- Click here to visit the main NUCC website
More information about each box can be found on the Instructions tab of the 1500 Instructions pop-up in ClientTracker.
- The 1500 Instructions pop-up is accessed by clicking one of the green box labels on the 1500 data entry form in ClientTracker. See <<953>> for more info how this pop-up works.
TABLE OF CONTENTS FOR THIS SECTION
There is a detail in this section of the manual for each box on the 1500. In other parts of this manual, the information is provided by the parts of the form.
Part 1 - Top of the Form: Insurer and Policy Information
For more detail, see <<39>>
- <<952>>
- <<884>>
Part 2 - Patient and Insured Information
For a broad overview, see <<121>>
- <<883>>
- <<885>>
- <<886>>
- <<887>>
- <<888>>
- <<889>>
- <<890>>
- <<891>>
- <<892>>
- <<893>>
- <<894>>
- <<895>>
- <<896>>
- <<897>>
- <<903>>
Part 3 - Visit and Diagnosis Information
For a broad overview, see <<577>>
- <<898>>
- <<899>>
- <<900>>
- <<901>>
- <<902>>
- <<904>>
- <<905>>
- <<906>>
- <<907>>
- <<908>>
- <<909>>
- <<910>>
- <<911>>
- <<912>>
- <<913>>
- <<914>>
Part 4 - Procedure Codes and Related Information
For a broad overview, see <<645>>
- <<915>>
- <<916>>
- <<917>>
- <<918>>
- <<919>>
- <<920>>
- <<921>>
- <<922>>
- <<923>>
- <<924>>
- <<925>>
- <<926>>
- <<927>>
Part 5 - Practice & Practitioner Information
For a broad overview, see <<578>>
- <<928>>
- <<929>>
- <<930>>
- <<931>>
- <<932>>
- <<933>>
- <<934>>
- <<935>>
- <<944>>
- <<947>>
- <<936>>
- <<945>>
- <<946>>
THIS IS INTENDED FOR THOSE WHO HAVE USED THE PREVIOUS VERSION 08-05 ALREADY
Old claims that have not been billed yet, or those that need to be resubmitted, will need to be in the 02-12 version as of April 1, 2014. When you do this, ClientTracker saves all the info you have entered, and displays it on the new form.
To change an individual claim to the new version:
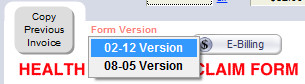
Click on the Form Version menu at the top, and select "02-12 Version"
To set ClientTracker so all new claims go to the new 02-12 version:
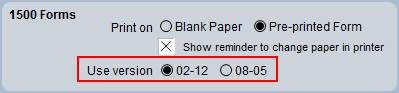
Go to the Settings area, and click the large Program tab. On the Financial subtab, in the lower right, in the 1500 Forms panel, click to Use version "02-12"
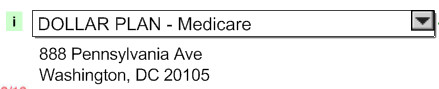
The "Carrier Block" is the white space at the top of the form showing the address of the Insurer (also called "Insurance Company." This is printed in the spot where it will show through an address window in an envelope, and is included in electronic submissions, too.
When you create a 1500 invoice, the first active Insurance Policy in the client's list (on their Insurance screen) will be auto-selected, and the address of the Insurer for that policy will show. See Insurance & Billing> Insurance Companies for more info.
- If the client has no active Insurance Policy, the Insurance Company label will be gray, and if clicked, the field will say "no values defined." A message will tell you to click the button.
- If
the client has only one active Insurance Policy, the menu for selection
will have only the one option. Add another active Insurance Policy the
client's Insurance tab, and it will show as an option in the menu.
- If the client has more than one active Insurance Policy, click the Insurance Company field (using the gray down arrow) to select another.
Not enterable on the screen - click the box to access source data

Source = The insurance company's 1500 tab of preferences on its Detail screen
- See <<463>> for more info
Not enterable on the screen - click the box to access source data

This could be the client, or another person, as defined by the choice made in Box 6.
Source = Policy info on the client's Insurance screen.
Not enterable on the screen - click the box to access source data

Source = The client's Personal screen, for the client of this appointment.
Not enterable on the screen - click the box to access source data

Source = The client's Personal screen, for the client of this appointment.
Not enterable on the screen - click the box to access source data

This could be the client, or another person, as defined by the choice made in Box 6.
Source = Policy info on the client's Insurance screen.
REQUIRED
Not enterable on the screen - click the box to access source data
- See <<740>> for more info

Source = The client's Personal screen, for the client of this appointment.
Note: The phone number is the one checked "Insurance" on the Phone tab. If no phone is checked, this will be blank.
Not enterable on the screen - click the box to access source data

Note: The choice made in this box tells ClientTracker where to pull the Insured info in Box 4, 7, and 11a-d.
Source = The client's Insurance screen, for the policy used for this claim.
REQUIRED
Not enterable on the screen - click the box to access source data
- See <<740>> for more info
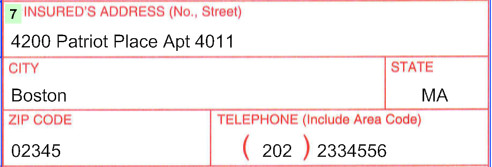
Note: This could be the client, or another person, as defined by the choice made in Box 6.
Source = Policy info on the client's Insurance screen.
OPTIONAL - Click to enter info only if required.
CHANGE - In the 08-05 version of the 1500, this showed the Patient's employment and marital status.
In the 02-12 version, this box is to remain blank unless specific information is required by the Insurer.
Source = None
OPTIONAL - Click to enter information only if required.

This can be filled out, if required, as related to coverage from a second insurance program. Once entered, this data is auto-filled in subsequently created 1500 forms for the same client, and can be changed at any time.
Source = None
OPTIONAL - Click to enter information only if required.

This box can be filled out, if required, as related to coverage from a second insurance program. Once entered, this data is auto-filled in subsequently created 1500 forms for the same client, and can be changed at any time.
Source = None
OPTIONAL - Click to enter information only if required.


CHANGE - In the 08-05 version of the 1500, this showed the Other Insured's date of birth, sex, and employer (or school).
In the 02-12 version, this box is to remain blank unless specific information is required by the Insurer.
Source = None
OPTIONAL - Click to enter information only if required.

This box can be filled out, if required, as related to coverage from a second insurance program. Once entered, this data is auto-filled in subsequently created 1500 forms for the same client, and can be changed at any time.
Source = None
USUALLY REQUIRED - Click to enter information.
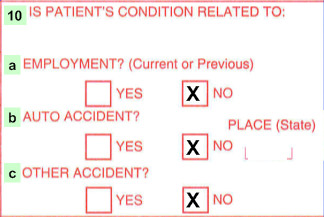
The check boxes can be filled out to describe factors related to the client's condition. (If 10b is "Yes," fill in the State.) Once entered, this data is auto-filled in subsequently created 1500 forms for the same client, and can be changed at any time.
Source = None
OPTIONAL - Click to enter information only if required.

CHANGE - This box was formerly labeled "Reserved for Local Use."
When applicable, use this box to report claim codes (e.g. for Worker's Compensation.)
Source = none
Not enterable on the screen - click the box to access source data.

This could be the client, or another person, as defined by the choice made in Box 6.
Source = Policy info on the client's Insurance screen.
Not enterable on the screen - click the box to access source data.

This could be the client, or another person, as defined by the choice made in Box 6.
Source = Policy info on the client's Insurance screen.
OPTIONAL - Click to enter information only if required.

CHANGE - In the 08-05 version of the 1500, this showed the Insured's employer (or school) name.
In the 02-12 version, this box is to remain blank unless specific information is required by the Insurer. You may enter a qualifier to the left of the dotted line if needed.
Source = None
Not enterable on the screen - click the box to access source data.

This pertains to the Insured, and could be the client or another person, as defined by the choice made in Box 6.
Source = Policy info on the client's Insurance screen.
USUALLY REQUIRED - Click a box to enter Yes or No.

Source = Policy info on the client's Insurance screen; or manually check this if the client is covered by a second health benefit plan. If yes, the Insurer may also require info in Box 9, 9a, and 9D.
REQUIRED
Not enterable on the screen - click the box to access source data.
- See <<620>> for more info

Source = There are two possible sources (both are the same field):
- Client Personal screen, on the lower right (under the Communications List), or
- On the Insurance screen, on the lower left in Box 12
REQUIRED
Not enterable on the screen - click the box to access source data.
- See <<620>> for more info
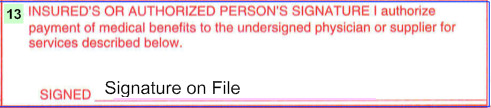
Source = Client Insurance screen, on the lower center in Box 13, check the box to indicate you have received an authorized signature from the Insured person. This is intended to indicate assignment of benefits to you, the provider.
ClientTracker will automatically enter "Signature On File" and the date when the source data is filled in.
USUALLY REQUIRED - Click to enter information.

CHANGE = A new 3 digit qualifier is required for the date. Click to the right of the dotted line to select.
Enter the date manually, as applicable, with information related to the client's current illness or condition. ClientTracker requires a 4-digit year.
Source = Beginning with v5.1, ClientTracker automatically enters the date of the appointment (if the 1500 is linked to a SOAP), or the date of the invoice (if it was created using the "New Invoice No SOAP" button. The qualifier 431 is automatically added.
OPTIONAL - Click to enter information only if required.

CHANGE = A new 3 digit qualifier is required, IF a date is entered in this field. Click to the right of the dotted line to select.
Enter the date manually, as applicable, with information related to the client's current illness or condition. ClientTracker requires a 4-digit year.
Source = none
OPTIONAL - Click to enter information only if required.

Enter two dates manually, as applicable, with information related to the client's current illness or condition. ClientTracker requires a 4-digit year.
Source = none
OPTIONAL - Click to enter information only if applicable.

CHANGE = A new 2-letter qualifier is required to explain the role of the provider. Click to the right of the dotted line to select.
Enter the date manually, as applicable, with information related to the client's current illness or condition. ClientTracker requires a 4-digit year.
- Click Edit List to see a list of all Referral Providers you have entered in ClientTracker
- Click clear to remove any selected Referral Provider
- If this is blank, click the field to pick from a pop-up menu of active Referral Providers
- For more info about Referral Providers, see <<447>>
Not enterable on the screen - click the box to access source data.
(Usually required, IF you fill in Box 17.)
- See <<861>> for more info

Source - Boxes 17a and 17b would be auto-filled first from the previous 1500, then from the record of the referral provider. Clicking these boxes will offer the choice of going to the provider's record IF Box 17 is filled in.
OPTIONAL - Click to enter information only if applicable.

Note: ClientTracker requires a 4-digit year.
Source = none.
OPTIONAL - Click to enter information only if applicable.
(Usually required for Worker's Compensation claims.)

Source = none
OPTIONAL - Click to enter information only if applicable.

Click the boxes to enter Yes or No. If yes, enter a dollar amount (no dollar sign).
Source = none
REQUIRED - Click the New button to add codes.
KEYBOARD SHORTCUT: Press Ctrl + Shift + D or the +New button to open the Diagnosis QuickFinder.

CHANGE - A single digit ICD Indicator is required in the upper right of this box. Click the area between the small dotted lines to enter or change the indicator.
- 9 = Only ICD-9 Codes are used on this claim
- 0 = Only ICD-10 Codes are used on this claim
Source - These would typically be auto-filled from the Diagnosis Codes from the client's previous invoice. You can manually enter up to a maximum of 12 unique Diagnosis Codes on a 1500 by clicking the button, and choosing from the pop-up QuickFinder window. Click the Edit List link to manage the list of Diagnosis Codes.
Tip: Go to the Details tab to access an editable portal of all Diagnosis Codes entered, which includes descriptive text not shown on the claim form. Codes can be entered on either tab, but can only be deleted from Details. See Invoices & Payments> 1500 Data Entry Tips>Entering Diagnosis Codes on a 1500 Invoice for more info.
To delete a Diagnosis Code, click the small delete button that appears next to it. This takes you to the Details tab; click on the right of its portal row on the Details tab. This also deletes the Diagnosis Code from its linked SOAP Note.
OPTIONAL - Click to enter information only if required.
(Usually pertains to Medicaid billing)

Source = none
(Usually pertains to Medicaid billing)

Source = none
Overview of Box 24
Box 24 is comprised of smaller sub-boxes labeled 24a through 24j, and is arranged in 6 rows. If needed, you can enter text in the pink shaded area of each row.
Like Diagnosis Codes, the procedures for a 1500 would typically be auto-filled from those on one or more linked SOAP Notes, or from the client's previous invoice. You can enter up to a maximum of six procedures on a 1500; from one or multiple client visits. These will show as lines in Box 24 of the 1500, with additional info required that can only be entered there. For more detailed info, see Invoices & Payments> 1500 Data Entry Tips>Entering Procedure Codes on a 1500.
You can manually enter procedures for the client by clicking the button (in Box 24a), and choosing from the pop-up QuickFinder window. Procedure information can be edited on the 1500 tab or Details tab, but the 1500 tab is more comprehensive.
- 1500 tab
- edit information related to the 1500, such as dates, modifiers,
diagnosis pointers, rendering providers, and other info (see below).
- Details tab - edit description, quantity, price, and apply discounts like other invoices.

To delete a procedure, click the small delete button that appears just below a line number on the 1500, or on the right of the portal row on the Details tab. This will also delete the procedure from its linked SOAP Note.
How to Bill Multiple Dates of Service on One 1500 Form
The 1500 form is essentially an invoice in ClientTracker. Multiple SOAP Notes can be linked to the 1500, which will show the cumulative Diagnoses, Procedures, and other information. See <<755>> for more information.
REQUIRED - If necessary, click to change information ClientTracker automatically enters. These are the beginning and end dates of each procedure.
- See Invoices & Payments> 1500 Data Entry Tips>Entering Procedure Codes on a 1500 for more info about editing these dates
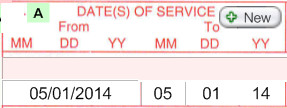
Source - ClientTracker will automatically enter the date of the invoice.
REQUIRED - Click to pick from the drop-down list if needed, or click the field again to enter manually. Different values you enter will be added to the drop-down list.
SET YOUR OWN DEFAULT - At the bottom of the form is a default for Box 24a.
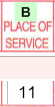
Source - ClientTracker automatically enters a presumptive "11," which is the code for your practice facility. Or, if you change the default at the bottom of the form, it will enter that instead. Other codes may be needed for other locations, such as a hospital or nursing facility. Check the Official NUCC instructions for complete information.
OPTIONAL - Enter "Y" only if this procedure was an emergency. Otherwise, leave blank.
SET YOUR OWN DEFAULT - At the bottom of the form is a default for Box 24c.
Source - none
REQUIRED - The CPT or Procedure Code is required, but not editable. Modifiers are optional, and may be entered manually by clicking a field, or they can be stored with the Procedure Code in ClientTracker.
- See <<258>> for more info.
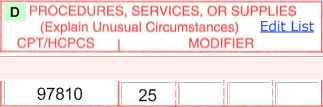
Source - The procedure code(s) entered on the SOAP Note, or the previous invoice if you have chosen that option in the practitioner's record.
REQUIRED - Each procedure needs to be pointed to one or more diagnoses by the diagnosis line letter A-L. Click the box to enter up to 4 letters. What you need to enter is decided by how many diagnosis codes you have entered, and to what diagnosis codes the procedure pertains.
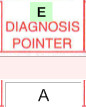
Source - ClientTracker enters an "A" to get you started. This happens when the procedure is added to the form, so if you change any diagnoses, or need a different set of pointers (letters), you will need to recheck this box to make sure it's correct.
Notes and Billing Tips:
In most cases when copying the previous invoice, if it was the old 08-05 version of the 1500, any numeric diagnosis pointers will be changed to "A" to avoid claim rejections. It is the responsibility of the practitioner or biller to ensure the pointer is accurate.
Usually it is not necessary to have anything other than an "A" in this box. Only if the payer wants a more specific pointer should you change it.
REQUIRED - Click to edit if you need to add or change anything.
SET YOUR OWN DEFAULT - At the bottom of the form is a default for Box 24f, which qualifies the "Days or Units" entered in Box 24g.
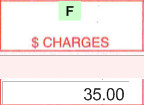
Source - Charges will auto-enter from the the SOAP Note or Procedure Code of origin, and may be edited if required.
REQUIRED - Enter days or units for the procedure. Check to see what the payer requires in this field.
Source - This comes from the "quantity" for the Procedure entered on the SOAP Note, but check the additional info above to see what this means.
OPTIONAL - Enter "Y" if this was an EPSDT/Family Plan procedure.
SET YOUR OWN DEFAULT - At the bottom of the form is a default for Box 24h.

Source - none
OPTIONAL - Enter a 2-character qualifier from the drop-down list, only if required by the payer.
Source - Manual entry, OR A 2-digit Qualifier will be auto-entered from the Detail screen of the insurer record for the client's policy.
- Use the and buttons to change the auto-entry.
- If the value in this field is "0B" or "1B" it could change the value in Box 24j (see below)
REQUIRED - (white area) Click in the white area to enter a NPI from the pop-up menu only if required by the payer. The list is from your active practitioners and their NPI numbers. The ID qualifiers and numbers are not modifiable in the white area once entered - they can only be changed in the practitioner's record.
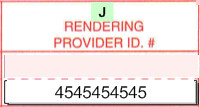
Source - (white area) The ID qualifier and numbers are auto-entered from the Detail screen of the practitioner of record for the SOAP, or you can select an active practitioner manually (for just that procedure) from the pop-up menu by clicking the white area of 24j.
- 24j (pink area) is available for manual entry of a non-NPI identifier, if required by the client's insurance company.
- If you change Box 24i (pink area) to "0B" then 24j (pink area) will look up the license number of the practitioner on the invoice
- If you change Box 24i (pink area) to "1B" then 24j (pink area) will look up the value (if any) entered in the Insurer's 1500 tab
- AUTO-ENTRY:
If both 24i and 24j are filled in on the Insurer's 1500 tab, those
values will be auto-entered in the respective boxes when the invoice is
generated. To add these to an invoice already created, use the Refresh Information button.
- For more info, see Settings> Practice>Create and Manage Practitioners and Invoices & Payments> 1500 Data Entry Tips>Entering Procedure Codes on a 1500.
REQUIRED - Not enterable on the 1500. May be changed in the practitioner's record.
- The EIN and SSN boxes are also controlled on the practitioner's record.

Source - Comes from the Tax ID for the practitioner of record.
OPTIONAL - Not enterable on the 1500. To change or add this, go to the Client's record.
- See Clients> Client Personal Tab>Client Identifiers for more info.
Source = If you use a client ID or patient account numbers, the number assigned to the client will auto-enter here.
OPTIONAL - This is left blank in most cases (see your 1500 instructions for more info). If needed, you can check either "Yes" or "No," and these will copy forward for the next 1500 for that client.
SET YOUR DEFAULT - (in the gray area below Box 31) if you always want it to be "Yes" or "No."

Source = none
REQUIRED - Not editable on the 1500.
- To change the total, adjust the Default for units in 24g or the way 24f works for the insurance company.
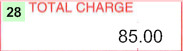
Source = The calculated total of all charges submitted on the 1500 in Box 24f. This cannot be edited.
OPTIONAL - The amount the patient and/or other insurance carrier has paid to you already for these services. By default, this box is blank to handle the different circumstances of when you submit the 1500.
To display an amount in this box, scroll down a little bit to the Defaults area and see "This invoice only: Box 29" below the form. Click in "Show payment" field to choose one of the following:
- "No" - The default, leaves the box empty
- "Copay"
- The copay amount paid by client for this 1500. (This only works if
the copay has already been entered on the the client's Insurance screen for the insurance policy, and a payment has been entered on the Details tab as a copay.)
- "Custom"
- Choose this and then enter the amount in box 29 on the form. This
does not include any payments already made on this 1500.
- "All payments" - The total of all payments made toward this invoice, as shown on the Payments tab
Source = The calculated total of your choice above.
OPTIONAL - Click to enter info only if required.
CHANGE - In the 08-05 version of the 1500, this showed the Total Due.
In the 02-12 version, this box is to remain blank unless specific information is required by the Insurer.
Source = None
REQUIRED
The name and license number of the practitioner of record shows just above the signature line. Click the practitioner's name to view their Detail screen. Click the button to choose a display for the signature line itself:
- The full name and credentials of the practitioner (default), or
- The abbreviation "SOF" (signature on file), or
- Last Name, First Name of the practitioner
- Blank (to be signed after printing)
Note: The date shown in Box 31 is the date of the 1500 invoice. Click it to use a pop-up calendar to change the date, if necessary.
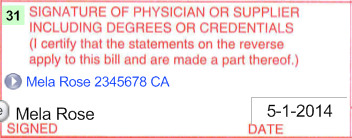
Source - The name of the Default practitioner for the client is auto-entered in this or if the 1500 invoice is linked to a SOAP Note, the practitioner for that visit.
REQUIRED
This is the name and address of the facility or place where the treatment was performed, and the NPI number associated with the facility. All the information in Box 32 auto-fills from the data filled in Settings/Practice tab.
To manually enter a different name or address, click in each of the fields. For the next 1500 for this same client with the same practitioner, this manually entered data will be remembered. To make the practice address show again, click the Reset link.
IMPORTANT - The HIPAA 5010 rule requires the zip to have all 9 digits.
- See <<861>> for more info
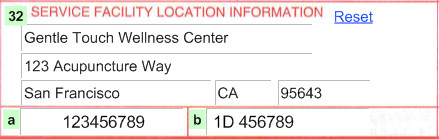
Source - The practice address is filled in automatically, or you can manually enter address information. If you change the practice address, click the button.
REQUIRED) - This will auto-fill with the Practice NPI. If you click in the field and type something, this will replace the Practice NPI for that invoice only.
Source - The Practice NPI is found in Settings, on the main Practice tab.
OPTIONAL - If the client's insurance company requires a different qualifier and ID for the facility, this can be manually entered.
Source - This can be automated for every claim for a particular insurance company, IF you fill the info in on the insurance company's 1500 tab. Or you can enter the data directly on the 1500 claim, then it will appear on future 1500 forms for that client & the same practitioner.
- Type in this field directly, and it will copy forward based on your rules for Copy Previous Invoice
- On the Insurer record, enter values that will show in combination:
- A 2-digit identifier in the Qualifier field, choose from the drop down list
- If this field is filled in on the Insurer's record, it will be used
- if 0B is chosen, then the practitioner's State license # will fill in.
- Up to an 11-digit number may be entered in the Optional field
- If both fields are filled in on the Insurer's record, they will be combined
- Click "Refresh Information" to update an existing 1500 form with new information
- See the NUCC official 1500 instructions for more detail
REQUIRED
You have a variety of choices for how information is displayed in Box 33:
- To select a different
practitioner for the 1500 invoice, select from
the Change Practitioner pop-up menu just below.
- To display the practitioner name as last name first, go to the Insurer's detail screen and chack the box in the 1500 tab.
- To display the name and NPI of the practice instead of the
practitioner, click the button to the left of the name.
Click it again to switch back to the practitioner.
- You can also use the button next to the address to switch between the practice address, and the practitioner's "insurance" address.
- Note: if you changed the Facility name address in Box 32 to be different from your default in Settings, this is the data that will show when you use the buttons for Box 33.
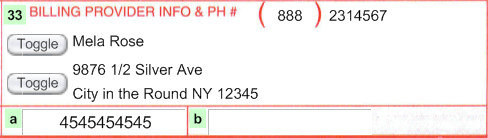
Source - This is auto-filled with either the practitioner or the practice name, address and NPI. To auto-fill for the practitioner: on the practitioner's Detail screen, check the box "Use practitioner's insurance address." If the practitioner has two or more addresses, make sure the correct address has the "Insurance" box checked. Starting January 2012, the new HIPAA 5010 rule requires the zip to have all 9 digits.
Note: Starting January 2012, most insurance companies will require your 1500 to follow the new HIPAA 5010 regulations for Box 33. The Billing Provider must be as follows:
-- If you do business as a corporation, this must be your corporation's name, address and NPI. For most practice's this will be the same as the Practice, Box 32, NPI. The Practitioner's NPI will still show in Box 24J
-- If the practitioner performs the services and will be paid does business an independent, non-incorporated individual, then the Practitioner's name, address and NPI may be used.
Tip: Information entered into these boxes will duplicate for the same client when seeing the same practitioner, if you have the latter's record set to copy for subsequent visits.
REQUIRED - NPI Number for the practitioner of record for the 1500 is the default only if you have checked the box "Use practitioner's insurance address"on the practitioner Detail screen. If you toggle the name for Box 33 to the Practice, the practice NPI displays.
Source - From the NPI number in the record of the practitioner in Box 31.
OPTIONAL) - Other number for practitioner that an insurance company may require
Source - This can be automated for every claim for a particular insurance company, IF you fill the info in on the insurance company's 1500 tab. Or you can enter the data directly on the 1500 claim, then it will appear on future 1500 forms for that client & the same practitioner.
- Type in this field directly, and it will copy forward based on your rules for Copy Previous Invoice
- On the Insurer record, enter values that will show in combination:
- A 2-digit identifier in the Qualifier field, choose from the drop down list.
- If "0B" State License Number is chosen, then the License Number will fill in from the record of the Practitioner on this invoice.
- If any other Qualifier is chosen, it's best to fill in the Optional field as well.
- Up to an 11-digit number may be entered in the Optional field
- If both fields are filled in on the Insurer's record, these will be used
- Click "Refresh Information" to update an existing 1500 form with new information
- See the NUCC official 1500 instructions for more detail
UNDER CONSTRUCTION
Note: This feature is available only in version 5.1 and higher.
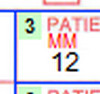
Click the little green number for any box on the 1500, and the "1500 Instructions" pop-up window will open. This window must be dismissed before you can continue working with the 1500. It has the following features, arranged on tabs.
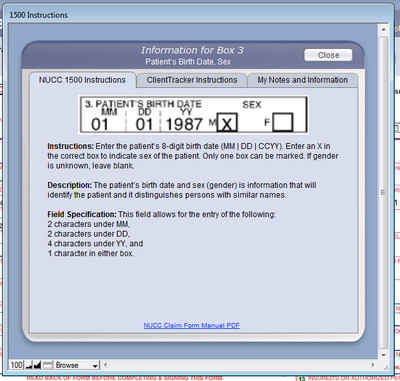
NUCC 1500 Instructions
These are taken directly from the NUCC 1500 Instructions, v1.1 0613 for the 02-12 Version. To see if there have been any updates since June 2013, check the NUCC web site: http://www.nucc.org.
ClientTracker Instructions
This tab has a link directly to this online manual for the box that you clicked. Below this link are "Pro Tips" that are provided as a suggested convenience only. In all instances, the official NUCC Instructions take precedent over ClientTracker's helpful suggestions.
My Notes and Information
This is where you can make the pop-up instructions your own. Enter any updated instructions, notes, or tips you have discovered for each box. Use the information to train new employees, or save the URLs of useful websites.
Click the Close button when you are done to save any info you entered and return to the 1500 form.
Tip: It is best to enter payments for a single invoice on the invoice itself.
Details in this section include:
- <<639>>
- <<640>>
- <<691>>
- <<641>>
- <<695>>

1. From the Payment Palette, where a payment is entered for just the current invoice.
The Payment Palette is on the lower right of the invoice Detail screen, and is labeled "New Payment" or "Edit Payment" depending on the task. (Example at left)
2. From the client's Invoices screen Payment On Account (POA) tab, where a payment can be entered and distributed to multiple invoices for that client.
The button on the right side of the invoice Detail screen takes you to the client's record to make a POA. See <<47>> for more info.
3. From an insurance company's Payments tab, where a payment can be entered and distributed to multiple invoices for different clients.
The button on the right side of the invoice Detail screen on a Superbill and 1500 only takes you to the insurance company's record to enter a payment. See <<468>> for more info.
Insurance Payer Information Superbill and 1500 only
Click the Insurance Payer checkbox to open the small panel, shown at left.
Date Claim Sent - This fills automatically when e-billing is used, or you can enter it manually when you mail it.
Total Expected - This amount calculates automatically from the total of the invoice, minus any Copay amount entered for the client's insurance policy. Click in this field to change it to a different amount.
The amounts due from the insurance company and client will display at the bottom of the panel, and in the Status field of the invoice List screen
Check the Final Insurance payment made box when appropriate (optional)
Note: The Insurance Payer panel shows automatically at the top of both tabs of the 1500 invoice.
Deleting a Payment from an Invoice
To delete a payment, click the delete button at the right of its row in the Payments portal. Deleting a payment is subject to the same rules as editing. See <<640>> below for more info.
Making Payments & Adjustments to an Invoice
To begin, select a tab of the Payment Palette based on the source of the payment. Your choices are: Client, Adj. (Adjustment), Other, and Insurer. The Insurer tab shows only on the 1500 invoice or on the Superbill if he Insurance Payer box is checked.
Client tab - These instructions are for all the tabs, unless noted.
Date - Click the blue underlined Date to enter today's date, click it again to put in the date of the invoice. A 3rd click blanks our the date, for your entry. Or click the icon to select from a drop-down calendar.
Method - Choose Cash, Check, Credit Card, EFT (Electronic Funds Transfer) or Gift Cert. If Credit Card is chosen, additional entry boxes will appear below.
Copay - The Copay checkbox will show next to Method only there is a selected insurance policy, and it has a Copay set up. See <<38>> for more info.
Note: If the client is making a copay then always check the Copay box. This is important because it affects the way ClientTracker calculates the payment. You may also also want to enter an amount in the 'Total Expected' box on the right side of the screen (see above). This amount should be the total amount due minus the client's co-pay amount, and minus any Products or other items that would not be covered by insurance.
Amount - Click the blue underlined Amount to enter the Total Due at the bottom of the invoice. Or, you can enter any amount up to the invoice Total Due. A warning will appear if you exceed this amount. The Amount should be a positive number.IMPORTANT: When all payment information has been entered, click the Apply button, and it will be transferred to a new row in the Payments portal of the invoice, to the left. The Clear button will remove all information entered in the Payment Palette. If you move away from an invoice before clicking Apply, any info entered here will be cleared.
Check # - Optional, unless you have selected in Settings/Program/Financial to be prompted to enter this. Displays on the Deposit Slip.
Note - Optional - This will show in the Details column of the Payments portal
Adj. tab Adjustments
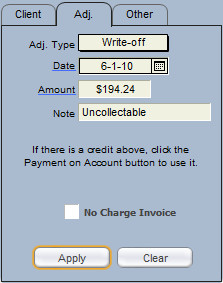
Use this tab for entering adjustments to the invoice that are not payments; e.g. a Write-off or No Charge Invoice. The functions are the same as for the Clients tab, except as noted below.
Adj. Type - Select Comp, Trade, or Write-off from the pop-up menu. (this list cannot be modified). Enter an amount as a positive number, and it will be subtracted from the Total Due and appear in the Payments portal when is clicked.
No Charge Invoice - Clicking this will enter 100% global discounts for Products and Goods on the invoice. See <<608>> for more info.
Note: If you want to make a payment using available credit, or to enter a prepayment, click the Payment on Account button.
Other tab
If the source of the payment is someone other than a client or insurance company in ClientTracker, (e.g. a fund, a parent, friend or caregiver), use this tab to make a payment.
The functions are the same as for the Clients tab; except for Paid by.
Paid by- The name of the person or entity making the payment. The payment will appear in the Payments portal when is clicked. This name also shows on the Deposit Slip and Payments Log.
Insurer tab (Insurance) -- Superbill & 1500 only
Entering a payment from an insurance company here. The functions are the same as for the Clients tab; except as noted below.
Payer - Preselected as the insurance company for the policy assigned to that invoice.Note: The Ins. tab does not show on the Simple invoice, or if there is no Insurance Payer selected for the Superbill invoice.
Method - Only Cash and EFT methods are possible for an insurance payment.
Once a payment has been entered via the button on the Payment Palette, it becomes part of the invoice. All payments made directly on the invoice or distributed from a POA will show in the Payments portal, which is not editable.

To edit a payment, click the small Edit link at the right of a portal row. This will load it into the Payment Palette, where it can be edited. After making changes (subject to the rules below), click to save the changes, or to leave the payment the way it was.
The little printer was added next to the edit link, to allow you to print a receipt for the payment without printing the whole invoice.
IMPORTANT RULES
The following rules apply when editing payments:
- The payment will load in the tab from which it originated. You cannot change the origin; e.g. a Client payment cannot be edited to be an Insurance payment.
- A payment that has been deposited and reconciled cannot be edited.
- If deposited and/or cleared, you may edit it after confirmation.
- If the invoice is Paid, you will get a warning but can still edit the payment if you choose.
- A payment cannot be edited to be more than the invoice Total Due.
- A payment (a.k.a. distribution) from a Payment on Account can only be edited on the POA screen of the payer
- For more info on client POAs, see <<47>>.
- For more info on Insurance POAs, see <<468>>.
- The payment Method cannot be changed.
- A Credit that shows in the Payments portal cannot be edited.
Warning: Changing any Payment info after an invoice has been paid in full will alter the Invoice Total, which could result in a Total Due that requires further adjustment. Changes to a payment will also affect the Balance of a client's account.
When you edit a payment for an invoice that has the Insurance Payer box checked, ClientTracker will recalculate the amounts "Due from" the Client and Insurer in the Insurance Payer panel. If the edited payment amount is more than what is "Due from" the Client or Insurer, a detailed message will offer you the option to:
- Revert the payment to be what is Due (in case you entered a larger amount by error)
- Adjust the amount "Due from" the Client and/or Insurer
Tip: You can always manually adjust the Total Expected from the Insurer, to recalculate the "Due from" amounts and rectify any discrepancies.
To delete a payment, click the delete button at the right of its row. Deleting a payment is subject to the same rules as editing.
Definitions:
- Reduction = The process of reducing the Total Due of an invoice by entering a new, negative line item on an invoice, or reducing the Quantity of an existing line item.
- Credit = Available when the invoice has a negative Total Due. Only clients can receive a Credit.
About Reductions

- A reduction can be made on any invoice, at any time
- Reduce the Quantity of an existing line item to cause a reduction in the Amount of the line item, which will also reduce the Total Due
- The resulting Qty can be positive or negative; but not zero
- You can also enter a new line item with a negative quantity
- The default Price of a Product or Procedure Code can be made negative on their respective source records
- The reduction of a line item also reduce sthe Sales Tax (if any) for that line item.
- The Total Due can be reduced to be a positive or negative number
- A line item reduction will also appear on the linked SOAP Note (if any)
- A reduction will reduce the Total Expected from Client, when an invoice has an Insurer Payer
About Credits
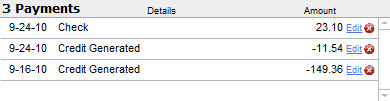
- A Credit can only be generated from an invoice with a negative Total Due
- When a Credit is generated, it is permanent and cannot be undone. (The delete button on the Payments portal will not work.)
How to Generate a Credit

When an invoice has a negative Total Due, the button will be visible at the bottom of the entry layout.
Click , and a confirmation message will show. Confirm by clicking , or to abort.
- A negative "Payment" will show in the invoice's Payments portal, equal to the entire negative Total Due amount, as Credit Issued
- The invoice Total Due will balance out to zero
- The "Total Expected from Client" will be adjusted to reflect the new Total Due
- A positive POA will be created for the invoice's client, as Credit Generated. This happens behind the scenes - you will remain on the invoice entry layout.
- The Posting Log will show both the the negative "Credit Issued" and the positive "Credit Generated"
Tip: To immediately distribute or refund a POA created with a Credit, click the Payments on Account button above the Payment Palette.
Refunds
Refunds can only be issued to a client from the Invoices tab of the client's record, on the Payments on Account tab. For brevity, a Payment on Account is often referred to as a "POA" in this manual. A POA can be created on this screen or from the Generate Credit button on an invoice.
- To make a refund, click the Ref. link on the row of a specific POA with a balance available to be distributed. See <<571>> for specific instructions.
Returned Products
The optimum way is to process one or more returned items is on the original invoice on which the item(s) were sold. This way you have a history on the invoice and its SOAP of what transpired. You can create a new invoice and put a negative line item; however, this is not the recommend way.
On the original invoice, enter a new Product line item with a negative number in Qty equal to the quantity of that item being returned (see below). Both the negative quantity and the Amount show as blue text with a pink background.

- Reduced or negative quantity on a Product line item will be adjusted in the past history of the Inventory Transactions for that product. If the product is not resalable or is not returned to active stock, you can adjust the Quantity on Hand for that item. See <<649>> for more info.
- Any sales tax charged on that item will also be reduced when the quantity is reduced. If a negative quantity is entered, the sales tax will be calculated as a negative. All Products and sales tax will show on their respective reports.
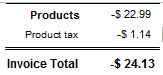
Note: The Amount Expected from the Insurer (if any) may need to be adjusted after a refund or return. ClientTracker will recalculate this when an invoice's Total Due is adjusted; however, there may be a Copay or other factors that affect the amount actually due from the Insurer and Client.
Tip: If a Return results in a negative Total Due, that can be made into a Credit for the client. See <<691>> above for more info.
In those rare cases when an Insurer makes an overpayment and you need to make a corresponding adjustment, this can be handled directly on the invoice.
- Go to the invoice and open the Adj. tab
- If the Insurance Payer box is checked, the pop-up menu for Type will have an additional choice: Overpayment. Select this and enter the amount of the overpayment as a negative number.
- Enter Notes or other info as needed
- Click , and the Overpayment amount will show as a negative payment on the invoice, which will increase the Total Due.
Details in this section include:
- <<124>>
- <<125>>
- <<647>>
- Use of the Register is optional. Other ClientTracker functions will work fine if the Register is not used.

To enable use of the Register, go to the Settings/Program/Financial tab, and click "Use the Register." Automatic Register entries will be made by ClientTracker only if this box is checked.
The Financial area will display the Register tab if you have enabled use of the Register.
Note: This is not a full fledged accounting program. It tracks one checking bank account. At this time, it can only track deposits and credit cards from the day you activate it; not any earlier payments.
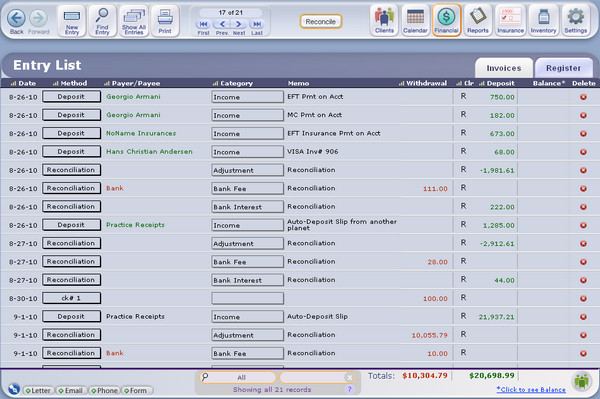
The main Register screen is set up like a checkbook register, with the most recent enties made at the bottom. When you click the Register tab from the Financial Area, you will go to the bottom of this screen with the entries sorted by date. New entries are added in date order at the bottom.
Functions and information on this screen:
- Click a column header to sort the currently displayed entries.
- Use thw QuickFinder at the bottom of the screen to find a single entry or isolate sets of entries by criteria.
- If an entry has not been reconciled, you may edit it at any time. See <<125>> below for more info on the editable fields.
- The totals of the Withdrawal (red) and Deposit (green) columns show at the bottom of the screen, and are updated each time an entry is made.
- To see a running balance (like a checkbook or ledger), click the link at the bottom: *Click to see Balance. If passwords are enabled, only those with Admin privileges can see the Balance.
Register Control Panel
- Creates a new manual entry with today's date, at the bottom of the Register screen.
- Goes to the Find Register Entry screen, where one or more entries can be found and displayed as a "found set" on the main screen for printing or processing. See <<125>> below for more info.
- After working with a found set of entries, click this icon to revert the Register to show all entries.
- Offers a choice of printing:
-- a chronological list of the currently displayed withdrawals and deposits, or
-- a report of Income and Expenses sorted by Category

- Begins the process of reconciliation. See <<647>> below for more info.
How Register Entries Are Created
Automatically with Method = Deposit
1) When a deposit is made using the Deposit Slip report in the Reports area. Running this report will create a single entry in the Register equal to the amount of the deposit, which should reconcile with your bank statement.
2) Whenever a payment is entered as a client or insurer Payment on Account (POA).
- For more info about client POAs, see <<570>>
- For more info about insurer POAs, see <<468>>
3) Whenever a credit card or EFT payment is entered on an invoice
- For more info about invoice payments, see <<639>>
Manually with Method of Your Choice
4) Click the icon to create an entry directly in the Register
Editable Fields in a Register Entry
Date - If you manually create an entry, the current date is auto-entered. You can change this as needed with the drop-down calendar.
Method - Choose a description of the type of entry from the non-editable pop-up menu. You can choose any combination of Method with other entry info, but each Method is usually for a Withdrawal (W) or Deposit (D).
- Check (W) - When you select this Method, an incremented Check # appears in a box. Change it or click OK to use it. (This will always be one more than that last Check # used.)
- Debit Card (W) - For use with payments made other than by check.
- Deposit (D) - This is used for automatic entries, and may be used for other deposits as well.
- Adjustment (W or D) - This is used for an entry made during reconciliation, and may also be used for a manual adjustment that is positive or negative.
- Bank Fee (W) -
- Bank Interest (D) - These are used for any entries made during reconciliation, but may also be used for a manual entry.
- EFT (W) or (D) - For electronic fund transfers
- Reconciliation (W) or (D) - Entered automatically during reconciliation, or you may use it for a manual entry. See <<647>> below for more info.
Category - This field indicates your choice to categorize a transaction, such as income, interest accrued, rent, and so on. Note that there is a Report that will sort Withdrawals and Deposits by Category, so this could be a good way to set up useful information.
- Select a value from the pop-up menu, or "Other..." to enter something else and add it to the list for next time. (When you first use the register, there could be no values yet - this is a list of every Category entered so far.)
Withdrawal - Enter an amount in this column for funds withdrawn or paid out. Withdrawals appear in red text.
Clr - This is a control for reconciling or "Clearing" entries. When you click this blank field, a "C" will appear, indicating an entry has cleared the bank. Click the "C" again to clear it. You may want to use this function to mark all checks that have cleared when your bank statement arrives.
Note: When you reconcile the Register, an "R" appears in the Clr column for every entry that has been reconciled. Clicking an "R" will give you the option to un-reconcile the entry.
Deposit - Enter the amount of a deposit or funds received. Deposits appear in green text.
Balance - The balance column will show a "running balance," or the balance after each entry. This will only show if you click the link at the bottom of the screen,*Click to see Balance.
- If passwords are enabled, only Admin can see the Balance
- Blank = Entry may be deleted after confirmation
- C = Entry may be deleted after a warning and confirmation
- R = Entry may not be deleted
Tip: Reconciling the Register with your bank statement is a process that should be done from start to finish and not interrupted for best results.
This function lets you enter the ending balance from your bank statement in the register, and add bank fees and subtract interest accrued to make the balances equal. After the reconciliation process, you can also generate new entries that are missing from the Register, or correct errors in entries if necessary.
- You can also reconcile your bank statement with the Register from Reports are, in the Reconcile area by running the "Bank Statement" report. See <<205>> for more info.
Part 1 - Statement Entry
1. Click the button in the Control Panel, and in the successive pop-up boxes, enter:
- the Statement date (MM/DD/YYYY)
- the Ending Balance from the Statement (no dollar sign needed)
- the total of any Bank Charges of fees shown on your Statement (click "Skip" if none)
- the total of any Bank Interest or other earnings shown on your Statement (click "Skip" if none)
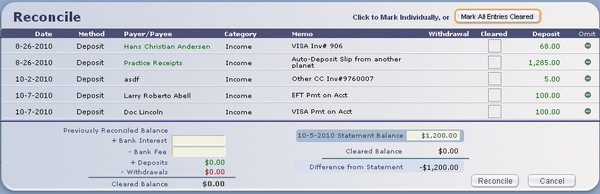
Part 2 - Reconciliation
2. On the Reconcile screen, click the "Cleared" box for all entries that appear on your Statement, or click the button and unclick the ones you don't see. As you click each item, it shows as "C" and its amount is added or subtracted from the Cleared Balance at the bottom of the screen.
- When you are finished marking entries as Cleared, if the statement balance and new balance amounts are equal, the account is reconciled.
Part 3 - After Reconciliation
4. If you choose to , you will return to the main Register screen, where all the cleared items will be marked with an "R" for reconciled.
Note: If the entry was made from an invoice Payment or POA, once it is marked "R" for reconciled it cannot be edited or deleted from other places in ClientTracker. You can click the "R" on the Register entry to blank the Clr column; after which the Payment or POA (or the Register entry) can be edited or deleted as necessary.
Warning: The Register entry amount is not connected with the amount of its invoice Payment or POA of origin. If you make a change in one place; it is not made in the other. Care must be taken to keep Register entries and Payments reconciled.
This section contains the following details:
- <<463>>
- <<600>>
- <<466>>
- <<985>>
ClientTracker is set up with the assumption that if a practice is
receiving payments from insurance companies, then most likely it
submits 1500 claims to the insurance company for reimbursement.
- Some practices print and send insurance claims directly to the insurance company
- Some practices bill claims electronically through a clearing house, using "E-Billing"
- Some practices like to receive full payment from the client and then print out either the 1500 or the Superbill to give to the client, who then sends it to their insurance company for reimbursement.
Whatever your practice's preference, there is a method in ClientTracker to handle it. For best results, you should conform your practice's billing procedures as much as possible to work with ClientTracker.
For more information on how the insurance claim form, or "1500" works in ClientTracker, consult the following areas of this manual:
- How to fill out a 1500 - see <<119>>
- More detail about the 1500 - see <<599>>
- Tips for avoiding rejected claims - see <<368>>
For the most complete information, consult the 1500 instructions published by the National Uniform Claim Committee.
The Insurance Company List Screen
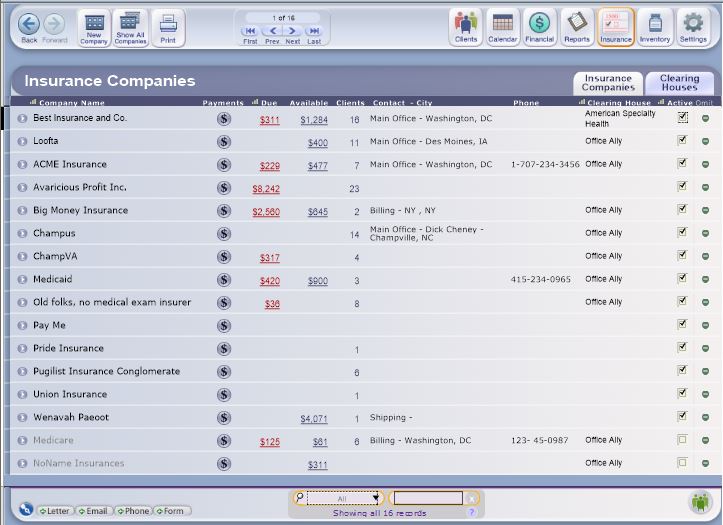
Click the Insurance icon in the Functions Bar to access the Insurance Companies List screen. All the main screens in the Insurance Area have three button choices in the Control Panel:
- - Create a new, blank record to enter details about an insurance company
- - Show all insurance companies in ClientTracker on the List screen, sorted alphabetically with Active companies showing first.
- - Print a simple list of the insurance companies shown on the screen.
List Screen Functions
Sort the records in the list by Company Name, Clearing House, or Active.
For each row (insurance company) in the list...
- Click the button or a row to view the Details screen (see below)

Click the button to view the Payments screen (see <<467>> for more info)
- Click the Clearing House link (e.g. Office Ally) to view the designated clearing house (see <<471>> for more info)
- Check or uncheck the Active box (only active companies will show when choosing an insurance company elsewhere in ClientTracker - see <<463>> below)
- Use the button to temporarily remove from the list (e.g. before printing)
Use the QuickFinder to Find a Company
The QuickFinder at the bottom of the screen will narrow the list based on Company name. Simply type a few characters in the oval to see those that match. For more info, see <<553>>.
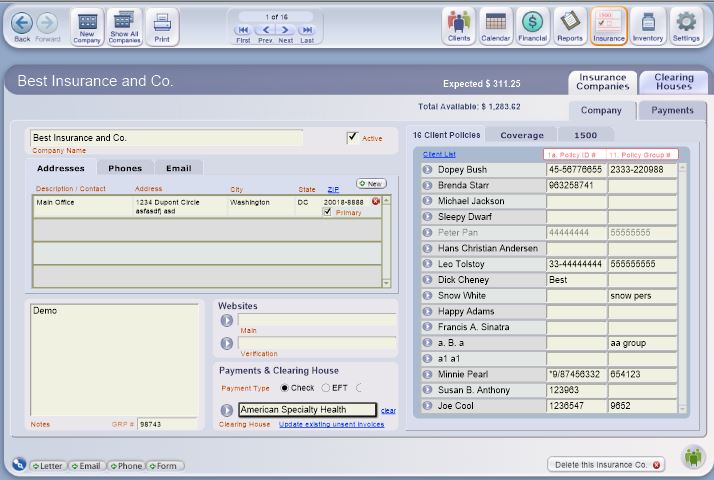
The Insurance Company Detail screen has two large subtabs on the right. Use these to toggle between the Company information on the Detail screen, or Payments for that company.

For more info on Insurance Company payments, see <<467>>.
On the left side of the Detail screen, enter company name. All new companies are marked as Active. Only active companies will show in lists used elsewhere in ClientTracker to select an insurance company.
Note: For greatest flexibility in billing, marking an Insurance Company inactive does not prevent you from using any client policies for that company, or performing other company tasks, such as processing payments. It simply makes it so the company does not show on the list from which new policies can be made.There are 3 separate subtabs for Address, Phones, and Email of contact persons, or departments within the company. For best results, click the button in each tab, and enter information for the same Description/Contact in each new row.
- The first rows created for Address or Phones will be automatically marked as Primary
- If there is more than one row, you can mark any one as Primary
- The address marked as Primary will be used for printing envelopes and labels (see below)
Tip: Enter the same Description/Contact for the Address, Phone, and Email of the same contact person to match up your portal entries, which are sorted by Primary first; then alphabetically.
Enter any Notes you want, just below the Address tabs. If a proper URL ( for example, http://websiteaddress.com ) is entered in the Website field, clicking on the button to the left will open that website in your browser.
In the Payments & Clearing House box, select the Payment Type most often received from this insurance company: Check or EFT.
- If you have selected a Primary clearing house, it will be added by default in this area. To assign another clearing house to this company, select from the pop-up menu. Click clear to have no Clearing House assigned to this company.
- Click the button to view the clearing house's Detail screen.
Delete an Insurance Company

To delete a company, click the button at the bottom right of the screen.
A company cannot be deleted if any of the following are true:
- The company has been assigned to any invoice by use of a client's policy
- The company is listed on any client insurance policies
You can inactivate the company instead (uncheck the Active box), or modify any invoices or policies using that company before deleting the company record.
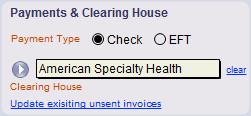
If you do electronic billing, or "E-Billing" as it's called in ClientTracker, select a Clearing House from the Payments & Clearing Houses
box. This will cause all invoices associated with this company to
appear in E-Billing batches created for the selected clearing house.
If you change the clearing house with which an
insurance company is associated after invoices have been created for
that insurance company, you can update those invoices that have not yet
been submitted to reflect the new clearing house by using the Update existing unsent invoices link. This will cause existing, unsent invoices
for this company to appear in the next E-Billing batch for the new
clearing house. Invoices that have already been sent will not be
affected.
Required 1500 Information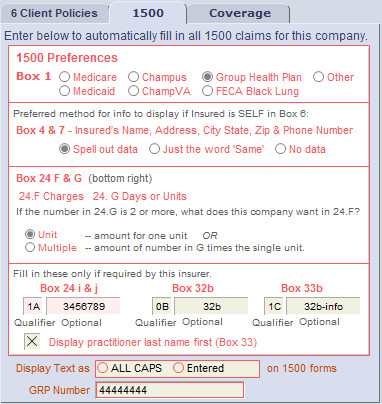
On the right side of the Detail screen are two large subtabs. The 1500 subtab contains information needed to correctly fill out a 1500 according to the company's preferences. If any fields are not filled in, an alert message will show above the subtab. Information in these fields will be used to fill the corresponding Boxes on the 1500.
IMPORTANT:
You should always contact an insurance company directly to find out
what are their 1500 preferences, and other billing information. For
more info on the 1500, see <<119>>.
Box 1 - Select the type of insurance company this is.
Boxes 4 and 7 - Select the preferred method for displaying the Insured's name, address, city, state, zip, and phone number, if the Insured (or policyholder) is the same as the client. A company may prefer that your claims:
-- Spell out the same data from the client's record
-- Display just the word "Same" in the space for the Insured's Name, Street, and Phone Number
-- Show no data (blank)
Boxes 24f and 24g - This selection relates to how the company interprets boxes 24f and 24g on the 1500 form; i.e. whether box 24f is the item cost, or the item cost times the quantity (box 24g). In other words, if the number in 24g is more than 1, what does the company want in 24f?
-- Unit - the amount for one unit (e.g. the price for one procedure), orFor more info, see <<597>>.
-- Multiple - the amount of a single procedure multiplied by the number in 24g
Boxes 24i, 32b, and 33b - Fill in the 2-character Qualifier only if required by the insurance company. (They have to tell you what they want.) A drop-down list is available with some of the known qualifiers.
Display practitioner last name first - Check this box if the Insurer requires this for Box 33.
The info for Boxes 24i, 32b, and 33b has been expanded to include a 2nd, optional value. The first small space is for a 2-digit Qualifier. The second, larger space is for the data the insurance company requires. This could be your state license, a provider number, etc.
Tip: The second space under Box 24i is for Box 24j. On the 1500, there must be a 2-digit qualifier in Box 24i for the value in Box 24j to look up from the Insurer record.
Note: If any data is entered in these fields, they will auto-enter in the corresponding box(es) on the 1500 for that Insurance Company.
Just below this area, you can choose how to display all text on printed 1500 claims.
-- AS ALL CAPS means each letter will be in its capital formThis choice will also affect how you see the information displayed on the client's Insurance screen, the 1500 Data Entry screen, and of course the printed claim form.
-- as Entered means it will print as you type it
GRP Number - This is optional info you can store for a company as needed. It is not used anywhere else in ClientTracker.
Note: If you change any insurance company information for the1500, changes will affect future claim forms, but not those already generated. To reflect your changes on an existing 1500 form, use the Refresh Information button on the 1500 Data Entry screen.
After entering insurance companies, you can assign one or multiple insurance companies to your clients, and fill out the clients' insurance forms. See <<32>> for more info.

The Client Policies subtab displays a portal, or list, of all clients who are set up with policies from this company, along with their the Policy and Group numbers that would be used on the 1500. Any client whose policy is inactive will show in gray. You can perform the following actions on this list:
-- Click the Go button or client name to view or edit the policy on the client's Insurance screen
-- Edit 1a. Policy # or 11. Policy Group #. These will also change on that client's Insurance Policy. See <<569>> for more info.
Tip: Click the Client List link to view an expanded list of all clients who have policies with that company
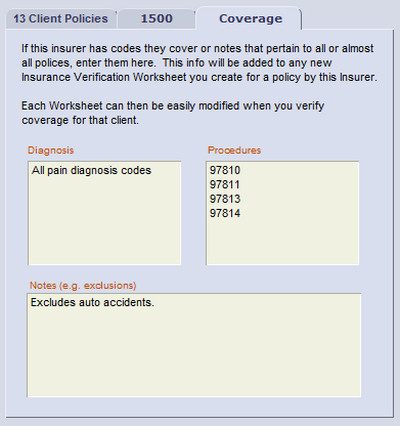
The tab named Coverage, is used to store details about coverage offered by this Insurer.
If this Insurer has codes they cover, or notes that pertain to all or almost all policies (such as exclusions), enter them on this tab. The info will be added to any new Insurance Verification Worksheet created for a policy issued by this Insurer.
Tip: Once looked up, the info on the Worksheet can be edited for the policy and/or client. See <<984>> for more info.
The Insurance Payments screen is the place to manage payments made by an insurance company, especially when the payment is for more than one invoice.
- To make an insurance payment received for only one invoice, you can use the Payment Palette on the invoice's Detail screen. See <<639>> for more info.
- <<468>>
- <<469>>
There are three ways to access an insurance company's Payments screen:
Click on the Payment button on the Insurance company List screen, or
Click the the Payments tab on the insurance company's Detail screen, or

From a Superbill or 1500 invoice, click the button on the right side, above the Payment Palette
The Insurance Payments Screen
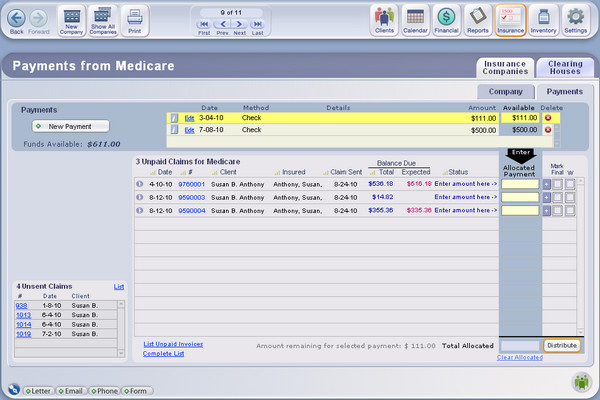
This screen functions similar to the Payments on Account tab in the Clients section. Payments that have funds available for distribution are in the dark blue area near the top, and outstanding invoices for this company show in the large portal below. On the lower left is displayed a small portal of unsent claims (i.e. invoices with a blank Claim Sent Date).
Under the button in the upper left, the total of undistributed Funds Available for this company is indicated.
Note: For invoices to appear on this list, they must
-- be either 1500 claim forms or Superbills that have the Insurance Payer box checked
-- be unpaid
-- be sent to the insurance company
-- have the both client's insurance policy and the insurance company selected at the top of the 1500 or Superbill.
Tip: Click the Complete List link under the large portal to see all invoices for that Insurance Company on the Invoice List screen. Click List Unpaid Invoices to see the same list in an expanded view.
Enter a New Payment
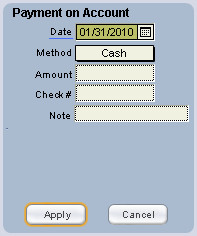
To enter a new insurance payment, click the button in the upper left area of the screen. Enter information about the payment into the boxes in the Payment Palette that appears on the left of the screen.
Date - Click on Date to auto-enter the current date, select a date using the drop-down calendar, or enter a date manually.
Method - Select Check or EFT (electronic funds transfer) as the method of payment.
Amount - Enter the payment amount.
Check Number - Enter the check or EFT number here.
Note - Use this to enter optional information, which will show in the Payments portal list as "Details."
Once you have confirmed that all information in the Payment Palette is complete and correct, click the button at the bottom. This adds the payment to the short Payments portal at the top of the screen. If you want to cancel the process, click the button.
View a Payment

The Payments portal at the top of the screen shows all payments entered on this screen from this company. It does not show Insurance payments made on individual invoices. The portal shows the remaining balance Available for distribution. Use the funds available on a payment to pay any outstanding invoices listed below in the Invoices box. To see more payments in the portal, use the small scroll handles on the right.
- To review or print information on a payment, click the button on the payment.
Insurance Payment (Detail)
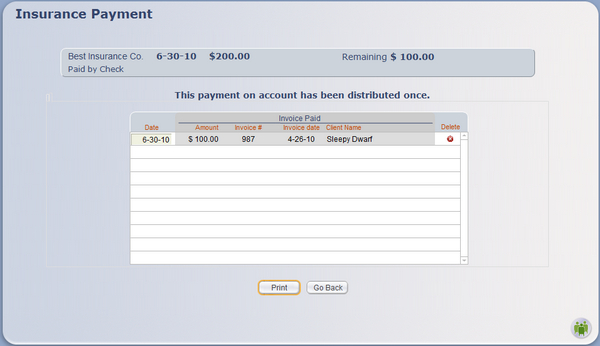
A full Detail view will show the history of distributions made for that payment, including the date, invoice, amount, and client it was processed for.
Functions on this screen include:
- The Date can be changed on a distribution, but nothing else can be edited.
Use the Delete button to completely remove a distribution (this will change the amount due from insurance on the invoice to which the distribution was made).
- Click the button at the bottom to print a simple list of the distributions, or .
Edit a Payment
To edit a payment, click the Edit link, and the payment will load in the Payment Palette if it qualifies for editing. Otherwise, a message will show explaining why it cannot be edited.
- Make any changes, and click to save them
- Click to cancel editing and keep it the way it was
Delete a Payment
To delete a payment, click the delete button at the far right of the row. You can only delete payments that have not had any distribution of funds.
Note: There method to refund a payment from an insurance payer, like there is for a refund for a client. You can delete the payment (first deleting its distributions, if any).
If a company claims it overpaid on an individual procedure or whole claim, then use the option available on an individual invoice for handling insurer overpayments. See <<695>> for more info.
A large portal of Unpaid Invoices appears below the smaller portals of Payments. The columns in the portal can be sorted by clicking a column header. To apply funds from an Insurance Payment to one or more invoices:
Step 1 - Select the Payment you want to distribute
Click on the Payment to select it. It will be highlighted in yellow and move to the top. If the company has multiple Payments with funds to be distributed, select and distribute them one at a time.
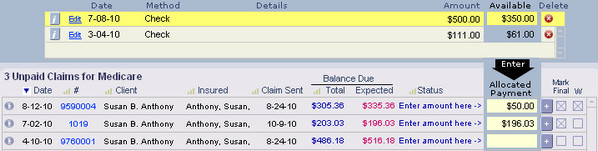
Step 2 - Allocate payment amounts for invoices
Type or auto-enter the payment amount into the "Allocated Payment" box on any invoice(s) you want to pay.
Tip: Next to each box is a button labeled [+]. Clicking this button will auto-enter the full Amount Expected from the insurer for that invoice -- up to the amount remaining in the selected Payment.
- Check "Mark Final" if this is the final payment expected from the insurance company for that invoice. This will check the corresponding box on the invoice and remove it from the Unpaid Claims portal when you Distribute.
- Check the box labeled "W" to write off any remaining amount on an invoice after the Allocated Payment is distributed. This will create a corresponding Write-off Adjustment on the invoice when you click Distribute.
Note: The "Expected" column under Balance Due includes the Amount Expected from the insurance company in red numbers, when applicable. This is controlled on the invoice.

Note: ClientTracker does not warn you if the amount you enter is greater than the total expected or available. Use your own discretion and caution when entering distribution amounts.
Step 3 - Check the total
The "Total Allocated" box is the sum of all amounts entered for all invoices for distrubtion from the selected payment. This sum will not be more than the Amount Available for the selected Payment.
If you need to clear all Allocated Payments, click the Clear Allocated link at the bottom.
Step 4 - Distribute the Allocated Payments
Click the button, and all Allocated Payments entered from the selected Payment will be distributed to the corresponding invoices in their respective Payments portal.
To distribute another Payment repeat steps 1 through 4. (The next Payment with available funds will auto-select.) You can partially or completely pay any number of outstanding invoices in this manner, up to the total amount of Funds Available for that insurance company.
- For more information on invoices see <<107>>.
Delete Distributions
Once made, distributions of a payment can be deleted by clicking the [i] button on the payment row (see <<468>> above). They cannot be deleted from the invoice itself.
Insurance Overpayments
In those rare cases when an Insurer makes an overpayment that needs to be adjusted, do this on the individual invoice. See <<695>> for more info.
Details in this section include:
- <<472>>
This section provides info about how to <<472>>.
Steps to Work with a Clearing House in ClientTracker
Outside of ClientTracker:
- Set up an account with a clearing house you want to use, and determine their preferences for receiving electronic submissions.
- Check that you are able to access your clearing house account via their website.
- Assign the clearing house to one or more insurance companies that use it. See <<600>> for more info.
- Prepare several 1500 invoices, or claim forms for clients who use the insurance company. See <<119>> for more info.
- Create an "E-Billing" batch file to upload (i.e. send electronically) to the clearing house. See <<377>> for more info.
The Clearing House List Screen
To see a list of clearing houses, click the Insurance icon (above) in the Functions Bar. There are tabs on the right where you can toggle between a list of Insurance Companies or Clearing Houses. (See <<464>> for more info on Insurance Companies.)
From the Clearing Houses List screen, you can do the following:
Control Panel
- Click the icon to add a new clearing house
- Click the icon to display all clearing houses in the list
- Click the Company or Contact column headers to toggle between
ascending or descending sorts of the records shown. Shift + Click a
column header to unsort.
- Click any row to view the detail screen for that clearing house
Click the E-Billing button to process a batch of "E-Billing" claim forms for a company
- Check if a company is Active or Primary (see below)
Click to Omit a company temporarily from the list
- Company and Contact information
- Web viewer and company web site information
- The E-Billing tab (see below)
Company and Contact Information
- Company - Enter the name of the clearing house.
- Active - If checked, the clearing house will show in lists throughout ClientTracker. New companies are automatically set to be Active.
- Primary - Check this box for the clearing house through which you intend to do all or most of your claims processing. New insurance companies will be assigned to use this clearing house by default.
- Notes - Enter optional notes about the company, if needed.
Tip: Enter the same Description/Contact for the Address, Phone, and Email of the same contact person to match up your portal entries, which are sorted alphabetically.
Web Viewer and Login Information
If there is a particular page on the clearing house's website that you use to log in, you can paste the URL into the Website field, in the format: http://websiteadress.com. The web site will display in a window above, which is a functional browser you can use to view and navigate the company's web site.
Click the Go button next to the website URL to open up that web page in your designated browser (outside of ClientTracker). Boxes for Login ID and Main Password are also available if you wish to store your login credentials for the clearing house website.
You may also enter a number for Minimum Invoices per Batch, if the company has set a minimum.
E-Billing - Click the E-Billing tab to create an electronic billing batch to be sent to a clearing house. See <<377>> for more info.
Delete a Clearing House
IMPORTANT: If you stop using a clearing house, you may not want to delete the clearing house record, but instead uncheck the Active box to make it 'inactive.' It will no longer appear when you create EFT batches. Deleting a clearing house once it has been associated with insurance companies can cause data integrity problems.
The E-Billing screen is the place to process a batch of claims, or invoices, to be sent to a clearing house for payment. This section contains the following details about E-Billing:
- <<378>>
- <<601>>
- <<383>>
- <<987>>
- <<751>>
![]() Cloud E-Billing Process
Cloud E-Billing Process
You will be saving the e-billing batch to your local computer. The first time you do this, you will need to navigate to find your local hard drive. See <<873>> for more info.
The E-Billing screen for each clearing house is in the Insurance area. For your convenience, there are several ways to reach this screen:
- Click the E-Billing tab on any clearing house's Detail screen
Click the button on any clearing house's row of the List screen

Click the button on a 1500 invoice
- From the Reports screen, run "Create an E-Billing batch" for the clearing house you have designated as primary.
The E-Billing Screen
There are 3 sets of tabs on the right side of this
screen:
The two main tabs in the banner will toggle between the List screens for Insurance Companies and Clearing Houses
The Company tab below will take you to the Detail screen for the current clearing house
- There are also 2 task-related subtabs just below, which display lists of Claims To Send, and of Claims Sent (see below)
Claims to Send
The Claims to Send subtab is a list of all client 1500 invoices, or claim forms, available to be
included in the next batch. Click a column header to sort the list, or Shift + click to unsort. For a 1500 to appear on this list, it must meet the following criteria:
- The Insurance Payer box on the invoice is checked
- The Date Claim Sent field on the invoice is blank
- See <<122>> for more info
- The invoice's insurance company has this clearing house designated
- See <<463>> for more info
![]()
Tip: To view an expanded, printable list of claims you are sending, first sort the list on the Claims to Send tab. Then click any blue invoice number, e.g. 1234 to view that invoice. Then click Invoice List to see all the invoices that were on the Claims to Send tab. From the Invoice List screen you can click Print to make a variety of reports. (You can also do this from the Claims Sent tab, although there will be more old invoices there.)
Claims Sent
To review or resend invoices that have been sent via past E-Billing batches, use the Claims Sent tab. Click a column header to sort the list, or Shift + click to unsort. Claims that appear on this list have a Date Claim Sent.
If
for any reason an invoice needs to be resent in a new batch, clicking the Resend link on its row causes it to transfer to the list of invoices
in the Claims to Send list.
Before you can create a batch of 1500 claims to send, you will need to have a clearing house assigned to one or more insurance companies. Click the Insurance Companies tab or icon in the Function Bar to view a list of companies. In the right column of the list is the assigned clearing house. To change the clearing house for an insurance company, click its row in the list to access its Details screen; then assign a clearing house at the bottom of the screen.
Other information that should be set up
before E-Billing is possible include:
- Create client insurance policies - see <<32>>
- Fill out referring providers' 1500 info - see <<447>>
- Assign practitioners' 1500 info - see <<578>>
- Create and fill out 1500 claim forms - see <<119>>
- Manage clearing houses - see <<471>>
- Create an E-Billing batch in ClientTracker and save it as a file to your computer.
- Go to your user account on the clearing house website and upload this file.
IMPORTANT: Your practice and practitioner addresses should be entered as a single line (without a return) for optimal transfer to the e-billing text file.
Step 1 - Access the E-Billing Screen
There are three ways to begin the process of creating an E-Billing batch file:
- Click the icon in the Functions Bar, and run the Invoices report entitled, "Create an E-Billing batch." This will take you to the E-Billing screen of the clearing house you have designated as Primary.
- If you have not designated a clearing house as Primary, click the button of any company from the list to use for this batch.
- Click the icon in the Functions bar, then the Clearing Houses tab, and click the button of any company from the list to use for this batch.
-
On the 1500 invoice, click the button, found on the top left of either the 1500 or Details tabs.
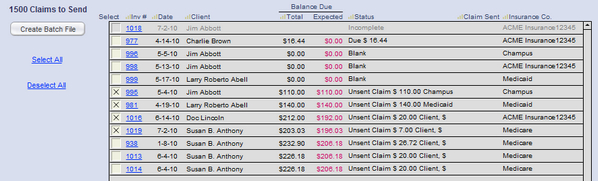
Use the small scroll bar on the right side of the list to scroll up or down the portal if necessary. You can also sort the columns by clicking the headers to group the invoices.
Step 2 - Select Claims to Include in the Batch
Under Balance Due, the total due for the invoice is indicated (Total) as well as the amount expected from the insurer/third party (Expected). The status, date the claim was sent (if there was a prior submission) and name of the insurance company are indicated. If you need to view or edit an invoice on its 1500 Data Entry screen, click the underlined invoice number, e.g. 901. To return to your E-Billing batch, click the button.
Check the box on the left of any invoice to include it in the batch, or use the Select All or Deselect All links at the bottom to make the job quicker.
Step 3 - Create and Save the Batch File
When you are satisfied that the batch is complete, click the button to the left of the portal. You will be asked to choose a name for your batch file. The first part of the file name is automatic: "ClientTrackerv6_" Type the remainder of the file name using no more than 12 characters.
Tech Note: The e-billing file created is a .txt file. In previous versions of ClientTracker, this was a .tab file. This new format is more universally accepted, and has the advantage that you can open the file and look at the data (but don't change anything there!)
File Naming Tips:
- Do not enter more than 12 characters in the space provided.
- It's a good idea to name your batch files
using the date created in sort order; e.g. YY-MM-DD
- Enter dates with dashes instead of slashes, e.g. 11-11-11, not 11/11/11. Better still, no slashes or dashes and use numbers only.
- If you send Batch Files to more than one clearing house, you might want to include the initials of the company in the file name, or have separate folders.
- It's best not to send more than 1 batch file to the same clearing house on the same date
Note: The invoices you selected for the batch transfer to the portal in the Claims Sent tab, and now have the current date in the Date Claim Sent field. A note is also added to the Private Notes field on the 1500 Data Entry Screen, on the Details tab. This serves serves as a log of each time you have created a batch file to send via E-Billing, plus other notes you may enter as needed.
Step 4 - Upload the Batch File to the Clearing House
Now go to the website for your clearing house by clicking the Company tab, and the button next to the website address, if you have entered one. Once you have logged in to the clearing house's web site, upload the batch file according to their directions. This is not a ClientTracker function. When you upload the file, you will need to locate the same file you saved in the previous step. If you encounter any problems with the web site or uploading the file, contact the clearing house for help.
IMPORTANT: If there is a problem with the clearing house's web site, or you think you uploaded a Batch File correctly but they did not receive it, contact the clearing house directly.
To resend a Batch File that has already been created, simply log on to the clearing house web site and re-upload the same file that you originally uploaded. You do not need to create a new Batch File unless it has been corrupted or the clearing house tells you to.
Recreate and Resend a Batch File
To locate the invoices comprising a Batch File, go to the Claims Sent tab on the E-Billing screen, and click the column header for Date Claim Sent. This should group all the claims whose Data Claim Sent matches the date in the name of the original Batch File. You may need to scroll down or sort the list to locate the grouped claims if they were in the distant past.

To recreate a Batch File (i.e resend the invoices), the first task is simply to move the invoices from the Claims Sent tab back to the Claims to Send tab. To do this, click the Resend link for each invoice one at a time.
Next, follow the instructions above for creating a Batch File. The date of this resend will be automatically noted the Practice Notes field of each invoice. You can see this on the 1500, the Details tab.
You can filter the claims displayed on the Claims Sent tab by using the "date filter" feature. Claims can accumulate over time, causing delays while the program loads hundreds of claims onto this tab.
Note: The date filter field is blank at first, which means 0 claims will show. All your claims are still stored in the program.
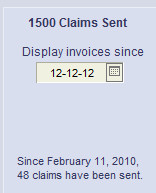
To show only the recent claims, simply enter a date in the date filter where it says "Display invoices since [ ]." To see all of them, enter the earliest date shown in the text below.
Interested in better understanding how insurance billing works? Considering billing insurance in your practice but don't know where to start? Or perhaps you feel like insurance billing is just too complex and overwhelming? A devoted user of ClientTracker, Rebecca Hurwood, is determined to demystify insurance billing with her ebook - Insurance Billing Made Easy: A Step by Step Guide for Acupuncturists and CAM Providers. If you haven't checked it out, please visit the book website at www.insurancebillingmadeeasy.com - special offers available!
Other details in this section include:
- <<369>>
- <<589>>
- <<648>>
Insurance Company E-Billing Tips
Some tips for successful billing using the 1500 invoice, or claim form:
- Call the insurance company and get clear on:
- the terms of your client's policy, what they will reimburse for, what are the co-pays, deductibles.
- do they want Box 24 F to be a Unit or Multiple. See <<597>> for more info.
- do they want Box 33b filled in with your state license number (default) or their number. If the latter, go to the insurance company's Detail screen and enter both the qualifier and the number for Box 33b.
- Enter all the insurance company information in their Detail screen. See <<600>> for more info.
- Create your client's policy with information from that insurance company, including box 11. See <<569>> for more info.
- Record the client's signed receipt of privacy practices in ClientTracker (in the Communications portal on their Personal screen). See <<33>> for more info.
Office Ally is a very commonly used clearing house for e-billing. It is free to you the provider. Office Ally submits the claims to the insurance companies and makes a few cents for each claim submitted. First, you must have an account set up with Office Ally, telling them your "vendor" is ClientTracker. They will also ask you to spend an hour with them for a training on their system. Once that is done, you're all set.
These tips are current as of the ClientTracker version 4.0 release date, but may change at the discretion of Office Ally.
- Double check each invoice that all the necessary fields are filled in before submitting the Batch File to Office Ally. Box 11 must be filled in. Box 33 must be the Practitioner's name, not the Practice name.
- The name of the Batch File MUST contain the word ClientTracker in the name. When you create an e-billing batch file in ClientTracker, does this automatically.
- Best to send one Batch File a day to Office Ally. One ClientTracker user reports that sending more than 75 invoices at a time can cause corruption.
- You should receive an email from Office Ally acknowledging the Batch File. If you don't receive an email, check that they have your correct email address.
Possible causes for rejection usually involve one of the above steps not being completed correctly. Please double-check that you have completed the above steps before contacting Office Ally or ClientTracker support.
- The email will say all is well or that one or more 1500s have a problem.
- You can go to your account in Office Ally and make the necessary changes there without having to resend them from ClientTracker. However, then you should also make these changes in ClientTracker.
- A 1500 can be rejected for any number of reasons, including missing data, or wrong Diagnosis or Procedure Codes.
The success of E-Billing depends on the 1500 being filled out correctly so that the data is organized properly in the Batch File. See <<119>> for more info.
Box 10 - make sure this has an entry
Box 17a & Box 17b (Optional) - If you have created the referring provider and entered his or her NPI and license number these automatically fill in as follows:
- 17a License #
- 17b NPI #
Create the referring provider from one of the following:
Box 32a Facility NPI - This fills in automatically from the Facility NPI field on the Settings/Practice screen
- Client's Personal screen, on the Referred By tab, click on the Edit List link to see a list of all Referring Providers.
- From the Settings/Practice screen, click on the button at the bottom right.
Box 32b (Optional) - The odds of this needing to be filled are very rare. However, if needed, you can enter what you want directly in that field. Once you entered it for a client, it will automatically fill in the next 1500 created for that client.
Box 33 - Although you can use the button to have either the Practitioner or the Practice name here, the best option is usually to have the Practitioner's name.
Note: For Office Ally, you must have your Practitioner name here for the 1500 claim to be processed correctly.
Box 33 Address - There are two addresses that can show in area 33 on the 1500 form. You can choose which one to show by clicking the button just to the right. The source addresses are:
- The practice address - this is set in Settings/Practice
- The practitioner's address - this is set in the Practitioner's Detail screen; accessed by selecting from the Practitioner subtab on the Settings/Practice screen
Box 33b - By default, when nothing is filled in on the insurance company record, the data for Box 33b is pulled from the Practitioner's license # which is stored in the Practitioner's record. ClientTracker automatically puts a 0B in front of the license # as required. If 33b is coming up with just the 0B, have you filled in the Practitioner's license # ?
Some Blue Cross and Blue Shield policies may require their PIN # to show up in Box 33b. The PIN # and the Qualifiers can be set up automatically by entering them on the 1500 tab of the company's Details screen. When these data are filled in, they are the first default for Box 33b.
- Here are the two digit qualifiers that precede of the respective PIN numbers:
- 1A Blue Cross Provider Number
- 1B Blue Shield Provider Number
You can also enter specific data in this area of the 1500 entry screen. Once you have entered it for a client, it will automatically fill in the next 1500 created for that client.
If a client has multiple policies with more than one insurance company, you may need to submit the same 1500 invoice (i.e. claim form) to multiple companies. This can be done by printing the 1500 and mailing it, or by E-Billing. The following is only a suggested process - your own office procedures may be different.
EXAMPLE: Client has 2 insurance companies, Primary and Secondary.
Setup - On the Client Insurance screen, you should enter each policy's info separately by clicking the + New Policy button on the left, filling in the Policy 1500 Info, and adding optional Policy Details as needed. See <<34>> for more info.
- Before entering each Policy, set up the Insurer that issued the policy (name, address, etc.) by clicking the Insurance icon at the top right of most screens. See <<463>> for more info.
Step 1 - Bill the Primary and Process Payment
- Make a 1500 invoice,
file the claim with the Primary, and make payments on the invoice using
Primary funds from the Payment Palette on either the insurance company's Payments screen, or on
the invoice itself
- Go to the invoice and change the Insurance Policy
at the top to Secondary, and be sure to click the Refresh Information button.
Step 2 - IF you need to bill the Secondary via a Clearing House:
- On the 1500 invoice, delete the Date Claim Sent at the
top
- Click the E-Billing button to go to the Clearing House
E-Billing screen
- Find the invoice in the Claims to Send tab
- You
may now send the invoice alone, or with others that need to be sent in a
Batch File
Step 3 - Process the Secondary Payment
- When
payment comes in from the Secondary company, make sure the Secondary
company's policy is designated on the 1500 invoice.
- Enter the Secondary payment on the Payment Palette of the 1500, or go to the Insurance Company Payments screen and distribute it there.
![]()
ClientTracker provides a robust inventory management system, including inventory levels, classification of items sold, sales tax, vendors, inventory transactions, and reports.
To access the Inventory area, click the icon in the Functions Bar.
Details in this section include:
- <<460>>
- <<505>>
- <<459>>
- <<653>>
- <<766>>
- <<704>>
- <<841>>
The Inventory List Screen
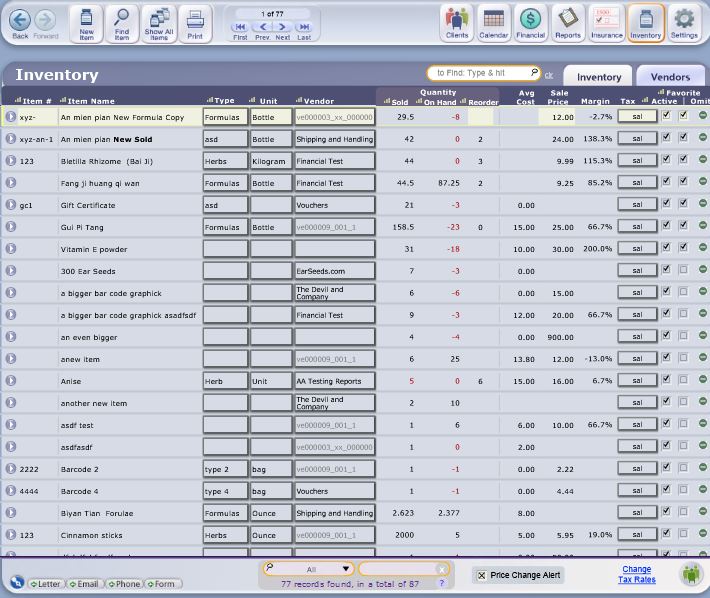
The Inventory List screen shows a summary of items in your inventory. Unlike many List screens in ClientTracker, you can edit most of the fields in the list by clicking on the field and typing new information, or selecting from a pop-up menu. The item row currently selected is highlighted in yellow.
The Inventory List shows all Active items, when accessed via the icon from other areas of ClientTracker. The items are sorted in the following order:
- Frequent items
- Inventory items (non-inventory items sort last)
- Alphabetical order of Item Name
Buttons in the Control Panel include:
- - Create a new, blank inventory item and go to its detail screen
- - Open the Find Inventory screen (see <<651>> for more info)
- - Populate the list with all items in ClientTracker; in sort order listed above
- - Print just a list of the items in the current found set, or sorted by Vendor
Other functions on the Inventory List screen include:
- Click the button on the left side of each row for a detailed view of that item.
- Data entry in the various fields works the same as described for <<460>> below.
- Click the column headers to sort the records in the current found set; in ascending or descending order
- Click the button to remove an item temporarily from the list.
Quick Find of one or more inventory items
[6.0] This Search Bar at the top right of the list, is the fastest way to find one or more items. It searches on the Item Number, Item Name, Vendor and a barcode. Type one or more values and hit Enter, or Tab. You can also scan a barcode. The more you type the narrower the resulting list.

Another QuickFinder panel at the bottom of this page gives you a few more options to search by. Click the black down arrow to see the options. This is a bit slower than the other search as it narrows the list by each letter you type.
Price Change Alert
There is a "Price Change Alert" checkbox at the
bottom of the master Inventory List. Check this to alert you when
creating an invoice that copies an old price from a previous invoice.
Clicking the arrow on the left side of each item row on the Inventory List screen switches to a detailed item view for that item. All items in the current found set can be viewed without leaving this screen, by clicking the buttons in the Record Navigator.
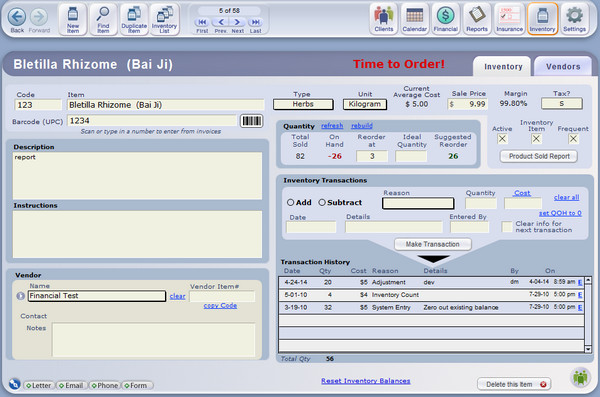
Data fields in bold below can also be edited on the Inventory List screen.
- Item Number = Your number for the item. Leave blank if you don't use a numbering system.
- Item Name = A recognizable name for the item. Include size differences to view in lists. You may want to include the initials of a Vendor if you buy the same record from more than one Vendor.
- Items can have the same name
- See below for details about duplicate items
- Barcode (UPC) - Use your existing barcode scanner (not part of ClientTracker), to scan in a UPC code for this item, in preparation for adding it to an invoice using a barcode scanner. You may also manually type in the code, if you prefer.
- First place your cursor in the field, then scan the item using the manufacturer's instructions for your barcode scanner. This is usually very easy!
- For more info, see <<981>>
- Type = An optional classification for your use.
- Unit = The unit by which the item is sold.
- Select "Other..." to add a new value to either of these pop-up menus
- Current Average Cost = ClientTracker calculates the average cost of all items recorded as a transaction (e.g. new stock). The amount shown is the average cost of each current item, and is used to calculate the cost of goods sold in reports.
- Sale Price = The amount you charge per item. Changing this will not affect invoices already containing the product.
Note: A negative Sale Price cannot be entered.
- Margin = Your margin percentage is automatically calculated from the Current Average Cost and Sale Price.
- Tax = If a tax rate is selected, tax will be added to the item in invoices. If you wish to have a rate assigned by default, go to the Settings/Practice tab and set up a Default rate for all new Products.
- Select
"none" to make the item non-taxable - For more information on Sales Tax Options, see <<246>>.
- Select
- Description = (Optional) Describe the item in this large text field.
- Instructions - (Optional) Add instructions for use or other comments about the item as needed.
- Vendor - Use this drop-down list to select the vendor that supplies this item.
- Enter any optional info in this area as needed:
- Vendor item # = Enter the vendor's item ID, if different from yours
- Contact = Automatically displayed from the first contact Description & Phone from the Vendor detail page
- Notes = (Optional) For notes about the Vendor, or other info of your choice. This is part of the Vendor record; not the Inventory item.
- Active - New items are automatically checked as Active, which makes them
available for selection when filling out a SOAP Note or
invoice. Unchecking this box is a useful alternative to deleting an item
(which is permanent, and loses all the item's details and history).
- An inactive item will be excluded from the Inventory List when you first go there, and also from the pop-up QuickFinder list used to select a Product for a SOAP Note or invoice.
- Inventory Item - When this is checked, and item is treated as a salable product. You may also use an inventory record to record transactions for non-inventory items, such as gift certificates, returned check charges, or anything you want to add to an invoice. See <<653>> for more info.
- Frequent - An optional field for your convenience. When checked, it brings those items to the top of most lists in ClientTracker for easy access to your most popular items.
- Inventory Transactions - This section of the detail screen is a history of all stock added or subtracted. See <<459>> below and <<649>> for more info.

The button will show a list of all clients who have ordered this item, and how many.
Inventory Control Panel
Click an icon in the Control Panel to access these functions:
- - Create a new, blank inventory item and go to its detail screen
- - Open the Find Inventory screen (see <<651>> for more info)
- - Copy an item record to make a new item. Items can have the same name; for example, if they are the same item sold by 2 different Vendors.
- Inventory List - Returns to the list view and shows all items. Use the button to retain the last found set.
To permanently delete any item that has not been sold, click the button in the lower right of the Detail screen.
Warning: An item that has been sold in ClientTracker cannot be deleted. If you no longer sell the item, and don't want to include it in the QuickFinder or drop-down lists, uncheck the Active box to make the item inactive.
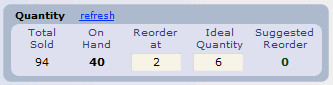
This area of the Inventory details screen displays quantitative information about the item including the Total Sold and the number On Hand, which are calculated by ClientTracker from Inventory Transactions (see below) and other data you enter.
Quantity (Inventory Level information)
refresh = Click this to rebuild Quantity totals for this product, including items sold and inventory transactions entered manually. ClientTracker does this automatically; however you may have been interrupted in doing something and refresh will normalize all the current data.
Total Sold = The calculated total number of items added to an invoice to date (even if the invoice is not paid). This can be a decimal number if that is how you sell the item on invoices.
On Hand = The calculated quantity currently remaining in stock. This is calculated from inventory transactions added or subtracted manually, and the quantities on invoices that are automatically subtracted. This can be a decimal number if that is how you sell the item on invoices.
Reorder at (Optional) = Enter a quantity at which the item needs to be re-ordered. Entry of decimal numbers up to 5 characters is supported.
Tip: When the quantity On Hand is at or below the Reorder level, an alert will show at the top of the details screen: Time to Order! The number will also show in bold red on both the Detail and List screens. An option is also available on the Settings/Program/Defaults tab, to show an alert when ClientTracker is opened for items that need reordering. See <<226>> for more info.
Ideal Qty (Optional) = This is intended to hold the ideal, or optimal quantity you wish to have in stock. For example, this number minus the Qty On Hand would tell you how many of an item to order.
Suggested Reorder = The amount On Hand subtracted from the Ideal Quantity.
Entering a New Item
All you need to sell an item in ClientTracker is the name and price. However, if you want to track the inventory levels, run reports, and keep track of applicable sales tax, it pays to set up an item properly from the beginning.
- Step 1 - Fill in as much info about the item as your practice needs, using <<460>> above as a guide.
- Step 2 - Assign a Vendor (the company should ideally be created before you enter a new item).
- Step 3 - Enter beginning stock as an Inventory Transaction.

Start by filling information in the "Make Transaction" area at the top of the section.
1. Select to Add the transaction
2. Enter the Quantity to be added
3. Enter the Cost per unit of the individual item
4. The current Date will enter automatically. You may change it as needed.
4. Select a Reason for the transaction from the pop-up menu (e.g. New Stock).
5. (Optional) Enter Details about the transaction, e.g. "beginning stock."
6. (Optional) indicate the person the transaction was Entered By.
7. If you will be entering similar info for other items, leave blank the checkbox "Clear info for next transaction."
When all information is complete, click the button, and the first entry will be made in the Transaction History portal below, and will update the Quantity on Hand.
- For more info about using Inventory Transactions to maintain Inventory levels in ClientTracker, see <<649>>.
ClientTracker has the option of entering non-inventory items and their related "vendors", as a suggested way to manage miscellaneous charges your office might need to include on invoices. These charges are most easily managed as "products" that are grouped by "vendor" so you can enter additional info about them and group them on lists. For non-inventory items, Quantity and order levels usually do not apply.
Non-inventory items are designated simply by unchecking the Inventory Item checkbox, which is automatically checked for any new item. On the Inventory List screen, these items will sort last unless designated as Frequent. Also, the Item Name of non-inventory names is in italics, and they have no Quantity or Cost info.
ClientTracker provides these basic non-inventory items and vendor groupings:
Vendor
Product .
Vouchers Gift
Certificate
- On the Inventory List, the
found set will be all the items shown on the list, and noted in the
Record Navigator in the Control Panel at the top of the screen, e.g. "1
of 21" will export records for all 21 items on the current list.
The data to be exported cannot be changed, except in the export file you create. You can edit your export file any way you choose, and that's not part of ClientTracker's functions.
How To Export Inventory Data
- On the top Main Menu, select File, and then Export Inventory Data
- A new pop-up window will open, "Inventory Export Options"
- Select the export option (see below)
- Select the type of file you wish to export to, its name, and location
- Click to create the file and export the data
- Optional: Before saving, you can check a box to:
- Automatically open the file after saving
- Create email with file as an attachment
- Note: This is not a ClientTracker email
Inventory Export Options
Inventory Items - Exports preselected data about the items in the current found set (i.e. those appearing on the List).
Tip: Create a found set first, and sort it as needed. Your sort order will be the order in which the items are exported.
Items Sold - Exports preselected data about the Products line items sold in the date range entered. Only data about the items in the current found set will be exported.
EXAMPLE:
You have an item that is purchased in bulk quantity, for example a 100 gram package. You would set this up so the unit reflects that you sell it by the gram.
- Enter the 100g Inventory Transaction as a purchase, to add quantity.
- From then on, you can enter fractions of the unit, e.g. enter 0.5 as Qty on an invoice to reflect that half a gram was sold.
- ClientTracker will reduce the Quantity on Hand by the fractional amount, e.g. 95.5g.
Fractional quantities will be tracked in Reports. Up to 5 characters will show, including the decimal point.
Note: ClientTracker does not support combining Inventory items into pre-made "formulas." Look for this capability in a future version.
You can use a SOAP Template as a way to manage a "Formula Template." See <<832>> for more info. The method involves the optional use of a "Formula Title." The ingredients of a formula are Inventory items, which will print in the order they appear on a SOAP Note. It's best to set these up on the SOAP Template in the order you want them to appear and print. One of these items can be a Formula Title, which adds flexibility and features.
- Make a descriptive or branded Formula Title with any text you want
- Create formatted instructions in the Formula Title item that can be copied to the SOAP Template or SOAP Note; for example, in the Client Instructions.
- Run the Product Sold Report to see who purchased any formula that included the Title item.
- Possibly create a "Vendor" that is like a library of your Formula Title items, and assign all these items to that Vendor.
Create an Inventory item and name it the way you'd like your title to read, for example on a SOAP Note or formula label. Most other info is unimportant, except for Price and Instructions.
Create and Format Instructions
The entire Instructions field can be copied to a SOAP Template or SOAP Note. In this field, type whatever text you want, and format it using the Format option in the top menu.
Price
This can possibly be the price for the entire Formula, and each constituent ingredient item would then be changed (manually, by you) on the SOAP Template. See <<832>> for more info.
Details in this section include:
- <<650>>
- <<651>>
ClientTracker allows great flexibility in controlling the inventory levels of products. You can make adjustments in inventory quantity or cost for any item; at any point in its history.
Adjustments are made to inventory in three ways:
- Automatically: each time a product is added to an invoice, the quantity sold is entered as a "Purchase" Inventory Transaction that reduces the Quantity On Hand. See <<650>> below for more info.
- Manually: Through the entry of "Inventory
Transactions" on the Detail screen of each product, which is explained below.
ClientTracker uses these, along with products sold on invoices, to calculate the Quantity and Current Average Cost, as well as other information in Reports.
![]()
Manual Inventory Transactions
Whenever a product is received, returned, or needs its quantity adjusted, a manual Inventory Transaction entry should be made, following these steps:
1. IMPORTANT: Select whether to Add or Subtract the transaction
2. Enter the Quantity to be adjusted, in whole numbers only
3. Enter the Cost per unit for the item
4. The current Date is entered automatically. This can be changed to any date in the past.
5. Select a Reason for the transaction from the predetermined drop-down list:
- New Stock = Product purchased from a vendor, or added to inventory for the first time (always an Add transaction, and a positive number)
- Inventory Count = Adjustments made to inventory due to an audit or physical count of product on hand. This can be an Add (positive number) or Subtract (negative number) transaction.
- Adjustment = Adjustments made to inventory for any other reason. This can be an Add (positive number) or Subtract (negative number) transaction.
6. (Optional) Enter Details about the transaction
7. (Optional) indicate the person the transaction was Entered By
8. If you are making similar transactions for multiple items (e.g. entering products from a packing slip), leave blank the checkbox, Clear info for next transaction. If checked, all the fields in the area will be cleared when you click the button.
When all information is complete, click the button. A new entry will be made in the
Transaction History portal below, and the Quantity on Hand will be updated.
Editing Inventory Transactions
Click the small E at the end of an Inventory Transaction row to open it in a pop-up window, where it can be edited or deleted.
![]()
- To edit, enter or change any information from the original transaction and click . Click to keep the info the same as it was.
- To delete, click the button.
Products are sold on invoices. ClientTracker is designed to have an invoice for every SOAP Note, but does not require you to have both. In other words, you can "sell" items on a SOAP Note without a linked invoice, and vice-versa.
Products can be added directly to SOAP Notes and invoices, and if they are linked, they will share that entry. An item must be created on the Inventory Details screen and be designated as Active before it can be sold in ClientTracker.
- Via the a SOAP Note, add an item by clicking the button above the Products
portal. Once an invoice is generated for that visit,
the items will appear in the Products portal of the invoice. Any
additional Products added to the invoice will also show on the linked SOAP
Note.
- Add items directly to the invoice Products portal by clicking its button, and they will also appear on any linked SOAP Note.
Select an item from the QuickFinder that opens in a pop-up window. Only Products designated as Active will show on the QuickFinder. The quantity will also show, so you can avoid selecting items that are out of stock.
Other Notes:
- Products added to a SOAP Note without an invoice are not "charged" to the client's account; in other words, they don't show as a Balance for that client.
- Products can be added to a
1500 invoice on the Products tab, but will not be billed on the 1500 claim form.
- Products subtracted as an Inventory Transaction will not be counted as goods sold.
ClientTracker provides a variety of search options and inventory reports.
One quick way to find an item is with the QuickFinder on the Inventory List layout. Most of the sortable column headers can be used to search with this handy utility. For more info, see <<553>>.
- This icon, located in the Control Panel of both the Detail and List layouts, will take you to the Find Inventory screen, where multiple criteria can be entered to locate the record(s) of one or more items.
- Status - Always enter a choice of Active, Inactive, or Both
- All other criteria are optional, including Item #, Name, Type, Sold By, Vendor, and Vendor Item #.
When all desired criteria have been entered, click to display the results on the Inventory List screen, or to abort and go back.
Click any clear link to blank a criterion, or Reset to blank them all (except Status).
Inventory Reports
Product Sold Report- This is available to
run from any item's Detail screen (using the button of the same name). It reports for the current item only.
- A pop-up window will ask you to "Select a date range." This retains the last dates entered.
- Click to preview and print the report, or to go back.
The report shows all items sold to any client; regardless of the price. The total quantities, discounts, and amounts for each client are shown, with a grand total of each at the bottom.
![]()
Other reports are available from the Reports screen, which is accessible via the icon in the Functions Bar. These are discussed in <<190>>.
- Sales & Profitability
- Inventory Valuation Detail
- Inventory List
- Items to Reorder List
1. Refresh a single item: go to that item's detail page, click the Refresh to the right of the Quantity header
2. Rebuild all your inventory: go to any inventory item detail page; in the footer, click the blue link Reset Inventory Balances On the next page, click the blue link Rebuild All Inventory. in the footer If you have a large inventory list, this can take for 30 min to 2 or more hours. Please run this outside of normal business hours so it does not interfere with your daily access. This only works with the whole list, not just a found set.

From the Inventory area, click on the Vendors tab to show a list of your vendors including basic information about each vendor. You can sort the records by clicking on a column, temporarily Omit records from the displayed list, or mark Vendors active or inactive.
Details in this section include:
- <<462>>
- <<507>>
Vendors Control Panel Actions
- = Goes to the Detail screen and creates a new, blank record
- Show all Vendors = Displays all active and inactive Vendor records in ClientTracker
- Print = Prints a simple list of the displayed records
Click on the button next to a vendor's name or the whole row to view their Detail screen.
On the Vendor Detail screen are common contact information fields to fill out: company name, address, the type of products they supply, the names, numbers, email addresses and function of company contacts, and an area for notes.
- The company name of all vendors will appear in Inventory drop-down lists
- Enter a website URL, and the button will open that site in your browser
- To edit the "Supplier of" drop-down list, select "Other..." at the bottom of the list, and enter a new value
There are 3 separate tabs for Address, Phones, and Email of contact persons, or departments within the company. For best results, click the button in each tab, and use the same Description/Contact for each new row.
- The first rows created for Address or Phone will be automatically marked as Primary
- If there are more than one row, you can mark any one as Primary
- The address marked as Primary will be used for printing envelopes and labels (see below)
The Inventory Portal
The right side of the detail screen shows a list of "Inventory Supplied by (name of vendor)," as well as the quantity in stock and order level. You can edit the items in this panel, by clicking on the boxes and typing new information. The portal can be sorted or unsorted by clicking the column headers.
Note: Any changes made to items in this portal are immediately applied to the records of your inventory items.
If you click the Go button at the left side of the inventory Item rows, this takes you to the Detail screen for that item. There is also a blue Detailed List link that will take you to the inventory List view, showing a list of all items from that vendor.
Print Vendor Information
- Click to print a list of items provided by that vendor
- Click to print envelopes or labels; using information from the row marked as Primary in the Address tab
- Click to abort printing

To permanently delete a vendor, click the button at the bottom right of the detail screen. Vendors linked to Inventory items (done on the Inventory Detail screen) cannot be deleted. You would first have to delete the Inventory item, or if it can't be deleted, click clear next to the vendor's name on the Inventory Detail screen to unlink the item.
Rules about deleting vendors:
- Vendors with items in their "Inventory Supplied by..." portal cannot be deleted
- Inventory items cannot be deleted if they have been sold; nor can the Vendor be unlinked
- Therefore, Vendors cannot be deleted if they are linked to inventory items that have been sold
ClientTracker includes a communication module that enables you to compose and send various types of communications - e.g. letters, emails, forms - directly from within ClientTracker. Communication can be composed for any or all of your clients or referral providers. By doing this from within ClientTracker, it enables you to keep track of the various communications for each recipient.
This section provides an overview of the Communications Module, including:
- <<142>>
- <<432>>
- <<431>>
Summary of Features
The features of the
communication module include:
- Compose communications using stored templates or segments of your
creation, greatly reducing the time spent composing.
- Communications can be composed for one recipient or multiple recipients, and will be tracked for each.
- Add multiple recipients to a communication at any time, using an easy name search or a more advanced multi-criteria search.
- Anticipate and account for the various mandatory HIPAA practice forms.
- Designate email appointment confirmations and communication that can be sent automatically when an appointment is made.
- Set up standard communication (e.g. practice forms, welcome letter) to be automatically created for each new client.
- New communications can be created from the central
communication list or on demand from almost any screen, via the 5
communication buttons (called "the Comm Panel" in this manual) on the
lower left of most screens.
- On the Client and Provider
detail screens, you can see a list of pending and sent communications
and access a full screen list.
- The status of communications (pending, sent, signed) is tracked
on a per-recipient basis.
- Print labels or envelopes for any printed communication; for
single or multiple recipients. See <<173>> for more info.
Communications can be printed letters, printed documents requiring a signature (called a "form"), sent emails, or records of phone calls. By planning your communications and monitoring their status, you will be able to manage both your practice and marketing communications in ClientTracker.
The Communications List
The Communications List screen is accessed by clicking the pen nib graphic on any comm panel.
On this screen, you can:
- Use the QuickFinder at the bottom to isolate records of your choice on the list.
- Omit any record temporarily from the list
- Click the columns to sort the records.
- View all communications by clicking .
- Access the
Communications to Clients or Providers can be managed in two ways:
1. On the Personal or Detail screen for each recipient of the communication, and
2. On the List View showing all communications initiated from within ClientTracker.

Example - The Client Communications Portal
The Client Personal screen has a Communications portal on the right side which displays all communications saved for that client, including date, a title, and an icon showing the type. The date column will show either the date completed, or the date last modified for pending communication.
Letter
Form
Phone
Note:
-- Pending communications are shaded orange
-- Completed communications are shaded gray
-- See <<620>> below for more info
To view a complete list of all communications saved for any individual client, click the Complete List link.
To signify that a client has signed the HIPAA forms required for your practice (whether or not they are managed as ClientTracker communication), enter the date in the field beneath the portal. This will show on the 1500 claim form. See <<620>> for more info.
This portal sorts to show the most recent pending items first, followed by the most recently completed (i.e. sent, done, printed, or printed and signed) items. Pending items will be highlighted in orange until completed. When completed, the date will be updated. See <<431>> below for more info.
Note: Referral Providers also have a communications portal on their Detail screen.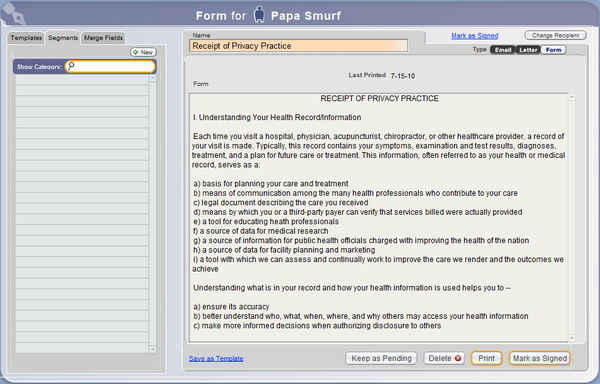
A Pending communication is one that has been marked as pending automatically or manually, but not completed yet. Any composed communication can be marked as Pending by clicking the button on the Compose screen, which saves it for later completion. Pending communications show with an orange highlight in communication portals and lists.
Once printed, pending Forms will have a status of Printed, but will not change to Signed (i.e. completed) until marked as signed.
Pending is not an available status for Phone communication, which is intended to log a completed call.
Clicking a Pending communication in the portal or list takes you to the Compose screen, where you can edit, complete, or delete it. The Name of a pending communication is also shaded orange on the Compose screen.
Completed communication has the following Status on the Communications List screen:
- Letter = Printed
- Email = Sent
- Form = Signed
- Phone = Done
ClientTracker keeps a copy of all communication sent. For single recipients, this is an exact record of what was sent. If there were any merge fields in the communication these are replaced with information from the client's record. These can be seen by clicking any sent (i.e. completed) communication.
See <<152>> for more info
For communication sent to multiple recipients, there is only one record in ClientTracker, which is referenced by all recipients. Merge fields will show in their placeholder format, e.g. %%firstname%%
Once communication has been completed, clicking it on a list or portal will access the Communication Info screen. From there, you can choose to a Letter or Form that was sent, or a Letter, Form, or Email. Clicking gives you 2 choices:
- Edit the original communication record (which will change its status from completed to pending), or
- Duplicate it as a new communication (and retain the old one as completed).
Manually Mark a Communication As Completed You can manually enter the date that a communication was completed
(whether or not its status is pending), by clicking the variable link just above
the Type on the Compose screen. The link will be slightly different, depending on the communication type: For all types but Phone, a pop-up message will ask you to enter the
date completed (today's date is automatically entered as a convenience). Tip: You can use this method to retain a record of communication made from outside of ClientTracker. See <<657>> for more info.
This section contains the following details:
- <<136>>
- <<138>>
- <<139>>
- <<141>>
The ClientTracker Communications Module has different features for different types of communication.
When the Letter, Email, or Form button is clicked in the Comm Panel and a recipient selected, the Composer screen opens with a heading indicating "(Type of communication) for (name of recipient)." If a letter or other communication is intended for more than one recipient, the heading will say, "Letter for (number) recipients." To switch or add more recipients, click the icon or recipient's name in the heading, or the Change/Manage Recipients button.
This icon will show when there is a single recipient, and will take you to the single recipient Quick Finder screen.
![]()
This icon will show when there are multiple recipients, and will take you to the multiple recipient Quick Finder screen.
The Letter screen is intended for printed communication. For details on how the Composer screen works, see <<658>>.
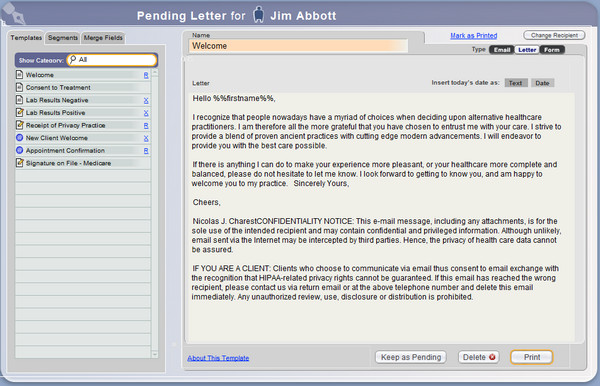
For Letters, the Composer displays 3 action buttons: , , or .
- - Saves the letter in progress and mark it as Pending. The letter shows in the recipient's Communications portal.
- or - If a new letter, this cancels its creation. If previously marked as Pending, this deletes the letter communication record after confirmation.
- - Offers a pop-up window of Print Menu choices for the letter (one for each recipient), using the letterhead design chosen in Settings/Program/Print. After printing, you have the option to mark the Letter as sent, which inserts the date sent on the Communications portal for each recipient, and marks it as completed ("Printed").
The email version of the Composer functions much the same as for letters, with notable differences.
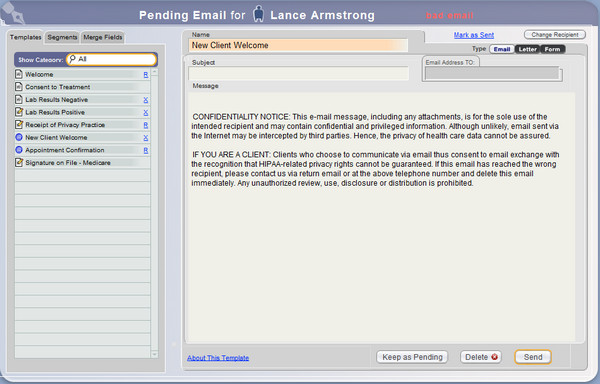
- - Saves the email in
progress and marks it as Pending in the recipient's
Communications portal.
- The function for emails sent from ClientTracker can only send plain text; not formatted text. The email is created in your default email program.
- The Subject field at the top becomes the subject of the email, which must be filled in to send the email.
- The Name field must also be filled in. You will have the option of using the Subject as the Name, if you like.
- There is an Email Address TO field that shows the first email address (see below). If you click this...
- For single recipients, a pop-up window will show you an editable display of up to two email addresses for the recipient. If two are valid and marked "Use," the email will be sent to both addresses.
- For multiple recipients, you will go to the "Choose Multiple Recipients" screen, where you can view/edit the recipient list, or the email addresses of the individual recipients. For more information on multiple recipients, see <<161>>.
- When you click for multiple recipients, a message will warn you if one or more recipients do not have a valid email setup. The email cannot be sent until the invalid recipients are removed from the recipient list on the Multiple Recipients screen.
Tip: A handy "Duplicate this email for recipients with no valid email" link will appear if needed, and lets you copy the email into another pending email for each invalid recipient, so you can first send the email to the valid recipients, and then fix the problem for invalid recipients.
Sending an Email from the Composer
Simply compose the text message in the Composer and click to save and send later, or to send it now.
When you click , a standard New Email window will open in your local email software, with information already entered from ClientTracker. You can then modify the text, format it, or add attachments within the capabilities of your local email software. Of course, any changes or additions made at this point will not show in the email record saved in ClientTracker.
You will also have the option to record the email as "Sent" within ClientTracker, which will mark the communication as completed.
Note: The System segment, "Email Confidentiality Footer" automatically loads in the Composer when you start an email. You can edit this footer in the Segments area. (To show nothing, remove all the text from the Segment.) The text of your email message should be typed above this text.
Recipients with No Valid Email Address
To prevent email bounce-backs, ClientTracker alerts
you to when an intended Email recipient has no valid email address.
Email cannot be sent from ClientTracker if there is one or more invalid
email addresses among the intended recipients. For more info, see <<433>>.
- Email Entry - When you enter email addresses for clients or
providers in their Details screen or a pop-up window, they will be
checked for valid format. If invalid, a message will show, and you can
fix it or keep it. If kept, it cannot be marked as Use. An email is
valid for use in ClientTracker only when it is marked "Use."
- Selecting Email Recipients - If an intended Email recipient
has no vailid email, a gray "no email" alert will
show in the recipient list. Clicking this will open a pop-up window,
where a valid email can be entered.
- Composing Communication - If one or more recipients has an invalid email, an alert will show in the banner of the Composer screen: "bad email."
Forms work almost the same as letters except that forms are intended to be signed and can have only one recipient. Forms are intended primarily for tracking HIPAA required documents and other items needing client signatures that you may require for your practice.
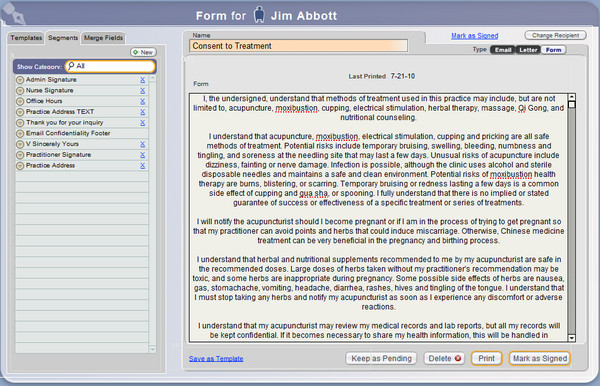
Creating a New Form
When you click the button in the Comm Panel, the Composer shows a different set of buttons at the bottom. The differences from letters functions are:
- ? There is no visible difference in this action from letters, but a form that is pending is also one that requires a signature.
- ? This will print one copy of the form for the single recipient, but will not designate the form as completed because it needs a client's signature (i.e. it will still show as Pending in the Communications Tracker for that person).
- A display above the form will show the date Last Printed.
- ? Once the form is signed, you may designate it as completed ("Signed") by clicking this button.
Unlike other forms of communication, phone calls are not made from ClientTracker. The Phone type of communication is merely a record of a phone call that was made, or received. This may be a valuable way to keep track of information related to a client or referral provider.

Create
a new Phone record by clicking the button
on any Comm Panel. This opens the Phone Call pop-up window.
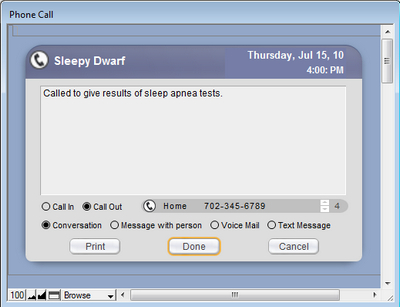
Options for a Phone record are:
- Click the recipient name, date, or time at the top to change.
- Type any notes about the call in the large field provided.
- Designate this as a Call In or Call Out, and whether it is a Conversation, Message with person, Voice Mail, or Text message.
Button Choices:
- - Print the Phone record for your use
- - Save the record as completed in the recipient's list
- - Delete the record (this cannot be undone)
Edit a Phone Communication
After a Phone communication has been saved, it will automatically show as completed with a status of "Done" in all lists. Clicking it will open a very similar pop-up window for editing.
Communication can be created from within ClientTracker, and used for most of your practice's communication needs.
Details in this section include:
- <<155>>
- <<658>>
- <<157>>
- <<161>>
- <<993>>
- <<165>>
- <<167>>
- <<750>>
- <<859>>
A basic rule is that in order to track communications to clients and other people in ClientTracker, you have to generate them from within the software. Of course, you can write a letter, send an email, or make a phone call outside of ClientTracker, but these communications would not be automatically tracked by the software. With some communications (such as phone calls), you can initiate them outside of ClientTracker and keep track of them in the software if you manually create a new communications record.
- For more info, see <<657>>.
The best way to take advantage of all that the ClientTracker communications module has to offer is to generate your communications from within the software whenever possible.
On most ClientTracker screens ? and even some pop-up windows ? you will find a group of 5 buttons referred to in this manual as the "Comm Panel." This is the most common way to create a new communication.
This provides a quick way to create a new communication to the client or provider you are currently viewing, to choose a recipient, or to view the Communications List screen.
The 5 buttons perform these functions: ? Takes you to the Communications List screen. If you are in a client- or provider-specific area, just the communications for that person will be displayed. Otherwise, the list will show all communications made in ClientTracker. (See <<430>> for more info.)
The remaining buttons in the Comm Panel (except ) take you to the Compose Screen and create a new communication of that specific type. If you are in a client-specific area, that client is automatically "loaded" as the recipient. Otherwise, you go to the QuickFinder pop-up window, and are asked first to choose a recipient (see below).

Letter ? Creates a new letter to be printed (see <<136>> for more info)

Email ? Creates a new email to be sent using your email sending method (see <<138>> for more info)
Phone ? Creates a pop-up record of an incoming or outgoing phone call (see <<139>> for more info)

Form ? Creates a new form to be printed and marked as signed (see <<141>> for more info)
Additional Ways to Create a New Communication

A small Comm Panel (without the Pen Nib) is available just above the Communications Portal on the Client or Provider Detail screens. This will create a communication with that person as a single recipient.
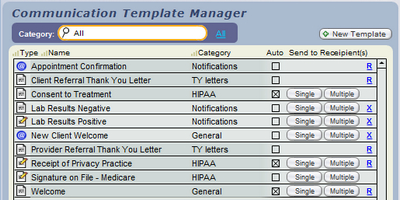
The Communications Template Manager has buttons for creating a new communication for or recipients, using a Letter, Email, or Form template.
See <<144>> for more info.
The "Composer" screen is where a Letter, Email, or Form is created. To get there, you will first have to choose a recipient (see <<157>> below). The single or multiple recipients are shown at the top. To change a recipient, click a button:
Variable Recipient Button (on the upper right of the screen)
- Single Recipient - The button is called , and takes you to the QuickFinder to choose a single replacement recipient
- Multiple Recipients - The button is called , and takes you to that screen, where one or more recipients can be added, subtracted, or replaced.
The "people" icon in the center of the recipient info.
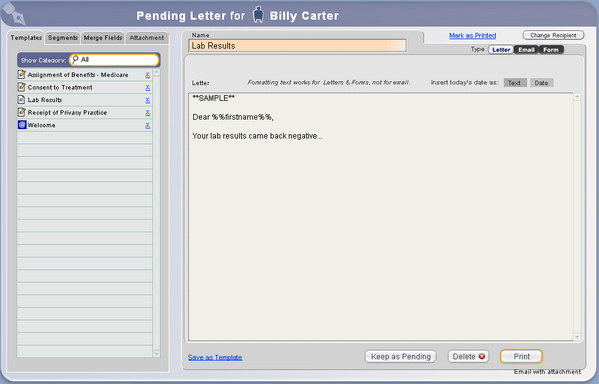
Name - This is a required field, which will show as the "title" of the communication in lists. If you are composing an Email, it can be the same as the Subject.
Body (or Message) - The large field where your communication is composed.
Functions on this screen include:

Apply a Template - Click a Template in the portal to the left, and it will overwrite anything already in the Composer (after confirmation). If you have many Templates, use the small QuickFinder to narrow the list.
- Hover your mouse over a row to see the Template's contents
- Delete or restore a Template, depending on its source. See <<147>> and <<148>> for more info.
Tip: You can format the text in a Letter or Form, and the formatting will print. (Email formatting does not transfer to the email. Only text email can be sent from ClientTracker.) See <<738>> for more info.
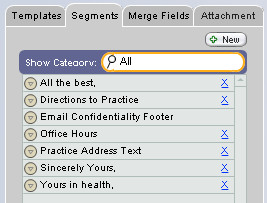
Create, Edit, or Insert a Segment - Click a Segment row to insert it at the end of your communication. Other functions include:
- Click to create a new Segment
- Hover your mouse over a row to see the Segment's contents
- Use the small QuickFinder to narrow the list, if needed
- Click the button at the left of a row to preview or edit a Segment
- Insert the Segment at the location of your cursor in the communication body
- Delete or restore a Segment
For details about using Segments, see <<150>>.
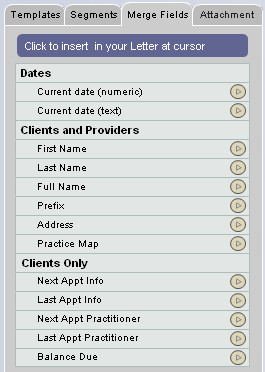
Insert a Merge Field - A merge field will substitute information from a recipient's record or other data in ClientTracker.
- For a single recipient, you may prefer to type the info. If you use a merge field, ClientTracker will show the recipient's info in the sent communication's record.
- For multiple recipients, this can be a handy way to personalize each communication. The data will not show in the saved communication, but the merge field will.
Merge Fields can be added at the point of the cursor. Simply open the Merge Fields tab, place your cursor at the desired spot, and click the arrow at the right to insert (>).
For detailed info about Merge Fields, see <<152>>.
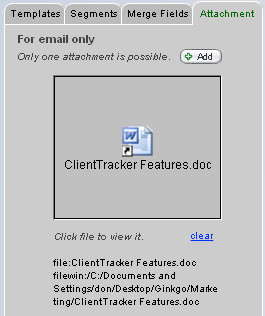
Add an Attachment to an Email - Use this tab to attach an existing file to an email.
1. Click the Attachment tab, and click +Add to browse your computer for an existing file.
2. Select and Open the file, or double-click to add it to the square attachment field on the tab.
3. To remove the attachment, click the clear link.
4. Click Send, and the attachment will
be sent with your email using the Email Sending method you have set
up. See <<426>> for more info.
- For details on how this tab functions, see <<750>> below.
Other Composer Screen Functions

Insert Today's Date - Click this to enter the text of today's date in the body of your communication; at the point of the cursor. You can choose to enter it as text (July 14, 2010), or date (7-14-2010).

Change the Type - Click to change the Type of your communication to a Letter, Email, or Form. This will change the options for composing and processing the communication (see below).

Save the Communication as a Template - Click the Save as Template link near the bottom of the Composer screen to open a small Communications Template Editing Panel. From here, you can save the content and type of the current communication as a Template, which can be used as often as needed.
- Select a Template Category from the drop-down list.
- Choose to Auto-Create for new Clients
- Click Save to save any changes made to an exiting Template that is loaded in the body of the communication (not seen unless a Template is in use)
- Click Save As to save as a new Template, which will use the Name field as its name
- Click the small [x] to close the Editing Panel
Action Buttons
Once you create a communication, there are different buttons for what you can do with it, depending on its type. You can always delete a new communication in progress by clicking the button, to save it for later, or or it.
For all - Letter, Email, and Form
- - Save the communication as "pending" in the recipient's list
- - Delete the communication (this cannot be undone)
- - Saves the
communication as a Template, by type
Letter
- - Print the letter, and
automatically mark it as sent (completed)
- - Create an email using your email
sending method, and automatically mark it as sent (completed)
Form
- - Print the from, with an option to mark as signed (completed)
- - Mark the Form
record as signed (completed)
There are 4 basic methods of managing the recipients for a communication.
1. As stated previously, if you are on a client- or provider-specific screen when you click a Comm Panel compose button, that person is automatically selected as the recipient.
2. If you click a Comm Panel button from a layout that is not specific to any single person, you must first use the QuickFinder to choose a recipient.
-- From here, you can also click the button
3. When the Composer has a single recipient selected, you can find, switch or add more recipients by clicking the icon or name in the heading, or the button on the upper right of the Composer.
4. When the Composer is open for multiple recipients, you can find, switch, add, or reduce recipients by clicking the icon or name in the heading, or the button on the upper right of the Composer.
The Recipient QuickFinder
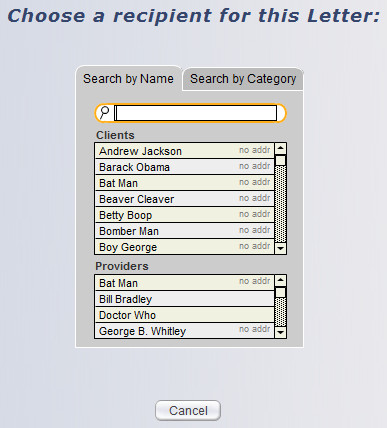
The recipient QuickFinder is for selecting one recipient for a new communication, or switching to a different recipient for a communication in progress. If you want to choose multiple recipients, click the button on the upper right of the QuickFinder screen.
You can search by name for clients or providers; or by category for clients. The Search by Name tab has a filtered search field. Simply type the client name or portion of the name, and the lists below will be filtered as you type. To select a recipient, click the client or provider name in the list, and you will be routed to the Composer for the type of communication chosen.
The Search by Category tab is for selecting a client only. Its QuickFinder has a drop-down list of user-defined client categories, which are assigned to a client on the Client/Personal screen. Select a category from the drop-down menu, and the list below will show only those clients in that category. Select the desired client the same as above.
Only letters and emails can have multiple recipients. Only one communication record is created and stored in ClientTracker; however, the output will be one letter or email per recipient. Each recipient's Communication List will reference the same letter or email.
If you select , a more detailed screen appears, with a header "Choose Multiple Recipients." On the left of this screen, in the Individuals & Groups tab, you can search by name or by category to choose individuals. Click one or more names in the list or go button and each name will be added to either the client or provider recipient list on the right tabs. You can combine an unlimited number of clients and providers for any letter or email.
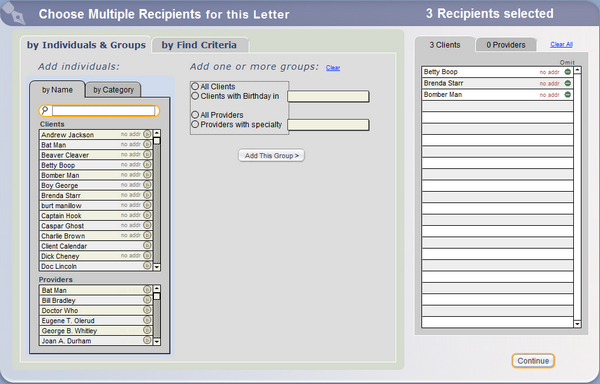
To choose multiple recipients by group, select a group type from the center section, Add by group, and if necessary, provide a filter value in the fields provided. Group selections include:
- All Clients
- Clients with Birthday in (choose month)
- All Providers
- Providers with specialty (Choose from drop-down list)
Click the button, and all records matching the group criteria will be added to the respective Clients or Providers lists on the right. You can mix & match adding clients or providers to these lists; by group or individually. To clear the list, click Remove All. To remove any one unwanted recipient from a list, click the small (x) in their row of the list. When you are satisfied with the list of recipients, click to proceed to the Composer.
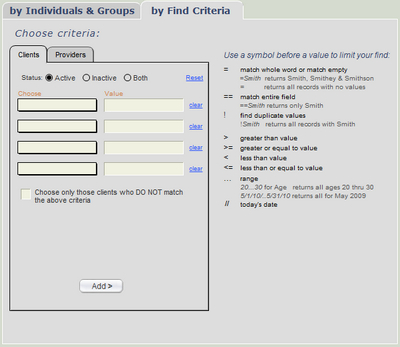
You can also add a group of recipients By Find Criteria; on the tab of the same name. This works much like the Find Clients function in the Clients area. See <<24>> for details.
-- There is a tab of criteria available for Client and Provider recipients
Managing the Recipient List
As you select recipients, they are added to the Clients or Providers lists on the right. To remove a recipient from a list, click the small button in their row.
- For Email, if the chosen recipient does not have a valid email address, a no email alert flag will show in red to the right of their name. Click this flag, and a pop-up window will open, in which you can edit the email addresses of the recipient.
- For a Letter with recipients who have no address, this will say no addr, but the address would need to be corrected on the recipient's screen.
If many Email recipients do not have valid email addresses, you can click to Duplicate Email for Recipients without Email Addresses, and a new communication record will be created, exactly like the one you are working on. (It's best to do this after you are finished composing the text of your email so their content will be the same.)
Multiple Recipient Output
The output of your communication will differ based on the type; for single or multiple recipients.
? Letter = One copy is printed for each recipient
? Email = One email is sent using the default sending method in Settings/Program Settings
? Form ? Multiple recipients are not possible, so only a single form is printed
? Phone ? There is no output for a phone record
A completed communication will show in the Communications List of each recipient.
Note: If a letter or email is completed, but output is not possible because of missing information, a pop-up window will warn you if one or more recipients have no valid address. For multiple recipients, you have the option of completing the communication for those with an address and creating a new Pending communication for those without an address.
Beginning with v6.0, you can send an email to anyone from ClientTracker. There are no restrictions - any valid recipient email will work.
How This Works
- You can start an email in 2 ways:
- Use the new Send As Email button, which appears on the Floating Preview Palette for selected print jobs
- Click any Email button (in the lower left of most screens) and choose a Client or Provider as recipient
- If a Client is selected as recipient, the email will be stored in the Client's Communications List (even if they do not receive the email)
- Once the email is started, you may remove the recipient and just send it to the override email if desired
- Email sent to an override recipient shows in the main Communications List with the recipient email address in parentheses, and any Note will show in a tooltip by hovering your mouse over the email address
- Multiple recipients are not supported with Email Override, except that you may enter more than one email address in the Override box, separated by a comma (or other syntax required by your email program)
- Use of CC and BCC are not supported, but you may go to your email program outside of ClientTracker and forward the Sent email to anyone if you wish
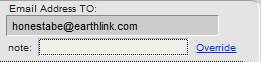
Steps to Enter an Override Email Recipient
- Start the email communication as usual
- In the upper right of the Compose screen, click the blue Override link
- Enter a valid email address and an optional Note in the pop-up box
- Click Save, and this email address will now be used as the "To" recipient
- Compose and send your email as usual (add an attachment as needed)
Tip: This is a useful way to send certain documents to third parties (e.g. attorneys, insurers, etc.) while keeping a record of what was sent (and to whom) in the Client's info.
A communication is designated as "completed" according to its type when you perform its final action as follows:
- Letter ? click
- Email ? click
- Form ? click
- Phone Call ? click
After completion, whenever you access a communication record from a list you will go to an information screen that looks much like the Composer. However, the communication cannot be edited on this screen because it has already been sent. See <<167>> below for details on how to edit a sent communication.
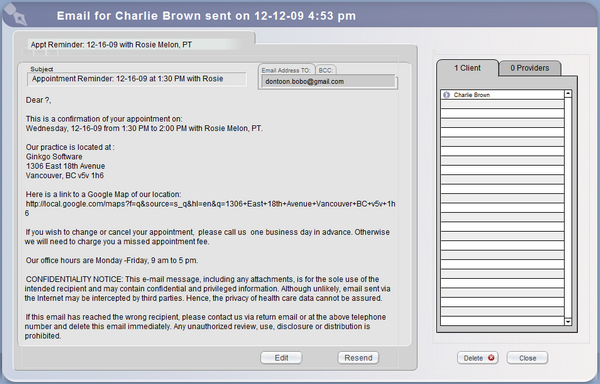
Functions on this screen include:
- For Letters, Emails, and Forms, you can view the date sent and a list of recipients.
- You can view any email attachment by clicking the file icon
- You can also click to the text and other details in the communication or the communication (see <<167>> below).
- If the communication was sent to multiple recipients, they will show in tabs of Clients and Providers to the right of the screen. Clicking on a recipient in either portal will take you to that person's record.
Manually Mark a Communication as Completed
If you need to manually enter the date that a communication as completed, you can do this with a link near the top of the Compose screen. For letters and emails, this displays as Mark as Sent. For forms, it says Mark as Signed. Either way, when clicked it offers a pop-up box to enter the date.
For completed communication, you can change the date completed by first choosing to the communication which will change it back to the Composer screen; then click the link.
Click the button on a completed communication, and you are offered two choices:
- Edit the date and/or content of the original communication
- Duplicate it as a new communication (leaving the original unchanged)
If you choose to a letter or form, or an email, it becomes a new, duplicate communication record. When you do this, a confirmation box appears before creating the new communication record. The new record will display in the Composer screen with the same recipient(s), after which it can be modified and tracked the same as any new communication.
Button actions for a duplicated communication:
- = Permanently delete the communication record (after confirmation)
- = Return to the previous screen and keep the communication record as it was
- = As described above
- = Print (or reprint) the communication after confirmation
You can send an attachment with an email from ClientTracker. This function will work with any file already saved on your local hard drive or network. The attachment will be added to the email program that is designated to actually send your email outside of ClientTracker, e.g. Mac Mail or Outlook. Only one attachment per email can be sent.
IMPORTANT: Attachment files are not stored in ClientTracker and do not have to be in the "ClientTracker Files-Photos" folder. If your attachment files involve Protected Health Information, it is advisable to safeguard their location and include them in your external backup processes.

An Email that has an attachment is signified by a square, blue email icon in lists and other places in ClientTracker. (An email without an attachment is a circle.)
- You can also add an attachment to a Communications Template, so it will be added to any email created from that template. See <<147>> for more info.
- See <<743>> for how to send an Invoice as an email attachment.
- Only one attachment file per email is possible.
How to Add an Attachment to an Email
1. On the Compose screen, click the Attachment tab, and click +Add to browse your computer for an existing file.
2. Select and Open the file, or double-click to add it to the square attachment field on the tab.
3. To remove the attachment, click the clear link.
4. Click Send on the lower right of the Composer, and the attachment will be sent with your email using the Email Sending Method you have set up. See <<426>> for more info.
5. A link to the attachment will remain in the record of the email saved by ClientTracker.
Note: Unlike linking a file to a client or SOAP, the file will remain in its existing location on your computer. The file's location will be remembered by ClientTracker and its file path displayed below the attachment field. If you remove or rename the file, it will show as "File Not Found," and you will need to reattach it.
Tip: When you see the attachment file icon, you can click it to view the actual file in a separate window, if you have the program that created the file on your computer.
[ClientTracker Cloud 5.0]
Use the system's Browser window to locate a file on your local computer and upload it to the Cloud, to be used as an attachment. See <<854>> for details on the upload process.
ClientTracker Cloud allows you to maintain a list of files stored in the Cloud, from which you may choose an attachment. This list is managed on the Attachments tab of the Compose screen.
Tip: The list can be filtered by Category, using the small QuickFinder above the list. Add a Category in the File pop-up, right after adding it. Or click the small Go button at the left of a row to open the File pop-up and change it.
Step 1 - Upload a file to the list. Click +Add File to browse for a file and upload it.
Step 2 - When the file appears in the list, click the Attach link to attach it to the email. The row will be highlighted in yellow to indicate the file is attached.
Note: The little blue @ icon for an email communication turns into a square to indicate there is an attachment.
- To remove the attachment, click Clear
- To open and view or edit the attached file, click its name
- To open the file pop-up and manage the file details or replace it, click the small Go button at the left of its row
ClientTracker is not an email program, so it does not actually send email itself. Instead, it relays email data to another email program that you are already using. This can be on your local computer or online.
Details in this section include:
- <<426>>
- <<427>>
- <<428>>
- <<433>>
In ClientTracker 7, you no longer need to enter your own email address with specific settings. Your ClientTracker 7, is set up to send email. All you need to do is go to Settings, Program, Email, and make sure that the Send email bool is checked.
After you do that, check your email settings, make sure that your choices are reflected here.
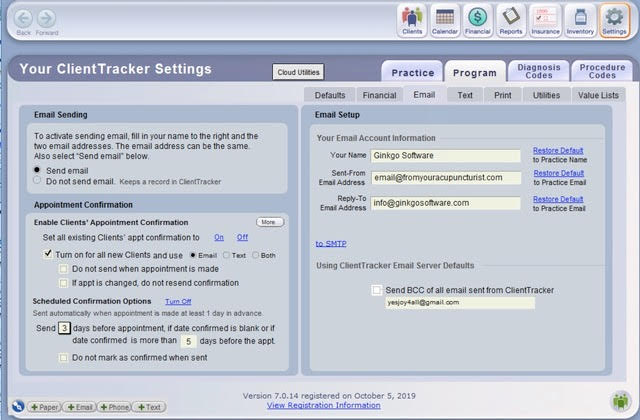
For a client to receive an automatic appointment confirmation email, the Enable appt confirmations by email box must be checked on the client's Personal screen; and:

On the Settings/Program/Defaults tab, you can set all existing clients' email confirmation to On or Off, and choose to turn On (or not) for all new clients.
Notes:
- Once set up properly, the email will be sent automatically, using your chosen email sending method, when the button is clicked while making an appointment
- The email can be resent up to 1 day before the appointment, by opening the Appointment pop-up window and clicking the blue link
- You can select, If appt is changed, do you resend confirmation. This turns off the pop-up, asking if you want to resend the confirmation, when you edit an existing appointment. You can resend if you choose to, manually.
- Or, use the Calendar "Day List View" to send an appointment reminder email. See <<83>> for more info.
- The email uses the "Appointment Confirmation" template, which you can edit in Reports/Templates & Marketing
- The email is stored in the client's Communications List each time it is sent
ClientTracker will evaluate email addresses for validity if they can be used to send mail within the program. These include client and provider email addresses only.
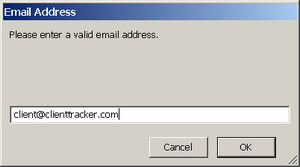
When you first enter a new email address, a small pop-up box will open. After you enter the email address here and click OK, a warning message will appear if the email address is invalid. Click to it as is, or . If the email is valid, ClientTracker will automatically mark it for use.
If you save an invalid email, you won't be able to mark it for use in ClientTracker by checking the Use box. If you try to mark an invalid email address for use, a warning message will appear, giving you the option to verify it or correct it.
Alerts During Entry of Invalid Email
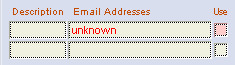
An invalid email address will display in red text in any email portal.
In addition,
- The Use box next to a Client's email address will show as pink if there are no valid email addresses marked as Use, and the "Enable appt confirmation by email" box is checked.
- The Primary box for Providers will show as pink if there is no valid email address marked as Use.
- If there are two valid email addresses, both can be marked as Use, and ClientTracker will send all email for that recipient to both addresses.
Communications Module Alerts
- Selecting
Email Recipients - If an intended Email recipient
has no vailid email, a gray "no email" alert will
show in the recipient list. Clicking this will open a pop-up window,
where a valid email can be entered.
- Composing
Communication - If one or more recipients has an invalid email, an
alert will show in the banner of the Composer screen: "bad email."
- For more info about how invalid email behaves in the Communications Module, see <<138>>.
In the Settings/Program/Defaults tab, you can choose from 2 email sending methods.
Note: Support for ClientTracker does not
include advice how to work with your particular email program. Consult the documentation of your chosen email
program for more info, or see <<793>> for some tips.
Option 1: Send email directly using your email provider
This method may be used if you have an Internet email provider that supports SSL encryption. This will send an email directly from ClientTracker; without a preview window from your online email provider. For this to work properly, you will need information about the SMTP server from your email provider.
Notes:
- Click here to see a PDF diagram of how this method works
- As of the version 4.0 release date, this method is not compatible with some services, such as Yahoo, or Hotmail. This will be reevaluated in future versions.
- If passwords have been set up, only those with Admin and Staff access can set up this method.
- Additional setup is needed to use this method. In this case, the Set up defaults link will show as red.
As of 8-23-16, we recommend Gmail for sending email from ClientTracker. If you have an email address from another Email provider that you want to use, we will try that BUT please be aware, Gmail is the most consistent, with the highest success rate when set up according to these instructions. If your preferred email fails, set up a free Gmail account. You only need to use this for sending email from ClientTracker, you do not need to replace your current email.
IMPORTANT: Check your Gmail Settings BEFORE settings up your email in ClientTracker.
FIRST, open your Gmail and click on the circle with your initial in it and click My Account. In Sign in and Security, Choose Connected Apps and Sites and scroll down until you come to Allow less secure apps and turn those On.
Second, go back to your Gmail and go to Settings, and choose Forwarding and POP\IMAP, Enable POP and IMAP and Save changes at the bottom.
Now you are ready to set up your sending method in ClientTracker.
EXAMPLE: How to set up this method for Gmail
- Once this method is chosen, click the blue link that appears: Set up defaults
- Enter your Admin password if passwords have been set up
- On the Admin Setup screen (see below), you will need to enter the following information:
- The email address of your online email account
- Your name (i.e. what you want recipients to see as "From")
- The Reply-To email address that recipients will see and use
- The SMTP server address and port for your online email provider. (To find this information, consult the Help pages of your email provider.)
- For Gmail, use smtp.gmail.com and Port 465
- If your online email provider requires SSL, check this box
- For Gmail check the box
- Authentication - Select None, Plain Password, or Cram-MDS
- For Gmail select Plain Password
- Plain Password - Applies the User Name and Password as you enter them
- For services that use Cram-MDS - Applies the same information, but using the Cram-MDS protocol.
- Enter an Email User Name and set the password for your email account.
- For Gmail, enter your entire email address as the User Name, e.g. Acupuncture@gmail.com
- Set or Change Email Password - Click this button to enter and confirm the password for your email account.
- For Gmail, enter the Password you set up for your Gmail account
- Click the button to return when finished, or Send Test Email back at the top
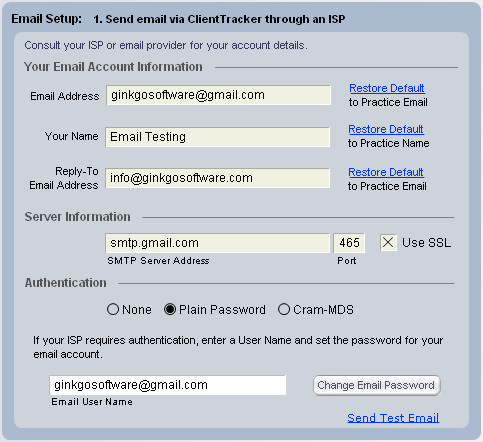
Option 3: Do not send email
This is the default method when ClientTracker is shipped. No email will be sent from ClientTracker, but you can still use it to store records of email sent by other means.
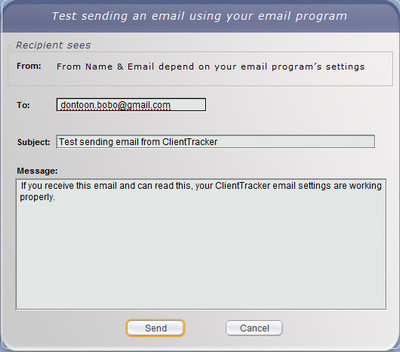
You can click the blue Send Test Email link anytime to send a test email that is not saved in ClientTracker, but uses all the current settings. A pop-up window will show the To address of your practice, and a default Subject and Message - all of which you can change if you want. If you are using SMTP settings, a "From" name will show as Your Name, and the Reply-To Email Address (which is what the recipient will see).
When you are ready to send the Test Email, click Send. Then, check the outbox and inbox of your email program or online email account to see the email.
If your test email returns an error code, you may contact Ginkgo Customer Service for assistance. Please note that customer service contracts do not cover problems with your local email setup.
Details in this section include:
- <<147>>
- <<148>>
- <<149>>
- <<150>>
- <<152>>
- <<1046>>
- <<435>>
- <<860>>
ClientTracker allows you to create or save communication in the form of Templates or text Segments that can be used over and over.
- Templates = whole communications (e.g. appointment confirmation)
- Segments = parts of a communication (e.g. signature)
Templates can be made for letters, email, and forms. Your
templates can be created, stored and edited in ClientTracker and used
anytime to send "as is," or customized for one or more recipients.
Communication Templates are managed in the Reports area; on the Templates & Marketing tab.
Segments can also be used in any communication. They are accessible in the Segments tab on the Composer screen of a Template, or an actual communication.
Merge Fields are a component of Templates and Segments, which act as placeholders to be replaced by actual data from ClientTracker. For example, the Merge Field %%first_name%% would be replaced by "Mary" from the Client's record. They are accessible in the Merge Fields tab on the Composer screen of a Template.
In the Reports area, on the Templates & Marketing tab, there is a portal of Communication Templates where you can perform the following actions:
- Create a new template by clicking the button
- Edit a template by clicking on its icon or title (see below)
- View template contents by hovering your mouse over its title
- Filter the portal by Category to locate a Template
- Send a template to or recipients by clicking the respective button*
- *Some templates cannot be sent this way because they depend on contextual data in ClientTracker; e.g. Appointment Confirmation
- Delete a template you made by clicking the at the right of its row
- Restore a System Template to its default text by clicking the at the right of its row
The Communication Template Composer Screen
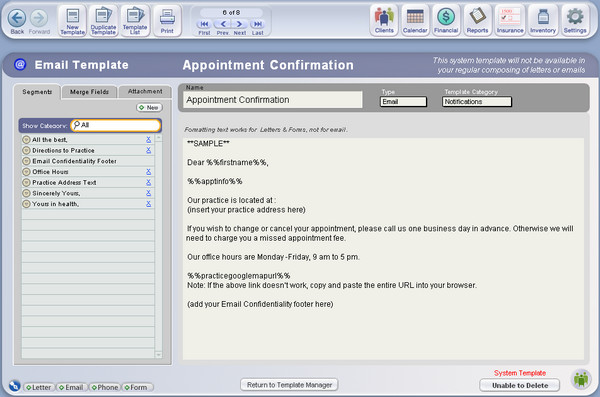
Tips:
You can format the text in a Letter or
Form Template, and the formatting will transfer to any communication created from that Template. (Email formatting does not transfer
to the email. Only text email can be sent from ClientTracker.) See
<<738>> for more info.
The use of quotation marks in your text can prevent proper functioning of Templates. Suggested alternatives are:
-- Do not use quotation marks ( " )
-- Use apostrophes ( ' ) instead of quotation marks
-- Use a backslash ( \ ) character right in front of every quotation mark. For example, "needles" would be typed as \"needles\"
Create a Template
Click the icon to access a blank Communications Template Composer screen for the new Template. Fill out the Name, Type, and Body, using typed text, Segments, or Merge Fields as needed. The composition of a Template is much like composing a regular communication. See <<658>> for more info. Also on the Communications Template Composer screen, you can:
- Assign the communication type
- Assign a category
- Set the communication to auto-create for new clients
- Use Segments or Merge fields to add to the template
- Add an attachment to an Email Template, and it will be copied to every email created from that template. See <<750>> for more info how this works.
The information you enter is automatically saved. Click to go back. Your new Template can be used to compose communication immediately.
Edit
a Template
Simply click any template's icon or title in the Communications Template Manager
and you will be taken to the Communications Template Composer screen.
Type any changes you want and click or to update the
template with the changes. You can also click in the Control Panel to save the edited version as a
new template (keeping the old one as is).
Delete a Template
On the Communications Templates Composer screen, Templates you have created can be deleted anytime using the button at the bottom of the screen. If you have edited a System Template, this button will instead say , and will restore it to the template shipped with ClientTracker. System Templates cannot be deleted.
Note: If a Communication Template has been designated for use on one or more SOAP Templates, it cannot be deleted until it has been removed from all SOAP Templates. Go to each SOAP Template in the Template Settings tab, and click the Remove button for the Communications Template. See <<504>> for more info.Control Panel Icons (on the Communication Template Composer screen)
- - Creates a new, blank template
- - Duplicates the existing template as a new template, with the word "Copy" added to its name
- - Returns to the Communications Template Manager in the Reports area
- - Prints the current template in a full page report format, for reference or training
When a template has been used to create a communication, a blue link, About This Template, appears at the bottom of the composer. Click this to access the Editing Panel for the source template used to create the communication.

By using the editing controls, you can:
- Change the Template Category
- Choose to auto-create this as communication for each new client
- Click Save to save the changes for the original template
- Click Save As to save the changes as a new template (the Name of the communication will be used as the template name, and must be different than other templates)
- Click [x] to close the Editing Panel with no changes
Use the portal on Template tab of the Composer screen to apply a template to a communication. When the row of a template on the portal is clicked, the entire template will replace any existing text in the Composer (after your confirmation). After a template has been applied to a communication, it can be edited as described above.
A new template can also be created from the Composer screen "on the fly." If you realize that a just-composed communication would be useful to save as a template, Simply click Save as Templateand enter its info in the editing controls at the bottom of the Composer panel.
- Enter a Category for the template (required)
- Check whether to auto-create a pending communication from this template for every new client (optional)
- Click Save As to save as a new template
Warning: Caution should be used when editing the text of System Templates, to avoid altering any merge fields. When a System Template is edited, it can be restored to its default text from any list by clicking the small R button at the right of its row. (See <<149>> below for more details.)
Notes:
- A completed communication cannot be saved as a template, but you can re-open it as a new communication by clicking Edit, and then save it as a template. See <<167>>.
- On the Composer screen, segments can also be created and used to compose or add to a template (see <<150>> below).
- Some system templates are used by ClientTracker and are not available for use on the Composer screen (see <<150>> below).
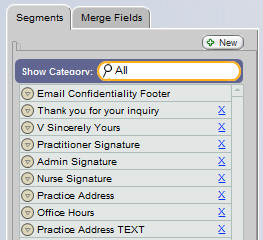
Use text-only communication segments to compose any communication or template for letters, forms, and email.
Text segments can be added at the point where the cursor is blinking ("cursor point"), or at the end of any existing text in the message field. As with templates, there are System Segments included with ClientTracker that can be edited, but not deleted.
The Segment tab is on the left of the Composer screen, and also on the Communications Templates Composer screen. If you have many Segments, the portals can be filtered by category.
On any Segments portal, you can perform the following actions:
- Create a new segment by clicking the button just above the list which opens the Segment Preview or Edit area (see below)
- Insert a segment at the end of the message field by clicking its title
- Delete a segment you created by clicking on the X
- View a segment's contents by reading the tooltip

View or edit a segment by clicking the grey "edit" button which opens the segment in the Segment Preview or Edit area
- Insert a segment at the cursor point of the message:
- Open it in the Segment Preview
- Position your cursor in the Body of your communication
- Click the arrow button at the bottom of the Segment Preview or Edit area.
Note: If the cursor is not positioned in the body of the communication, the segment will be added at the end.
The Segment Preview or Edit Area
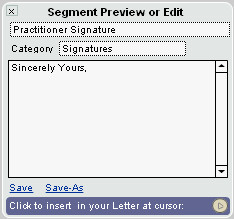
In this area of the Segments tab, you can create a new segment, edit an existing one, or insert it at the cursor point.
When creating a new segment, you must assign a category from the pop-up menu to make searching easier. The Category list is managed on the Settings/Program tab, in the Value Lists subtab.
When you click the edit button to the left of a Segment name in its row, it will open in this area.
If you want to keep it without any changes, click the small [x] at the upper left to close it.
If you make changes to a segment, you can either click Save to save the changes in the original segment, or click Save As if you want to save the edited version as a new segment (keeping the old one as is). A new segment will require a unique name.
ClientTracker comes with several System Templates and Segments already made. Some of these may optionally be defined as required communications by your practice (see below), which would then be auto-created for each new client.
- System Template or Segment = Comes with the ClientTracker software. Most of it can be edited, but it cannot be deleted.
- Custom Template or Segment = The ones created by you, with full editing and deleting privileges.
All templates can be edited and customized
to suit your needs; however, System Templates and Segments cannot be deleted, and
caution should be used when editing so as not to alter the merge fields. Other characteristics of System Templates and Segments
include:
- The "Name" of a System Template or Segment cannot be changed; however, you can edit the name and text if you use to save it as a new custom template. Any new custom templates you make can be designated to auto-create for new clients.
- Any Communications record created from a System
Template can be fully edited or deleted
- The "Name" of a Communication Template is just a label to identify the Template within ClientTracker. This is different than the Subject of an email, for example, which can be edited by you. In the case of a form, the Name may also show as the title of the form in the text area that is printed or transmitted. The subject can always be changed in a System Template or communication.
Auto-Create Communication from Templates
OPTIONAL: Required communications, such as the HIPAA notices, can be auto-created from a template when a client is created and shown in the communications tracker as "Pending" until they are completed according to type. You can set your own custom templates as required forms or communications by marking them to auto-create.
Templates can be marked or unmarked to auto-create for new clients:
Check the "Auto" box on the Communication Templates Manager
Check the "Auto Create for new clients" box on the Communication Templates Composer screen, or the Composer screen editing panel
Edit or Restore System Templates
- A one-letter code serves as a delete button, when appropriate, on the right of any template or segment list. Likewise, the button on the Communications Template screen will change, based on the type of Template.
- An X blue link (or button) signifies a template or segment made by you and allows deletion
- An R blue link (or button) is a System Template or Segment that you have edited, which cannot be deleted.
- When clicked, the R offers the option of restoring the text to the System default.
- A System Template or Segment cannot be deleted, and doesn't display any delete/restore button in the Communications Template Manager. The button on the Communications Template Composer screen will say, .
- An X blue link (or button) signifies a template or segment made by you and allows deletion
Merge Fields are placeholders in a communication that will be filled with data from the record of a recipient. Merge fields can be placed anywhere in a communication, and will work for Letters, Email, or Forms. ClientTracker's merge fields are designated by a "tag" of double percent signs at the beginning and end (e.g. %%lastname%%).
Warning: The"tag" should not be altered in any way, or the merge field will not work.Merge fields are provided by ClientTracker, and cannot be edited or created by the user. They can be found in the Merge Field tab to the left of Compose screens.
SAMPLE:
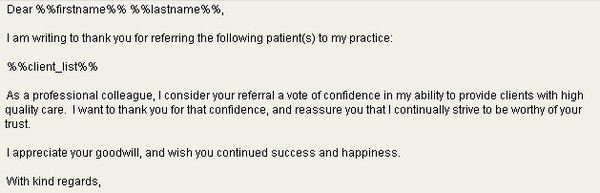
When used for a single recipient, the merge field is replaced by the recipient's data when the communication is printed or sent, and this data shows when viewing a completed communication.
The same is true for multiple recipients, except that the merge fields remain as visible placeholders in the completed communication. In other words, the communication record itself will still show any merge fields in their coded format (e.g. %merge_field%); not the variable information for each recipient.
Merge fields will always show the most current information in ClientTracker; except when retained as completed communications, which will show the data at the time the communication was originally sent.
To insert a merge field anywhere in the body of your communication:
- Click to open the Merge Field tab on the left side of the Composer screen
- Place your cursor anywhere in the Body of your communication
- Click the desired merge field
To insert a merge field at the end of the body of your communication:
- Click to open the Merge Field tab
- Click the desired merge field
Tip: You may want to add the merge field for the client's first name to the Email Appointment Confirmation template. This would be useful if family members use the same email.
Preview What Merge Look Like in the Communication Received
To see what your Communication will look like to the recipient, click the Preview Message button at the bottom of the Compose screen.
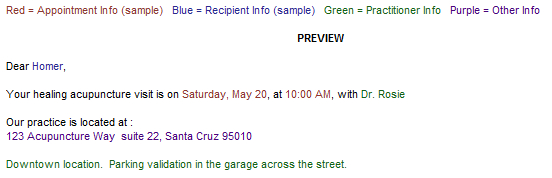
Merge Fields are placeholders in a confirmation that will be filled
with data from the record of a recipient. Merge fields can be placed
anywhere in the Body of your confirmation template, and will be used for Appointment Confirmations ONLY.
- The reason these only work for Appointment Confirmations is because they display information about the appointment itself.
ClientTracker's merge fields are designated by a "tag" of double percent signs at the beginning and end (e.g. %%lastname%%).
Warning: The"tag" should not be altered in any way, or the merge field will not work.Merge fields are provided by ClientTracker, and cannot be edited or created by the user. They can be found in the Merge Field tab to the left of Compose screen.
The Merge Fields available for Appointment Confirmations are different, depending on your choice for Appointment Confirmation Templates. For more info about your choices, see <<1044>>.
Default Confirmation Template Custom Practitioner Templates
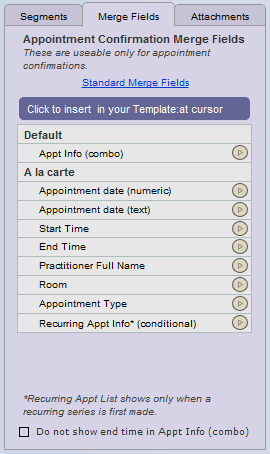
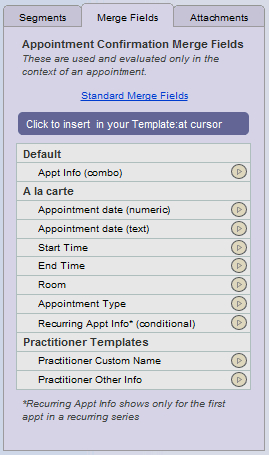
How Merge Fields Work for Appointment Confirmations
Each merge field "tag" is replaced by data from ClientTracker when the confirmation is printed or sent, and this data shows when the recipient sees it, or in your Email program's outbox, or if you look at the Communication record stored in ClientTracker.
Merge Fields for confirmations pull data from the appointment (Visit), Client, or Practitioner records. (See "Preview" below.)
Merge fields will always show the most current information in ClientTracker; except when retained as completed communications, which will show the data at the time the confirmation was originally sent.
Insert a Merge Field
To insert a merge field anywhere in the body of your confirmation template:
- Click to open the Merge Field tab on the left side of the Composer screen
- Place your cursor anywhere in the Body of the template
- Click the desired merge field
To insert a merge field at the end of the body of your confirmation template:
- Click to open the Merge Field tab
- Click the desired merge field
Use "Default" or "A La Carte" Merge Fields for Appointment Info
You may use the default Appt Info (Combo) Merge field in your template to display all the information about each appointment, or build your own message using "A La Carte" merge fields.
The merge field for Appt Info (Combo) looks like this: %%appt_info%%
The content of this field is controlled by ClientTracker, and displays in the following format. The red text indicates data from the appointment itself.
Tip: For recurring appointments, the same Appt Info (Combo) merge field is replaced with a list of appointments in the recurring series.This is a confirmation of your appointment on:
Tuesday, June 20, 2017 from 10:00 AM to 10:30 AM with Mela Rose, L.Ac.
The merge fields for "A La Carte" appointment info represent individual data from the appointment, and may be used in your own way.
- These merge fields are in the "A La Carte" section of the menu
A sample of using "A La Carte" merge fields might look like this:
Your healing acupuncture visit is on Tuesday, June 20, 2017 at 10:00 AM with Dr. Bliss
Tip: If you use "A La Carte" merge fields, you also need to insert the merge field for %%recurring_appt_info%% as shown below. This is replaced with the list of recurring appointments in the series, otherwise it's ignored for single appointments.
Preview
What Merge Fields Look Like in the Body of Your Template - BEFORE
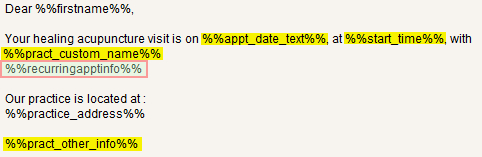
Preview What Merge Look Like in the Communication Received - AFTER
To see what your Communication will look like to the recipient, click the Preview Message button at the bottom of the Compose screen.
ClientTracker comes with 3 pre-made Communications Templates (Forms) and 1 pre-made Segment marked with the category of "HIPAA." These are essential to any practice, and are probably already in use; in some way. The ones provided by ClientTracker are SAMPLES only, and can be edited to suit your practice's needs, but cannot be deleted.
HIPAA Form Templates
- Consent to Treatment
- Receipt of Privacy Practice
- Signature on File - Medicare
HIPAA Segment
- Email Confidentiality Footer
The HIPAA Form Templates can be set by your practice to auto-create for all new clients at the time the client record is created, and thus would appear as "Pending" in the Communications portal for each client. You can change this setting in the Communications Template Manager.
The Email Confidentiality Footer is automatically added to all new emails, and this action cannot be altered. However, you can edit the content of the template or make it blank.
Like other "System" Communication Templates, HIPAA templates may be edited to suit your practice, but they cannot be deleted.
When a communication is created for a client from a HIPAA template, it gets marked behind the scenes as a HIPAA communication. You can always edit it the communication, and even delete it. However, there will be a warning message before you delete it due to the importance of HIPAA communications.
Note: HIPAA requires that all communications to clients be saved, so ClientTracker will give you a warning if you want to delete any completed communication.Create a New HIPAA Communication Template
By selecting a category of HIPAA, you can make any Communication Template of your choice behave like a HIPAA template. If you also mark the auto-create checkbox, your template will be created as a new communication for all new clients.
Date HIPAA Forms Signed
HIPAA
requires all patients to sign for the Privacy Notice and
Consent to Treatment. These can be combined on one form or you can use the two separate forms provided with ClientTracker. When your client signs
for both of these, enter the date in the lower right corner of the
client?s Personal screen. If you prefer to use your existing forms, when you get all required
documents back signed, you would enter the date signed.
- Entering a date will cause the Box 12 area of the client's Insurance screen to show "Signature on File," which would also display on any 1500 forms made for that policy. For more info, see <<33>>.
Tip: For best results, your practice policy and personnel training should be clear about what forms are used, and how the data is reflected in ClientTracker
[ClientTracker Cloud 5.0]
Use the system's Browser window to locate a file on your local computer and upload it to the Cloud, to be used as an attachment. See <<854>> for details on the upload process.
ClientTracker Cloud allows you to maintain a list of files stored in the Cloud, from which you may choose an attachment. This list is managed on the Attachments tab of the Compose screen for Email Templates. Any file attached to a Template will automatically be attached to an email made from that template (including Appointment Confirmation Email).
Tip: The list can be filtered by Category, using the small QuickFinder above the list. Add a Category in the File pop-up, right after adding it. Or click the small Go button at the left of a row to open the File pop-up and change it.
Step 1 - Upload a file to the list. Click +Add File to browse for a file and upload it.
Step 2 - When the file appears in the list, click the Attach link to attach it to the email. The row will be highlighted in yellow to indicate the file is attached.
Note: The little blue @ icon for an email communication turns into a square to indicate there is an attachment.
- To remove the attachment, click Clear
- To open and view or edit the attached file, click its name
- To open the file pop-up and manage the file details or replace it, click the small Go button at the left of its row
When using ClientTracker's Communications Module, you can print a label or envelope at the same time you are printing a communication -- even for multiple recipients in a batch. You can also print labels and envelopes for marketing or other purposes using the utilities found in Reports/Templates & Marketing.
Details in this section include:
- <<174>>
- <<175>>
Note: for labels, envelopes, lists, etc. any blank spaces on printouts usually indicate a client or other record that was created but never completed.
When you choose to Print a Letter or Form communication, the Print Options pop-up window will open:
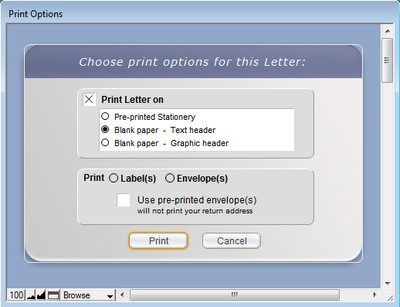
At first, the options to print labels or envelopes will be blank. Click either one to print for all recipients with a Primary address.
An address marked as Primary will print on labels and envelopes even if partially filled out, so maintaining good addresses is recommended.
See <<31>> for more info.
Labels for communications will print in the "Mailing 30-up" format, after the Letter or Form is printed. There will be a brief prompt so you can load the label sheet into your printer.
- Mailing 30-up = Avery 5160 (30-up), and will always begin with the top left label on the sheet.
Envelopes will print as either "#10 Plain" (blank) or if you check the box, as "#10 Pre-printed." The addressee info will print in the "To" area of a standard #10 size, with no window.
On blank envelopes, the return address printed in the "From" area will be what is shown for your practice in Settings/Practice.
If your communication was intended for multiple recipients, ClientTracker will print a label or envelope for each recipient with a valid address after printing the communication. (There will be a prompt so you can load the labels or envelopes in your printer.) The choice of printing labels or envelopes can be canceled at the time of printing.
There are several ways to print envelopes or labels in ClientTracker:
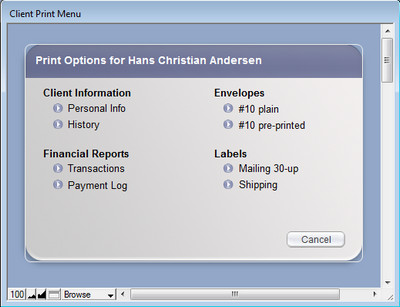
Clients
1. From any Client's Personal screen, click in the Control Panel for a menu of options, including envelopes and labels. This will print for the ONE client. Select one:
- #10 Plain (blank) or #10 Pre-printed envelopes, or
- Mailing (Avery 5160, 30-up) or Shipping (Avery 5453, 2-up) labels.
2. From the Clients List screen, the same Print Menu is available, but it will print for ALL clients currently listed. Use the QuickFinder at the bottom or the button to create customized lists.

3. In Reports/Templates & Marketing, click the Envelopes & Labels row or arrow, and you will go to the Clients Advanced Find screen, where you can find clients using flexible criteria. When found, a list of clients will appear on the Clients List screen. Select from the Control Panel, and then select your output from the pop-up Print Menu.
4. You can also choose to print Labels or Envelopes "on the fly" during the printing of a communication such as a letter (see <<174>> above).
No Address Checker - ClientTracker will evaluate whether a selected recipient has an address, to avoid wasting envelopes or labels. If you try to print a single label or envelope for a recipient with no address, a message will say they have no addresses and will not be printed. For multiple recipients, a message will say " There are X Clients without addresses, for whom (Envelopes or Labels) will not be printed." X being the number of recipients without addresses.
Providers
As providers are possible recipients in the Communications Module, the printing of labels or envelopes as an option for communications will work the same as for clients; or when providers are combined with clients as multiple recipients.
The Providers List screen has a button in its Control Panel that also works the same as described for clients.
Other Addressees for Which Labels or Envelopes can be Printed:
Insurers and Vendors - Can print labels and envelopes for a single company only; from their respective Detail screen. A Print Menu pop-up window will open when is clicked.
Any incoming letters, lab or other reports, photos, can be stored as a digital file linked to a client's Personal or SOAP record in ClientTracker. Digital files can be in any format: .doc, .txt, jpg, .pdf, xls, etc. You can create links to an unlimited number of files for each client. These files can be opened directly from the client's record in their parent application if you have it on your computer.
In this way, incoming communications can be saved as files and stored in ClientTracker; however, the program does not actively receive any communication.
Details in this section include:
- <<171>>
- <<657>>
- <<851>>
ClientTracker is flexible in allowing you to store incoming communication as a linked file. By using your imagination and controlling a systematic approach, you can save almost any type of incoming communication in a client's record or SOAP Note.
Email - Copy and paste (text only) to the bottom of an edited communication to create an email "string" of messages you sent, and replies you received regarding the same email. (This method can also be used for email received from Providers.)
- You can also save the email as any type of file link (see below).
Letter or Form - Scan any paper document and save it as a file; then link it (see below).
Phone - Incoming calls can be noted as regular communication records. See <<141>> for more information.
Manage File Links
For more information about linking files to:
- Clients, see <<480>>
- SOAP Notes, see <<101>>
If you want to keep a record of any communication made from outside ClientTracker, you can do this by creating the type of communication, pasting copied text (or writing a brief description), and marking it as completed. See <<165>> for more information.
How to store a record of communication sent from outside ClientTracker so it is attached to a client's communication history:
- Email - First generate a blank email communication; then copy
the email from your program and paste it into the ClientTracker email
record.
- Letter or Form - Scan the document as OCR text; then
copy and paste it into a blank ClientTracker communication record.
- Mark as Sent - Click this to manually set the date a communication was completed outside of ClientTracker.
There are several ways to use forms with ClientTracker. Superior results are achieved by adopting a consistent, systematic approach to handling documents and forms. ClientTracker supports this by allowing you to create unlimited Communication Templates, and to attach an electronic document to a client?s Personal record, or any individual SOAP Note.
Paper Forms
1. Patients fill out a paper form you provide in person, or as an email attachment. They mail or bring you the completed paper form. You convert it to an electronic image or PDF file using a scanner. Then link the file to the client?s Personal record or SOAP. [Privacy = HIGH]
NOTES: If you have a Word or other document file that cannot be filled in on a computer, but must be printed and filled in by hand, this is considered a paper form. It?s all about how you receive the PHI. A blank form is not PHI until it is filled in by the patient. Forms requiring a signature are almost always on paper. Once you scan a paper document, it is often permissible to destroy the original; however, if you need to retain an original signature it?s best to also keep the paper. Check your local medical records laws.
Electronic Forms
2. You email a text-based form (no formatting) using an Email Communications Template. The patient replies by email, typing her answers in the body of the reply. You ?print this email to PDF? or otherwise convert it to an electronic file. Then link the file to the client?s Personal screen or SOAP in ClientTracker. [Privacy = LOW]
3. You email a file attachment of a form that can be filled out on a computer, such as a Word form or PDF document. The patient fills it out electronically and emails it back as a file attachment. Better security can be achieved if you have a secure upload portal on your web site, or use a password-protected online file transfer service. (There are many such services, e.g. YouSendIt, SendSpace, etc.) When you receive the file, download it to your computer and link the file to the client?s Personal screen or SOAP in ClientTracker. [Privacy = LOW to MEDIUM]
4. You have a web-based form on your website, and patients fill it out there and submit it electronically, usually resulting in an email to your practice. You ?print this email to PDF? or otherwise convert it to an electronic file, and save it to your computer. Then link the file to the client?s Personal screen or SOAP in ClientTracker. [Privacy = LOW]
NOTES: This may seem obvious, but any time you print out an electronic document or form, it becomes a paper form. Get a scanner and learn how to use it! Administering all documents and forms electronically requires setting up a system, maintaining discipline while using the system, and of course you need patients who can use such a system! With ClientTracker Desktop, backing up your storage of electronic medical records is critical. With ClientTracker Cloud, files linked within the program are stored and backed up ?in the cloud.? Software other than ClientTracker is required to make fillable forms, such as Microsoft Word or Adobe Acrobat (PDF).
How to Deliver Forms to Patients from ClientTracker
There are 2 methods available in ClientTracker for delivering paper or electronic forms.
1. Create a Communication Template with a file attachment of your form.
2. Create a Communication Template with the Body being the form.
- Email (text only)
- Letter (formattable, print & mail)
- Forms (formattable, print & mail, track when signed)
Tip: Communication Templates can be set to auto-create when a new patient record is created. Then you just send them (email) or print them (letters & forms).
A third method, and probably the most common, is when the patient fills out the forms at your office just before their appointment. Your patient flow can be greatly improved when you deliver forms in advance to patients. Getting them to fill forms out ahead of time is worth the extra effort!
ClientTracker makes it easy to send thank you letters or emails to providers and clients who refer new clients to you. The referral communication process will look for clients who have either a provider name in the Referred By field of the Referrals tab (on the client's Personal screen), or a client name. There are separate Communication Templates and processes for providers who have made referrals, and clients, too.
Marketing with communications is limited only by your imagination. You can make groups of recipients for any outgoing communication for marketing or other purposes.
Details in this section include:
- <<436>>
- <<437>>
- <<438>>
Send a new Thank You communication (referred to as a "TY Letter" in these instructions) to a provider from 4 different starting points. Any button will allow you to send a TY letter or email.
1. From the Personal screen of any client referred by the provider
- Click the TY letter needed link that appears beneath the referral provider's name when a TY communication has not been sent yet for that client.
- This will create a TY Letter addressed to the referral provider that includes the name of just the one client.
2. From the Thank You Letters section of the Reports, Marketing & Templates tab in the Reports area

- Click the Provider Referrals row or button, and a list of providers needing a thank you is displayed. -- For any provider, click the button.
- This will create a TY Letter that includes the names of ALL unsent clients that have been referred by that Provider
3. From the Provider List screen (accessed via the button on the Settings/Practice tab)
- In any provider's row, click the button.
- This will create a TY Letter that includes the names of ALL unsent clients that have been referred by that Provider

4. The provider's Detail screen (works the same as #3 above)
Thank you communication to providers can be customized each time you send one, and include the names of clients referred for whom a thank you has not yet been sent. The communication (letter or email) will automatically show the text of the "Provider Referral Thank You Letter" template, which is an editable System Communication Template. See Section <<144>> for more information on Communication Templates.
Tip: You can customize the Provider or Client TY Letter templates according to your own preferences, and they will be used for either a letter or email.
Edit and Send the TY Letter
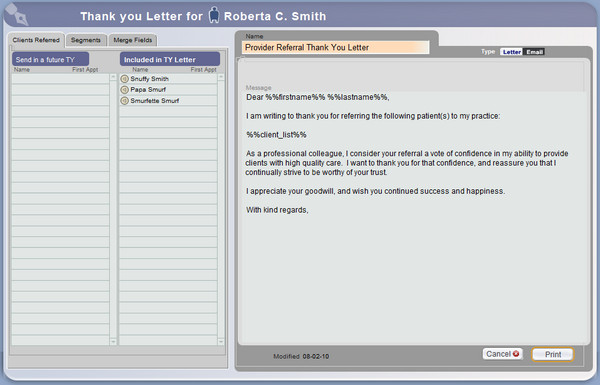
On the Thank You Compose screen, the communication will first show as a letter. (You can change the type to email, if desired, but this manual refers to it as a TY Letter for convenience).
There are several functions available on the side of the Composer.
Clients Referred Tab - All clients' names in the Included in TY Letter portal will be included in the TY letter. If you don't want to include one or more of them, click the name and it will be moved to the Send in a Future TY portal for a future letter. Conversely, clicking on a name in the Send in a Future TY portal moves it to the Included in TY Letter portal.
You can always customize the TY letter using the Segments and Merge Fields tabs just like a standard communication, or by typing text. When finished, you can or the communication or to cancel and delete it. (TY Letters cannot be saved as Pending communications.)
The completed TY Letter will show as a communication in the Provider's Communications tab on their Detail screen.
The Provider's List of Clients Referred

The Clients Referred tab on the main Provider screen shows a list of clients referred by that provider, and the date any TY Letter was sent. If you want to mark manually that a communication was sent, simply enter a date in the space provided. The presence of a date will keep the referral from being processed again as a TY Letter.
This works the same as it does for providers (above); the main difference being the recipient is another client in ClientTracker. The letter will automatically show the text of the "Client Referral Thank You Letter" template, and can be created from 2 different places:
1. From the Personal screen of any client referred by another client
- Click the TY letter needed link that appears beneath the referring client's name only if a TY communication has not been sent yet for that client.
2. The Clients Who Made Referrals section of the Reports, Marketing & Templates tab in the Reports area
- Click the button on any row of the resulting list of clients who made referrals
- This will access the Clients Who Made Referrals list screen

Tip: Clicking the left side of any referring client's row will access their Personal screen.
Referrals Made by a Client
The Referrals Made subtab under the Referrals tab on the Client Personal screen shows a list of other clients referred by that client, and the date any TY communication was sent. If you want to mark manually that a communication was sent, simply enter a date in the space provided. The presence of a date will keep the referral from being processed again as part of a TY Letter.
Note: A new Thank You communication will always include the names of all eligible referred clients, i.e. those who have not yet been included on a Thank You for that referrer. You can choose which clients to include in the Thank You (see above).
After a Thank You has been sent for a referring Client or Provider, the blue link under their name changes to: TY Sent (date). Clicking on this will show the completed communication. For more info on functions regarding completed communications, see <<165>>.
Mass Mailing
As you can send a letter or email to multiple recipients, there is no limit to how many persons can receive a communication. You can compose a promotional letter and send it to any Client and/or Provider recipients with an address marked Primary.
For more info, see <<161>>
Forms are intended for use when something needs to be signed, and for this reason are not possible to send to multiple recipients.
Letters and emails are limited to text only, (i.e. no text formatting, color, or pictures); the look of which is determined by your email program or provider.
Bulk Email
If you use a bulk mailing service, you can export a list of clients from Reports/Templates & Marketing, Bulk Email section to an Excel file, by using Advanced Find criteria to create the list.
- For more info, see <<220>>
Details in this section include:
- <<602>>
Access the main screen by clicking the icon in the Functions Bar (above). The screen has two sections accessible by its main tabs.
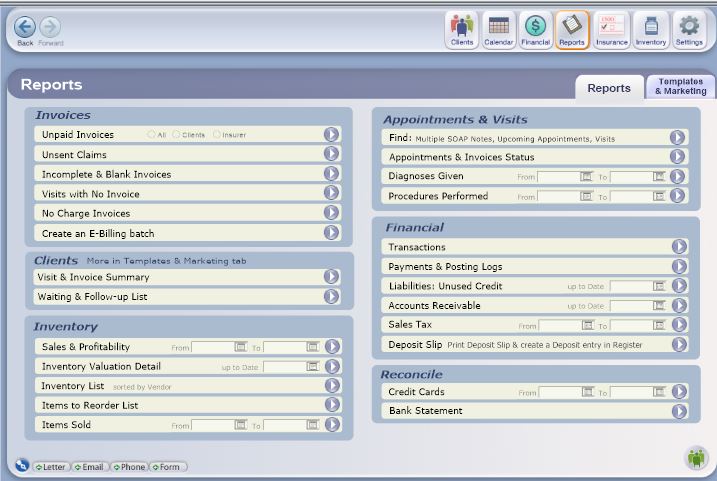
- Reports
- Templates, Forms & Marketing
The Reports Tab
Reports and other functions on the main Reports tab are divided into sections for:
- Invoices - See <<603>>
- Inventory - See <<190>>
- Appointment & Visits - See <<195>>
- Financial - See <<607>>
- Reconcile - See <<613>>
The Templates & Marketing Tab
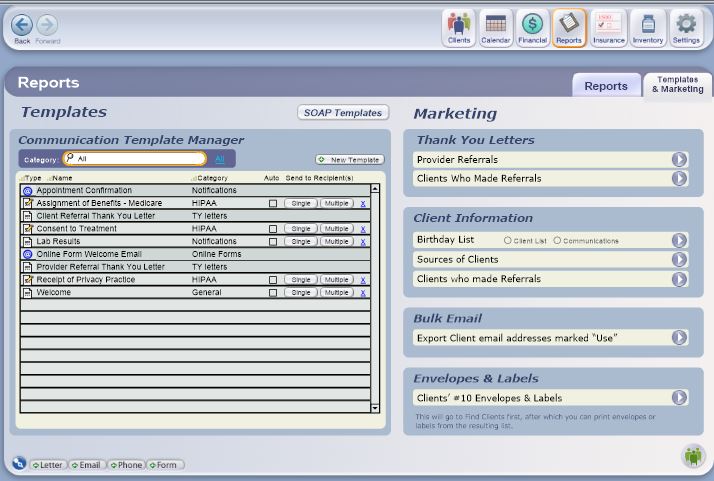
This main tab is divided into two smaller areas:
- Templates - Includes the Communication Templates Manager, and a button to access . This area is discussed in detail in <<147>>.
- For more info on SOAP Templates, see <<494>>
- Marketing - Just like reports, click a button to perform tasks related to marketing in the different sections, such as Thank You Letters, Information, Bulk Email, or Envelopes & Labels. See <<215>> for more info.
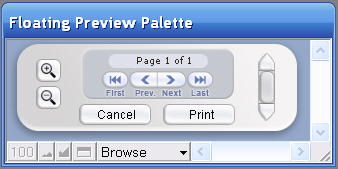
Tip: This is called a " Floating Preview Palette" because it can be moved around to view the print job underneath it. Use the Zoom In and Zoom Out buttons, scrolling and page controls on to review the contents of a report before printing it.
The print headers for Reports are text-only. Some are very simple and uneditable, containing just the Practice name. Reports that might be distributed have a full header, which is composed of your Practice information from the Settings/Practice area. The content and alignment of the full header text can be customized in the Settings/Program area, on the Print tab.
When printing envelopes from the Marketing tab, you have the choice of whether to print on blank or pre-printed #10 envelopes. See <<664>> for more info.
All labels printed from ClientTracker are standardized to Avery 5160 (30-up mailing labels), or Avery 5453 (2-up shipping labels).
There is a hidden link to a new Export Utility. It is hidden because it should be used only by those with adequate knowledge of computers.
To Access the Hidden Link
Go to the main Reports screen, hold down the Shift key, and click on the ClientTracker logo at the bottom right. You will go to a screen on the Utilities tab of Settings entitled, "Export Your Data." You may choose an optional date range for the data to be exported. Leaving the data range blank will export ALL data. The source data will remain in ClientTracker - only a copy of the data is exported.
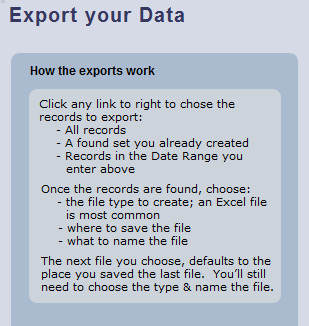
Instructions re "How the exports work" can be found on the screen (see the picture at left).
When you export, you will have the option to choose the file type. It is best to choose the file type of Excel.
When you export with the file type of .xlx or .xlxs, then all the columns will have a header with the name of the field. When you export it as the file time of .tab, .cvs or almost any other type, the column headers will not be there and the data may be unintelligible to the average viewer.
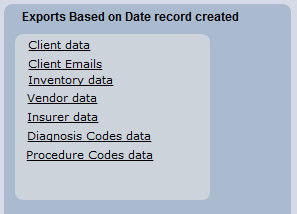
When you open the resulting Excel file, the first set of columns, aka field names, should be very clear. As you scroll to the right, other field names may seem more complex, as they were named for the clarity of programming. However, they still should be reasonably self-explanatory. There is no "data dictionary" available.
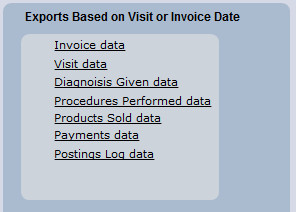
Exported data is the responsibility of the owner, including maintaining HIPAA security. The standard support for ClientTracker does not include support of this export function or the resulting data.
Reports and functions discussed in this section include:
- <<185>>
- <<187>>
- <<604>>
- <<189>>
- <<188>>
- <<606>>
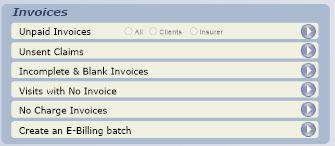
Most of the reports in the Invoices section are intended for quality control of invoices that need something done to them. The report results are cumulative, meaning they will show all past invoices in ClientTracker that meet the report criteria.
Results display on the Invoice List screen, which allows for customization of the report contents before printing and other functions. On this screen you can sort, view details, or omit records as needed before printing. Click at the bottom right to add all the Due amounts shown. For more info about the invoices List screen, see <<106>>.
Warning: If you use the QuickFinder on the Invoice List that displays the results of a report, you will lose those results and must re-run the report to replace them.
Tip: If you leave the Invoice List screen (for example, to view an invoice on the list), use the Back button to retain the found set of your report results.
Click the button to open an Invoice Print Menu pop-up window, with options for printing for the invoices showing in the list (i.e. the current Found Set). You can do this multiple times, e.g. click once to print the invoices; then again to print envelopes.
Print Options:
Tip: Use the Find Invoices icon in the Control Panel of the main screens in the Financial area to produce a found set of results to criteria you specify. This is another way of producing "reports" about invoices. See <<605>> for more info.
- Invoice List - A simple report listing the invoices and information from the List screen. (An optional title can be entered for the report.)
- Print Invoices - Prints a complete invoice for each row of the List screen; according to type.
- Print Statements - prints a statement for each client appearing on the List screen.
- Client Envelopes & Client Labels - Select an option to print plain or pre-printed envelopes; or mailing or shipping labels for each client appearing on the List screen who has a valid address.

This report displays all Unpaid Invoices on the invoices List screen with the most recent ones showing first, and its contents can be viewed and customized in several ways before printing. You can print All unpaid invoices, or only those owed by Clients or Insurer.
- Report Criteria - Any positive balance in the Total Due of any invoice; regardless of who is responsible for the balance.
Select Clients or Insurers, and see a list of the unpaid invoices that have a balance due from either Clients or insurers. Hover your mouse over the choices for more details. This is a good way to batch print Client Statements on a regular basis.

This report displays all Unsent Claims on the invoices List screen with the most recent ones showing first, and its contents can be viewed and customized in several ways before printing.
- Report Criteria - Any 1500 invoice (i.e. claim form), with a blank Date Claim Sent
This report displays all Incomplete & Blank Invoices on the invoices List screen with the most recent ones showing first, and its contents can be viewed and customized in several ways before printing.
- Report Criteria -
- Incomplete = Any 1500 invoice (i.e. claim form) that is missing information needed for billing, for example insurance policy info.
- Blank = Any invoice having no charges (i.e. Procedure or Product line items)

The Visits with No Invoice report shows a list of SOAP Notes for same-day or past appointments that don't have linked invoices. This is a good way to make sure all appointments have been invoiced. The results are displayed on the SOAP List screen, from which you can perform many tasks.
- Sort the list to group by Date, Client, Practitioner, etc.
- View the SOAP Note, appointment info, or client record
- Generate a new Invoice for any SOAP Note
- See <<107>> for more info
- Mark this Visit "No Invoice"
- Click the box under the "No Invoice" on the right side
- The button changes from "Generate" to "No Invoice"
- Later, if you change your mind, click the button on the list, SOAP, or appointment pop-up to remove the "No Invoice" restriction
- Now this visit will no longer show when you run this report
- Use this for
- Cancel Invalid & No Show appointments you're choosing not to invoice
- Other visits you choose not to invoice
- CAUTION: If you check this box after you have just created an invoice from this list, it will delete the invoice (you are designating it to have no invoice)
- Access any SOAP Note and link it to a qualifying invoice
- See <<498>> for more info
- Print the list as Appointments, as a SOAP list, or full SOAP Notes
Remember that when you create an appointment for a client, ClientTracker automatically creates a SOAP Note for it. On both the Appointment pop-up window and the SOAP Note is a button to generate an invoice. It is always better to generate invoices this way, rather than directly from the client record, as this generates the link that the system uses to determine if all SOAP Notes (i.e. appointments) have been invoiced.

This report displays all No Charge Invoices on the invoices List screen with the most recent ones showing first, and its contents can be viewed and customized in several ways before printing. This is different than the report that shows "blank" invoices with no Procedures or Products.
- Report Criteria - All invoices that have the No Charge Invoice checkbox marked (on the Adj. tab of the Payment Palette).
On the List screen, you can perform a variety of tasks to customize and print the report contents (see <<106>>, and above for more info).

This is not actually a report, but a utility that will take you to the E-Billing screen of the clearing house marked as Primary, and show all invoices eligible for E-Billing in the Claims to Send tab.
- For more information on this process, see <<377>>.
Reports in this section include:
- <<191>> (a.k.a. Cost of Goods Sold)
- <<193>>
- <<192>>
- <<194>>
- <<662>>
- <<810>>
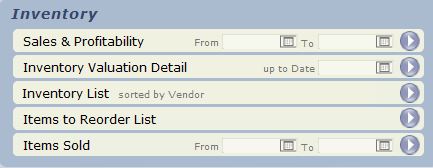
This section lets you print out reports about product sales data, items in your inventory, and items to be re-ordered. The output is printable only.
Report data are from your inventory records, and invoices with products sold.
-- See <<457>> for more info about inventory.
-- See <<106>> for more info about invoices.
Note: Some of these reports require a date, and others require that certain information is entered in the Inventory area, such as Reorder Date.
When most of these reports are run, they are controlled by the Floating Preview Palette. Use this to Zoom In, Zoom Out, or preview multiple pages. Click to access the print options available on your computer. See <<549>> for more info.

This report, similar to a "Profit on Goods Sold" or "Cost of Goods Sold" report, allows you to review and/or print a list of products sold in a specified date range, and what your cost is for them. The report is sorted by the Vendor assigned to each product.
- Report Criteria - Any products sold on invoices during the specified date range.
Note: If passwords have been assigned for Admin and any of the other three levels of access, only the Admin user can run this report.

This prints a complete list of your inventory, with Quantity On Hand, Average Cost, and Most Recent Cost. It also calculates the Purchase Cost and Replacement Value for each item. This report is for accounting purposes, and is sorted by Vendor.
- Report Criteria - All products in Inventory, with the values as of the specified date.
Note: If passwords have been assigned for Admin and any of the other three levels of access, only the Admin user can run this report.

This prints a complete list of your inventory with data up to the current date, including Cost, Price, Markup, Tax, Sold By, Reorder Level, Quantity On Hand, and Total Sold. This report is sorted by Vendor.
- Report Criteria - Any product in the Inventory area of ClientTracker
Tip: Best practice would be to run this report at regular intervals, and see the changes in inventory over time.

This report shows a list of all active products with Quantity On Hand that is at or below the Reorder at quantity specified in the inventory record.
- Report Criteria - If the Quantity On Hand is equal to or below the Reorder at level specified on the List or Detail screen for each product.
Tip: On the Inventory List or Detail screen, you can set your preferred quantity at which you want to Reorder this item. ClientTracker can alert you to re-order when the number in stock reaches that number. See <<505>> for more info. Also, note, that on the screen this is called Reorder at. On the printed report it is called Reorder.

This report shows the total quantity, average price, and total amount for inventory items sold for a desired date range. You have a choice of printing just a list of all Items Sold and their names (regardless of Practitioner), or to see which Products were sold by each Practitioner.
- Report Criteria - Any Inventory item (Product) that was listed on an invoice within the specified date range.
- The criteria do not include Products listed on SOAP Notes without an invoice.
- There is no distinction whether the item was paid for or not (this option may be possible in a future upgrade).
- See <<460>> for more info on the origin of Inventory data.
Reports and utilities in this section include:
- <<196>>
- <<609>>
- <<610>>
- <<835>>
- <<836>>
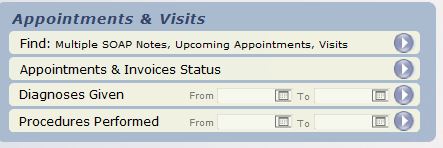
The Appointments & Visits section of the Reports area provides many ways to find and analyze information about past & future client visits.
Remember, in ClientTracker a SOAP Note is automatically created for all appointments; whether you use them or not. An appointment is a scheduled client visit, and a SOAP Note is the medical record for that visit.
Tip: When you use the "Find" utility in this area to find appointments, visits, or SOAP Notes, they are all the same record in ClientTracker.
Results of the "Find" utility are displayed on a List screen. You can also access appointments, SOAP Notes, or Invoices from this screen as appropriate. So for example, if a client stopped treatment, you could delete all her upcoming appointments by accessing the Appointment pop-up for each one.
Note: Be aware that when deleting SOAP Notes, if an invoice has been generated from, or linked to the SOAP Note, you may not be able to delete the SOAP Note until it has been unlinked from the invoice. See <<496>> for more info.
Deleting either an appointment or SOAP Note will erase both SOAP Note and appointment. Be very careful about deleting appointments: if the appointment occurred in the past, the SOAP Note has probably been filled out. HIPAA requires that you retain records of all client visits.
Diagnosis and Procedure Reports
These are summary reports only, that show the diagnoses and procedures used on SOAP Notes during a specified date range.
When these reports are run, they are controlled by the Floating Preview Palette. Use this to Zoom In, Zoom Out, or preview multiple pages. Click to access the print options available on your computer. See <<549>> for more info.
Tip: A list of Diagnoses, Procedures, or Products invoiced for a specific client can be printed by date range on the History tab of the client's record. See <<625>> for more info.

With this utility, you can find multiple appointments or visits, and print them as an appointment list, SOAP list, or individual SOAP Notes. You can search by single or multiple criteria. The Search Results are displayed on a Visit List screen, which represents appointments and if applicable, their SOAP Notes too.
- Click the row or button to access the Find Appointments & Visits screen
- Choose one or more criteria to define your search results
- Click , and the results are displayed on a List screen with full sort and print functions
The Find Appointments & Visits screen will show the last criteria used during your current session. If you log off ClientTracker, the criteria will be reset to the system defaults the next time you log on. The default criteria are shown in green in these instructions. Click Reset at any time to restore the default criteria.
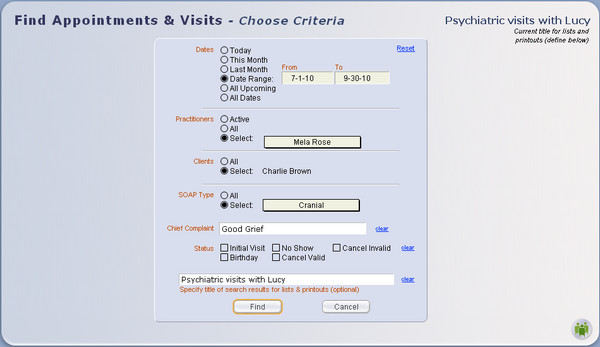
- Dates - Choose: Today, This Month, Last Month, Date Range, All Upcoming, or All Dates. When Date Range is clicked, enter a date From and To in the designated fields.
- Practitioners - Choose: Active,
All, or Select. Choosing Select will show a pop-up menu from which to
choose from a list of all practitioners in ClientTracker (active or
inactive).
- Clients - Choose All,
or Select. Choosing Select will open a pop-up QuickFinder window, from
which you can choose from a list of all clients in ClientTracker (active or inactive).
- SOAP Type - Choose: All or Select. Choosing Select will show a pop-up menu from which to
choose from your current list of SOAP Types.
- Chief Complaint - (Optional) Enter all, or the first word of a Chief Complaint. (This is from the SOAP Note field of the same name.)
- Status - (Optional) Choose one or more visit status assigned by ClientTracker: Initial Visit, No Show, Cancel Invalid, Birthday, or Cancel Invalid.
- Title - (Optional) Enter an optional title for the results of your Find, which will display on the List screen and printouts until you leave that screen.
Visit totals are at the bottom of reports, showing Valid Appointments, Initial Visit, Birthday, Cancel Valid, Cancel Invalid, and No Show.

This report displays all Diagnoses given on SOAP Notes for a specified date range. The report shows a summary of Diagnosis Codes and how many times they were used. This may be useful to see the types of conditions treated by your practice.
- Report Criteria - Any Diagnosis Code that was used on a SOAP Note within the specified date range.
- The criteria are based on the Code; not the Description of the Diagnosis.
- See <<254>> for more info on the origin of this data.
You have a choice printing a list of all Diagnosis Codes, their descriptions, and how many times each was used by all Practitioners during the selected time, or to sort the list by Practitioner to see the Codes used by each Practitioner.

This report displays all Procedures performed on SOAP Notes for a specified date range. The report shows a summary of Procedure Codes and how many times they were used, as well as any discounts and charges. The total amounts for the report period are displayed at the end.
- Report Criteria - Any Procedure Code that was used on a SOAP Note within the specified date range.
- The criteria are based on the Code; not the Description of the Procedure.
- See <<254>> for more info on the origin of this data.
You have a choice printing a list of all Procedure Codes, their descriptions, and how many times each was used by all Practitioners during the selected time, or to sort the list by Practitioner to see the Codes used by each Practitioner.
Begin on the Reports screen, in the Appointments & Visits section at the top right choose the second one: Appointments & Invoices Status. Find the visits you want by date range, practitioner, etc. and your resulting Found Set will show on the Visits List, with a title of your choice.
Click Print on the Visit List, and a pop-up window of Print Options opens. Choose the Appt - Invoice Status option to print the report as a list.
The Status column shows the nature of this visit; is it a Self-Pay or Insurance patient, an initial appointment, etc. If this SOAP was marked FINAL, then the text in here will be underlined.
Tip: You can print this report from a list of any visits; e.g. a list of a specific client's visits, or a list resulting from a find.
This report shows the Time In, Out, and Total for each appointment. It also displays an aggregate Total Time at the bottom of each section, and in the Grand Totals at the bottom. See <<968>> for more info.
To begin, click the Run Report link in any Procedure Code row to open The Procedures Sold Report pop-up window. Enter a date range (i.e to and from), and choose your report by clicking the or button.
If you choose to view , you will have a further option to view the report results on the Invoice List screen (with all its functions), or print the results as a report.
Note: Procedures appear on this report when they have been added to an invoice, whether or not they are paid.
Reports and functions in this section include:
- <<200>>
- <<201>>
- <<611>>
- <<612>>
- <<202>>
- <<663>>
- <<1020>>

Financial reports are detailed in scope, and some offer flexibility so that you can set desired report criteria before running.
Report results are displayed as a preview, and are controlled by the Floating Preview Palette. Use this to Zoom In, Zoom Out, or preview multiple pages. Click to access the print options available on your computer. See <<549>> for more info.
Note: If passwords are enabled for Admin and any of the other three levels of access, only an Admin user can run Financial reports.
This prints a report detailing and summarizing all sales activity on invoices including procedures, products, taxes, payments, adjustments, and discounts for a given date or range of dates. The report can be limited to a particular practitioner and/or client.
Report Results - All invoices generated during the selected period (and meeting any additional criteria) are included in the report, along with any payments and adjustments made against them. Taxes and discounts are also shown and summarized.
When you start this report, the Financial Transactions Report screen will show the last criteria used during your current session. If you log off ClientTracker, the criteria will be reset to the system defaults the next time you log on. The default criteria are shown in green in these instructions. Click Reset at any time to restore the default criteria.
Choose Criteria
- Dates - Choose: Today, This Month, Last Month, Date Range, or All. When Date Range is clicked, enter a date From and To in the designated fields.
- Practitioners - Choose: Active,
All, or Select. Choosing Select will show a pop-up menu from which to
choose from a list of all practitioners in ClientTracker (active or
inactive).
- Clients - Choose All,
or Select. Choosing Select will open a pop-up QuickFinder window, from
which you can choose from a list of all clients in ClientTracker (active or inactive).
- Show - Choose Details or Subtotals Only
- Subtotals by - Choose Day or Month
Subtotals Only gives just the summary, by day or month, of the procedure codes, products, discounts, taxes, payments and adjustments with no invoice details.
For example, if you check 'Details' and check 'Subtotals by Month', it will show each invoice with subtotals after each month and a grand summary at the bottom. If you check 'Subtotals Only' and 'Subtotals by Month' it will show only the subtotals for each month and the grand summary at the bottom.
When you have entered all desired criteria, click to display the results with the Floating Preview Palette. If no matching invoices are found, a message will tell you that, and you can try again. Click to abort.
Tip: The Transactions report prints all the invoices for a given date range, i.e. the month of September. If you print this report on September 30 at 5 pm, it shows all payments and adjustments made on an invoice anytime before you ran the report, on or before September 30th at 5 pm. If the report is run on October 15th for all the invoices in September, then all the September invoices show with all payments and adjustments made on or before October 15th on those invoices.
Make a Year-End Transaction Report for One Client
Often a patient wants to have a year-end report, annual report, or other report of all their invoices for insurance or taxes. To print out a financial record of a patient's invoices for the past year, go to Reports > Financial > Transactions to generate a Transactions Report for the patient (client) with the following criteria:
- Set the Date Range (for example) as 1/1/11 to 12/31/11In Choose Report Format you can set it to show "Details" and use Subtotals by either Day or Month.
- Practitioners should be All
- for Clients, choose Select and specify the patient
Quick Year-End Report
Go to the client's record, click on the Invoices tab. Click on the button in the lower right corner Year End Transaction Report. Then enter your Year.

This offers a choice of two reports for a selected date range and practitioner:
- Payments Log - A list of all funds received from clients and/or Third Party Payers, entered on an invoice or as a Payment on Account.
- Posting Log - A list of "postings" (aka journal entries) made in ClientTracker. A "posting" happens when making an adjustment or distributing a payment on account that affects the Total Due on an invoice.
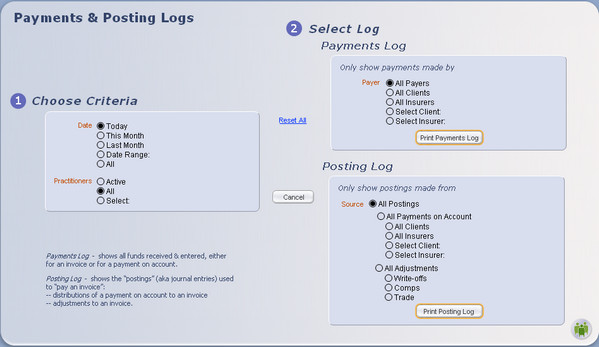
(1) Choose Criteria
- Dates - Choose: Today, This Month, Last Month, Date Range, or All. When Date Range is clicked, enter a date From and To in the designated fields.
- Practitioners - Choose: Active, All, or Select. Choosing Select will show a pop-up menu from which to choose from a list of all practitioners in ClientTracker (active or inactive).
Payments Log
Only show payments made by (select one):
- Payer - Choose one from the following:
- All Payers shows all the payments received from all clients and all insurers
- All Clients shows all payments from any and all clients
- All Insurers
- Select Client opens a pop-up QuickFinder window, to select one client from a list of all clients in ClientTracker (active or inactive)
- Select Insurer displays a pop-up menu, to select one insurer from a list of all insurers.
Only show postings made from (select one):
- All Postings - This shows all types of postings listed below
- All Payments on Account - shows distributions from all Clients' Payment on Account and all Insurers' Payments screen.
Choose one of the below to narrow your results: - All Clients - distributions from all Client's Payment on Account
- All Insurers - distributions from all Insurers 's Payment on Account
- Select Client from pop-up QuickFinder window
- Select Insurer from pop-up menu
- All Adjustments - shows all the below types of adjustments that can be made on invoices.
Choose one of the below for just one; - Write-offs
- Comps
- Trade
Note When the Payments Log is run for a single Practitioner, it will not show any Payments on Account. A Payment on Account is only linked to the client or insurance company that made POA, not to any invoice and hence a practitioner. When the POA is distributed to an invoice, then it will be linked to a specific practitioner; these distributions are shown on the Postings Log. To see the "Payments" for a practitioner, run both the Payments & Postings Logs.
REPORT
All the column headers are self-explanatory, except perhaps for the three on the right, grouped under the title "Payment For". This section groups payments based on the date of an invoice the payment is for:
- Today = payment was made on the same day of the invoice, aka date of service
- A/R = payment was made on a past invoice; i.e. paid on an Accounts Receivable
- Prepmt = a Payment on Account that is not associated with any invoice.
These funds will show on the Postings Log when they are distributed to specific invoice(s).
This section provides a way of evaluating your cash flow and resources spent on your accounts receivable.

This report displays all unused credits for clients and insurers. Credits are payments that have been entered on the Payments on Account tab on the Clients Insurance screen, or on the Insurers' Payments tab, and have not yet been fully distributed.
- Report Criteria - Any client or insurer Payment On Account that has not yet been distributed or refunded. Credits are listed as individual entries in the order they were entered, and are not summarized by client or insurer.

This report provides a "snapshot" of the practice's Accounts Receivable total up to a specified date. It is similar to the "Unpaid Invoices" report, but is intended to be used for accounting purposes, and provides no direct access to the invoices themselves.
When you run the report, you are offered a choice of seeing the AR invoices in date order, or grouped by client. The report does not differentiate the payer (e.g. self-pay vs. insurance).
To run this report, enter a date in the "up to Date" field, and click the button.
- Report Criteria - Any invoice with a balance due, up to the date specified.
Tip: You can get similar results if you run the Unpaid Invoices report and use the QuickFinder to narrow the resulting list by date, client, or status. Having access to the actual invoices in this way may be useful.

Use this report to determine what the amount of sales tax you owe for a particular reporting period.
This prints your choice of a detail or summary of all the invoices, taxable items and taxes collected during a chosen date range. Enter the start and end dates in the blanks, and click the button, and then choose Summary or Detail to generate the report.
Note: If you have set up more than one tax rate in Settings/Practice, the report will show the different rate categories for filing your tax return.
See <<768>> for info on how the sales tax is calculated, especially if you think the total tax collected may be incorrect.

The Deposit Slip is an optional great time-saving utility for processing checks and cash received from clients or third parties entered into ClientTracker. ClientTracker generates a bank deposit slip detail. No more handwriting the deposit slip detail. Credit Cards are handled separately (see <<607>> for more info). The printout is in two sections:
- the right side is the width of a standard deposit slip with the check number and amount so it is HIPAA compliant. Your bank account number (entered in Settings/Practice) is at the top. This goes to the bank.
- the left and wider side has all the details for each payment, invoice # and date, client's name, etc. Attach your receipt from the bank to this section and use it if needed for any troubleshooting.
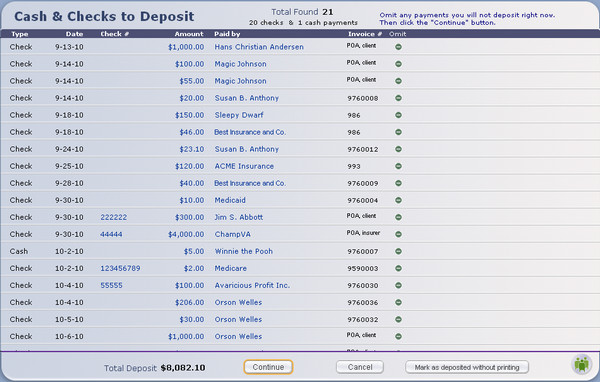
At the Cash & Checks to Deposit screen, review all your payments to be deposited against the actual checks. This is a good opportunity to double-check the accuracy of your data entry against the actual check. You can also omit specific payments from being deposited by clicking the button next to the item. For example, if check is post-dated, this method omits it from deposit until the correct date. When finished, mark the payments as deposited in two ways:
- Click the button to generate a printed Deposit Slip, or
- Click the button, and you will return to the Reports area
If you have the Register enabled, the utility also creates a new entry for the total of the Deposit Slip in the Register. See <<123>> for more info.
The totals will be different when the following happens:
- Clients may purchase a package for a discount on future invoices.
- You have Accounts Receivables so payments are made for past invoices
- Clients are extended credit
- Insurers s pay for claims
The invoices on the Transactions are always for your chosen date range, however all the the payments and adjustments will include any made up to the minute you run the report.
The Payments Log and Posting Log run for September will always show the same total, regardless of when you run the report. In our example, whether you run the report(s) on 5:00 pm September 30 or October 15. These two logs only show the payments received for the month of September. Payments and Postings are often for invoices that are prior to the month they are received i.e. a patient or an insurer may pay in September for invoices in July or August, so naturally these amounts will not be show on the Transactions report for the September invoices. A patent may pay for a "package" for visits for the next two months, and therefore have no invoices in September.
Reports in this section include:
- <<206>>
- <<205>>
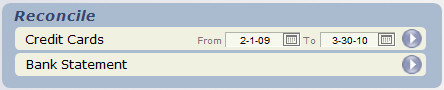
The Reconcile section of the Reports screen contains report functions that will coordinate with the Register, if you have chosen to use it.
Note: If passwords are enabled for Admin and any of the other three levels of access, only an Admin user can perform Reconcile functions.

This report prints a summary of credit card payments received in a chosen date range, or in the last calendar month. Select either "Last Month" or enter a From and To date, then click the button to generate the report. The report will preview and print in a 2-column format; sorted by credit card type.
- Report Criteria - Any payment with a Method of "Credit Card" in the date range specified.
Register Info
As you enter Credit Card payments, ClientTracker marks them as deposited, and creates an entry for each one in the register. Running the Credit Card report has no effect on these Register entries, which would need to be reconciled using the usual process in the Register area. See <<647>> for more info.
Tip: You can use either this report, or the statement you receive from your credit card processing company to reconcile the Register, if you have it enabled.

This utility allows you to reconcile the current balance shown in the Register, with the actual balance of your checking account. Detailed instructions on the process can be found in <<647>>.
Tip: You can use either this report or the Reconcile button on the main Register screen to initiate this process.
The Marketing section allows you to generate printed letters or envelopes to send to clients and referral providers, and export email addresses. Each function is detailed below.
- <<216>> - Thank providers and clients who have referred new clients to your practice.
- <<219>> - Create a birthday list or communication. Also see and print details & statistics about the clients in ClientTracker.
- <<220>> - Export email addresses to a file for external bulk mailing.
- <<664>> - Print batches of envelopes & labels from a Found Set of clients.
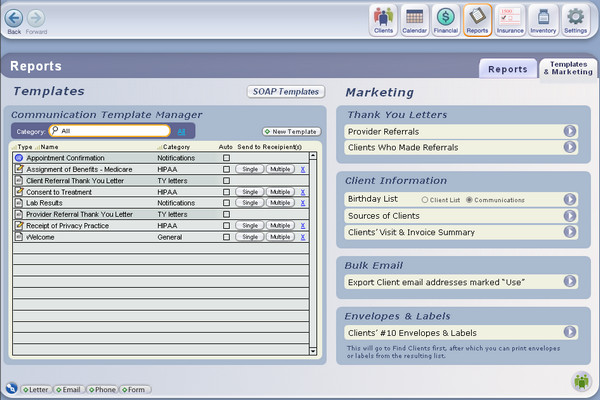
The Communications Template Manager provides access to other methods of marketing; in the form of emails or letters you can customize and send for client birthdays, promotions, and other communications used by your practice. For more info, see <<147>>.

The buttons in the Thank You Letters section allow access to separate lists of the providers and clients who have referred new clients to your practice. From these lists, you can view statistics, print thank you letters, or access contact and other info about your referral sources.
Tip: The Communications Template Manager provides access to the System Templates provided by ClientTracker for use as Thank You letters for providers and clients.
- Provider Referrals - See <<436>> for more info.
- Client Referrals - See <<437>> for more info.
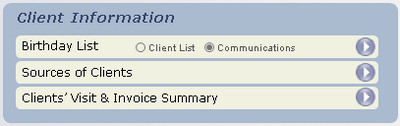
Use Birthday List to find clients for printing labels or envelopes, or to create a group email or letter.
The other Client Information reports provide visit statistics and other details about the clients that have been seen at your practice.
Birthday List - You can choose "Client List" to go to the Advanced Find screen to create a list of clients by birth month; after which you can print labels, lists, or envelopes. Choose "Communications" to compose an email or letter for a group of multiple recipients, which can be sent to a certain birth month.
For more info about how the Advanced Find works to find clients, see <<24>>
For more info about how a group of Multiple Recipients can be found for a communication, see <<161>>
Note: To make a reusable Birthday Letter template and send it as a letter or email, you would create a Communications Template, then create a new communication with multiple recipients. Clients whose birthdays fall in a specific month can be added as a group of multiple recipients. See <<161>> for more info
Sources of Clients - Compiles a list of all clients who were either referred by another client, a provider or a person, or have a value in the Source field (located on the Client Personal screen, Referrals tab).Clients' Visit & Invoice Summary - Shows a list of all clients and a summary of their visit (i.e. appointment) and invoice information. Note: This report begins by showing all clients in ClientTracker, so it could be slow to run.
Once these reports are run, you can change the found set by entering criteria in either the QuickFinder in the footer or using the Find Client button in the Function Bar. You can sort the list, and/or choose to print the report.
![]()
You can also view the
same found set in the context of another Client List screen, by clicking
the Multiple Clients icon; the Multiple Clients icon is in the blue banner to the left of the Title for this list, under the Back button.

When you click to Export email addresses, you are offered a choice of exporting All the client email addresses in ClientTracker, or to customize your list by using Advance Find criteria.
- If you choose All, only active clients with emails marked as "Use" will be exported
- If you choose the Advanced Find method, you can create a custom list, or "Found Set" of clients. See <<24>> for more info on using this method.
- Results will display on the Client List screen, where you can further refine your Found Set
- When you are satisfied with your Found Set, choose File --> Export Client Emails from the top menu.
- Choose where to save the export file, with all emails marked "Use" for all the client records in
the current found set
- You can save as a file type of your choice, i.e. excel, tab-separated etc.
The Envelopes & Labels utiliy allows you to print envelopes and shipping labels using address information from a selected list or "Found Set" of ClientTracker records.
Note: From the Reports/Templates & Marketing area, you can only print envelopes and labels for clients. Other available options include clicking the Print icon in the Control Panel of Clients, Insurance Companies, or Vendors, which will open the respective Print Menu for that area.
You can print the following types of envelopes and labels:
- Pre-printed #10 envelopes (only the "To" name and address will print)
- Blank #10 envelopes (Your practice return address will print as well)
- Mailing Labels (30-up Avery 5160 labels or equivalent)
- Shipping Labels (3-up Avery 5453 labels or equivalent)
When you click the Go button or row on Reports/Templates & Marketing, you access the Advanced Find criteria to create a Found Set of clients. For details on how to use these criteria to find clients, see <<24>>.
The resulting Found Set of clients is shown on the Clients List screen. There, you can click to any unwanted records, sort the set, or change it using the QuickFinder. When you are ready to print, click the Print icon in the Control Panel.
In the Clients Print Menu, select an envelope or label option. You are shown a preview of the printed sheets with the Preview Palette, and have the opportunity to review the print job and load envelopes or labels in the printer before it is printed.
Why is it important to regularly back up your data?
Two words: Data Loss.
We hear from people who have lost years' worth of financial information, appointments, etc. simply because they didn't have a good backup system in place. The good news is data loss is preventable. Wherever critical data is involved, it is vital to have good backup policies in place. This is your only insurance against loss of data in the not-uncommon event of a computer malfunction or 'power event' resulting in data loss or corruption. We strongly recommend a local and external, two-level approach to protecting your data, as outlined below.
Tip: Shut down ClientTracker at the end of every day. This will:
-- automatically save a copy in ClientTracker's Backup folder
-- create an additional backup copy, if specified.
-- protect data file from possible corruption in case of power failure.
Details in this section include:
- <<294>>
- <<295>>
- <<748>>
- <<693>>
- <<746>>
- <<747>>
Avoid Data Corruption due to a power outage. See also the UPS, uninterrupted power supply, information <<670>>.
Automatic Local Backup
ClientTracker automatically creates a local backup copy of your data file every time you close ClientTracker or when you click the Backup Now button. This copy is put in the Backup folder contained inside your ClientTracker folder on your hard drive.
Tip: We strongly recommend shutting down ClientTracker at the end of every day, which will perform a Local Backup and protect your data from possible computer malfunctions.
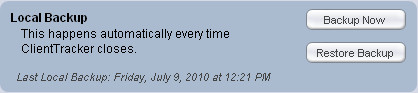
Manual Local Backup
You can perform a manual Local Backup at any time.
- Open ClientTracker
- Go to Settings/Program/Utilities
- Click the button in the Local Backup panel
Technical Notes
When a Local Backup is run, the file ClientTracker_1.ctr is created. Up to 9 backup files are created, numbered ClientTracker_1 through ClientTracker_9, with 9 being the oldest. You can look at the Date Modified to see when the file was created.
When a new ClientTracker_1 file is created, any existing ones are renumbered and moved down in order. 1 becomes 2, 2 becomes 3, etc.
Video
If you need to restore from Local Backup file, the process is very simple.
- Open ClientTracker
- Go to Settings/Program/Utilities
- Click the button
- Wait until the entire process is complete
If ClientTracker Will Not Open
Sometimes, your main ClientTracker file may be damaged to the point where it is not able to open. In such a case, if you are not able to use the Restore from Backup or Recover options, then you can manually replace the main data file using one of the backup ClientTracker files and rename it.
- Remove the damaged ClientTracker.ctr file from the main ClientTracker folder
Note: You may or may not see .ctr at the end of the file. It should be at least 35,000 KB in size. - Copy the desired backup file in the Backup folder (e.g. ClientTracker_1.ctr) You can tell when a backup file was made by the date displayed on your computer. Look for a file that is dated before the damage occurred.
- Paste this copied file one level up in the main ClientTracker folder
- Remove the _1 from the file name so it is named exactly: ClientTracker.ctr or clienttracker if you do not show the extensions in your list.
If you get the message that this new copy from the Backup folder also is corrupted, you can do the same steps 1-4, except use the file ClientTracker_2.ctr.
Note: If this process does not work, STOP IMMEDIATELY and contact Ginkgo Support for assistance. If you run this process by mistake and overwrite your "good" file, see <<748>> below.
OOPS -- Made a mistake when you clicked the button?
Good News! When the Restore Backup process is chosen, ClientTracker automatically saves a copy of the main data file that gets overwritten, in case you need it.
1. In your ClientTracker folder, delete the ClientTracker.ctr file.
2. In your ClientTracker 6.0\Backup\Overwirtten folder, copy the ClientTracker file with the most recent (or appropriate) date and time stamp at the end of the name.
3. Paste this file into the main ClientTracker folder. Rename it to just ClientTracker.ctr, removing the date and time stamp.
Tip: The overwritten files will accumulate with different timestamped names over time, if you perform the Restore Backup function frequently. You may want to delete old copies from time to time.
"An Ounce of Prevention Is Worth a Pound of Cure"
(Ben Franklin obviously had a computer)
Are you making regular external backups of your ClientTracker data? Amazingly, some people still do not do this simple and HIPAA required step. HIPAA requires that you store a backup of your data to an external, protected area. It is standard practice for all businesses with mission-critical data on computers to protect against fire, theft, water and earthquake by keeping copies on an external drive or on the internet, ie out of the office.
ClientTracker includes an automatic backup system that saves a copy of your data file to the Backup folder inside your ClientTracker folder on your main
computer drive. However, this practice still does not meet the HIPAA requirement
concerning external data backup.
You also must have an external backup (of all important
data, in ClientTracker or not) to a separate hard drive, USB (a.k.a. "flash") drive, or
to a recordable CD/DVD, or the internet. This practice is the only way to protect your data
from hard disk failure or damage. Disk failure is not uncommon and can cause you to start
over with nothing - requiring a clean install of all your software and re-entering all of your data.
You may choose to backup just the ClientTracker.ctr data file, or your entire ClientTracker folder. If you have attached files or photos in your ClientTracker, these will be in the ClientTracker Files-Photos folder, and should also be backed up.
Important: Make sure this backup system is actually backing up ClientTracker. You may need to specifically instruct it to choose ClientTracker. Check with their support. ClientTracker support cannot help you with this.
Taking these steps daily will insure that your data will not be lost if your computer should crash, be stolen, or otherwise suffer corruption caused by accidents, electrical disruption, etc.
ClientTracker Data File to copy to external backup
Location: inside your ClientTracker folder
Name: ClientTracker.ctr
- you may or may not see the .ctr extension.
- this will not have the ClientTracker icon
- it will be at least 35 MB (35,000 KB) in size
Location of the ClientTracker folder
Unless you placed it somewhere else when you installed the program, this folder will be in:
- Macintosh: Your ClientTracker folder is in your
Applications folder.
- Windows: Your ClientTracker folder is at this location: C:\Program Files\ Ginkgo Software
FIRE DRILL
Whatever method you choose to create your External Backup, do a "fire drill" to insure that you know how how to restore from this method!
- You do not want to discover after a disaster that your external backup method was faulty. See <<747>>.
Tip: Making an external backup of your data is intended to allow recovery if your main computer is stolen, damaged, or non functional, i.e. "crashed." We very strongly recommend that you do this DAILY, and take the backup copy offsite (don't leave it plugged into your computer).
- An excellent method is to have TWO external flash drives, alternating weekly, and taking one of them home (just in case).
- Remember, backups are also protected HIPAA information!
- To begin, go to the Settings area, on the Program/Utilities tab, under "Your Additional Location"
Tip: To make an external backup, choose the path assigned to your external drive or USB when it is connected to the computer. If you need help with this, it's best to find someone local who knows your computer system.
- To have ClientTracker backup to this location every time you close, check the box provided just below the Backup Now button.
- To change the Default Path, click clear and then the Backup Now button.
- You will be backing up ClientTracker's single data file which will have a date-time stamp automatically included in the file name, so you can easily keep backups for each day.
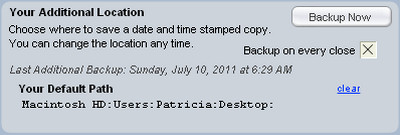
Note: Your file will automatically be named with a date and timestamp for your reference. These files will accumulate over time if you do not manage them. We strongly recommend checking your Additional Backup location regularly to remove old, unwanted backups and ensure that new ones are being made properly.
TROUBLESHOOTING
When you close your ClientTracker, if you get an error message that says "the file could not be created on this disk," it means that the connection to the Default Path for your Additional Backup location is broken. Your options are:
- Click clear and then the Backup Now button to select a new location, OR
- Just click clear and have no Additional Backup (your ClientTracker will close normally)
FIRE DRILL
Whatever method you choose to create your External Backup, do a "fire drill" to insure that you know how how to restore from this method! Your do not want to discover after a disaster that your external backup method was faulty. See <<747>>.
IMPORTANT: This process will overwrite any data on the main ClientTracker data file. You are strongly advised to make a backup copy of your entire ClientTracker folder before you attempt to restore from an external backup.
These instructions assume that you have your main ClientTracker folder installed in the standard locations assigned during installation. Custom installations are not supported.
Standard Locations for the ClientTracker Data File
Location: inside your ClientTracker folder
Name: ClientTracker.ctr
- you may or may not see the .ctr extension.
- this will not have the ClientTracker icon
- it will be at least 38 MB in size
Location of the ClientTracker folder
Unless you placed it somewhere else when you installed the program, this folder will be in:
- Macintosh: Your ClientTracker folder is in your
Applications folder.
- Windows: Your ClientTracker folder is at this location: C:\Program Files\ Ginkgo Software
How to Restore from Backup
Follow these simple steps:
- Locate your most recent external backup file. If you use the Additional Location default path, that will tell you where to look and when the last backup was made.
- Rename the file to be exactly ClientTracker.ctr
- Copy the file and locate your standard data file
- Paste the new file, and overwrite the old one
WARNING: If you use automatic backup software or a service that backups up to the Internet, before you use their restore method, make sure you have zipped or compressed your main ClientTracker folder as an additional precaution.
An interruption of electrical power to your computer can cause loss of data. It is highly advisable to connect a UPS (Uninterruptible Power Supply) between your computer and the electrical outlet.
A surge protector strip is not the same an a UPS!! While a simple surge protector may assist for power surges, it will not help if the power goes out.
A UPS can be purchased at any office supply store and is well worth the investment.
Even if you have a UPS, still turn off your ClientTracker every night. The battery in a UPS will provide power for enough time to safely shut down ClientTracker and your computer, but not enough power to last overnight. A "cold shut down" of ClientTracker can cause file corruption.
Passwords can be set up in ClientTracker. See <<232>> for more information about how to set these up.
- If you have lost your password, see <<753>>
Tip: It's a good idea to write your passwords down and keep them in a safe place. Ginkgo Support will never know your passwords, and cannot retrieve them if lost. If you forget your password, contact support to obtain a temporary one.
IMPORTANT: Information provided in this section is a courtesy only, and does not constitute technical support. Encrypting ClientTracker data on a local computer is the responsibility of the computer owner, and is not a function of the ClientTracker program. In all cases, your computer's operating system support resources are the best reference.
Introduction
Data encryption is handled differently for Mac and Windows computers. The goal is to encrypt any folder that contains Protected Health Information (PHI). ClientTracker may not be the only place you have PHI.
- The folder where ClientTracker data is contained is called "ClientTracker x," where x = your version number, for example:
- ClientTracker 3.41
- ClientTracker 4.0
- ClientTracker 5
- ClientTracker 6
- To learn the standard location of this folder for your type of computer, click here: <<758>>
Tip: To find precise encryption information for your computer system, do a Google search for the OS and the word "encryption," for example "Windows 7 encryption."
Windows Encryption
Basically, all you need to do is locate the folder(s) you want to encrypt, and perform a few simple steps:
-
Right-click the folder or file you want to encrypt, and then click Properties.
-
Click the General tab, and then click Advanced.
-
Select the "Encrypt contents to secure data" check box, click OK, and then click OK again.
Click here for more info, and a video for Windows 7 (this link may be changed by Microsoft, but you can find the info you need in their Support web pages).
Mac Encryption
Basically, you're looking to turn on the "FileVault" feature for desired folders and users.
- Choose Apple menu > System Preferences, click Security & Privacy, and then click FileVault.
- Click the lock icon to unlock the pane, and then type an administrator name and password.
- Click Turn On FileVault.
If the computer has multiple users, a list of users appears. You can enable a user to allow them to log in after the computer starts up. If they are not enabled, an administrator will need to log in first, before the user can log in.
NOTE: If you need Ginkgo Software to provide any assistance with encryption beyond what is provided here, there will be a minimum charge and an hourly rate for technical assistance with local computer issues.Click here for more info (this link may be changed by Apple, but you can find the info you need in their Support web pages).
Details in this section include:
- <<758>>
- <<668>>
- <<697>>
- <<757>>
- <<699>>
The necessary files and folders for the proper function are contained inside the main ClientTracker folder. This folder's name also contains a number for the version. Do not change the name or number of the folder!
Depending on your version the ClientTracker folder may be called
- ClientTracker 4
- ClientTracker 5 or ClientTracker 5.0
- ClientTracker 6.0
The location of the ClientTracker folder is the same (inside the Ginkgo Software folder), but
the "root" location of the Ginkgo Software folder has changed for Windows.
WINDOWS
Version 4 and 5
The standard location is in the C:\Program Files(x86)\ folder. The complete address is
- C:\Program Files(x86)\Ginkgo Software\ClientTracker X (where X = 4 or 5.0)
Version 6
The standard location is in the C:\Program Files\ folder. The complete address is
- C:\Program Files\Ginkgo Software\ClientTracker 6.0
MAC
- Your ClientTracker folder is in your
Applications folder.
Contents of the ClientTracker Folder - Both Windows and Macintosh
Your computer settings may or may not display any "extensions" on a file name, i.e. the .ctr .exe or .app that follows at the end of the file name.
- Backup folder - copies of your data files
- ClientTracker_1.ctr (up to _5) (see <<293>> for more info)
- Overwritten folder
- ClientTracker.ctr - file with all your data.
- You may or may not see the ".ctr" at the end of ClientTracker.
- This will not have the ClientTracker icon of the 3 people, that is a shortcut.
- This file will be at least 35,000 KB in size.
- ClientTracker Files-Photos folder - any files and photos you may have attached to records. (see <<456>> for more info on to how to move this elsewhere)
- Program folder - files and folders that with the software to run ClientTracker and should not be moved or altered.
- ClientTracker.exe (Windows), ClientTracker.app ( Mac) - the program's executable file or application. Your shortcut or alias points to this file to open ClientTracker.
- Extensions folder - files and folders necessary for functioning of ClientTracker.
- Windows has additional files and folders necessary for functioning of ClientTracker. These 5 folders and 36 .dll files should also not be moved or altered.
The process for moving your data to another computer is deceptively simple. However, if this procedure sounds like it's beyond your ability, please get someone with computer experience to assist you. Please read through the following instructions before beginning.
Warning: Moving the ClientTracker files requires good file management skills so you don't accidentally overwrite the wrong copy of the program. Be sure to make a backup copy first.
Tip: NO REGISTRATION CODE is needed. Your registration is contained in the ClientTracker.ctr data file you transfer from the 1st computer to the 2nd computer. When you put that into the newly installed ClientTracker folder and then click the shortcut on your desktop, it opens your data file and is registered.
For more information on moving the program to a different platform, see <<697>> below.
- Note: If you are moving ClientTracker to a new Mac, click here for important preparations.
- If you do not have the most current version of ClientTracker, contact Ginkgo Support by email and tell us your version and computer OS.
For a screen shot of the standard location, see <<758>>. If your ClientTracker folder is not installed in the standard location, use your computer's search (Windows) or find (Macintosh) function to locate your ClientTracker files.
- You may or may not see the ".ctr" at the end of ClientTracker.
- This will not have the ClientTracker icon of the 3 people, that is a shortcut.
- This file will be at least 35,000 KB in size.
Step 3 - On your new computer, replace the existing ClientTracker.ctr data file with the one on your USB or flash drive.
Step 4 - Open ClientTracker from the shortcut on the desktop and confirm that all your data is there.
Tip: If you have linked files and/or photos to your ClientTracker clients or visits, also move your 'ClientTracker Files-Photos' folder to the same location on your new computer.
Note: Your license allows you to have an active installation of ClientTracker on up to 2 computers. If you need more installations, contact Ginkgo Software support.
Please read through the following instructions before beginning. If this procedure sounds like it's beyond your ability, please get someone with computer experience to assist you.
Warning: Moving the ClientTracker files requires good file management skills so you don't accidentally overwrite the wrong copy of the program. Be sure to make a backup copy first.
- Note: If you are moving ClientTracker to a new Mac, click here for important preparations.
2. On your Windows version of ClientTracker, Copy the ClientTracker.ctr data file to a USB drive or CD.
The standard location of your data file is described in <<758>> above3. Move the portable drive to your your new Mac. Locate the existing ClientTracker.ctr data file in the standard Mac location (described above) and move it to the Trash.
4. Move (drag/drop or copy/paste) the ClientTracker.ctr file on the portable drive/CD inside the destination ClientTracker folder.
5. Start ClientTracker on your Mac. Verify that all of your data is present.
Tip: If you have linked files and/or photos to your ClientTracker clients or visits, also move your 'ClientTracker Files-Photos' folder to the same location on your new computer.
Note: Your license allows you to have an active installation of ClientTracker on up to 2 computers. If you need more installations, contact Ginkgo Software support.
Please read through the following instructions before beginning. If this procedure sounds like it's beyond your ability, please get someone with computer experience to assist you.
Warning: Moving the ClientTracker files requires good file management skills so you don't accidentally overwrite the wrong copy of the program. Be sure to make a backup copy first.
1. On your Windows PC, download and install the demo of ClientTracker from our website.
2. On your Mac version of ClientTracker, Copy the ClientTracker.ctr data file from the standard location described above in <<758>>.
3. Move the portable drive to your your new Windows PC. Locate the existing ClientTracker data file in the standard location described in <<758>> above.
4. Move (drag/drop or copy/paste) the ClientTracker.ctr file from the portable drive/CD inside the destination ClientTracker folder.
5. Start ClientTracker on your Windows PC. Verify that all of your data is present.
Tip: If you have linked files and/or photos to your ClientTracker clients or visits, also move your 'ClientTracker Files-Photos' folder to the same location on your new computer.
Note: Your license allows you to have an active installation of ClientTracker on up to 2 computers. If you need more installations, contact Ginkgo Software support.
Windows
Go to your Control Panel. Click Start->Settings->Control Panel or just Start->Control Panel depending on your version of Windows. Once there, double-click on "Add/Remove Programs" or "Uninstall Programs". Find ClientTracker among this list of installed programs and click "Remove". You may also need to remove the ClientTracker folder from the C:\Program Files\ Ginkgo Software folder.
Macintosh
Simply delete your ClientTracker folder from within your Applications folder.
Note: Putting in Trash & emptying trash may result in this message:
Emptying the Trash cannot be completed becauseIf the above doesn't work (it may not in OS X 10.4.x and 10.5.x), press 4 keys at the same time:
"FMStrs.dls" is locked. To empty everything in the Trash,
Including locked items, press the Option key while selecting
Empty Trash.
cmd-option-shift-Backspace.
This empties Trash without a message, included locked files.
Trash short-cuts
In Finder:
* cmd-Backspace = move selected item to trash
* cmd-shift-Backspace = empty trash (with warning prompt; locked files not deleted)
* cmd-option-shift-Backspace = empties trash without dialog, included locked files
Details in this section include:
- <<296>>
- <<298>>
If you have a corrupted or damaged file, you will need to restore a recent backup, losing any data you have entered since that backup was made. This is why closing ClientTracker every night is key, so you have your regular backups.
Restoring a backup will replace your damaged ClientTracker file with an earlier copy of the file made before the damage occurred.
File damage usually results from a sudden shut-down of the computer while the program is open, either due to a power outage, unplugging, or using the power button to turn your computer off instead of its recommended procedure. (see <<670>> )
For specific instructions about restoring from backup, see:
- <<295>>
- <<693>>
There could be several reasons why your ClientTracker may seem to become unresponsive or freeze up. Not all of them require action, so it's best to go through these questions one at a time.
1. Can you see the cursor and move it around?
YES - Can you click anything in the program? Try one of the Navigation buttons, such as or . If these don't work, try clicking the top menu and select Help --> About ClientTracker. If you see the "About ClientTracker" pop-up window, it means ClientTracker is working. If you can't do anything but access the top menu, select File --> Exit to close ClientTracker properly.2. Do you see the hourglass (Windows) or spinning rainbow wheel (Mac)?
NO - go to #2
YES - This could mean that ClientTracker is working on a memory-intensive function, such as preparing a report or running a utility. In such a case, we recommend waiting at least 5 minutes (or more if you have an older computer). Note that some functions may be slower if your computer's memory is being used for other things, such as a file download or streaming music.3. Can you move the program window by clicking and dragging?
NO - go to #3
YES - This could mean that ClientTracker is unresponsive, but your computer is OK. You may have to close ClientTracker by doing a "forced quit" (see below). Do not turn off your computer while ClientTracker is open.4. If none of the above work, you may have to do a "forced quit." Only do this as a last resort, as it can result in corrupted files and loss of data. If you must force quit the program, this is done by holding down specific keys:
NO - Go to #4
- Windows Ctrl and Alt keys and pressing Delete
- Macintosh Alt + Option + Esc on a Macintosh.
5. If your keyboard is also unresponsive and you can't even do a "forced quit," you may have to restart your computer by turning off the main power button. Wait for 30 seconds, then restart your computer and try to open ClientTracker.
- If it opens OK, check the last thing you were doing to see if it was saved.
- If ClientTracker does not open, or if your data is not current when it opens, see <<296>> above.
1. Be sure that you are printing using the ClientTracker Print button in the Function Bar at the top of the screen. Do not use your keyboard to print, Ctrl + P or Command + P
2. Make sure your printer is turned on, is not jammed, and has paper.
3. If you are just getting one record printing, or one line in a list. Then check that your printer settings are correct. After you click the button on the Floating Preview Palette, you will see your the printer dialog from your computer. This looks something like:
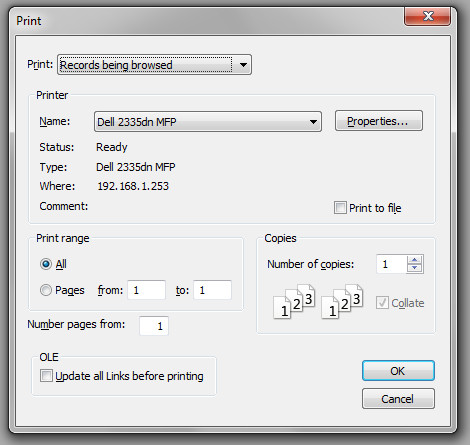
On this dialog, be sure that:
- Print: "Records being browsed" is selected. (Not "Current Record" or "Blank")
- The correct printer is selected
- 'Print to File' is NOT checked (Windows)
- 'Print range' is set to "All" and not just Pages from your last print job.
- Windows: Check that the drop-down containing 'Current Record' and other options is set to 'Records being browsed'.
- Macintosh: Click the drop-down menu titled 'Copies and Pages'. Choose ClientTracker from the list. Of the choices now shown, check that 'Records being browsed' is checked.
Advanced Questions & Advice
Be prepared to provide this information if you need further support with printing problems:
1. What printer make & model do you use?
-- Do you have the most current driver installed?
-- What version of operating system do you have?
If Windows 7 32 bit or 64 bit, is the printer in your user group?
2. Do you see the item to print in Preview before you click the Print button on the Floating Print Preview (little blue window to the right)?
3. What exactly happens after you click Print? At what point do you see evidence of a problem? Do you get to your system Print dialog after you click the Print button on the Floating Print Preview?
4. Can you print anything else from ClientTracker?
5. Are you able to print other things from your computer?
Have a Problem? Have a Solution? Let Us Know!
This section is a work in progress for version 4.0. As we learn new tips, or receive them from those who are using ClientTracker version 4.0, we will add them here.
To let us know of a problem or solution you have encountered with version 4.0, please contact us at: support@ginkgosoftware.com.
Tip: For troubleshooting version 3.41 and earlier, check our web site Knowledge Base, in the Support section.
This section contains:
- <<793>>
IMPORTANT
Note: SMTP Email Setup is not supported by Ginkgo Software; with or without an active subscription. With an active subscription, we will assist to make sure you know how to use the Email Setup tool. Correct data entry, and how that data is interpreted by your email service provider, are the responsibilities of the customer.
TECH TIPS:
- Have you changed anything about your online email account? For example, if you have changed your password or settings recently in Gmail, you may need to update the information in ClientTracker.
- Has anything changed with your email provider's policies? If you get an error sending multiple emails, it could be the provider's "spam filters" have changed in regard to your account.
- Have you logged on to your email provider's account and looked for any messages from them about "restrictions" or other changes? It's a good idea to do this regularly, because your practice depends on a smoothly functioning email account!
- Your own firewall or security settings may be interfering. Sometimes this is due to "anti-virus" software that is installed automatically when you get a new computer, or when an update is done to your OS or other software on your computer.
- You may want to have a local tech person involved to determine your computer's security settings, and what will work best in your situation.
- You may be able to send email by other means, but not through ClientTracker. This does not mean that ClientTracker is malfunctioning; more likely, it could mean that your email ISP does not accept email directly sent to its server.
- Yahoo and Hotmail are two known online email service providers that ARE NOT compatible with ClientTracker.
- For setup details, see <<426>>.
Error Codes and Information
1501 = SMTP Authorization Failed
This usually means your email server is temporarily down, or that its authorization protocol is temporarily unavailable. Sometimes it can also mean that the Email User Name and/or password do not match the account. Check your data entry.
1502 = Connection refused by SMTP server
This usually means the Email User Name and/or password do not match the account. Check your data entry.
1503 = Error with SSL
This is rare, and might mean that your email service provider does not use SSL encryption, or they have changed their protocol. Check with their support resources.
1504 = SMTP server requires the connection to be encrypted
This usually means you did not check the SSL box, and that is required by the email service provider. Otherwise, check with their support resources.
1505 = Specified authentication is not supported by SMTP server
Try a different Authentication method. If none of them work, check with your email service provider's support resources.
1506 = Email(s) could not be sent successfully
This is the most general error message, and usually means your email service provider is not compatible with ClientTracker. If it is known to be compatible (such as Gmail), all you can do is confirm that you have entered correct data, and check with your email service provider's support resources.
- Make sure the first 3 fields (Email Address, Your Name, and Reply-To Email Address match what's in your email account, if applicable. In some cases, removing the "Your Name" data completely may help.
- Check to see if the email is being sent anyway (e.g. the "Sent" folder in your online email account). Sometimes this error message can pop up prematurely.
- Check for changes to your online email account - maybe their server was down temporarily, or new restrictions have been added to your account.
- Don't be afraid to try, try again! Temporary server issues with your email provider can cause this message, and a few minutes later it can sometimes work just fine.
This could mean your email server is down. Check with your email service provider's support resources.
Details in this section include:
- <<753>>
- <<754>>
If your Registration Code has been lost, and you need it to login or install ClientTracker on a new computer, follow these steps:
If you can login to ClientTracker, and you need a NEW Registration Code because your Practice Name has changed,
If you can't login to ClientTrackerContact us at:
support@ginkgosoftware.com
Call us at (877) 727-6174 (Toll free)
OR: Contact us at:
support@ginkgosoftware.com
Note: If passwords are set up, only those with Admin privileges can view the registration info. If you can't remember a password and are locked out of ClientTracker, see <<753>> below.
If you have lost your Admin password and cannot open ClientTracker, the only way to login is to obtain a temporary password from Ginkgo Software, which will clear any passwords entered (both Admin or Staff).
If you have lost just the Staff password but know your Admin password, follow the instructions to change the Staff password here: <<232>>
How to Get a Temporary Password
When you open a ClientTracker program that is password-protected, there is a button option where you would normally enter a password. Click this and then the button on the next box to go to the Ginkgo Software web site and request a password by email for fastest service.
You can also call 877- 727-6174, and your request will be forwarded by email after verifying your account.
After Obtaining a Temporary Password
- Click the option where you normally would enter your password.
- Click the button on the next box.
- Enter your temporary password exactly as shown in your email. Enter only the exact temporary password with no extra spaces at the beginning or end of the password.
- Click . All your ClientTracker passwords will be cleared.
Tip: Keep your passwords written down in a safe place for reference.
Your Practice Name shows on your printed invoices and reports. It is tied to your Registration Code and must be entered exactly as it is provided to you by Ginkgo Software. This cannot be changed without Ginkgo Software assistance.
To change your Practice Name, contact Ginkgo Software: support@ginkgosoftware.com
To change your practice name in ClientTracker After obtaining your new Registration Info, follow these steps:
1. Go to Settings/Program/Defaults tab, Click View Registration Information from one of these two places:
- Settings/Program/Defaults tab, in the lower left area
- From the very top of any screen, click Help
3. Enter this info exactly as it has been provided to you, and click.
Tip: Watch for differences between then number 1 and letter "i", or zero "0" and the letter "O" as in orange. Do not enter extra spaces or returns.
4. Check your new practice name in the Settings area, on the Practice tab.
Note: If you change your practice address, phone, or other info that appears in your invoice header, go to the Settings/Program/Print tab and click the Reset Address button. You don't need to do this for just a change of Practice Name.
Running the Do-It-Yourself UPGRADE to ClientTracker 6.0 from version 4.0 and any version of 5
Your link to download the installer was sent to you by email.
Tip: To check your version, go to the top menu under "Help --> About ClientTracker." Email Ginkgo Software for assistance if you are unsure.
Details in this section include
- <<1016>>
- <<961>>
- <<1019>>
The version 6 Upgrade contains the ICD-10 codes needed for October 1, 2015 and beyond and contains a number of other new features.
Compatibility
The upgrade program will not run on older computers. To move your ClientTracker to a new computer before running the upgrade, see <<668>>
- Windows - You must have Windows 8 or higher
- Mac - You must have OS 10.9, Mavericks, 10.10, Yosemite or 10.11, El Capitan
IMPORTANT: When you download and install the upgrade program, you must run it all the way through when you start the installer. If you stop in the middle, you will need to download and install again. For most people, this takes about 20-60 minutes total, depending on the size of your file.
Version 6 has 2 stages
- Stage 1 - Your file is converted to the new version 6 platform
- Stage 2 - All your data is transferred to the new version 6 file
After you have run a successful upgrade
- See <<996>> for information about the new features in version 6
- See <<1000>> for instructions how to use the new CodeTracker and ICD-10 codes
- See <<998>> for general information about ICD-10 codes
- If you use a third-party backup program, add your new ClientTracker to its regular backup process
- If you use ClientTracker's file-photos feature, check if you need to repoint the Path in Settings/Program/Utilities.
If the upgrade failed for you
Please try again and watch carefully for these two stumbling blocks:
- Your existing ClientTracker was not opened and closed today before the upgrade - OR
- When asked to save your converted file, it was not saved in the proper location.
If this doesn't work, please email us for the most rapid support. We will arrange the first available tech appointment for you. Until we can help directly, please continue to use your old ClientTracker. Support requests are handled in the order received, and according to priority.
This gives the steps for you to run the latest Do-It-Yourself Upgrade yourself. It will run smoothly if you have a standard install and follow the instructions carefully. If you do receive an error message to contact tech support, please email Ginkgo Software for help during regular support hours.
4 main steps to Upgrade your ClientTracker
1. Confirm your existing version is v4.0 or higher
2. Download the Installer
3. Run the Installer program to install the v6 software
4. Open ClientTracker 6.0 to import your existing data into the new version
Before you start
- Open your ClientTracker and close it to make an automatic backup, and to date your program TODAY. The installer looks for a ClientTracker dated TODAY.
- An additional, external backup is strongly recommended.
- Make sure the setting to alert you about Inventory is turned OFF in Settings/Program, on the Defaults tab (i.e. the box is unchecked):

- Verify the location of your most current ClientTracker folder. If it is not in the default location, write that location down.
- Make sure you are logged into your computer with Administrator privileges.
Download the installer for the Do-It-Yourself Upgrade from the link provided in your email. When asked if you want to run or save the file, click Save.
Step 2 - Run the Installer
This puts the ClientTracker 6 software on your computer..
a) Locate the Installer application, most likely in your Downloads folder. It will be named
- Mac: ClientTracker_Upgrade_6.0.**.app
- Windows: ClientTracker_Upgrade_6.0.**.msi
Install ClientTracker 6.0 in the default folder. If you choose another location, it may impact performance, and may incur additional support costs should you need assistance.
- Mac: Applications folder
- Windows:
- Windows 7, 8, or 10 (32 or 64 bit): C:\Program Files\Ginkgo Software\
- Mac Default location: Applications folder.
- Windows Default location of your existing ClientTracker:
- C:\Program Files(x86)\Ginkgo Software\ClientTracker # (4.0, 5.0 or 5)
You must have "administrative privileges" on your own computer system to run this upgrade. You may also need to give a one time permission for this to work.
- MAC: System Preferences/Security & Privacy to give a one time permission
- WINDOWS ONLY: To
run the installer on Windows, you may need to choose to "Run" or
otherwise confirm that a program will be making changes to your
computer.
Windows 7 - When you click Run, you may see a dialog from Microsoft security which warns you about making changes. You have two button choices:
-- "No" aborts the download.
-- "Yes" click this to proceed.Windows 8 or higher - When you click Run, you may see a dialog from Microsoft security which does not allow changes. You have two choices:
-- "View more info" is a smaller option: click this, then click the option to "Run Anyway"
-- "OK" aborts the download.
c) When you are on the last screen of the installer, the Finish screen, click OK on Windows and Quit on Mac.
This performs all the work to bring all your earlier data into the latest version of ClientTracker. To start, open ClientTracker at the end of the installer, or click on the new ClientTracker 6.0 desktop alias or shortcut. You'll open to the large blue-gray Upgrade page. Here you have 2 choices:
- More Info and then Begin Upgrade - Run the Update immediately (this will take 10-30 minutes, depending on the size of your data file)
- Do Later - Continue using your current version until you're ready.
If you choose Do Later, you will need to download a fresh installer.
When finished, click the link to proceed to your new ClientTracker. We recommend closing it right away (which will make a backup), and then re-opening it before you use it. If you notice anything not working properly, please contact Ginkgo Support by email and clearly describe the problem.
Troubleshooting
If the update doesn't go as planned, check the following:
- Did you open and close your existing ClientTracker program before you started?
- Is your existing ClientTracker in the standard location?
With basic computer skills, anyone should be able to complete this on their own. Your ClientTracker subscription comes with support, and we are happy to assist by appointment if needed. The process goes like this:
After the upgrade has been fully completed:
1. Find your source folder containing all attached files and photos. If you're using the ClientTracker default,the source folder is ClientTracker Files-Photos folder contained in the larger ClientTracker folder of your old program.
If your old program is... The folder name is2. Copy this entire folder, and paste it inside the new ClientTracker 6.0 folder, overwriting the blank one that's already there.
Any version 4 ClientTracker 4.0
Any version 5 ClientTracker 5 or ClientTracker 5.0
3. Open your new ClientTracker 6, and set your Default File Path to this folder. (This is in the Settings/Program area, on the Utilities tab. See <<455>> for more info.
4. The links to all the files and photos should be restored. In any case, the original data is safe.
Contact Ginkgo Support by email for assistance if needed - and tell us your computer OS.
ClientTracker Self-Serve Updates
Ginkgo Software issues updates to the current version of ClientTracker to add new features, improve performance, or fix bugs. For best performance, we recommend running these updates promptly.
- Updates are available with a current subscription only. You are welcome to use the software you purchased for as long as you like, without renewing your subscription.
- If you use ClientTracker Desktop, the updates need to be run on your computer by you. If you have ClientTracker Cloud, updates will be performed for you as needed.
The Self-Serve Update will run smoothly if you have a standard install and follow the instructions carefully. If you do receive an error message, please email Ginkgo Software with the error number for help during regular support hours.
OVERVIEW: 4 main steps to Update your ClientTracker
1. Confirm your existing version is v6.0 or higher
2. Download the Installer
3. Run the Installer program to install the update software
4. Open ClientTracker to import your existing data into the new version
Before you start
- Open your ClientTracker and close it to make an automatic backup.
- An additional, external backup is strongly recommended.
- Make sure the setting to alert you about Inventory is turned OFF in Settings/Program, on the Defaults tab (i.e. the box is unchecked):
- Verify the location of your most current ClientTracker folder. If it is not in the default location, write that location down.
- Make sure you are logged into your computer with Administrator privileges.
- Mac Only: Temporarily disable your GateKeeper settings -
click here for instructions
- Download
the installer for the Self-Serve Update from the link provided
in your email
- When asked if you want to run or save the file, click Save.
Step 2 - Run the Installer
This puts the update software on your computer.
You
must have "administrative privileges" on your computer system to run
the update. You may also need to give a one time permission for this to
work.
- Mac: System Preferences/Security & Privacy to give a one time permission
- Windows: You will need to log out and relog in again with the right account.
a) Locate the Installer application, most likely in your Downloads folder. It will be named
- Mac: ClientTracker_Update_6.0.**.app
- Windows: ClientTracker_Update_6.0.**.msi
Run the installer with the default settings. If you choose other options for the installer, it may impact performance, and may incur additional support costs should you need assistance.
The Update Installer will look for your existing ClientTracker program in the default location for your applications. If your ClientTracker program is in a customized installation for (e.g. you moved it to your desktop, a network, or another location or external drive), you may require local IT assistance.
- Mac Default location: Applications folder.
- Windows Default location of your existing ClientTracker:
- C:\Program Files\Ginkgo Software\ClientTracker 6.0
- WINDOWS ONLY: To
run the installer on Windows, you may need to choose to "Run" or
otherwise confirm that a program will be making changes to your
computer.
Windows 8 or higher - When you click Run, you may see a dialog from Microsoft security which does not allow changes. You have two choices:
-- "View more info" is a smaller option: click this, then click the option to "Run Anyway"
-- "OK" aborts the download.
c) When you are on the last screen of the installer, the Finish screen, click OK on Windows and Quit on Mac.
This brings all your earlier data into the latest ClientTracker. To start, open ClientTracker at the end of the installer, or click on the ClientTracker desktop alias or shortcut you normally use to open your program. You'll open to the large blue-gray Update page. Here you have 2 choices:
- Begin Upgrade -
Run the Upgrade immediately (this usually takes 10-30 minutes,
depending on the size of your data file and the speed of your computer)
- Do Later - Continue using your current version until you're ready.
Details in this section include:
For the version 5 series:
- <<941>>
- <<942>>
- <<959>>
- <<986>>
For the version 6 series:
- <<996>>
NOTE: Also look in other areas of the Online Manual (e.g. SOAP Notes) for new features & changes in each area.
Tip: Use the Search field at the upper right of this site to find specific topics, e.g. Client Instructions, Waiting List, Formula Templates, etc.
New Features in 5.0 for BOTH Desktop and Cloud VersionsQuick Clips
- <<819>>
- <<839>>
- <<834>>
- <<814>>
- <<872>>
- <<811>>
- <<806>>
- <<812>>
- <<815>>
- <<817>>
- <<852>>
- <<823>>
- <<824>>
- <<825>>
- <<818>>
- <<821>>
- <<832>>
- <<841>>
- <<809>>
- <<840>>
- <<805>>
- <<837>>
- <<810>>
- <<835>>
- <<836>>
If you upgrade from a previous version
Version 5.0 (released December. 2013)
Major Differences
Mostly, version 5.0 functions the same as it did in version 4.0, so there is little to learn about how things that you're already used to doing might behave differently. There are many new features and functions possible, which are best described on the 5.0 Features page of our web site.
- For an index to all the new features instructions in the manual, see <<876>>
If you have the Admin and Staff passwords function set up in ClientTracker, you will be asked to enter a "user name" at the same time you enter your password. This is a measure of heightened security and documentation brought about because some offices "share" the ClientTracker passwords legitimately among several people, and HIPAA requires knowing who the user is.
- For more info on passwords, see <<232>>|
- For info on the new Access Log, see <<872>>
Copy Previous SOAP Note
One major change is when a SOAP Note gets copied from the previous. In past version, the previous SOAP was copied at the time an appointment was made. This led to some confusion, because for appointments made well in advance (e.g. Recurring Appointments), the previous SOAP could be different than what was copied.
Now, the previous SOAP is evaluated and copied automatically as before, only if you access the SOAP Note on the day of the visit. You may also use the new Copy Previous SOAP button anytime. For more information, see <<852>>
Export Appointments
If you use this feature, it used to be a button on the Calendar layouts. Now, the same function is a menu choice at the top. Go to File --> Export Appointments.
Letterhead Graphic
The nature of a graphic is that it cannot be transferred as data. So if you had a graphic for your letterhead and invoices, you will not see it in 5.0, and will have to re-enter it. See <<289>> (scroll down).
Attached Files-Photos
If you have attached files or photos in your v4.0, see <<937>> for additional instructions.
For the best info about changes to the SOAP Notes in versions 5.0 and higher, see <<826>>, and read the updates to all the details in that section.
Here is a summary of new features:
SOAP Notes & SOAP Templates
? Free form SOAP Note -- a blank slate for you to create & format as you wish
? Client Instructions -- use for special instructions, information; even promotions!
o Customizable and prints separately from the SOAP Note.
o Add the Next Appointment date
o Add an ?ingredient list?
? Private notes -- exclude from SOAP printouts as desired
? New fields -- weight and electric acupuncture procedures
? New time start & end fields for Treatments to support CPT coding
? Mark a SOAP final with a date
? Editable lists, data entry shortcuts, and customizable SOAP Note fields
? Choose between scanned signature, a blank signature line, or nothing at all
? Quickly delete all line items - not just one at a time
NOTE: Also look in other areas of the Online Manual (e.g. SOAP Notes) for new features & changes in each area.
Tip: Use the Search field at the upper right of this site to find specific topics, e.g. Client Instructions, Waiting List, Formula Templates, etc.
New 02-12 Version of the 1500
- For full instructions how to use the new 1500 in ClientTracker, see <<882>>
Multi-Pick Option - Add multiple line items to an invoice
- <<950>>
Copy Previous Invoice Button
- <<951>>
SOAP Note Changes
- <<948>>
- <<949>>
Distribute a POA from Client or Insurer
- The restrictions on entering an amount of distribution have been removed. ClientTracker will no longer warn you if the amount entered is more than the amount expected or available. For details see <<49>> and <<469>>.
Version 5.1 (released March 2014)
- For an index to all the new 5.1 features and instructions in the manual, see <<958>>
- For a video summarizing some of the changes in 5.1, click here
New 02-12 Version of the 1500 Form
If you bill insurance directly by paper or electronic claims, you must use this new form ONLY as of April 1, 2014. Click here to see an informative video about how to use this new form in ClientTracker, or see <<882>> for complete instructions in the manual.
Copy Previous Invoice Button
ClientTracker is designed to copy the previous SOAP and/or invoice automatically. However, different use patterns can prevent this from happening. If you have a blank invoice and wish to copy the previous invoice with the same client and practitioner, use the new Copy Previous Invoice button. This is prominently located at the top left of invoice entry layouts.
- For more info, see <<951>>
New "Multi-Pick" Option
This new option will add multiple Diagnoses, Procedures, or Products to any invoice. Look for the Multi-Pick link in the pop-up QuickFinder window when you click the +New button on an invoice.
- For more info, see <<950>>
In the fall of 2014, ClientTracker 5.2 was released, with some exciting new features!
Send Text Messages from ClientTracker
- <<476>>
- <<981>>
- <<984>>
- <<968>>
"Pain Scale" or Other Measurements Before & After Treatment (on the SOAP Note)
- <<969>>
- <<966>>
New "My Resources" Area to Keep Track of Info Important to Your Practice
- <<983>>
ICD-10 Information and FAQs - not a feature, but a helpful place to start
- <<998>>
Improved Diagnosis Code List
- <<1001>>
NEW! Use CodeTracker to select ICD-9 or ICD-10 Codes
- <<1000>>
Convert ICD-9 Codes That Copy from the Previous Client Visit
- <<1002>>
Use Up to Four Password Levels
- <<990>>
Print to PDF and Send as Email
- <<992>>
Override Email Recipient
- <<993>>
Copy & Paste Appointment on Graphic Calendar
- <<994>>
Year End Transactions for Client (aka "Tax Report")
- <<46>>
- Scroll down to read the new options on the Client's Invoices screen
Details in this section include:
- <<718>>
- <<719>>
PREPARATION FOR UPGRADE
Confirm your Practice Name in the email you received from Ginkgo Software. To do the upgrade you need the new Registration Code shown there. As in v3.41, your registration code is tied to your practice name. If your practice name is different than what's shown in the email, send us a return email with the correct name and we will send you a new code based on your corrected practice name.
- You will need to perform a Quality Check of your files before you can download the upgrade files. See additional info at <<715>>
IMPORTANT: If you are not yet in v3.41, you will need to upgrade to v3.41 first. Please contact Ginkgo Software for more information.
Note: If you have any photos in your v3.41 SOAP or clients records, please contact Ginkgo Support before you perform the upgrade process.
INSTALLATION & UPGRADING
STEP 1: Download the Upgrade Installer (see your email for the URL)
STEP 2: Run the Installer (estimated time: 2-5 minutes)
Locate the installer in your download folder and click on it to install ClientTracker v4.0 and the files used to upgrade your 3.41 data. The default location for the ClientTracker 4.0 "parent" folder is:
- Windows XP and Vista 32-bit: C:Program Files\Ginkgo Software
- Windows 7 and Vista 64-bit: C:Program Files(x86)\Ginkgo Software
- Mac: Macintosh HD/Applications folder.
Tip: If your computer asks you if you should allow this program to have access to the Internet, click "Yer "Unblock."
STEP 3: Run the Upgrade Process (estimated time: 1 to 4 hours, possibly 18+ hours)
Once the installation is finished, will open for you to run the full upgrade process. Depending on the number of records you have it will take from 30 minutes to 18 hours. For most practices, the upgrade time is estimated to be 1-3 hours. Once this process is started, it is imperative that you DO NOT STOP IT for any reason.
For or the longer times, we recommend disabling any screen saver ahead of time, insuring that your computer will not shut down and not having any other programs running at the time.
Very early on in the upgrade process you will be asked to enter your Practice Name and your Registration Code for v4.0. Once that is done, the computer can be left running unattended; even overnight. DO NOT USE YOUR COMPUTER FOR ANYTHING ELSE WHILE THE UPGRADER IS RUNNING.
Your v4.0 Registration Code:
Practice Name:
Registration Code: < Reg Code >
STEP 4: After the Upgrade
We strongly recommend reviewing the extensive online documentation we have prepared for ClientTracker Version 4.0. The most important part is Chapter 14, <<673>>
You will be shown a "Success!" screen after the upgrade is finished, after which you can begin using your new version of ClientTracker immediately. Of course, all new data should be entered in the new version from this point forward, and NOT in the 3.41 files.
Tip: There will be a new shortcut icon on your desktop for ClientTracker 4.0. You may want to remove the old one for version 3.41 so you don't enter anything there by mistake.
1. Will I need to prepare my ClientTracker in any way for the upgrade?
Note: The upgrade can only be done from ClientTracker v 3.41 or 3.411. If you purchased after June 27, 2006, you are in v3.41. Or if you purchased before then, you may have already upgraded to v3.41.Tip: If you?re not sure, click Help on the Main menu and select ?About ClientTracker.? If you are not yet in v3.41, you need to upgrade to v3.41 first. There is no additional cost for this. Download the Upgrader to 3.41 here: http:://ginkgosoftware.com/3.41_upgrade_installer.htm
- Close your ClientTracker and make an external
backup
- Turn off your screen saver, sleep mode,
automatic backups, and other processes that may interfere with the upgrade.
- The Upgrader needs to be installed in the same parent folder as your ClientTracker 3.41 files. For most people this will be the default folder where the Upgrader is installed.
2. How long will this take?
Even with a new computer and a fast microprocessor, converting your many ClientTracker 3.41 files and data to one single, faster 4.0 file takes longer if you have large numbers of records. The Upgrader?s careful, rigorous process consolidates all the data into the new version 4.0 structure. Please choose a time when you can let your computer run without interruption, and with NO other work being done on it, even overnight.
Tip: Use the chart below to estimate the processing time. This chart assumes that a newer, faster computer is used. To find out how many records you have, in ClientTracker 3.41 at the top of the screen, on the Main menu, choose Records -Show All Records in each of the areas indicated. The total is in the record navigator in the Functions Bar, where it says, for example, ?1 of 300.Estimated Timeline for Upgrade

3. Do I have to be present while the upgrade process runs?
Yes, but only for the first 5 to 20 minutes after you click Begin Upgrade. Then you enter your Practice Name and Registration Code provided in the 4.0 Upgrade email. After that, your computer can run unattended.
4. I stopped the Upgrade to run at a more convenient time. How do I start the Upgrade again?
- Windows: click the ClientTracker 4.0 shortcut on
your desktop, or click Start and click ClientTracker v4.0 in the Programs list.
- Macintosh: click the ClientTracker 4.0 alias.
5. In what operating systems will the upgrade work?
The Upgrader runs on all of the most recent Windows and Macintosh operating systems:
- Windows XP Service Pack 3, Vista, Windows 7
- See <<4>> for more info
- We do not recommend running the Upgrader on Windows 8. Contact Ginkgo Software for assistance.
- Mac OS 10.4.11 (Tiger) through 10.6.8 (Snow Leopard)
- See <<5>> for more info
- The Upgrader will not run on Mac OS 10.7 (Lion) and 10.8 (Mountain Lion). Contact Ginkgo Software for assistance.
6. I have ClientTracker installed on 2 computers; will I have to run the upgrade in both computers?
Yes, you will need to run the 4.0 Upgrade on both computers.
- Your license allows you to install
ClientTracker on up to 2 computers only.
- The data on the 2 computers will not be shared.
7. What do I need to do when the upgrade process is over?
We strongly recommend:
- First go to Settings and review all the
defaults and preferences on the Practice and Program tabs.
- Next spend a few minutes getting familiar
with the new look, by just clicking around.
- See <<673>> for more info
8. How can I get help?
- First, consult this online documentation. If your
questions are not answered, contact Ginkgo Support.
- If you would like us to run the Upgrader
for you, the fee is $75, by appointment only.
- If you want this service, purchase one unit of the Import process and
email us with the number of your Client and Invoice records. We will set up an
appointment for your upgrade. This may take up to two business days, during
which time you should not be entering any data in your existing files.
1.
After I clicked "Begin Upgrade," the file closed and nothing
happened.
- It could take 5 to 10 minutes for the first step of the upgrade to open a yellow screen. DO NOT use your computer at this point. Please be patient while your data is prepared for upgrade.
2. I never saw a yellow or sage green screen, and it looks like the upgrade stopped.
OR: The upgrade got stuck and never completed.
OR: I had to interrupt the upgrade process.
- If you don't see a yellow or green screen after 30 minutes, or if the upgrade process was aborted for any reason, you can start over:
- Click the ClientTracker 4.0 shortcut or alias on your desktop.
- Or reinstall from what ClientTracker 4.0 Upgrade.
- Or if needed, download a fresh copy of the Upgrade program. Reinstall it.
3. Why is the Upgrade screen all black or white?
This can happen if you go away to do something else on your computer (which you should NOT do). Or perhaps the screen saver is on and you clicked on the screen to see the Upgrader. Just wait; the Upgrader should show itself again as it progresses. This is why you are asked to do nothing else and turn off the screen saver.
4. I'm having trouble with my registration information.
First, verify your Practice Name and Registration Code in the Upgrade Email you received. This info must be entered exactly as you see it there. If you don't have it handy, then you can Quit. Locate your registration information and start over again. Simply click the Upgrade shortcut or alias on your desktop to begin again, and enter the correct info.
5. I see a message that I have demo data or no records.
If you have not been using ClientTracker 3.41 with "real" data for your practice, or if you had no data in 3.41, then you don't need to run the upgrade. Simply download the new Version 4.0 Demo from our web site, and enter your Registration Code from the Upgrade Email.
If you had data in v3.41, this message displays because your v3.41 data isn't where the Upgrader thinks it should be. Don't despair! Your data is not lost. Email us with your operating system with a good time to call you so we can help locate your v3.41 files.
6. I see a message that I don't have any v3.41 files.
This will happen if your v3.41
data isn't where the Upgrader thinks it should be.
- Solution: locate where your 3.41 folder is. Then reinstall the Upgrade in the same parent folder.
It can also happen if your ClientTracker is an earlier version than 3.41. See #1 above re <<718>>.
7 I see a message "Sorry there is not enough memory to complete this operation."
Click OK and the Upgrader should continue. The odds are good you were doing something else on the computer while the Upgrader is running.
IMPORTANT: It is strongly recommended that you perform an external backup before you perform any file verification. See page 74 of the v3.41 User's Manual, or <<693>> for more information.
STEP 1 - Verify Your 3.41 File Integrity
FIRST, please check integrity of your data. If it looks like any data is missing, we will need to repair your files. Email us at support@ginkgosoftware.com for more information, and please tell us:
- Your exact operating system
- What data appears to be missing
- Whether you can perform a local backup (see below)
- Go to Settings/General and click the button. If this functions correctly, your file integrity should be stable.
- If you get an error message saying "(file name) cannot be found," you probably have a loss of file integrity, and will need an active Support Plan to have Ginkgo Software repair the files. Contact us at support@gingkgosoftware.com to schedule an evaluation.
STEP 2 - Verify the Name of Your Main v3.41 Folder
Your files MUST be within a folder with a specific name. (The folder is named during a standard installation of v3.41; however, you may have renamed it)
- Windows: ClientTracker 3.41
- Macintosh: ClientTracker 3.41 or ClientTracker 3.411
STEP 3 - Verify Your File Location
When you run the upgrade, ClientTracker 4.0 must be installed in the same place that ClientTracker 3.41 is. The v4.0 installer will use the following default locations unless you choose otherwise.
- In Windows: C:/Program Files/Ginkgo Software/ClientTracker 3.41
- If you don't find your files there, see <<721>> for additional information
- If you are using Windows 7 or Vista, see <<728>>
- In Macintosh: Applications\ClientTracker 3.41 (or 3.411)
Tips for locating your v3.41 files:
- Check the Shortcut or Alias to see what it is opening
- Use Windows Explorer or Mac Finder to determine which was the file most recently modified
- If needed, see the more detailed instructions: <<721>>.
Note: If you have multiple copies of ClientTracker 3.41 on your computer, it is your responsibility to locate the most current copy. For this, you may need to find a friend or hire a computer support person to do this. See <<721>> for more info. Compress, zip or delete all the extra copies.
STEP 4 - Review the New Online Manual for v4.0
Review our extensive v4.0 Online Manual (you're reading part of it now)
Especially read the following:
- <<673>>
- <<717>>
IMPORTANT Standard Location
If your files are not in the standard location, this is not the responsibility of Ginkgo Software. When v3.41 was installed new or as an upgrade, the Installer was programmed to put the files in a standard location. It is your responsibility to find your most current files, and confirm they are in the standard location prior to the Upgrade to the Version 4.0 series.
Windows: C:\Program Files\Ginkgo Software\ClientTracker 3.41
Mac: Macintosh HD:Applications\ClientTracker 3.41 (or 3.411)
SIMPLE INSTRUCTIONS for Locating Your Working Copy of ClientTracker
Check the Desktop Shortcut or Alias
If there is a shortcut or alias on your desktop or dock, this can guide you to the ClientTracker application. This is in the same folder that all your data files are.
Windows - Right click on the shortcut. Click Properties at the bottom of the menu. In the shortcut tab, look in the field to the right of the word Target. This is where your current ClientTracker files are located.
- If this doesn't work, see <<722>> below
- If you are using Windows 7 or Vista, see <<728>>
- If you cannot back up in Windows 7 or Vista - see <<729>>
If the alias is in the dock, right click the alias. Click Open in Finder. This will open to the folder where your data files are.
- If this doesn't work, see <<722>> below.
IMPORTANT: Make an external backup of your current data files as soon as you confirm their location, by copying your entire ClientTracker 3.41 (or 3.411) folder onto a CD or external drive. Making a compressed or zip file will take up less space.
If you have multiple copies of ClientTracker on your computer, it is important to positively identify which copy contains your actual data (patients, invoices, etc.) before proceeding with your upgrade. Choosing the wrong folder during the upgrade will result in an incomplete upgrade.
WINDOWS
Use Windows Explorer to Find the Recently Modified Files
Open "My Computer" and click "Search" at the top. Perform a search for "Flies and Folders" with the name: "settings.ctr." You should find more than one copy. Scroll the Search Results to the right and look under Date Modified to see which is the most current. Then note its location in the "In Folder" column. That should be the location of all your most current files (you can navigate there and check).
If these simple steps don't work, get someone local who knows Windows computers, and try again, or have that person contact Ginkgo Software.
Note: If your computer is a Vista 64 bit or Windows 7 64 bit, the folder where Ginkgo Software is installed is called C:\Program Files(x86).
After your upgrade is complete, you should locate any extra copies of ClientTracker on your system and remove them to avoid future confusion. If you feel you want to keep them, then move them to a CD or an external hard drive.
MACINTOSH
Your current ClientTracker files were installed in the Application folder. Any other location is non-standard so if you don't find them there, perform a search in the Finder for the file, 'settings.ctr.'
IMPORTANT: Make an external backup of your current data files as soon as you confirm their location
WARNING! While you do any to the below:
1. DO NOT have ClientTracker open.
2. DO NOT run ClientTracker's automatic backup.
Find someone local who knows Windows 7 and Vista to help you if needed. Ginkgo Software will assist customers who have purchased a current Support Plan, however, please have someone knowledgeable on working with a computer for us to talk with.
Step1 Locate the files
Unless ClientTracker is set to run as an administrator, Vista and Windows 7 place all data files into a system user?s folder with the following AppData path:
Vista: C:\Users\[User Login Name]\AppData\Local\VitualStore\Program Files\Ginkgo Software\ClientTracker 3.41Note: If you don't see, the AppData folder in the above path it is set to be a hidden folder. In Windows Explorer, chose the C:\[User Name] folder. At the top of the window, choose "Organize", then "Folder and Search Options". On the View tab, click "Show hidden files, folders & drives". Click Apply and OK.
Windows 7: C:\[User Login Name]\AppData\Local\VitualStore\Program Files\Ginkgo Software\ClientTracker 3.41
If the above paths don't work, then in the address bar of Windows Explorer, use this
%localappdata%\VirtualStore\Program Files\Ginkgo Software
Step2 Get files into the right place
In order for to easily make an external backup and to run the Upgrade, your v3.41 files need to be in the correct location to run the v4.0 Upgrade, please do the following with ClientTracker v3.41 closed:
1) For safety purposes, make a compressed zip file of the ClientTracker 3.41 folder in the AppData path shown above. Rename it to ClientTracker AppData files.zip. Copy and paste it to the Desktop.
2 ) Open the ClientTracker 3.41 folder in the long user?s path shown above.
3) Select and copy all files in this folder, but not the Backup folder.
4) Open the ClientTracker application folder within C:\Program Files\Ginkgo Software\ClientTracker 3.41, right click in it and select Paste.
5) In the Copy File dialog that opens check the box in the lower left corner for ?Do this for the next ## conflicts? and click on ?Copy and Replace.?
6) A ?Confirm Folder Replace? dialog will open. Check ?Do this for all current items? and click the Yes button.
7) You may get a ?Destination Folder Access Denied? dialog, where you should click the Continue button. Click Continue for any other confirmation dialogs Vista displays.
8) Set ClientTracker 3.41 to work for Vista or Windows 7 so the v4.0 Upgrade will run properly. Instructions below <<728>>
Note: If you have a corrupt files situation,copy just the Backup folder from the AppData path above. Paste into the C:\Program Files\Ginkgo Software\ ClientTracker 3.41 folder. Then do a ?Restore Backup? in Settings. See <<725>>, #4.
If this does not work, customers with a current Support Plan can upload the ClientTrackerAppData Files.zip created in #1 above to Ginkgo Software for manual correction. Contact us for an appointment and upload instructions.
IMPORTANT: Make an external backup of your current data files as soon as you confirm their location
Set ClientTracker to ?Run this program as an administrator?
a. Locate your ClientTracker 3.41 shortcut on your desktop.IMPORTANT: Make an external backup of your current data files as soon as you confirm their location.
b. Right click on it
c. Choose Properties at the bottom of the pop-up menu.
d. Click on the Compatibility tab.
e. Click ?Run this program as an administrator?
f. If you have multiple users, click on the "Show settings for all Users."
(This is necessary even if the user is logged on as an administrator.)
What to do if a file becomes damaged
The first thing is DO NOT BACKUP. Backing up at this point overwrites a possible good backup copy with a corrupt one. When you shut the program down it asks you if you want to do a backup; if you have seen a message about file corruption, say "No."
Tip: Write down the name of the file(s) in the error message.
If the suggestions below do not work, you will need to restore a recent backup, losing any data you have entered since that backup was made. This is why regular backups are important. Restoring a backup will replace your damaged files with earlier version from before the damage occurred. File damage usually results from a sudden shut-down of the computer while the program is open, either due to a power outage, unplugging, or just using the power button. At times, the only way to get back up and running is to restore a backup.
If you have a Windows computer, see <<725>> below for more info
If you have a Mac, see <<726>>
1. FIRST, make a zip folder, or compressed copy of your entire ClientTracker 3.41 folder in case you need to send your files to Ginkgo Software for repair.
- Locate your ClientTracker folder. Its normal location is C:\Program Files\Ginkgo Software\ClientTracker 3.41 folder. From the Start menu, choose "My Computer", choose the C:\Program Files\Ginkgo Software. Make a zipped copy of this folder. Right-click on the ClientTracker 3.41 folder. Select Send to>Compressed (zipped) Folder. (Leave it there for now.)
- If you do not know where your ClientTracker folder is, see <<721>>.
2. RECOVER YOUR FILES
If you have damaged files, use the Recovery of Corrupted files function in Settings/General. Begin by selecting the file that has been reported as damaged from the drop-down list.
Next, hold down the Ctrl key and click the button. Repeat these two steps for all files that have reported damage. Once the recover is complete check that your data is intact in the affected files.
If your data still doesn't show correctly, or if you get an error message, try #3.
3. COPY & PASTE
Go back to your original ClientTracker v3.41 folder. Inside that is a folder called "Backup." Copy the necessary file(s) in there, then back out one level and and paste into the ClientTracker 3.41 folder. When asked if you want to replace the file(s) already there, choose Yes.
If your data still doesn't show correctly, or if you still get an error message when trying to use ClientTracker, contact Ginkgo Software.
4. RESTORE FROM BACKUP
In your v3.41 Settings area, on the Program tab, click , and then check your recent data.
If you are in Vista or Windows 7 and your data doesn't appear, rather you see the original demo data, do not panic. Your data is not lost. But do NOT choose to Backup when you close ClientTracker! See <<729>>
If this doesn?t solve the problem, you may need to restore a backup from an external source. If you manually copied the ClientTracker folder to an external drive, copy that back to you computer. If you have backup software, follow its instructions.
If your data still doesn't show correctly, or if you still get an error message when trying to use ClientTracker, contact Ginkgo Software.
As v3.41 has been released for over 4 years now, there have been variances with new operating systems -- particularly Mac 10.6 or "Snow Leopard" -- that may cause instability in how the files interact with your computer.
- Ginkgo Software has developed a detailed list of "Mac Best Practices" to assist with running v3.41 in newer Mac OS X versions until upgrading to v4.0. See <<727>> for more info.
How to Repair Your 3.41 Files
1. FIRST, make a compressed copy of your entire ClientTracker 3.41 (or 3.411) folder in case you need to send your files to Ginkgo Software for repair.
- Locate your ClientTracker folder. Its normal location is in the Applications folder. Make a compressed copy of the whole folder: control-click on the ClientTracker folder and select Compress "ClientTracker 3.41" . (Leave it there for now).
- If you do not know where your ClientTracker folder is, see <<721>>.
2. RECOVER YOUR FILES
If you have damaged files and have no recent backup to restore, use the Recovery of Corrupted files function in Settings/General. Begin by selecting the file that has been reported as damaged from the drop-down list.
Next, hold down the Ctrl key and click the button. Repeat these two steps for all files that have reported damage. Once the recover is complete check that your data is intact in the affected files.
If your data still doesn't show correctly, or if you get an error message, try #3.
3. COPY & PASTE
Go back to your original ClientTracker v3.41 folder. Inside that is a folder called "Backup." Copy the necessary file(s) in there, then back out one level and and paste into the main ClientTracker 3.41 folder. When asked if you want to replace the file(s) already there, choose Yes.
4. RESTORE FROM BACKUP
In your v3.41 Settings area, on the Program tab, click , and then check your recent data.
If this doesn?t solve the problem, you may need to restore a backup from an external source. If you manually copied the ClientTracker folder to an external drive, copy that back to you computer. If you have backup software, follow its instructions.
If your data still doesn't show correctly, or if you still get an error message when trying to use ClientTracker, contact Ginkgo Software.
Please review our best practices for running ClientTracker on a Mac below. They address the main issues that cause problems, including performance problems. When version 4.0x is released, #1-7 below will not be an issue.
1. USB Devices - Do not connect or disconnect any USB devices (such as printers, iPhones or iPods) while running ClientTracker. Quit ClientTracker and then you can connect or disconnect from the device.
2. Sleep Mode - We recommend configuring your Mac so that it does not go into sleep mode. Letting the Mac go into sleep mode while ClientTracker is running can reduce performance and potentially cause the program to crash if the Mac is in sleep mode for too long.
The instructions for turning off sleep mode are as follows:
- Click on the Apple icon in the upper right hand corner of your display.
- Choose System Preferences from the Apple menu.
- Click on Energy Saver in the Hardware preferences.
- Drag the Computer Sleep slider to Never.
4. Spaces - We recommend not using the Macintosh Spaces desk management utility as this may limit the system resources available to ClientTracker and result in poor performance.
5. OS Upgrades - If you upgrade your system to a newer version of the Mac OS, you should re-install Rosetta for the new OS. Rosetta is a utility designed for providing newer Intel based Macs with compatibility for programs like ClientTracker 3.41 that were originally designed for PowerPC Macs. Even if it appears to be installed after doing the OS upgrade, you should install Rosetta from the installation discs for that new OS.
The instructions for installing it for Snow Leopard are as follows:
- After exiting ClientTracker place the disc in your DVD drive. A Mac OS X Install Window will appear.
- Double-click on the Optional Installs Folder.
- Double-click on Optional Installs.mpkg to start the Optional Installs Installer.
- Keep clicking on Continue and Accept to accept the license agreement until you reach the Installation Type step.
- In this step select Rosetta from the list of options and click on continue. Then click on Install.
- http://www.ginkgosoftware.com/download/ClientTracker_3.4_Quickstart_and_User%20Manual.pdf
BACKUPS
7. Time Machine - If you use this feature, you will want to make sure that Time Machine is only making backups when you are not using ClientTracker. By default Time Machine automatically backs up every hour. It is best to manually control when it makes the backups to prevent corrupt files from being backed up and to prevent backups from occurring while data is changing in the program.
8. ClientTracker Backups - Please make regular backups in ClientTracker. We recommend at least once a day. Also make regular copies/backups of your ClientTracker files to an external device like a USB drive or a CD/DVD. You can also use backup programs to assist you. In particular, the Time Machine for the Mac mentioned above.
When this happens, a window opens inviting you to find the missing file on your computer. You should select a file only from your main ClientTracker 3.41 folder. Do not select a backup copy from your Backup folder.
If you have inadvertently selected a file from the Backup folder, you will get a message when trying to perform a Local Backup: "(name of file)" could not be created on this disk. Make more room on the disk, remove the write protection, or use a different disk." The Local Backup is then aborted and your data may not be backed up properly.
How to Repair
First write down the name of the file in the message. Then make an external backup of your entire ClientTracker 3.41 folder for safekeeping before you begin.
1. Go to the Backup folder located inside your ClientTracker 3.41 folder.
2. Copy the file (the name you wrote down)
3. Go back up one level to the main ClientTracker 3.41 folder and paste this file. When asked if you want to overwrite the file that is there, say YES.
4. Open your ClientTracker and check for your most current data in the area affected by the file you just copied & pasted. Then go to Settings and try "Backup Now."
- If you get the same message for a different file, repeat steps 1-4 above
- If you get the same message for the same file, contact technical support
- If you get no error message, everything should be fine
Upgrades are released periodically to add major new features to ClientTracker. Updates are made available to improve performance and add minor features to the existing software.
- Updates are free to everyone as they are intended for performance enhancement.
- Upgrades have major new features and are free to those on a current support contract.
Details in this section include:
- <<770>>
- <<773>>
- <<772>>
This will tell you how to run the Self-Serve Update, and what is involved. If you need tech support, Ginkgo Software can provide assistance for standard installations with a valid Support Plan.
There are 3 main parts to Update your ClientTracker:
1. Download the Installer.
2. Run the Installer
3. Run the Updater when ClientTracker opens.
Time Estimates to run the Updater
This is nowhere near as complex as previous ClientTracker upgrades, if you have run any before.
- For most people, the Update should be done in 5 to 15 minutes
- If you have a very large number of records (e.g. over 8,000 invoices), it can take15 to 30 minutes.
- Close ClientTracker
- Create an external backup of your ClientTracker program before you run the Updater.
Download, Install & Run the Update
1. Download the latest Updater from the link provided in your email. When asked if you want to run or save the file, click Save.
2. Locate the Installer application, most likely in your Downloads folder. Open or Run the installer. The Installer will set up the Updater in the standard location for your files. If you have a customized installation (e.g. you moved ClientTracker to your desktop, a network, or another location or external drive), you may need local tech assistance.
A Ginkgo Software Support Plan does not cover non-standard installations.
- Windows Standard location:
- XP, Vista, Windows 7 32 bit: C:\Program Files\Ginkgo Software\ClientTracker 4.0
- Vista, Windows 7 64 bit: C:\Program Files(x86)\Ginkgo Software\ClientTracker 4.0
- Mac Standard: Applications folder.
When you are on the last screen of the installer, the Finish screen, click OK on Windows and Quit on Mac.
- Begin Update - Update immediately
- Do Later - Update later.
4. After a successful update, check to make sure all your data looks OK in all parts of ClientTracker before you enter anything new.
For info about the new features included in the latest update, see <<772>> below.
Troubleshooting
If the install doesn't go as planned, the odds are good that you installed the updater to a different folder than your main ClientTracker 4.0 folder. (Step 2 above.)
Note: There are a couple of new settings that may need your attention right after you update to 4.0.20 or higher. See <<773>> below for more info.
There are a couple of new settings and features in 4.0.20 (and beyond) that need to be set for your preferences if you are updating from a version lower then 4.0.20.
For Windows Users Only
Window Size - Go to Settings area on the Program/Utilities tab, and choose "Yes" or "No" for Full Screen next to "Set Window Size" in the lower right of the screen. You only need to do this once.
For all ClientTracker Users
SOAP Note Printing Preferences - On any SOAP Note, go to the File/Photos tab and look for the new tab set at the bottom of the screen. Choose "Print Preferences for SOAP Notes" . On the right of this tab, set your preferences for what you want to print for "All SOAPs." This only needs to be done once. You can also customize for just the one SOAP Note your working with.
If you want to customize the Labels for sections in the Plan part of the SOAP Note, do that on the left side of this tab.
- See <<745>> for more info
Changes of note in this new version:
Thanks to input from people using ClientTracker 4.0, some nice new features have been added, and a number of small bugs and glitches have been fixed as well.
- Version 4.0.20 is supported on Mac Lion OS
Text Formatting can be applied on SOAP notes & templates, on letters &
forms and in the header for invoice and reports.
- For more info see <<738>>
Email Attachments
- Attach any electronic file to an email sent from ClientTracker
- Attachments can be stored with the Communication Templates & sent each time the template is used
- See <<750>> for more info
HIPAA 5010
- New ZIP+4 look-up goes to a web site of your choice for looking up the 9-digit code that will be required effective January 1, 2012 and enforced starting on March 31, 2012. This is for Boxes 32 & 33 on the 1500.
- All ZIP Code fields are big enough to show 9-digit codes
- See <<767>>
SOAP Notes
- The default tab can
be changed in the footer. Before that could only be done in the SOAP Template
- Print is in smaller font, reduces paper used
- The client's DOB and first words of the Chief Complaint are in header on each page
- Customize what sections print, and with what labels. Go to the
side tab "Files/Photos" and see the new SOAP Print Preferences tab
- For more info see <<745>>
Window Sizing: Change the Window to fill the whole screen if you prefer it the way it was in the older version in the Settings/Program/Utilities tab.
- For more info see <<452>>
-- Mac: drag the window taller & it will stick.
- 150% Zoom feature can be used safely in Mac Lion OS
-- Windows: Set the height of the window taller, or set it to maximize
Additional Backup: Choose a path on your computer or external disk to create a copy of your data file. Do this in the Settings/Program/Utilities tab. Do the manually or have it happen automatically with every close of ClientTracker.
- For more info see <<746>>
Speedier Entry for Codes & Products on Invoices & SOAPs
Ctrl+Shift+D to enter a new Diagnosis Code
Ctrl+Shift+P to enter a new Procedure Code
Ctrl+Shift+G to enter a new Product item
1500 Entry & E-Billing
- Procedure codes easier to fill
- Date
Sent easier to fill & clear
- Toggle action of Box 32 & 33 improved
-
Birth date of the insured no longer required
- Easily create a list of or search the Invoice List by Claim Sent date
- For more info see <<377>>
Negative Payments Allowed: As a way to adjust for a returned check, for example.
-
Export options now available in top menu: File --> Export Client Data
- See <<749>>
-
Hover mouse over Balance to see split of Client due vs. Insurance due amounts
- New printout option of Client Personal info that can be used to give to the client for verification purposes
- Easier Birthday List options now in Reports / Templates & Marketing tab
- See <<219>>
- Invoice Statements for clients: Save the date last sent, and add optional notes to the
statement. Search on the Client List for the
Last Statement date.
- New option to show only the amount client owes
- See <<46>>
- Product Sold Report has a new option to show the invoices on which the product was sold. This report run from the item's detail screen.
- Export the Inventory list or Products Sold info
- See <<766>>
- Inventory list shows the Quantity Sold
- Ability to include an attachment to email sent from ClientTracker
- See <<750>>
-
Set up a Template with an attachment to be sent with any email made from that template
- Automatic Appointment Confirmation Email - New option to show start time only. This choice is made in the Settings area, on the Program/Defaults tab
- BCC for practitioners brought back (was a 3.41 feature)
- See <<240>>
Minor features and fixes:
-- Printing multiple invoices: shows the Balance Due for all invoices
-- Credit Generated entries can be deleted
-- Payment On Accounts received portal larger
-- Deposit Slip sorts correctly
-- Claims Sent: new find by date QuickFinder of Invoice List
-- Inventory: new Ideal Qty field shows optimum quanity to keep on hand
-- Changing the Vendor on an item that has been sold, if needed
-- Store your Ginkgo web site account email & password in Settings/Program, the "Password Setup" area
-- Printing envelopes: added more options to accommodate more printers
-- Procedure Code lists import improved
-- Client List: new sorts added to columns
-- Transactions Report now shows Procedure Code modifier and has improved format
-- Calendar List view: hover your mouse over an appointment to see if an invoice has been created yet